
When I first started working with clients who had locs, I’ll be honest—I was nervous. I had spent years perfecting winged eyeliner and contouring techniques, but hair? That felt like stepping into completely new territory. But here’s what I quickly discovered: locs are one of the most versatile, beautiful, and expressive hairstyles out there. And when you’re working with short locs? The possibilities are absolutely endless.
I remember this one client who came to me for a red carpet event. She had these gorgeous short locs that she thought limited her styling options. “Belle,” she said, “I feel like I can only wear them down.” Twenty minutes later, we had created this stunning updo that had everyone asking who did her hair. That moment taught me something powerful: short locs aren’t a limitation—they’re an opportunity to get creative.
Over the years, I’ve seen short locs transform my clients’ entire look. There’s something incredibly empowering about a woman who rocks her natural texture with confidence. Whether you’re new to your loc journey or you’ve been loving your locs for years, I’m excited to share these 14 stunning styles that work beautifully with shorter lengths.
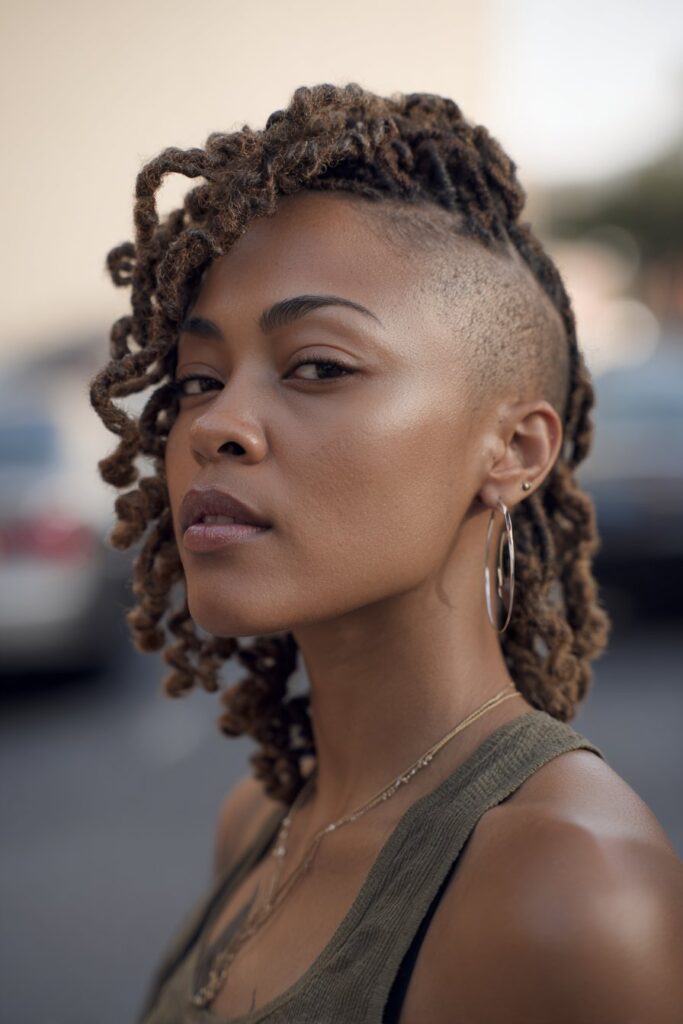
The Classic Free-Form Short Locs

What It Is
Free-form locs are exactly what they sound like—locs that form naturally without much manipulation or a strict parting pattern. With short locs, this style creates an organic, textured look that’s full of personality. Think of it as letting your hair tell its own story. Each loc forms uniquely, creating a beautiful, one-of-a-kind pattern that no one else will have.
I love this style because it embraces the natural beauty of your hair’s texture. There’s something so authentic about allowing your locs to develop their own character. When they’re short, they have this wonderful, youthful energy that just radiates confidence.
Best For
This style works beautifully for women who prefer a low-maintenance approach to their hair care routine. If you’re someone who values authenticity and doesn’t want to spend hours in front of the mirror, free-form short locs are calling your name. They’re perfect for active lifestyles, creative souls, and anyone who wants to embrace their natural beauty without overthinking it.
I’ve found this style particularly stunning on women with oval or heart-shaped faces, as the organic texture adds beautiful dimension. But honestly? I’ve seen it work on every face shape when worn with confidence.
How to Achieve It
Starting free-form locs is simpler than you might think, but it does require patience. Begin with clean, product-free hair. The key is to let your hair naturally coil and mat together over time. You can encourage loc formation by palm rolling occasionally, but resist the urge to over-manipulate.
Keep your scalp moisturized with a light oil—I always recommend jojoba or sweet almond oil because they don’t leave heavy residue. Wash your hair regularly with a residue-free shampoo. This is crucial because buildup can prevent proper loc formation.
One tip I always share: embrace the awkward phase. Your locs will look a bit wild at first, and that’s perfectly normal. This is where patience becomes your best friend. The transformation is worth the wait, I promise.
Twisted Short Locs Updo

What It Is
The twisted updo takes your short locs and transforms them into an elegant, sophisticated style that’s perfect for special occasions. I created this look countless times backstage, and it never fails to make a statement. You’re essentially gathering your locs upward and securing them in a twisted pattern that creates height and visual interest.
What I love about this style is its versatility. You can make it sleek and polished for formal events, or keep it a bit loose and textured for a more casual, bohemian vibe. Even with shorter locs, you can achieve impressive height and drama.
Best For
This style is absolutely perfect for women heading to weddings, galas, professional events, or any occasion where you want to look polished and put-together. It works wonderfully for elongating the neck and showing off those gorgeous earrings or necklaces.
I’ve found this style particularly flattering on women with square or round face shapes because the upward movement creates beautiful vertical lines that balance facial features. If you have shorter locs that are at least three to four inches long, you can absolutely rock this look.
How to Achieve It
Start with slightly damp locs—this makes them more pliable and easier to work with. Apply a small amount of loc gel or styling cream to smooth any flyaways. Gather your locs toward the crown of your head, sectioning them as you go.
Begin twisting small sections of locs together, pinning them as you create your desired shape. Don’t worry about perfection—some texture actually adds to the style’s charm. Use bobby pins that match your hair color to secure everything in place.
Here’s my secret trick: leave a few locs loose around your face to soften the overall look. This creates a more natural, effortless vibe. Finish with a light mist of holding spray if you need extra security, but honestly, locs hold styles beautifully on their own.
Side-Swept Short Locs

What It Is
Side-swept short locs are all about asymmetry and modern sophistication. This style involves directing all or most of your locs to one side of your head, creating a dramatic, eye-catching look. I discovered this style’s power during a fashion event when we needed something edgy but elegant.
The beauty of this style lies in its simplicity. It’s not overly complicated, but the impact is undeniable. You’re creating movement and flow that draws the eye and highlights your facial features in the most flattering way.
Best For
This style is fantastic for women who want to make a bold statement without going too extreme. It’s perfect for date nights, professional photoshoots, or any time you want to feel a little extra special. I’ve used this style on clients heading to evening events, and they always feel like the most glamorous version of themselves.
The side-swept look particularly flatters women with strong jawlines or those who want to create the illusion of facial symmetry. It also works beautifully for showcasing one side of your face—perfect for photography or when you want to highlight a particular feature.
How to Achieve It
Begin by creating a deep side part. The placement of this part is crucial—I typically recommend starting it above the arch of one eyebrow for the most flattering effect. Use a rat-tail comb to create a clean, precise line.
Sweep all your locs to the opposite side of the part, using your fingers to smooth them gently. You can secure them behind your ear with bobby pins if needed, but I often find that locs have enough weight to stay in place naturally.
For extra hold, apply a small amount of edge control to keep everything sleek and polished. My favorite finishing touch? Tuck one loc behind your ear on the opposite side to create even more asymmetry. This little detail makes such a difference.
Loc Bun with Accessories

What It Is
A loc bun adorned with accessories is where function meets fashion. This style gathers your short locs into a bun—whether high, low, or to the side—and elevates it with beautiful accessories like scarves, beads, or decorative pins. I absolutely love how this style allows you to express your personality and creativity.
Every time I create this look, I’m reminded that hair styling is truly an art form. The bun provides the canvas, and the accessories become your artistic expression. Whether you prefer gold accents, colorful scarves, or natural wooden beads, the options are limitless.
Best For
This style is incredibly versatile and works for virtually any occasion. Heading to brunch with friends? Go for a casual low bun with a silk scarf. Have a music festival coming up? Try a high bun with colorful beads threaded throughout. Professional presentation? A sleek bun with minimal, elegant accessories is perfect.
I’ve found this style particularly beneficial for women who get bored easily with their hair. You can completely change the vibe just by switching out your accessories, which means you’re essentially getting dozens of different looks from one base style.
How to Achieve It
Start by gathering your locs into your desired position—high, low, or side. If your locs are on the shorter side, don’t worry about achieving a huge bun. Sometimes a smaller, more compact bun looks incredibly chic and modern.
Twist your locs together and wrap them around the base, securing with an elastic band that matches your hair color. Make sure it’s secure but not too tight—you don’t want tension on your scalp.
Now comes the fun part: accessorizing! If you’re using a scarf, fold it into a long strip and wrap it around the base of your bun, tying it in a bow or knot. For beads, thread them onto individual locs before creating the bun, allowing them to peek through. Bobby pins with decorative ends can be placed strategically around the bun for added sparkle.
Two-Strand Twist Out on Short Locs

What It Is
The two-strand twist out creates gorgeous, defined curls and waves on your short locs. While it’s traditionally done on loose natural hair, it works beautifully on locs too, adding extra texture and dimension. I learned this technique early in my career, and it’s been a go-to ever since.
This style essentially involves twisting your locs in pairs, letting them set, and then unraveling them to reveal beautiful, crimped texture. It’s like giving your locs a temporary makeover that adds volume and visual interest.
Best For
This style is perfect for women who want to add extra volume and texture to their locs without permanent changes. It’s fantastic for special occasions, photoshoots, or just when you want to switch things up. The added dimension can make your locs appear fuller and more voluminous.
I’ve seen this style work beautifully on women with finer locs who want to create the illusion of more density. It’s also wonderful for adding a romantic, soft touch to your overall look.
How to Achieve It
Start with clean, slightly damp locs. Divide them into sections—the smaller the sections, the tighter the resulting texture will be. Take two locs and twist them around each other from root to tip, ensuring the twists are tight and uniform.
Secure the ends with small elastic bands or by palm rolling the tips together. Allow your locs to dry completely—this is crucial for the style to set properly. You can air dry overnight or sit under a hooded dryer for faster results.
Once completely dry, carefully unravel each twist, separating the locs gently with your fingers. Don’t brush or comb—this will disrupt the beautiful pattern you’ve created. Apply a light oil to your fingertips and gently fluff the roots for added volume.
Faux Hawk Short Loc Style

What It Is
The faux hawk is an edgy, bold style that creates the illusion of a mohawk without actually shaving the sides of your head. Your short locs are styled upward in the center, creating a dramatic ridge that runs from front to back. I’ll never forget the first time I created this look for a client heading to a concert—she felt like a rockstar.
This style is all about attitude and confidence. It’s punk rock meets sophisticated, rebellious meets refined. When done right, it’s absolutely show-stopping.
Best For
This style is perfect for women who aren’t afraid to stand out and make a statement. It works wonderfully for concerts, festivals, nights out, or any time you want to showcase your bold side. I’ve also seen it worn beautifully in professional creative industries where personal expression is celebrated.
The faux hawk particularly flatters women with oval or long face shapes, as the vertical styling adds beautiful proportion. It’s also fantastic for showcasing your facial features since all the hair is pulled up and away from your face.
How to Achieve It
Start by creating a center part that runs from your forehead to the nape of your neck. The locs on either side of this part will be styled down or back, while the center section gets styled upward.
Apply a strong-hold gel or loc styling cream to the center section. Using a comb or your fingers, push these locs upward and toward the center, creating height and volume. You can twist them together loosely or leave them separate, depending on your desired look.
Secure with bobby pins along the base of the raised section, making sure they’re hidden within the style. Use additional pins as needed to maintain the shape. For the sides, you can slick them down with gel, create small flat twists, or leave them in their natural state. Finish with a strong-hold spray to ensure everything stays in place throughout the day or night.
Crown Braid with Short Locs

What It Is
The crown braid is an absolutely stunning style that creates a halo effect around your head using your short locs. It’s romantic, feminine, and has this ethereal quality that I absolutely love. When I first started creating this style, I was amazed at how something so beautiful could be achieved with shorter lengths.
This style involves taking locs from around your hairline and braiding them together to create a crown-like effect that frames your face beautifully. The remaining locs can hang free or be styled separately, creating a lovely contrast between the structured braid and the natural texture.
Best For
This style is absolutely perfect for weddings, garden parties, romantic dates, or any occasion where you want to feel like royalty. It works beautifully for women who want an elegant, feminine look that still feels natural and approachable.
I’ve found this style particularly stunning on women with heart-shaped or oval faces, as the crown effect draws attention to the eyes and cheekbones. It’s also wonderful for keeping hair off your face while still looking incredibly styled and intentional.
How to Achieve It
Start with slightly dampened locs for easier manipulation. Create a section around your hairline, about one to two inches back from your forehead. This will be your crown section.
Begin at one side of your head, taking three locs to start your braid. As you braid around your head toward the opposite side, continuously add locs from your hairline, incorporating them into the braid. Think of it like a French braid that follows the curve of your head.
Continue braiding all the way around until you reach your starting point. Secure the end of the braid with a small elastic band, then tuck it under the beginning of the crown to hide it. Pin everything in place with bobby pins that match your hair color.
For a softer look, gently pull on the braid to loosen it slightly. This creates more volume and a more relaxed, romantic vibe. You can leave the remaining locs flowing free or gather them into a low ponytail or bun.
Pinned Back Short Locs

What It Is
Sometimes the simplest styles are the most effective. Pinned back short locs involve taking the front sections of your locs and securing them away from your face, leaving the back to flow naturally. This style is understated elegance at its finest, and I find myself reaching for it time and time again.
What I love about this style is how it opens up your face, highlighting your bone structure and features. It’s polished enough for professional settings but relaxed enough for everyday wear. True versatility at work.
Best For
This style is ideal for women who want a polished look that doesn’t require a lot of time or effort. It’s perfect for work, running errands, coffee dates, or really any day when you want to look put-together without overthinking it. I also recommend it for women who are growing out their locs and dealing with different lengths—this style works beautifully regardless of uniformity.
The pinned back style particularly flatters women who want to showcase their facial features or draw attention to their eyes. It’s also fantastic for showing off statement earrings or a bold lip color.
How to Achieve It
Start by sectioning off the front portion of your locs—typically from your temples forward. You can create a straight horizontal part or angle it slightly for a softer effect.
Bring these front sections back and secure them at the crown or slightly behind it with bobby pins or small clips. You can twist them before pinning for added texture, or keep them smooth and sleek for a more polished look.
My favorite technique is to create a slight puff at the crown before pinning. This adds beautiful volume and prevents the style from looking too flat. Simply tease the roots gently before securing. For extra security and a professional finish, cross your bobby pins in an X pattern—this holds much better than a single pin.
Half-Up, Half-Down Short Locs

What It Is
The half-up, half-down style is a classic for a reason—it offers the best of both worlds. You’re getting the polished, face-framing effect of an updo while still showing off the length and texture of your locs. I’ve created countless variations of this style over the years, and it never goes out of fashion.
This style involves securing the top portion of your locs up and away from your face while allowing the bottom section to flow freely. It’s balanced, beautiful, and incredibly flattering on virtually everyone.
Best For
This style works wonderfully for almost any occasion—casual brunches, work meetings, date nights, or even formal events when styled elegantly. It’s particularly perfect for women who can’t decide between wearing their hair up or down. Why choose when you can have both?
I’ve found this style especially flattering on women with round or square face shapes, as the upward movement at the crown creates lengthening vertical lines. It’s also excellent for showing off layered jewelry or a beautiful neckline.
How to Achieve It
Create a horizontal part from ear to ear, going across the crown of your head. Gather all the locs above this part into your hand, smoothing them as you go.
Secure this top section with an elastic band, creating either a ponytail or a small bun, depending on your preference. You can wrap a loc around the elastic to hide it for a more polished finish—this is one of my favorite professional tricks.
For added volume at the crown, gently pull on the gathered locs to create a slight puff before securing. Leave the bottom section flowing naturally, or you can add a slight curl or twist to the ends for extra flair. If you’re feeling creative, try braiding the top section instead of just gathering it, or add decorative pins or clips for extra visual interest.
Loc Mohawk with Curled Ends
What It Is
This style takes the faux hawk concept and adds a feminine twist—literally. By curling the ends of the upswept center locs, you create a softer, more romantic version of the edgy mohawk style. I love this because it shows that you can be bold and feminine at the same time.
The curled ends add movement and playfulness to what could otherwise be a severe style. It’s the perfect balance between tough and tender, and the visual interest is absolutely captivating.
Best For
This style is fantastic for women who want to make a statement but prefer a softer approach than a traditional mohawk. It works beautifully for creative events, parties, festivals, or any occasion where you want to showcase your unique personality.
The loc mohawk with curled ends particularly flatters women with strong facial features, as the soft curls create a beautiful contrast. It’s also wonderful for adding height if you have a shorter stature or want to create more dramatic proportions.
How to Achieve It
Start by creating the mohawk base using the same technique described earlier—center parting with the middle section styled upward. Once you have the basic mohawk shape secured, it’s time to work on those ends.
Using perm rods, flexi rods, or even your fingers, curl the ends of the center locs. If using rods, wrap damp locs around them and allow to dry completely. For tighter curls, use smaller rods; for looser waves, use larger ones.
Once dry, carefully remove the rods and gently separate the curls with your fingers—never use a brush or comb as this will cause frizz. You want defined, bouncy curls that add movement and dimension to the top of the style. Apply a light oil to your fingertips and scrunch the curls gently to add shine and definition. The contrast between the sleek sides and the curly crown creates such a stunning visual effect.
Bantu Knot Out on Short Locs

What It Is
Bantu knots are a traditional African hairstyle that creates beautiful, spiral curls when unraveled. On short locs, this technique produces gorgeous texture and volume that’s absolutely eye-catching. I was first introduced to this style by a colleague, and I fell in love with the sculptural beauty of it immediately.
When you create Bantu knots on your locs and then unravel them, you get these stunning, defined spirals that add incredible dimension and visual interest. It’s like giving your locs a complete texture transformation.
Best For
This style is perfect for women who want to add serious volume and texture to their locs for special occasions or just to switch things up. It works wonderfully for photoshoots, parties, or any time you want to feel extra fabulous. The resulting curls photograph beautifully and create incredible movement.
I’ve found this style particularly stunning on women who want to create the illusion of fuller, thicker locs. The spiraled texture makes each loc appear more voluminous and creates beautiful dimension that catches light gorgeously.
How to Achieve It
Start with clean, damp locs. Divide your hair into sections—the number of sections will depend on how many locs you have and how tight you want the resulting curls. Smaller sections create tighter spirals, while larger sections create looser waves.
Take each section and twist it tightly from root to tip. Once twisted, continue wrapping the loc around itself to create a small knot that sits close to your scalp. Secure the end by tucking it under the knot.
Allow your locs to dry completely—this cannot be rushed if you want defined results. Air dry overnight or sit under a hooded dryer. Once completely dry, carefully unravel each knot, allowing the spirals to fall naturally. Gently separate larger spirals with your fingers if desired, but don’t overwork them. The result should be beautiful, bouncy spirals that last for days.
Asymmetrical Short Loc Style

What It Is
Asymmetrical styling is all about creating intentional imbalance that’s incredibly visually striking. This could mean styling one side of your locs differently from the other—perhaps pinning back one side while leaving the other flowing free, or creating height on one side while keeping the other sleek. The possibilities are endless, and that’s what I love most about this approach.
Asymmetry in hairstyling creates movement and draws the eye, making the overall look more dynamic and interesting. It’s modern, it’s artistic, and it’s absolutely gorgeous.
Best For
This style is perfect for fashion-forward women who aren’t afraid to experiment and stand out. It works beautifully for fashion events, creative industry gatherings, or anytime you want to showcase your artistic side. It’s also fantastic for photoshoots because it creates such interesting angles and dimensions.
I’ve found asymmetrical styles particularly flattering on women with perfectly symmetrical faces who want to add more visual interest, or conversely, on women who want to create the illusion of more symmetry through strategic styling. It’s all about balance through imbalance.
How to Achieve It
The beauty of asymmetrical styling is that there are no hard rules—you’re creating your own unique look. Start by deciding which side you want to emphasize. A good rule of thumb is to create volume or visual interest on the side opposite your natural part.
One of my favorite techniques is to create small flat twists or cornrows on one side, keeping them very close to the scalp, while leaving the other side free and voluminous. Another option is to pin one side back sleekly while allowing the other side to fall forward and frame your face.
You can also play with height—create a small pompadour or puff on one side while keeping the other smooth and flat. Use bobby pins, clips, or even decorative hairpins to secure everything in place. The key is to be intentional about the asymmetry—it should look deliberate and stylish, not accidental.
Wrapped Short Locs

What It Is
Wrapped short locs involve using colorful thread, yarn, or cord to wrap sections of your locs, creating beautiful patterns and pops of color. This style has roots in various African and Caribbean cultures, and I find it absolutely beautiful how it combines hair artistry with cultural expression.
The wrapping can cover entire locs or just sections, and you can use any colors you desire—metallic gold for elegance, bright rainbow hues for fun, or natural earth tones for a more subdued look. Each wrapped loc becomes a work of art.
Best For
This style is perfect for women who want to add color and personality to their locs without using dyes or chemicals. It’s fantastic for festivals, beach vacations, cultural celebrations, or simply when you want to express your creative side. The wrapping also provides added protection to your locs, which is a wonderful bonus.
I particularly love this style for women who enjoy hands-on crafts and don’t mind spending time creating their look. There’s something meditative about the wrapping process, and the results are always stunning and completely unique to you.
How to Achieve It
Choose your wrapping material—embroidery thread, yarn, or specialty loc wrapping cord all work beautifully. Select colors that complement your skin tone or match your personal style.
Start at the base of the loc you want to wrap. Hold the end of your thread against the loc and begin wrapping tightly around both the loc and the thread tail, effectively securing it. Continue wrapping in a tight spiral, working your way down the loc.
When you reach the end or want to switch colors, tie off the thread securely and trim the excess. You can wrap entire locs from root to tip, or just wrap sections, leaving parts of your natural loc showing through. I love creating patterns by wrapping different locs in different colors, or even wrapping the same loc in multiple colors for an ombre effect.
For the most secure wrapping, make sure each spiral sits tightly against the previous one with no gaps. The tighter you wrap, the longer it will last—properly wrapped locs can maintain their beauty for weeks.
Loc Rosettes

What It Is
Loc rosettes are exactly what they sound like—small, rose-shaped formations created with your locs that resemble beautiful flowers. This style transforms your locs into wearable art, creating dimensional, sculptural shapes that are absolutely stunning. I first created this style for a spring event, and it was such a showstopper.
You can create multiple rosettes across your head for a full floral garden effect, or just one or two as accent pieces. Either way, the result is romantic, feminine, and incredibly eye-catching.
Best For
This style is perfect for weddings, garden parties, formal events, or any occasion where you want to look exceptionally elegant and unique. It’s also wonderful for women who love vintage or romantic aesthetics, as the rosettes have a timeless, classic quality.
I’ve found this style particularly stunning for special occasions where you want your hair to be a conversation piece. The sculptural nature of the rosettes photographs beautifully and creates such a memorable look.
How to Achieve It
Creating a rosette requires a bit of patience, but the results are worth it. Start by selecting a small section of locs—typically three to five locs work well, depending on their thickness.
Twist these locs together tightly from the roots down, creating one thick twisted rope. Once you reach the ends, begin wrapping this twisted rope around itself in a circular motion, creating a spiral that resembles a rose. The first wrap creates the center of the rose, and each subsequent wrap builds the outer “petals.”
As you wrap, secure the formation with bobby pins, inserting them through the wrapped sections to hold everything in place. Continue wrapping until you’ve used all the length of your twisted locs and have created a full rose shape.
You can create multiple rosettes, arranging them in a pattern across your head, or create one large statement rosette at the crown. For added elegance, try incorporating small pearl pins or decorative hairpins into the centers of your rosettes. The shimmer catches the light beautifully and adds an extra touch of glamour.
Conclusion
As I sit here reflecting on all these beautiful styles, I’m reminded of something important I’ve learned throughout my career: hair isn’t just about looking good—it’s about feeling empowered, expressing yourself, and celebrating who you are. Your locs tell a story, and that story is uniquely yours.
When I first started working with clients who had short locs, I quickly realized that length doesn’t limit beauty or creativity. If anything, short locs offer this incredible playground for experimentation. You can switch from edgy to elegant, from casual to formal, from understated to dramatic, all while honoring your natural texture and the journey your locs are taking.
What I want you to take away from all of this is that there are no rules—only possibilities. Some days you might feel like wrapping your locs in vibrant colors and dancing under the stars. Other days, you might want something simple and sleek for a professional presentation. Both are beautiful. Both are valid. Both are you.
Throughout my years in this industry, I’ve watched women transform not just their appearance but their entire energy when they find a style that resonates with their authentic self. There’s this moment—I see it every time—when someone looks in the mirror and truly sees themselves, maybe for the first time in a long time. That’s what this is all about.
Your short locs are not something to work around or apologize for. They’re a canvas for creativity, a testament to your patience and commitment, and a beautiful expression of your natural self. Whether you’re rocking a bold faux hawk for a night out or a simple pinned-back style for a Tuesday morning, you’re making a statement about who you are.
I encourage you to experiment with these styles, make them your own, and don’t be afraid to fail. Some of my best discoveries have come from styles that didn’t quite work out as planned but led me somewhere even better. That’s the beauty of this journey—it’s yours to take wherever you want it to go.
Remember, beauty isn’t about perfection. It’s about confidence, creativity, and feeling empowered to express yourself however you choose. Your locs are already beautiful exactly as they are. These styles? They’re just different ways to celebrate that beauty.
So go ahead—try that crown braid you’ve been eyeing, experiment with those Bantu knots, add some colorful wraps just because you feel like it. Life’s too short not to have fun with your hair. And your locs? They’re ready for whatever adventure you want to take them on.
As you continue your loc journey, be patient with yourself and your hair. Some days the styles will come together effortlessly, and other days you might struggle. That’s all part of the process. What matters is that you keep showing up for yourself, keep honoring your natural beauty, and keep finding joy in the small moments of self-expression.