
Spring is my absolute favorite time of year — and not just because the flowers are blooming and the air finally smells fresh again. It’s because spring means Easter, and Easter means the most playful, colorful, and creative nail season of the whole year. I’ve been doing nails for years now, and every spring I feel like a kid again opening a brand-new box of watercolor paints. There’s something about the pastels, the florals, the little bunnies, and the speckled eggs that makes me want to sit down at my nail station and just create.
I still remember the first time I truly fell in love with Easter nail art. I was getting ready for a spring brunch with my closest friends, reached for the softest lilac polish I owned, added a few hand-painted daisies on my ring fingers, and the moment I looked down at my hands I felt this rush of pure happiness. That’s exactly what great nail art does — it lifts your mood before you even walk out the door.
What I’ve learned through all those hours at the nail station is that spring Easter nails don’t have to be complicated to be stunning. It’s not about how many details you pack onto the nail. It’s about choosing colors and designs that make you feel something, that connect you to the season and the joy that Easter brings.
I’ve put together my personal favorite fourteen spring Easter nail designs — each one unique, each one wearable, and each one absolutely gorgeous in its own way. Let’s dive in, because your nails deserve to celebrate spring as much as you do.
Pastel Ombre Fade Nails

Inspiration for pastel ombre fade nails
Every spring, when I look out at the sky just before sunset — that soft blend of pink melting into lavender and then into the palest blue — I think, that’s what I want on my nails. Pastel ombre is the design that started my love affair with spring nail art. It’s effortlessly elegant, totally on-trend, and somehow looks gorgeous on every skin tone. The beauty of this design is in its softness. There are no harsh lines, no bold statements — just a dreamy, blended wash of color that feels like spring itself. I first experimented with this look years ago when I was getting ready for a spring garden event, and the reaction I got made me realize that sometimes the most subtle designs leave the biggest impression.
Tools needed to create the nail design
To bring this look to life you’ll need a makeup sponge or nail sponge, two to three pastel shades of your choice such as soft pink, lavender, and baby blue, a clear base coat and top coat, nail tape or liquid latex to protect your cuticles, and a fine cleanup brush dipped in acetone for any messy edges.
Step by step guide to create nails design
- Start by applying your clear base coat and letting it dry fully before anything else.
- Paint your lightest pastel shade across the entire nail as your base color and let it dry.
- Apply your two or three chosen pastel colors onto a makeup sponge in a line, then gently dab and press the sponge onto the nail repeatedly until the colors blend into each other seamlessly.
- Finish with a glossy top coat to seal everything and give it that smooth, polished finish.
Watercolor Bunny Nails

Inspiration for watercolor bunny nails
Honestly, watercolor nail art is one of those techniques that makes people think you’re incredibly talented even when it’s surprisingly beginner-friendly. I was inspired to create this design after flipping through a botanical illustration book — those soft, ink-wash-style paintings felt so perfectly Easter to me. I thought, what if I put a tiny little bunny right in the middle of that watercolor wash? The result was absolutely precious. This look is delicate and artistic, and every time I wear it I get at least five compliments before noon. I love doing this design with a nude or soft white base so the watercolor effect really pops.
Tools needed to create the nail design
You’ll need a fine detail brush, a thin nail art brush, sheer pastel polishes or gel colors in soft pink, lilac, and mint, a white base polish, a dotting tool for bunny details, and a matte or satin top coat to finish the watercolor effect authentically.
Step by step guide to create nails design
- Apply a white or nude base coat to all nails and let it dry completely.
- Using your sheer pastel polishes, lightly dab and blend soft washes of color across the nail using a thin brush, leaving some areas lighter for that watercolor look.
- Once dry, use your fine detail brush to paint a simple bunny silhouette — two oval ears, a round head, and a tiny cotton tail — in white or soft pink on your accent nail.
- Seal with a matte top coat to enhance the watercolor painting effect.
Easter Egg Floral Nails
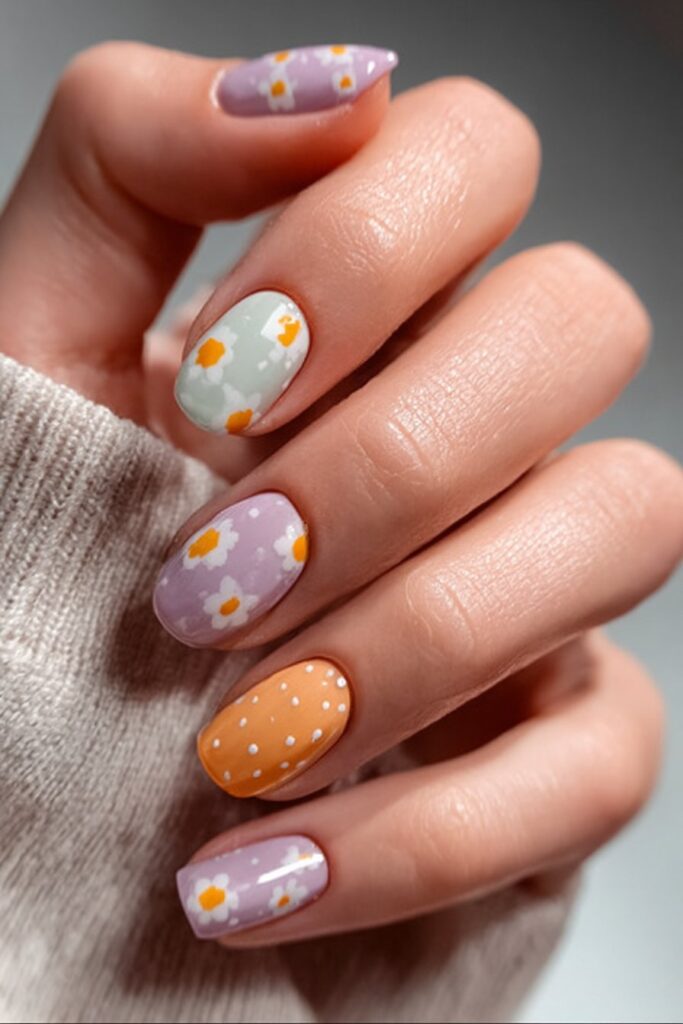
Inspiration for easter egg floral nails
Every Easter, I think about those gorgeous hand-decorated eggs — intricate patterns, tiny flowers, soft swirls of color. That visual inspired this nail design completely. I wanted to capture the artistry of an Easter egg but translate it onto nails in a way that felt fresh and modern. The result is one of my most requested spring designs. Tiny florals scattered across a pastel base, almost like someone hand-painted each nail with care and intention. It reminds me of spring afternoons decorating eggs as a child, which is always a memory worth holding onto.
Tools needed to create the nail design
You’ll need a dotting tool in two sizes, a thin nail art brush for petals, pastel base polishes, white and yellow accent polish for flowers, a green striper brush for leaves, and a high-shine top coat.
Step by step guide to create nails design
- Paint your nails in a pastel base of your choice — soft lavender or mint work beautifully here.
- Using your dotting tool, create small five-dot flower shapes across the nail by placing four dots around one center dot.
- Add tiny yellow dots in the center of each flower using the smaller dotting tool, and use the green striper brush to add delicate little leaves.
- Finish with a glossy top coat and let everything cure or dry fully.
Lavender French Tip Nails
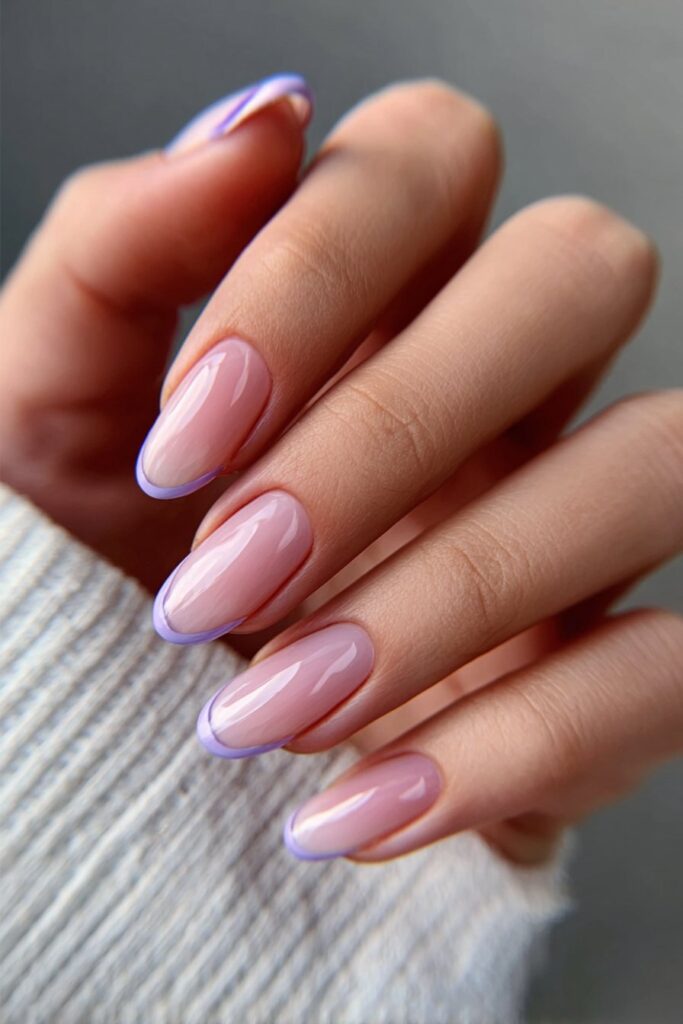
Inspiration for lavender french tip nails
I am a huge lover of the classic French manicure — it’s timeless, it’s chic, and it goes with literally everything. But for Easter, I wanted to give it a spring makeover, and lavender was the obvious answer. Instead of the traditional white tip, imagine a soft, dusty lavender arc sitting at the edge of a sheer nude or white base. It’s sophisticated, it’s fresh, and it whispers spring without screaming it. This is the design I always recommend to people who say they want something Easter-appropriate but still work-friendly. It bridges the gap perfectly.
Tools needed to create the nail design
You’ll need a sheer nude or soft white base polish, lavender nail polish, a French tip brush or nail guides, a nail form or tape to create clean tip lines, and a glossy top coat.
Step by step guide to create nails design
- Apply your sheer base coat and let it dry before moving to the tips.
- Place nail guides or thin tape just below where you want your tip to start, then carefully paint the lavender color across the tip of the nail in a smooth, curved motion.
- Remove the guides slowly while the polish is still slightly tacky to get a clean line, then clean up any edges with a fine acetone brush.
- Finish with two layers of glossy top coat for a polished, salon-worthy result.
Spring Daisy Garden Nails

Inspiration for spring daisy garden nails
Daisies have always felt like the most optimistic flower to me. They pop up everywhere in spring, bright and cheerful, and they make everything feel lighter. I designed this look after spending a morning at a local botanical garden and feeling completely overwhelmed by the most beautiful display of wildflowers. I came home, sat at my nail desk, and painted a little garden right onto my nails. White petals, yellow centers, green leaves peeking out — it’s like having a little piece of spring right at your fingertips, literally.
Tools needed to create the nail design
You’ll need a white nail polish, a bright yellow polish for the centers, a thin detail brush, a dotting tool, green striper polish for stems and leaves, a soft pastel base, and a glossy or matte top coat depending on your preference.
Step by step guide to create nails design
- Start with a pale yellow, white, or soft green base and let it dry fully.
- Use your detail brush to paint five or six elongated petals in white, starting from a central point and fanning outward on each nail.
- Add a bright yellow dot in the center of each daisy using your dotting tool, and use the green striper to create tiny stems and leaves between the flowers.
- Seal with your preferred top coat — I personally love matte for this design because it gives it that fresh, real-garden feel.
Speckled Robin Egg Nails

Inspiration for speckled robin egg nails
If you’ve ever seen a robin’s egg up close, you know how stunning that color is — that vivid, slightly teal blue with little brown speckles scattered across the surface. It’s one of nature’s most beautiful details. When I first recreated this on nails, I was honestly blown away by how realistic and gorgeous it looked. This is one of those designs that feels effortlessly chic and earthy at the same time. It’s perfect for someone who loves nature-inspired aesthetics and wants something a little more unexpected than the typical pastel Easter look.
Tools needed to create the nail design
You’ll need a robin’s egg blue or teal nail polish, a fine fan brush or a repurposed stiff brush, dark brown nail polish or a brown nail art pen, a clear base and top coat, and a small bowl for paint mixing if you want to add texture.
Step by step guide to create nails design
- Paint all nails with two coats of your robin’s egg blue base color and allow to dry completely.
- Dip the tips of a fan brush or stiff bristle brush lightly into dark brown nail polish, then flick the brush gently across your nail to create small scattered speckles — the lighter the touch, the more realistic it looks.
- Build up speckle density toward the tips or base of the nail and keep the center a little cleaner for a natural egg effect.
- Seal with a satin or glossy top coat to protect the speckles and add a subtle shine.
Peach Blossom Nails

Inspiration for peach blossom nails
Peach blossoms remind me of new beginnings. There’s something about that warm, soft coral-meets-pink color that feels like the first warm day of spring after a long winter. I created this design during a particularly inspired creative session where I was surrounded by fresh flowers, and the result felt almost romantic. This look works beautifully as a minimalist design — delicate blossoms painted on a nude or cream base — or you can go more maximalist with overlapping blooms covering the entire nail. Either way, it feels incredibly special.
Tools needed to create the nail design
You’ll need a nude or cream base polish, a soft peach and warm pink nail polish, a thin detail brush, a small dotting tool for flower centers, white accent polish, and a glossy top coat.
Step by step guide to create nails design
- Apply your nude or cream base coat and allow it to dry before adding any nail art.
- Using your detail brush, paint small five-petal flowers in soft peach, varying the sizes slightly across the nail for a natural, organic look.
- Add tiny white highlights on each petal and a small dot of warm pink or pale yellow in the center using your dotting tool.
- Finish with a glossy top coat to make the blossoms look fresh and vibrant.
Mint Green Marble Nails
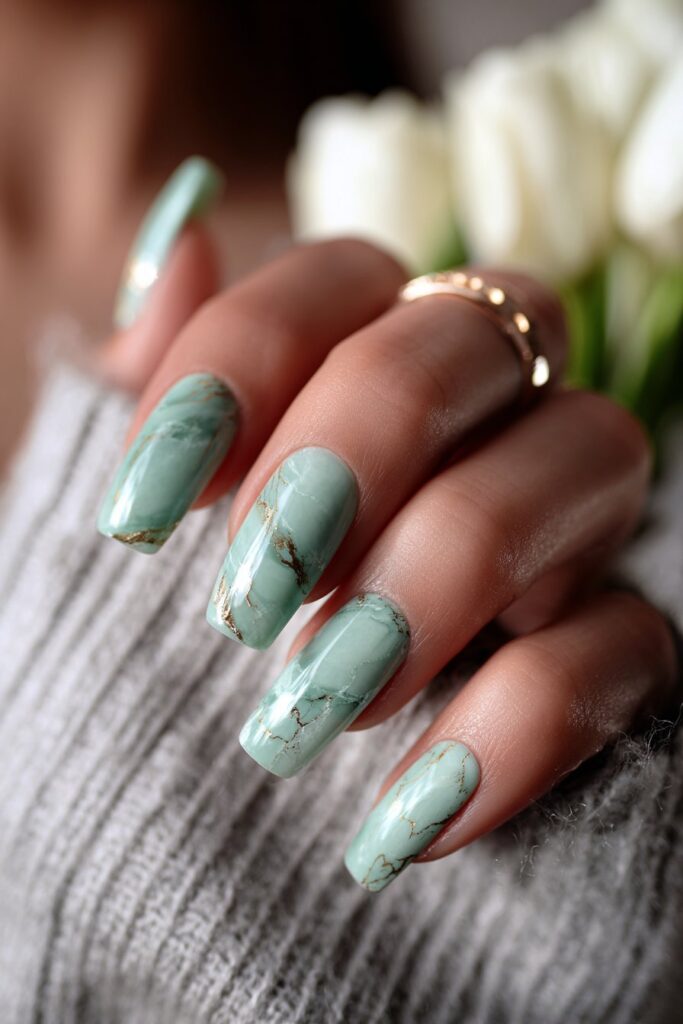
Inspiration for mint green marble nails
Marble nails are timeless, but mint green marble? That is a spring revelation. I started experimenting with this look because I wanted something that felt luxurious and elevated but still had that fresh spring energy. The cool, clean tone of mint paired with delicate white and gold veining creates this incredibly sophisticated look that works equally well at a formal Easter dinner or a casual brunch with friends. It’s one of those designs that photographs unbelievably well, and I’m always thrilled with how much dimension it creates.
Tools needed to create the nail design
You’ll need a mint green base polish, white nail polish, a thin detail brush or a feather for veining, gold nail foil or a gold striper polish, a glossy top coat, and a marble effect top coat if available.
Step by step guide to create nails design
- Apply two coats of mint green base polish and let dry completely.
- Using a feather or thin detail brush dipped in white polish, drag irregular, branching lines across the nail in a natural marble vein pattern — vary the pressure to get thin and thick lines.
- Add gold accents by tracing a thin gold striper along some of the white veins to add warmth and luxury.
- Seal with a high-gloss top coat to mimic the polished stone effect of real marble.
Chick Yellow Gel Nails

Inspiration for chick yellow gel nails
Yellow is the most underrated spring color, and I am on a personal mission to change that. A soft, buttery chick yellow nail is cheerful without being overwhelming, and it pairs with literally every spring outfit. I got the inspiration for this design from all the adorable baby chick imagery that pops up every Easter — that warm, golden-tinged yellow that just radiates sunshine and joy. I added tiny little chick faces as accent nails to take it to the next level, and the result is one of the most smile-inducing nail looks I’ve ever created.
Tools needed to create the nail design
You’ll need a soft buttery yellow gel or regular polish, an orange dotting tool or fine brush for tiny beaks, black nail art pen for eyes, white polish for accent details, and a glossy or gel top coat.
Step by step guide to create nails design
- Apply two coats of your soft yellow polish across all nails and cure if using gel, or allow to dry if using regular polish.
- On your accent nails, use a black nail art pen to draw two small dots for eyes and an orange dotting tool or brush to add a tiny triangular beak below the eyes.
- Add optional wing details in a slightly deeper yellow using a fine brush for extra charm and dimension.
- Seal everything with a clear top coat and admire your adorable Easter chick nails.
Baby Blue Butterfly Nails

Inspiration for baby blue butterfly nails
Butterflies are the ultimate symbol of spring transformation, and there’s something deeply meaningful to me about that. I created this design during a personal period of change in my life, and painting delicate blue butterflies on my nails felt like a little ritual of renewal. Baby blue is such a perfect spring shade — calm, open, and full of possibility. I love how a butterfly accent nail elevates the whole look from simple to extraordinary, and the combination of soft blue and white creates a look that’s both ethereal and grounded.
Tools needed to create the nail design
You’ll need a baby blue base polish, a fine detail brush, white and silver accent polish, black nail art pen for butterfly outlines, a dotting tool, and a glossy top coat.
Step by step guide to create nails design
- Paint all nails with two coats of baby blue and allow to dry thoroughly.
- On your ring finger accent nail, use your detail brush and black nail art pen to outline a butterfly shape with upper and lower wings, keeping the lines thin and delicate.
- Fill in the wings with white, silver, or a slightly lighter blue, and add tiny dot details along the wing edges using your dotting tool.
- Seal with a glossy top coat and feel like the most elegant person at every Easter gathering.
Rose Gold Spring Nails
Inspiration for rose gold spring nails
Rose gold never goes out of style, and in spring it takes on an especially romantic quality. I think of rose gold spring nails as the grown-up glamorous version of Easter nail art — something you’d wear to an upscale spring lunch or a garden party where you want to look effortlessly polished. I was inspired to create this look after playing with metallic foils one afternoon, realizing that rose gold combined with soft blush florals or minimal chrome accents creates something truly luxurious. It’s modern, it’s warm, and it is absolutely stunning in person.
Tools needed to create the nail design
You’ll need a blush or rose gold nail polish, rose gold chrome powder and an applicator sponge, a soft pink base, a clear top coat applied before chrome powder, and optional floral nail stickers or a detail brush for extra decoration.
Step by step guide to create nails design
- Apply a blush pink base coat to all nails and cure fully if using gel.
- Apply a special gel top coat to your accent nails without curing, then rub rose gold chrome powder over the surface with an applicator sponge until it reaches a mirror-like shine, and then cure.
- On remaining nails, add subtle rose gold details like small foil flecks or fine metallic line accents using your detail brush.
- Finish with a top coat on all non-chrome nails to unify the look and add longevity.
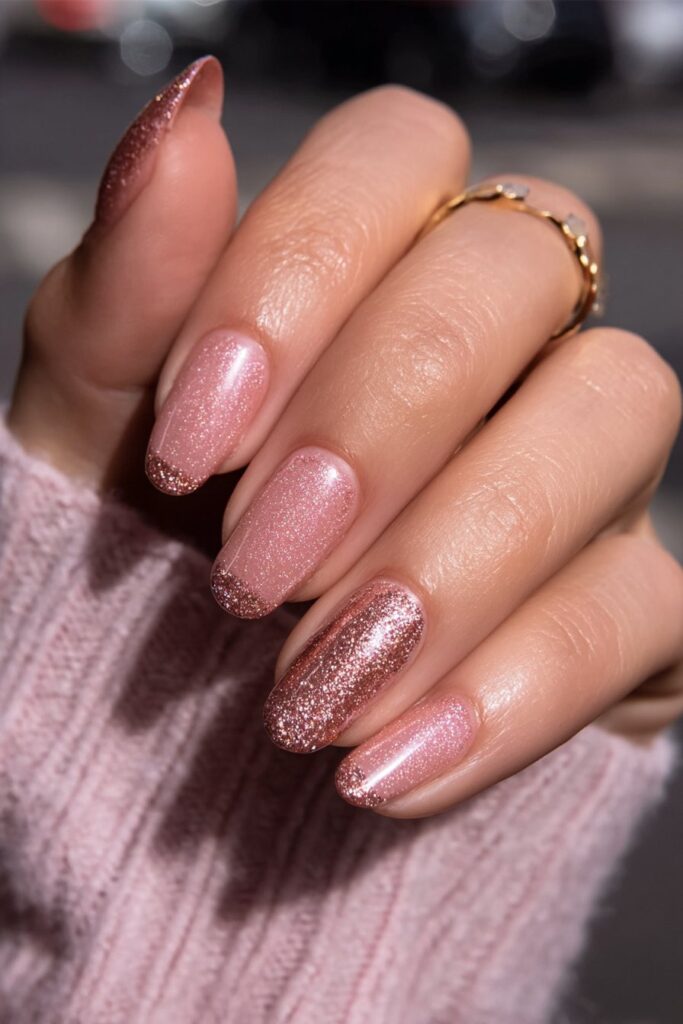
Lilac Glitter Gradient Nails
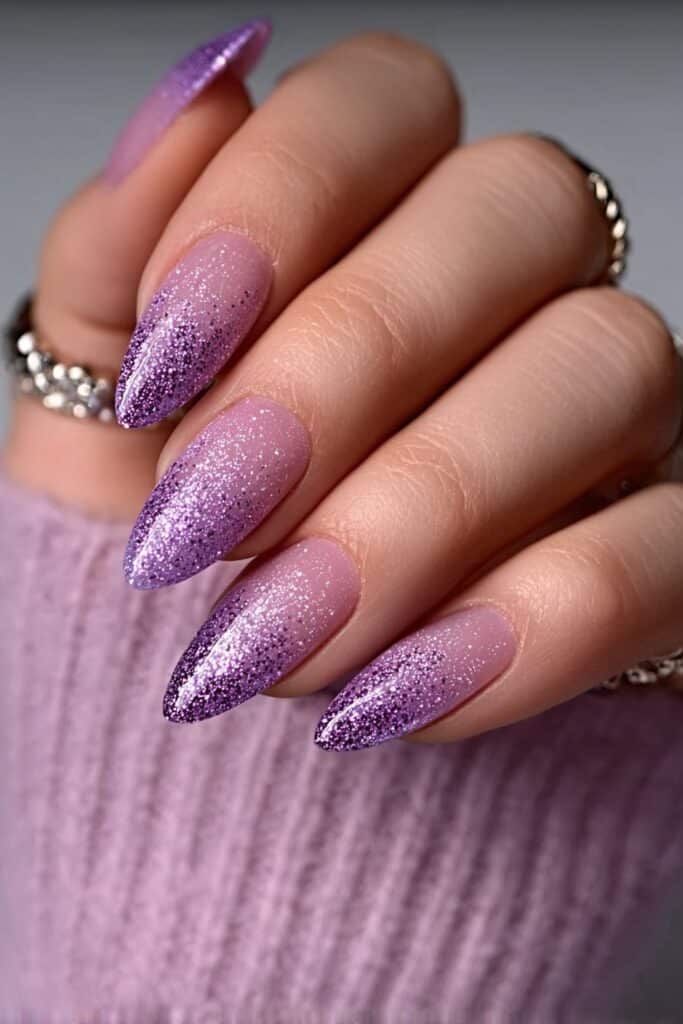
Inspiration for lilac glitter gradient nails
Some days you want your nails to sparkle, and spring Easter is absolutely one of those days. Lilac is my personal favorite Easter color — it’s soft but it has depth, it’s feminine but not cliché — and when you add a glitter gradient that fades from the tip, it creates this magical, almost galaxy-like effect that catches the light beautifully. I designed this look for a spring celebration that required something a little extra, and I’ve been recreating it every Easter since. It’s playful, it’s glamorous, and it photographs like a dream.
Tools needed to create the nail design
You’ll need a lilac base polish, fine purple or holographic glitter polish, a makeup sponge for the gradient, a clean-up brush and acetone, a clear base coat, and a thick glossy top coat to seal in the glitter.
Step by step guide to create nails design
- Apply two coats of lilac base polish and let dry completely.
- Apply your glitter polish onto a small makeup sponge and dab it concentratedly near the tip of the nail, then blend it upward fading toward the middle of the nail for the gradient effect.
- Repeat the sponging process two or three times to build up the glitter density at the tip, then use your clean-up brush for any stray edges.
- Apply two coats of glossy top coat to smooth out the glitter texture and give it a polished finish.
Coral Sunset Spring Nails
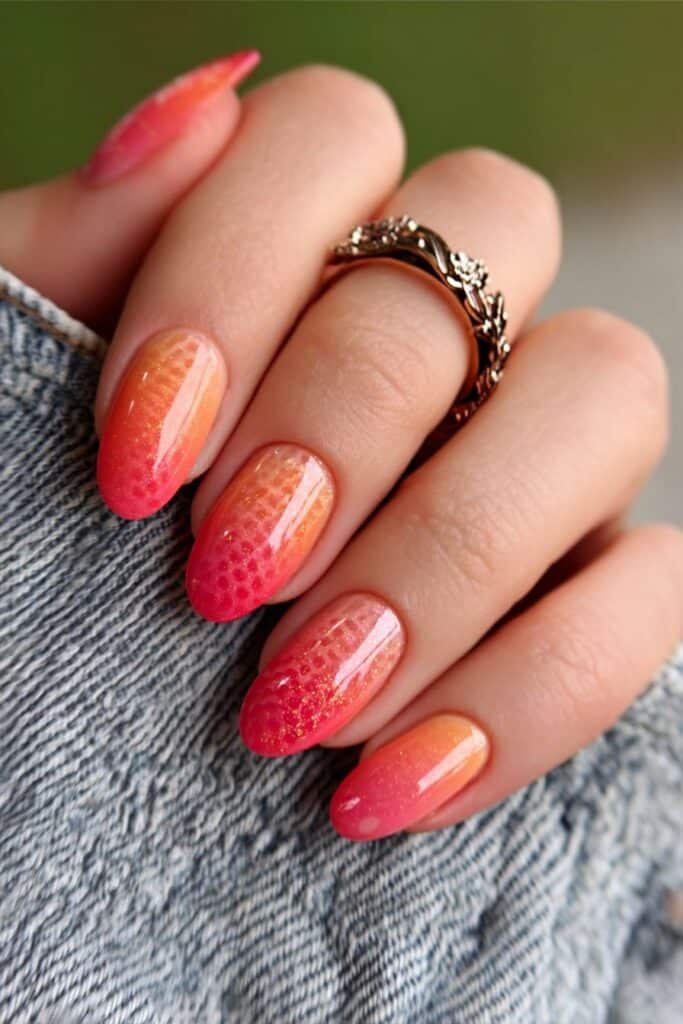
Inspiration for coral sunset spring nails
Coral is the color I reach for when I want to feel alive. It’s warm, it’s vibrant, and it has this incredible energy that just makes everything feel celebratory. I designed the coral sunset nail look after being completely captivated by a spring evening sky — that warm blush melting into deep coral and then into the faintest touch of gold. It feels bold but still entirely appropriate for Easter, and it’s the perfect choice if you want to move away from cool pastels and bring some warmth and fire to your spring look.
Tools needed to create the nail design
You’ll need a warm coral nail polish, a soft blush or peach base, a gold shimmer topper or foil, a sponge for blending, an orange striper polish for detail, and a glossy top coat.
Step by step guide to create nails design
- Paint your nails in a soft peach or blush base and let it dry fully.
- Using a sponge, layer warm coral polish from the tip down toward the middle, blending it into the peach base for a seamless sunset gradient effect.
- Add a touch of gold shimmer topper over the coral portion of the gradient to mimic that warm golden-hour glow.
- Seal with a glossy top coat and let your nails look like the most beautiful spring evening sky you’ve ever seen.
White Lace Easter Nails

Inspiration for white lace easter nails
Lace nails feel like the most romantic and timeless Easter nail design I know. Every time I do this look, it reminds me of delicate Easter dresses and white church gloves and all the elegance and grace that the holiday carries at its heart. White lace on a nude or soft pink base is incredibly versatile — it works on short nails, long nails, square shapes, coffin shapes — and there’s something about the intricate, hand-drawn quality of lace nail art that makes it feel truly special. I created this look as a tribute to the classic beauty of Easter, and it remains one of my all-time favorites.
Tools needed to create the nail design
You’ll need a nude or soft pink base polish, white nail polish, a very fine detail brush, a nail art pen in white, optional lace nail stamps or stencils for precision, and a glossy top coat.
Step by step guide to create nails design
- Apply your nude or soft pink base and let it dry completely before starting the lace work.
- Using your fine detail brush or white nail art pen, begin drawing a scalloped border near the tip of the nail, then add tiny dots, arcs, and floral motifs below it to build up the lace pattern organically.
- Work section by section rather than trying to paint the whole nail at once — lace nail art rewards patience, so take your time and let each section dry slightly before moving on.
- Finish with a glossy top coat to bring all the delicate details together and give your lace nails that beautiful polished finish.
Conclusion
Spring Easter nail art is one of the most joyful creative expressions I know, and every year I fall a little more in love with what’s possible when color, creativity, and the season come together. From my very first pastel ombre experiments to the more intricate lace and marble looks I do now, nails have always been a way for me to express what I’m feeling and celebrate the world around me. Easter especially holds a place in my heart because it’s a holiday that’s truly about renewal — the flowers coming back, the colors returning after winter, the feeling that everything fresh and beautiful is possible again.
What I want you to take away from these fourteen designs is not just a how-to guide, but an invitation to play. When I sit at my nail station with my brushes and my polishes, I’m not thinking about perfection — I’m thinking about joy. I’m thinking about how the right color can shift your whole energy, how a tiny painted bunny on your accent nail can make you smile for a whole week. Beauty, to me, has always been about that — the little moments of delight that remind you of who you are and what makes you feel alive.
You don’t need to be a professional nail technician to create stunning Easter nails. You need patience, a few good tools, and the willingness to try. Start with the design that calls to you most. Maybe it’s the soft dreamy pastel ombre, or maybe you’re feeling bold and you want to go straight for the coral sunset look. Whatever it is, trust your instincts. Your hands are your canvas, and spring is the most generous and forgiving season of all.
I always say that makeup — and nail art — isn’t about hiding anything. It’s about amplifying the best of who you already are, adding a little color and sparkle to the story you’re already living. So this Easter, let your nails tell a beautiful story. Whether you choose one of these fourteen looks or mix and match elements from several of them to create something entirely your own, I’m cheering you on every step of the way.