
Graduation day is one of those rare moments in life that you carry with you forever. I remember the very first time a client came to me before her big ceremony — she sat in my chair with this nervous energy, holding a folder full of inspiration images, and said, “Belle, I just want to feel like myself, but like the best version of myself.” That sentence has stayed with me ever since, because honestly, that is what every great hairstyle should do, especially on a day as monumental as graduation. As someone who has spent years crafting looks for people on their most important occasions, I can tell you with absolute certainty that the right hairstyle does not just complete a look — it transforms how you carry yourself. It shapes your confidence, your posture, and the way you smile when your name is called. In this guide, I want to walk you through fourteen stunning grad hairstyles that I genuinely love and have either worn, created, or helped someone fall in love with. Each one is unique, beautiful, and completely achievable. Whether you have long, flowing locks or a shorter cut, natural curls or stick-straight hair, there is something here for every graduate ready to own their moment.
Classic Updo
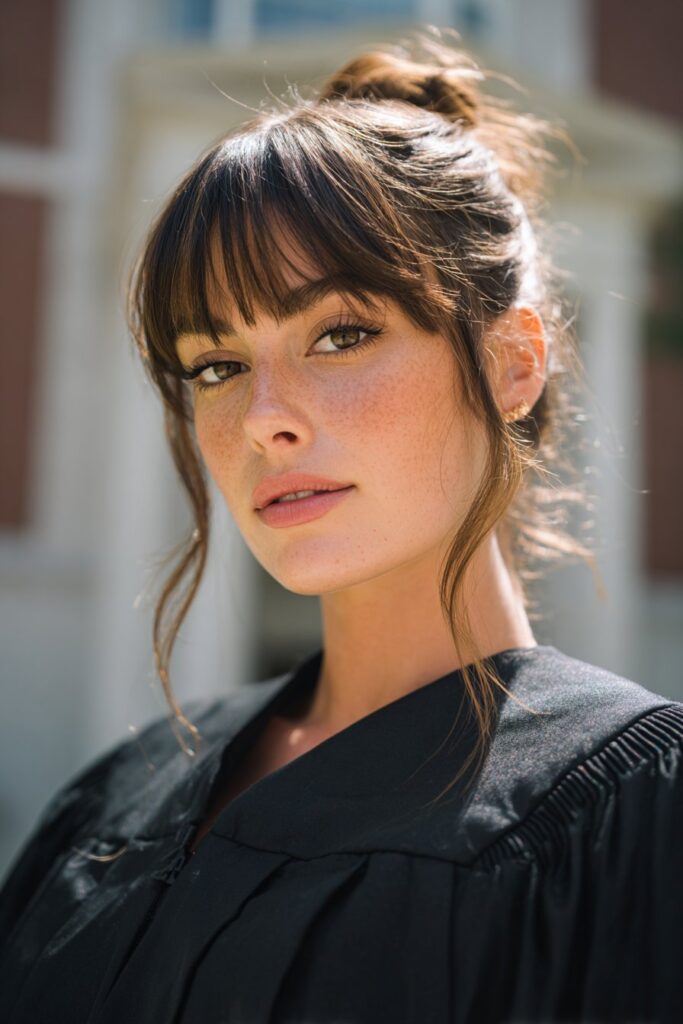
What The Classic Updo Really Is
The classic updo is, in my opinion, the queen of all graduation hairstyles. It is that polished, structured look where all your hair is swept off your shoulders and secured elegantly at the back or top of your head. It can range from smooth and sleek to softly textured, but what makes it “classic” is its timeless, refined quality. I first fell in love with the classic updo when I was still training, watching how a simple sweep of the hair could completely transform someone’s presence. It communicates a kind of quiet confidence — the type that says, “I am ready for this moment.” The updo keeps everything neat under your graduation cap and holds beautifully throughout hours of ceremony, photos, and celebrations. It does not compete with your gown or your cap — instead, it elevates both.
Who This Timeless Look Works Best For
The beauty of the classic updo is that it is remarkably inclusive. It works exceptionally well for people with medium to long hair since there is more to work with when creating height and volume. However, I have also crafted gorgeous classic updos for clients with shorter hair using strategic pinning and small extensions. If you have a long neck, a classic updo will highlight it in the most flattering way. It also suits oval, heart, and square face shapes particularly well. For those with thick hair, this style helps manage volume and keeps things looking intentional rather than overwhelming. Those with fine hair can use volumizing products and teasing techniques at the crown to create fullness. Essentially, with the right adaptation, almost anyone can wear a classic updo and feel like the most poised version of themselves.
Tips To Create Your Perfect Classic Updo
Start by prepping your hair the night before — washing and conditioning gives you a clean base, but I personally recommend styling on day-old hair since it holds better. Apply a light volumizing mousse at the roots before blow-drying. On the day of, use a medium-hold hairspray before you begin pinning to give your hair grip. Section your hair into three parts — two sides and the back — and begin building the base of the updo at the nape of your neck. Use bobby pins in an X formation for the strongest hold. Smooth the top sections over the base and tuck the ends. Finish with a fine-mist setting spray and gently pull a few face-framing strands loose for that soft, lived-in touch. Do not skip a final layer of strong-hold spray once everything is in place.
Sleek Low Bun

Understanding The Sleek Low Bun
The sleek low bun is, in my opinion, one of the most elegant choices a graduate can make. This style involves gathering all your hair at the nape of your neck and creating a smooth, flat bun that sits close to the head. There are no flyaways, no frizz, no volume — just clean, polished perfection. I absolutely adore this look for graduation because it has a sophistication that photographs incredibly well, especially in ceremony shots where your profile is often captured. The sleek low bun has this beautiful way of drawing attention to facial features, making your smile and your eyes the real stars. It also works wonderfully under a graduation cap since it sits low enough to prevent any awkward bumps or height issues with the cap placement.
The Hair Types That Love A Low Bun
The sleek low bun is most naturally suited to straight and wavy hair types because achieving that glassy smoothness is easier without too much curl texture fighting against it. However, I have helped clients with naturally curly or coily hair achieve this style using a strong-hold gel or edge control product to smooth everything down beautifully. It is particularly flattering for those with longer hair since the bun itself can be fuller and more dramatic. It suits all face shapes but is especially gorgeous on round faces since the sleekness at the sides draws the eye vertically, creating an elongating effect. Those with fine hair should focus on building a false sense of volume by wrapping their hair around a small donut hair form before pinning.
How To Get A Flawless Low Bun Look
Begin with freshly straightened or blown-out hair. Apply a smoothing serum through the lengths to eliminate any frizz before you start. Gather all your hair into a low ponytail at the nape of your neck and secure it tightly with an elastic. Using a fine-tooth comb, smooth any bumps along the top and sides, applying a small amount of hair gel or pomade to slick everything flat. Twist the ponytail around its base tightly and tuck the ends under, securing with bobby pins all around. Use a toothbrush dipped in hairspray to tame any baby hairs along your edges and hairline. Finish with a high-shine serum on the surface of the bun for that mirror-like finish. Wrap a silk scarf around the finished style for about ten minutes to set the smoothness before heading out.
Half Up Half Down Style

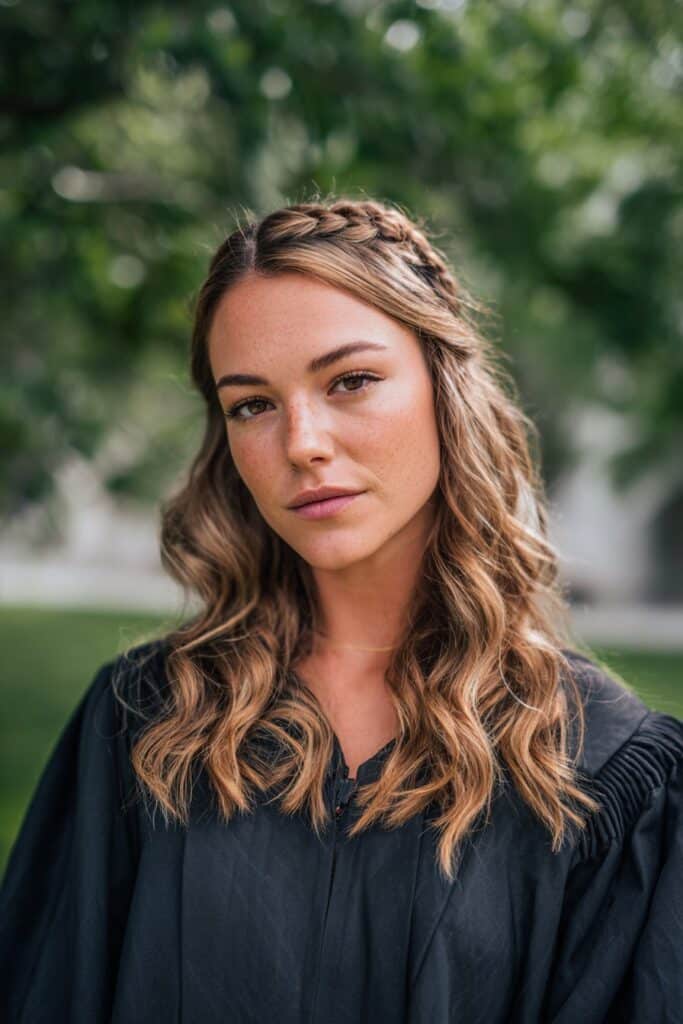
Breaking Down The Half Up Half Down Look
This is one of my personal favorite styles to create because it genuinely offers the best of both worlds — the romance of wearing your hair down with the elegance of having some of it pinned back. The half up half down style simply means that the top section of your hair is gathered and secured while the lower half flows freely. The beauty of this style is how incredibly versatile it is — you can make the top section into a small bun, a braided knot, a simple twist, or just a secured loop of hair. It reads as effortlessly chic and gives graduates the freedom to toss their hair over their shoulder during photos while still looking completely intentional and styled. I always tell my clients that this style photographs with the kind of softness that looks expensive.
When And For Whom This Style Shines
This look is perfectly suited to graduates who have medium to long hair and want to show off the length while still keeping a polished appearance. It is also a wonderful option for those who struggle with heat or feel uncomfortable wearing their hair fully up for long periods. If you have gorgeous waves, curls, or highlights you want the world to see, this style lets you display them beautifully. It is particularly flattering on heart-shaped and oval faces because the volume at the bottom of the style balances the narrower chin area. Those with naturally voluminous or curly hair will find this style especially stunning since the free-flowing lower half showcases their natural texture in all its glory. It also works well for shorter medium-length hair where a full updo might feel forced.
Steps And Tricks To Master This Gorgeous Look
Start by curling or waving the bottom half of your hair loosely for texture and movement. Then, take the top two sections from either side of your temples and gather them at the crown of your head. You can either tie them with an elastic and pull them into a small, loose bun, or twist them and pin them elegantly. For a more romantic finish, pull a few curls forward around your face before pinning the top section. Use a light-hold flexible hairspray rather than a stiff one so the bottom section retains movement. If you are adding a bun or twist at the top, gently tug at it to loosen it slightly — this prevents the look from feeling too severe. Finish with a shine spray over the entire style for a polished, glossy result.
Braided Crown

What Makes The Braided Crown So Special
The braided crown — also sometimes called a halo braid — is one of those hairstyles that makes people feel truly magical. It involves braiding your hair and wrapping those braids around your head like a crown or halo, creating a look that is both bohemian and deeply refined at the same time. I remember working this style on a client who had the most beautiful natural texture, and when we finished, she literally teared up looking in the mirror. That is the power of a braided crown — it frames the face in this soft, ethereal way that feels almost regal. It works brilliantly for graduation because it holds all day without losing shape and looks just as stunning in photos taken six hours into the celebration as it did first thing in the morning.
Who Should Rock A Braided Crown
The braided crown is a style that genuinely suits a wide variety of people, but it is particularly breathtaking on those with thick, long, or naturally textured hair because the braids have more substance and visual presence. Those with thinner hair can still achieve this look using a three-strand braid and gently pulling the sections apart to create the illusion of a fuller braid. Oval and heart face shapes are most flattered by this style since the crown placement draws the eye upward and highlights the bone structure beautifully. It is also a dream hairstyle for those who want to incorporate flowers or decorative accessories into their look — small blooms tucked into the braid add a breathtaking finishing touch for graduation photos.
Creating Your Braided Crown At Home
Begin with freshly washed or lightly textured hair — a light texturizing spray helps the braids grip better. Divide your hair down the center from the forehead to the nape. Take one side and braid it from just above the ear all the way down to the end, securing with a small elastic. Repeat on the other side. Then, wrap each braid over the top of your head in the opposite direction — left braid goes to the right side, right braid goes to the left — and secure each end with bobby pins tucked underneath the opposite braid. Gently pull apart the sections of each braid to make them appear fuller. Smooth any flyaways with a small amount of hair oil and lock everything in place with a flexible-hold hairspray.
Waterfall Braid Style
Discovering The Beauty Of Waterfall Braids
If you have never tried a waterfall braid, consider this your personal invitation from me to fall completely in love with it. A waterfall braid is a partial braid that runs horizontally across the head, allowing sections of hair to fall through the braid and cascade downward — creating the visual effect of a waterfall. It is romantic, intricate-looking, and genuinely unlike any other style. The cascading sections catch light beautifully, especially if your hair has any color dimension or natural shine. I consider this a statement braid for graduation because it looks incredibly detailed and purposeful, yet once you learn the technique, it comes together more quickly than people expect. Paired with soft waves in the loose sections, it creates a look that is nothing short of breathtaking.
Hair Types And Face Shapes That Suit It Best
The waterfall braid absolutely thrives on long hair because the cascading sections need enough length to flow gracefully. It also works wonderfully on naturally wavy or lightly curled hair — that natural texture in the dropping sections adds movement and dimension to the overall effect. For face shapes, this style is exceptionally flattering on square and round faces because the diagonal line of the braid across the head creates a softening, lengthening effect. It also complements those with prominent cheekbones, drawing attention beautifully across the upper portion of the face. Those with fine hair should pre-curl all sections before beginning the braid so the cascading pieces have fullness and body rather than appearing flat as they fall.
Making The Waterfall Braid Work For You
Start by curling your hair loosely and applying a light texturizing spray for grip. Part your hair on the side you prefer, then take a section from the top near your part and divide it into three strands as you would for a regular braid. Begin braiding normally, but instead of folding the bottom strand over, drop it and replace it with a new section of hair from above. Continue this pattern across the head, always dropping the bottom strand and replacing it with fresh hair, allowing the dropped sections to cascade freely. Secure the end of the braid behind the opposite ear with bobby pins. Gently loosen the braid by pulling the top sections upward for a more romantic, airy finish. Lock in with a flexible hairspray.
Soft Romantic Waves

What Soft Waves Actually Mean
Soft romantic waves are, without question, one of the most universally flattering styles a graduate can choose. These are not tight curls or beach waves — they are gentle, flowing, loose waves that move gracefully with every step you take. Think of that effortless, luxurious quality you see on editorial covers: hair that looks like it was styled by the wind in the most cooperative way possible. I have always been passionate about this look because it celebrates the natural beauty of hair movement. When done correctly, soft waves make hair appear healthy, full, and luminous. They are also incredibly photograph-friendly — the movement in the waves catches light from every direction, giving your hair that lit-from-within glow that everyone notices but cannot quite explain.
The Best Candidates For Soft Romantic Waves
Soft romantic waves work beautifully across almost all hair types, which is one of the reasons I recommend them so often. Naturally straight hair takes waves beautifully with a curling wand and holds them well with the right products. Naturally wavy hair just needs a little encouragement and definition. Even naturally curly hair can be stretched and styled into softer, more uniform waves for a polished graduation look. This style is most strikingly beautiful on medium to long hair because the length gives the waves room to move and flow. All face shapes benefit from this look, but those with angular or square features will find that the soft, rounded lines of the waves create a beautiful contrast with their natural bone structure.
Achieving Those Perfect Soft Waves At Home
Prep your hair with a heat-protective spray and blow-dry completely. Divide your hair into sections — working in smaller sections creates more defined waves, while larger sections create softer, more relaxed ones. Using a medium-barrel curling wand, wrap each section around the wand away from your face, hold for eight to ten seconds, and release. Alternate the direction of every other section to prevent the waves from clumping together. Once all sections are done, allow the waves to cool completely before running your fingers through them loosely — never a brush, as this creates frizz. Finish with a lightweight shine serum applied from mid-length to ends, and set with a flexible-hold hairspray. For extra longevity, flip your head upside down and give a light scrunch with your hands before spraying once more.
Elegant Chignon

The Art And Story Behind The Chignon
The chignon — pronounced sheen-yon — is one of those hairstyles that carries an almost architectural beauty to it. It is a low, smooth bun that typically sits at the nape of the neck and is distinguished from a regular bun by its refined structure and intentional placement. I think of the chignon as the classic updo’s more sophisticated, European cousin. It has an old-world glamour that translates perfectly to graduation settings because it is simultaneously formal and graceful. A well-executed chignon does not look like a rushed ponytail twisted up — it looks considered, artful, and complete. The key characteristic is its smoothness: every strand has a direction, every surface lies flat and purposeful, and the overall shape is clean and round.
Who The Chignon Flatters Most Beautifully
The chignon is particularly beautiful on those with long hair, though it can be achieved with medium-length hair using some creative pinning and small hair pieces for additional volume. It is one of the most flattering styles for long necks since it draws the eye directly to the neckline and collarbone — perfect for showing off jewelry. It suits oval, oblong, and heart face shapes most naturally, though with the right adjustments to how much hair you pull forward around the face, it can complement every face shape. Those with naturally smooth or straight hair will find this style the easiest to achieve. For those with textured or curly hair, a strong smoothing product applied generously before blow-drying will create the silky base you need to build a polished chignon.
Styling Tips For A Perfectly Polished Chignon
Start with heat-straightened or blown-out hair for maximum smoothness. Apply a smoothing cream through the lengths before gathering all your hair into a low ponytail at the nape of your neck. Secure with a strong elastic. Divide the ponytail into two equal sections. Twist one section clockwise and wrap it around the base of the ponytail. Twist the second section counter-clockwise and wrap it around in the opposite direction, meeting the first in the middle. Tuck all ends neatly underneath and secure generously with bobby pins. Run the edge of a fine-tooth comb across the surface while applying hairspray to create that glassy smoothness. Gently press the sides of the bun with flat palms while the spray sets. Finish with a high-shine serum applied over the surface with your fingertips.
Effortless Messy Bun

What Truly Defines A Messy Bun
Do not let the word “messy” fool you — a truly great messy bun takes real intention and skill to create. The messy bun is a higher-placed bun that intentionally incorporates loose pieces, varied textures, and a slightly undone quality that reads as relaxed, confident, and modern all at once. I love the messy bun for graduates who want to look effortlessly chic rather than overly formal. It has a youthful energy that feels perfectly appropriate for a day that is, at its core, a celebration of beginning something new and exciting. The messy bun also adapts beautifully to personal style — you can make it sleek around the edges with a loose, tousled top, or fully textured all around for maximum casual-cool vibes.
Who Benefits Most From A Messy Bun
The messy bun is a particularly wonderful option for those who feel uncomfortable in very structured, formal styles. It works best on medium to long hair, though creative use of sectioning can make it work beautifully on shorter lengths too. Thicker hair especially thrives in this style because the extra volume gives the bun a full, lush appearance without needing any additional support. It is also an excellent choice for those with naturally textured or wavy hair — the natural movement in the hair actually makes the final result look more intentional and beautiful. All face shapes suit the messy bun, but those with longer or more oval face shapes might prefer to keep the bun a little lower or off-center for the most flattering proportion.
Getting That Perfectly Imperfect Messy Bun Result
Begin with lightly texturized or day-old hair since it holds the shape far better than squeaky-clean hair. Apply a volumizing dry shampoo through the roots and mid-lengths, scrunching it in with your fingers for extra grip and body. Gather your hair into a high or mid ponytail, but do not pull it all the way through on the last loop — leave a loop instead, creating the base of the bun. Fan the loop out and secure with bobby pins all around. Take the remaining tail and wrap it loosely around the base, tucking and pinning as you go. Now — and this is the key step — gently tug at different sections of the bun to loosen and expand them, creating that gorgeous, dimensional messiness. Pull a few face-framing pieces loose and curl them lightly with a small wand. Finish with a flexible-hold hairspray.
Fishtail Braid Style

Everything You Need To Know About Fishtail Braids
The fishtail braid is one of those styles that looks impossibly intricate but is actually built on one of the simplest techniques imaginable. Instead of using three strands like a traditional braid, a fishtail uses only two sections of hair, alternating small pieces from each side and crossing them over. The result is a chevron-like pattern that looks woven and detailed in a way that draws attention and compliments in equal measure. I find the fishtail braid endlessly romantic — it has a textured, artisanal quality that looks like something from a fashion editorial. For graduation, it works perfectly whether worn centered at the back, swept to one side, or incorporated as part of a half-up style. It is a conversation-starting hairstyle that photographs exquisitely from every angle.
The Right Hair Type For A Fishtail Braid
The fishtail braid is most stunning on long hair, where the intricate pattern has room to fully develop and show itself. Medium-length hair can also work well with a shorter fishtail positioned lower on the head. In terms of texture, this braid actually benefits from hair that has a little texture or wave to it — too-slippery, freshly washed straight hair can make the sections harder to control and the braid harder to keep tight. Naturally wavy or curly hair, once loosened slightly, creates a fishtail that looks beautifully full and boho. Thicker hair produces a more dramatic, lush fishtail, while finer hair creates a delicate, daintier version — both are gorgeous in their own way. Apply a light texturizing product before you begin for the best grip and definition.
Crafting A Stunning Fishtail Braid Step By Step
Apply a texturizing spray through clean or day-old hair and split your hair into two equal sections. Take a very thin piece from the outer edge of the left section and cross it over into the right section. Then take a thin piece from the outer edge of the right section and cross it over into the left section. Continue this alternating pattern all the way down, keeping each section taut as you go. The thinner the pieces you cross over, the more intricate and detailed the final pattern will appear. Secure the end with a small, clear elastic. Now, gently tug the outer edges of the braid from bottom to top to loosen and expand it — this gives the fishtail its full, dimensional look. Finish with a light hairspray to hold everything in place without stiffening the texture.
Hollywood Curls

What Hollywood Curls Are Really All About
Hollywood curls are the embodiment of old-glamour beauty — those perfectly set, lustrous, cascading curls that speak of another era while remaining timelessly relevant. They are larger and more structured than soft waves, with each curl moving in the same direction and lying in an intentional, overlapping pattern. What makes Hollywood curls different from everyday curls is the level of polish and intentionality in the set — every curl is smoothed, defined, and placed deliberately. I remember styling this look on a client who had never worn her hair curled in a formal way, and watching her reaction when she saw herself in the mirror was one of those moments that reminded me exactly why I love what I do. Hollywood curls feel cinematic and powerful, and for a graduation day, that energy is absolutely perfect.
Who Truly Glows In Hollywood Curls
Hollywood curls are most strikingly beautiful on medium to long hair where the length allows the curls to make their full visual impact. Those with naturally smooth or straight hair will find this style holds exceptionally well once set properly with the right products. It is also a gorgeous option for those with natural curl patterns who want to show off their curls in a more structured, defined way. In terms of face shapes, Hollywood curls are particularly flattering for round and square faces because the cascading vertical lines of the curls create an elongating effect. They draw the eye downward and outward in the most flattering way. Those with finer hair should use a smaller curling iron and a strong-hold mousse to ensure the curls maintain their definition throughout the day.
How To Create Your Own Hollywood Curl Moment
Prep your hair with a thermal protection product and a strong-hold mousse, distributing both evenly from roots to ends. Blow-dry completely for a smooth foundation. Section your hair into horizontal layers, starting from the bottom. Using a medium-barrel curling iron, curl each section in the same direction — all away from the face — holding for ten to twelve seconds before releasing onto a clip to cool in its coiled shape. Once all sections are cooled and set, remove the clips and apply a small amount of shine serum to your fingertips. Gently separate each curl by running your fingers through it from the top downward. Use a fine-tooth comb to lightly smooth the top layer for that characteristic Hollywood sleekness. Finish with a medium-hold hairspray and smooth the side sections flat against the head for that signature side-swept polish.
Side Swept Elegance

Understanding What Side Swept Hair Really Is
Side swept hair is exactly what it sounds like — your hair is gathered, styled, and swept gracefully to one side of your face and over one shoulder. It can incorporate waves, curls, braids, or a smooth finish, but the defining characteristic is that sweeping asymmetry that frames the face so beautifully. I have always been drawn to side swept styles because of how deliberately they highlight one side of the face and create this visual movement that reads as effortlessly glamorous. For graduation day, when there are countless photos being taken from every angle, a side swept style ensures there is always a beautiful, flattering perspective in every frame. It is also one of the styles that photographs most consistently well regardless of the lighting or background.
Face Shapes That Truly Adore Side Swept Hair
Side swept styles are particularly transformative for those with round face shapes since the asymmetry of the style creates the illusion of length and angles that balance rounder features. They also suit heart-shaped faces very well, with the fuller side of the sweep placed on the side of the wider forehead to create visual balance. Those with square faces will love how the soft diagonal line of a side sweep softens the jaw and adds femininity. This is also one of the best styles for people who feel self-conscious about one side of their face — you can simply sweep the hair toward whichever side you prefer to feature or minimize. It works on medium to long hair most naturally, though with the help of strategic pinning, shorter hair can also achieve a lovely partial side sweep.
Bringing Your Side Swept Vision To Life
Begin with fully curled or waved hair for the most romantic version of this style, or blow-dried smooth hair for a sleeker interpretation. Part your hair deeply on one side — a deep side part is what sets everything in motion for a proper side swept look. Using your fingers, guide all of your hair over to the heavier side of the part, sweeping it forward over one shoulder. Apply a light hold product to the roots on the lighter side to prevent any hair from falling back across the part. Secure the hair behind one ear with bobby pins, either allowing the rest to fall loose over the shoulder or gathering it into a low, loose arrangement. For the most elegant finish, spray a small section at the crown, smooth it backward with a fine-tooth comb, and pin it in place before allowing the front and side sections to sweep forward. Finish with hairspray and a touch of serum.
Low Ponytail

What Makes A Low Ponytail Stand Apart
The Low ponytail takes one of the most familiar, everyday hairstyles and elevates it into something genuinely striking and sophisticated. Rather than a simple gathered ponytail, this style involves twisting sections of the hair before incorporating them into the ponytail, creating a textured, dimensional look that has real visual interest. The result is a ponytail that reads as styled and intentional rather than rushed or simple. I love recommending this to graduates who want something that feels polished without the commitment or complexity of a full updo. A Low ponytail achieves a beautiful middle ground — it keeps hair off the face and neck beautifully while still looking like someone took time and care to create it. It also sits perfectly beneath a graduation cap when positioned at the right height.
Who The Low Ponytail Works Best For
The low ponytail is incredibly flattering across a range of hair types and lengths, making it one of the most democratic styles in this entire guide. It works particularly well for medium to long hair since the twists have room to develop and the ponytail itself has visible length. Thicker hair creates especially gorgeous low ponytails because the twists appear full and substantial. Those with fine hair can use a volumizing mousse and back-combing at the crown to create a ponytail that appears fuller than it naturally is. All face shapes suit this style, though those with longer or oblong face shapes might prefer a lower ponytail position, while those with rounder faces will find a mid to high ponytail more elongating and flattering. It is also a fantastic option for those who struggle with keeping their hair in place — the twisting technique naturally keeps everything more secure and structured.
Perfecting Your Low Ponytail Technique
Start with lightly texturized hair — either day-old hair or freshly texturized with a dry shampoo. Create a deep or center part based on your preference. Take a section from one side of your part at the temple and twist it backward tightly, then pull in a thin section from behind it and add it to the twist before continuing — this is essentially a twist version of a French braid technique. Pin the hairs at the back of the head and repeat on the other side. Gather all remaining hair into a ponytail at whatever height feels most flattering, incorporating the pinned twists into the elastic. Wrap a thin piece of hair from the ponytail around the elastic to conceal it and pin underneath. For the ponytail itself, you can leave it straight, curl it loosely, or add a light wave. Finish with hairspray over the twists and ponytail.
Vintage Finger Waves

The History And Essence Of Finger Waves
Finger waves are one of those hairstyles that carry an entire era of style within their structure — deeply rooted in a period of jazz music, creativity, and bold artistic expression. They are sculpted, S-shaped waves that lie flat and close to the head, created by molding damp hair with the fingers and a comb, then setting it in place. I am completely obsessed with this style for graduation because it is unexpected, artistic, and undeniably eye-catching. In a sea of updos and loose curls, finger waves stand apart as a true statement of individuality and confidence. They communicate that the wearer knows exactly who they are and has absolutely no fear of being noticed. The sculpted precision of finger waves also means they hold their shape beautifully throughout long events, making them supremely practical for a full day of ceremonies and celebrations.
Who Pulls Off Finger Waves Most Beautifully
Finger waves are most achievable and most stunning on shorter to medium-length hair — think chin to shoulder length — where the waves can be properly sculpted close to the head. Very long hair can be challenging to set in traditional finger waves since the weight of the length can pull the waves loose, though a skilled stylist can work around this. In terms of hair texture, finger waves are traditionally done on straight or moderately wavy hair that can be molded and set smoothly. However, with the right products and patience, naturally textured and curly hair can also achieve a modern interpretation of finger waves using gel and diffused setting techniques. The style is particularly striking on those with strong facial bone structure — prominent cheekbones and a defined jaw are beautifully highlighted by the sculpted, close-set nature of the waves.
Creating Flawless Finger Waves Step By Step
Begin with clean, slightly damp hair. Apply a firm-hold styling gel or wave cream generously through all of your hair, distributing it evenly from root to tip. Use a fine-tooth comb to create a deep side part, then begin creating the first wave by pushing the hair in an S-curve shape with your fingers — press firmly while using the comb to mold the ridge of the wave into place. Continue this process across the entire head, creating alternating S-curves that follow the curve of your skull. Use duckbill clips to hold each ridge in place as you work. Once the entire head is set, apply another light layer of gel over the surface and sit under a hooded dryer or diffuse on low heat until completely dry. Remove the clips carefully and finish with a light shine oil patted gently over the surface. Avoid touching the waves to preserve their crisp definition.
Floral Accent Updo

What A Floral Accent Updo Actually Means
A floral accent updo is any structured updo — whether a bun, chignon, twisted style, or pinned arrangement — that incorporates fresh or silk flowers as a decorative element woven into or placed upon the hair. The flowers are not merely accessories — they become part of the style itself, adding color, dimension, and a soft organic quality that completely transforms the energy of the look. I have been using floral accents in my work for years, and I can tell you that there is something genuinely magical about the moment flowers are added to a completed updo. The whole look softens and blooms — quite literally. For a graduation day, a floral accent updo communicates joy, celebration, and a deep love of beauty that is hard to express any other way. It is both personal and visually stunning, and it makes for the most unforgettable photographs.
Who Should Try The Floral Accent Look
The floral accent updo is particularly beautiful for those who love a romantic, nature-inspired aesthetic and who feel comfortable making a visual statement. It works best with medium to long hair since there needs to be enough hair to create a base updo that can anchor the flowers properly. Smaller, more delicate flowers work beautifully in updos for finer hair, while those with thick, full hair can carry larger blooms with ease. In terms of face shapes, floral accent updos are universally flattering — the flowers draw the eye upward and create a sense of height and visual interest that suits every face type. Those who want a style that feels uniquely personal should choose flowers that hold special meaning or that complement their graduation gown color beautifully.
Adding Florals To Your Updo Like A Professional
Begin by creating your chosen base updo — whether that is a classic bun, a braided crown, or a twisted chignon. Once the updo is fully secured and hairsprayed, you can begin placing flowers. If using fresh flowers, trim the stems to about one to two centimeters long and insert them directly into the updo using hairpins bent around the remaining stem for security. If using silk flowers, remove any excess plastic components and use U-pins to anchor them at the base of each bloom. Group flowers in clusters of odd numbers — three or five — for the most visually balanced result. Place the largest blooms first, then fill in with smaller flowers or greenery. Step back frequently to assess the overall balance and ensure no one area feels too heavy or sparse. Finish with a light misting of hairspray over the entire style to help anchor the flowers in place and add longevity.
Conclusion
Choosing your graduation hairstyle is about so much more than simply picking something that looks nice. It is about choosing a look that mirrors the incredible person you have become through years of hard work, growth, and transformation. I have poured my whole heart into this guide because I genuinely believe that when you feel beautiful on the outside, it amplifies the confidence you have been building on the inside — and graduation day, of all days, deserves that full amplification.
Whether you choose the timeless structure of a classic updo, the romantic movement of soft waves, the artistic precision of vintage finger waves, or the joyful celebration of a floral accent updo, every single one of these styles has the power to make you feel like the best version of yourself when you walk across that stage. And that, more than anything else, is what I care about most.
I always say that makeup and hair are not about hiding who you are — they are about introducing the world to the most fully expressed, most confident, most radiant version of the person you already are. And on graduation day, that person deserves to shine from the very top of their head. Whatever style you choose from these fourteen options, wear it with pride, wear it with joy, and most importantly, wear it like you. Because you are the one who earned this moment — and your hair should celebrate that right along with you.