If there is one event on the entire beauty calendar that genuinely makes my heart race with creative excitement, it is festival season — and more specifically, the glorious, sun-soaked, music-filled world of Coachella. I have been doing hair and makeup in this industry for years, and I will tell you honestly, nothing pushes my creativity quite like a festival look. There is something so freeing about the desert air, the flower crowns, the glitter, and the music. It all comes together to create this incredible permission to be bold, playful, and entirely yourself. Over the years, I have worked with so many clients preparing for festival weekends, and the hairstyle conversation is always the most fun one. So today, I am sharing my absolute favorite Coachella hairstyles — fourteen of them — broken down so you know exactly what each one is, who it works for, and how to actually pull it off. Let us dive in.
Boho Crown Braids

What The Boho Crown Braid Really Is
The boho crown braid is, in my opinion, the defining hairstyle of festival culture. It is that romantic, almost ethereal braided style that wraps around the head like a halo, giving off an energy that is equal parts free-spirited and effortlessly put-together. When I see someone walking through a festival crowd in a crown braid, I immediately feel like they understand the assignment. This style has roots in traditional braiding techniques but has been completely reimagined by the festival world. It typically involves two Dutch or French braids that are pinned together at the back or sides to create a full circular effect around the crown of the head. It can be adorned with flowers, gold pins, tiny jewels, or left completely natural. The beauty of it is that it feels intentional without looking too polished — and that tension between effort and ease is exactly what Coachella fashion is all about.
Who This Dreamy Style Was Created For
This style is honestly a gift for people with medium to long hair. If your hair is at least shoulder length, you have enough to work with. It is especially flattering for those with round, oval, or heart-shaped faces because the elevated crown adds height and draws the eye upward. If you have naturally wavy or textured hair, this style is going to look even more stunning on you because the imperfections and flyaways only add to that boho aesthetic. That said, even if you have straight hair, a little texturizing spray before braiding will give you that loose, effortless look. I always tell my clients with finer hair not to be intimidated by this style — backcombing sections slightly before you braid creates an illusion of thickness that photographs beautifully. It also works incredibly well for people who want a style that stays secure through hours of dancing in the heat.
My Expert Tips To Get This Look Right
Start by applying a salt spray or texturizing mousse to slightly damp hair and letting it air dry or diffuse before braiding. This gives your hair grip and makes the braid hold beautifully. Braid both sides loosely, starting from just behind the ears and working toward the nape. Once you have two braids, pull them across the top of your head and pin them securely. The key to that boho fullness is gently pulling each loop of the braid outward after you complete it — do not be afraid to stretch it. Finish with a light-hold hairspray and tuck in any small dried flowers or pins that speak to your personal style. This is one of those looks that actually improves as the day goes on and pieces fall loose naturally.
Space Buns

Breaking Down The Space Bun Aesthetic
Space buns are pure joy in hairstyle form. They are two high buns placed on either side of the top of the head, and they carry this incredible energy that is simultaneously nostalgic and futuristic. I love them because they are genuinely fun to wear — there is no way you can have space buns in your hair and not feel a little playful. At Coachella, space buns have become iconic. They show up in every form imaginable — sleek and shiny, messy and undone, wrapped in colorful thread, adorned with sparkle, or paired with tiny braids weaving through the buns themselves. The style has a retro reference point but lives fully in the modern festival world. It is one of those looks that works just as well with a flowy sundress as it does with bold sequined outfits, which makes it incredibly versatile as a festival hairstyle choice.
The Hair Types That Rock This Style Best
Space buns are genuinely accessible to almost any hair type, which is one of the reasons I love recommending them. For straight or sleek hair, they look polished and graphic — almost editorial. For naturally curly or coily hair, they create these gorgeous, voluminous bun shapes that have so much texture and personality. If you have medium-length hair, this is one of your best festival options because you have just enough length to twist into buns without needing extensions. For shorter hair, you can still achieve a version of this look with smaller buns and some strategic pinning. The style is also a brilliant choice for people who have hair that tends to frizz in heat and humidity — gathering it up into buns means you spend less time worrying about your hair as the day heats up.
How To Create Perfect Space Buns At Home
Part your hair down the center of your head from your forehead all the way to the nape of your neck. Secure one side while you work on the other. On one side, gather the hair into a high ponytail near the top of your head. Then twist the ponytail around its own base and pin it into a bun shape. Repeat on the other side. The messier version — which honestly photographs better at festivals — involves loosely twisting rather than wrapping tightly. Pull a few face-framing pieces out before you start for a softer look. A little glitter gel pressed on top of each bun right before you step into the festival crowd takes this from cute to absolutely iconic.
Beach Waves

Understanding The Beach Wave Texture
Beach waves are the hairstyle that looks like you just stepped off a boat in the Mediterranean and decided to go dancing. They are loose, effortless, slightly undone waves that carry a natural, sun-kissed quality that perfectly complements festival fashion. I have styled beach waves on so many clients over the years, and every single time, the result feels like a breath of fresh air. What makes beach waves special for Coachella specifically is that they work with the environment — the desert heat, the outdoor setting, the dusty golden light — all of it actually enhances that natural wave texture. Unlike structured curls or sleek styles that might struggle in heat, beach waves only get better as they loosen throughout the day.
When And Who Should Wear Beach Waves
I want to be very clear about something: beach waves are not just for people with naturally wavy hair. This is one of the most universally flattering hairstyles I work with, and it suits almost every face shape, hair length, and hair texture with a little preparation. They are ideal for people with longer hair because the wave pattern has more room to show itself, but medium-length hair works beautifully too. If you have fine hair, beach waves add incredible body and dimension. If you have thick hair, they manage volume in a way that feels relaxed rather than controlled. The only time I would suggest something different is for very short hair, where defined waves may be harder to achieve, though even then a small-barrel curl technique can create a mini wave effect that is completely adorable.
My Favorite Techniques For Effortless Waves
The key to great beach waves is not making them look too perfect. I always start by applying a salt spray to towel-dried hair and letting it air dry about seventy percent of the way. Then I use a one-inch curling wand to wrap sections of hair — and here is my secret — I alternate the direction I wrap each section. One section wraps toward the face, the next wraps away. This creates irregular, natural-looking waves rather than uniform curls. Once all sections are done, I let them cool completely and then run my fingers through them — not a brush — to separate and soften. A light mist of flexible hold spray locks it in without stiffening the texture. If you want extra grit and hold, a tiny amount of sea salt paste scrunched into the ends is a game changer.
Glitter Roots

The Story Behind Glitter Roots
Glitter roots are one of those hairstyles that I genuinely fell in love with the moment I first saw them at a festival years ago. The concept is simple but the impact is extraordinary — you apply cosmetic-grade glitter or shimmer powder along your part, your hairline, or your roots, and suddenly your hair becomes this magical, luminous thing that catches light with every movement. It started as a niche festival trend but has exploded into one of the most photographed hair looks at any outdoor music event. The reason it resonates so deeply at Coachella is because the aesthetic of the festival itself celebrates maximalism, creativity, and that slightly otherworldly energy. Glitter roots feed directly into that mood. And the best part? This works as an addition to almost any other hairstyle — whether your hair is up, down, braided, or wavy.
Finding Your Perfect Festival Candidate For This Look
Glitter roots are one of those rare styles that genuinely work for everyone. There is no wrong hair type, no wrong length, no wrong texture. The glitter sits on top of the hair and scalp, so it is not dependent on your hair doing anything in particular. That said, this look is especially impactful on people with darker hair because the contrast between the deep base color and the shimmer is incredibly dramatic and beautiful. For lighter hair, the glitter blends in a softer, more ethereal way. I always encourage my clients who are nervous about bold looks to try glitter roots first because it is low commitment, completely washable, and delivers massive visual impact with very little effort.
Step-By-Step Guide To Sparkling Roots
The most important rule of glitter roots is to always use cosmetic-grade or hair-safe glitter. Never use craft glitter near your scalp or eyes — it is not formulated for skin contact and can cause irritation. Start by mixing your chosen glitter with a small amount of hair gel or aloe vera gel to create a paste that sticks rather than flaking off immediately. Apply this paste with a fine brush or your fingertip along your part and gently press it in. You can also dab it along your hairline for a halo effect. Let it dry for a few minutes before touching your hair further. Finish with a light spray over the top to seal it in and reduce fallout throughout the day. Layering two or three complementary glitter colors — like gold, copper, and champagne — creates an especially rich, dimensional effect.
Half-Up Twisted Knots

Unpacking The Half-Up Twisted Knot Style
The half-up twisted knot is one of my personal favorites for festival season because it manages to look both effortless and intentional at the same time. The style involves taking the top half of your hair, twisting it into one or two knots at the crown of your head, and leaving the bottom half to flow freely. It is neither a full updo nor completely down, which makes it perfect for the festival environment where you want your hair out of your face during the heat of the day without sacrificing the visual impact of your length. The twisted knots themselves add a sculptural element to the look that always photographs beautifully, especially when you leave a few face-framing pieces loose. I have seen this style done in so many ways — with scrunchies, with pins, with ribbons woven through the knots — and each variation feels fresh.
Hair Personalities That Suit This Look Most
This style is an excellent choice for people with medium to long hair who want something that holds up in the heat. It is especially lovely on people with naturally wavy or textured hair because the knots have a beautiful organic quality when the hair has some texture to it. For people with straight hair, adding a little wave with a curling iron before styling gives the knots that soft, full appearance. I also love this style for people who have significant hair volume — gathering the top half into twisted knots controls some of that volume beautifully while still letting the bottom half show off its fullness. If you are someone who tends to get hot and uncomfortable with hair on your neck, this style is a brilliant compromise.
My Foolproof Method For Twisted Knots
Section off the top half of your hair and clip the bottom away temporarily. Divide that top section into two equal parts — one for each knot if you want double knots, or keep it as one section for a single center knot. Twist one section tightly around itself and then coil it into a small knot shape, securing it with bobby pins pushed in from multiple angles for maximum hold. Repeat on the other side if doing double knots. Gently pull the edges of each knot outward to create a fuller, more relaxed shape before pinning. Release the bottom half of your hair and style it however feels right — loose waves, natural texture, or smooth and straight. Tuck a small flower or decorative pin near one of the knots to make the style feel especially festival-ready.
Fishtail Side Braids

What Makes The Fishtail Braid So Special
The fishtail braid is one of those hairstyles that looks incredibly complex and technical but is actually more approachable than people think once you understand the basic movement. Unlike a traditional three-strand braid, the fishtail uses only two sections of hair and pulls small pieces from the outer edge of each section over to join the other side. The result is this intricate, herringbone-like pattern that looks absolutely stunning whether you are wearing it tight and precise or loose and bohemian. For Coachella, the side fishtail braid is an especially iconic choice because it drapes beautifully over one shoulder, creates a visual focal point, and pairs effortlessly with floral, boho, or maximalist festival outfits.
The Best Hair Length And Texture For This Style
Fishtail braids are most impactful on longer hair because you need enough length for the braid pattern to really show itself. I typically recommend at least bra-strap length for the fullest effect, though shoulder-length hair can absolutely work for a shorter, chunkier fishtail. Thicker hair creates a more voluminous and dramatic braid, while finer hair produces a more delicate, intricate-looking result — both of which are gorgeous in their own way. Slightly wavy or textured hair grips itself naturally during braiding, which makes the process easier and the finished result slightly fuller. If your hair is very smooth and straight, using a texturizing spray before you begin gives the sections something to hold onto and prevents the braid from slipping loose too quickly.
Crafting The Perfect Fishtail Braid For Festival Day
Start by gathering all of your hair to one side and securing it loosely with an elastic. Divide the gathered hair into two equal sections. From the outer edge of the right section, pull a thin slice of hair and cross it over to join the left section. Then do the same from the outer edge of the left section, crossing it to join the right. Keep alternating, pulling thin slices from the outer edges of each section each time. The thinner your slices, the more intricate the pattern appears. Once you reach the end, secure it with a small elastic. Now — and this is the step most people skip — gently tug the edges of the braid outward along its entire length to loosen and expand it. This transforms a tight, stiff braid into that gorgeous, full, boho fishtail that photographs like a dream.
Floral Headband Updo

Defining The Floral Headband Updo Look
If there is one hairstyle that captures the romantic, garden-party-meets-desert-festival energy of Coachella perfectly, it is the floral headband updo. This style combines a soft updo — often a loose chignon or twisted bun at the nape or mid-section of the head — with a headband made entirely of fresh or artificial flowers sitting at the crown. The overall effect is this incredibly romantic, almost mythological look that makes the wearer look like they belong in both a meadow and a music festival simultaneously. I have been creating versions of this look for years, and it never fails to generate the most beautiful reactions. The flowers can be tiny and delicate, bold and tropical, or a mix of both. The updo beneath the floral crown grounds the whole look and keeps it from feeling costume-y.
Who Wears This Romantic Style Best
This style is particularly stunning on people with longer hair because the updo itself has more material to work with, creating a more voluminous and architectural shape that complements the fullness of the floral headband above it. However, medium-length hair works beautifully too — a smaller, more delicate updo paired with a more minimal flower crown creates an elegant, understated version of the look. Face shape-wise, the floral headband adds width across the top of the head, which makes it especially lovely on those with longer or more narrow face shapes. For round faces, positioning the flowers slightly toward the back rather than fully across the forehead elongates the look beautifully. I always encourage people to choose flower colors that complement their skin tone rather than clashing with it — warm pinks, peachy tones, and golden yellows are universally flattering.
Building Your Floral Updo From Scratch
Start by creating your updo first before placing the floral headband. A loose, slightly messy chignon or twisted low bun works best for this style because it has the right visual weight to balance the flowers above. Leave a few soft pieces out around the face. Then, prepare your floral headband — you can purchase pre-made ones or create your own by wiring small flowers together with floral wire and forming them into a band shape. Place the headband at the crown of your head and adjust it so the flowers frame your face naturally. Secure it with bobby pins pushed through the wire and into your hair on both sides. Finish with a light spritz of shine spray on the updo to make it look polished without being stiff.
Messy Low Bun

The Art Of The Perfectly Imperfect Low Bun
There is a real art to a messy low bun done well. It sounds simple — you twist your hair and pin it at the nape of your neck — but the difference between a messy bun that looks chic and effortless versus one that simply looks unfinished is all in the intentionality of the imperfection. The festival-ready messy low bun is loose, textured, and has pieces artfully falling around the face and neck. It sits low at the nape rather than high on the head, which gives it that cool, laid-back aesthetic that feels right at home in the Coachella crowd. I love this style because it solves the classic festival problem of wanting your hair off your neck in the heat while still looking like you made an effort. It is the hairstyle equivalent of that perfectly worn-in vintage denim jacket.
Which Hair Types Benefit Most From This Style
The messy low bun is a champion for thick, heavy hair that can sometimes feel overwhelming in heat. Gathering that volume into a low bun contains it beautifully while still letting a little of that fullness show through the shape of the bun itself. For medium-thickness hair, this style is a natural go-to. For finer hair, I recommend building volume before styling — using dry shampoo, a volumizing mousse, or even some light backcombing at the roots gives the bun more substance. The style also works incredibly well for people going into their second or third day of festival hair, when natural oils and dry shampoo create that perfect lived-in texture that makes the bun look even more effortlessly cool.
My Secret Steps To A Festival-Ready Low Bun
Apply dry shampoo or texturizing spray to your roots and mid-lengths before styling — this is the foundation of a good messy bun. Gather your hair at the nape of your neck as if you are making a low ponytail, but do not pull the elastic all the way through on the last loop. Leave it half-pulled to create a loose loop of hair. Fan the loop out and twist it gently around the base of the ponytail, pinning it at various angles. Do not be afraid to make it look slightly wild. Pull a few pieces loose around your face and temple area intentionally — these are not mistakes, they are finishing touches. A tiny amount of pomade worked between your fingertips and pressed lightly onto any frizzy sections smooths them without flattening the texture. Finish with a medium-hold spray and you are ready.
Butterfly Clip Retro Look

What The Butterfly Clip Trend Is All About
I have to be completely honest — when butterfly clips came back into the cultural conversation, I felt a personal joy that I cannot fully explain. I grew up in an era when butterfly clips were everywhere, and watching them return with such force in the festival world feels like a beautiful full-circle moment. For Coachella, butterfly clips have become one of the most photographed hair accessories in recent years, and the styling around them has gotten remarkably creative. The classic approach involves scattering multiple small butterfly clips throughout half-up or fully-down hair to create a playful, collected effect. The modern version often involves using them to pin back specific sections, creating architectural shapes within the hair that are uniquely interesting and very photogenic.
The Ideal Hair Type For Butterfly Clip Magic
Butterfly clips work best on hair with at least some length — they need enough hair to grip onto to stay secure. They are most visually impactful on straight or slightly wavy hair because the clip stands out clearly against a smoother surface. On very curly or coily hair, the clips can get a little lost in the texture, though using them on defined, stretched sections or on straight-ironed hair creates a beautiful contrast. Fine hair and medium hair are honestly ideal for this style — the clips add a decorative element without adding weight that might cause drooping. For people with very thick, heavy hair, choose larger, sturdier butterfly clips that can grip properly rather than the tiny decorative ones that may not hold.
How To Style Butterfly Clips Like A Pro
The key to the modern butterfly clip look is placement intentionality. Rather than randomly clipping them throughout your hair, think about creating a visual flow. On a half-up style, gather the top section and secure it loosely, then place three to five clips along the gathered section in a staggered pattern. For a fully-down look, clip sections back from your face using two or three clips arranged asymmetrically — one at the temple, one slightly behind the ear, one at the crown. Mixing clip sizes creates an interesting, layered effect. If you want to be extra festival-glam, look for butterfly clips with crystal, pearl, or holographic finishes that catch the light as you move. The more collected and artful the arrangement, the more editorial the result.
Micro Braids

Getting To Know The Micro Braid
Micro braids are one of the most technically intricate and visually stunning protective hairstyles in existence, and at Coachella, they have become a symbol of both creativity and cultural artistry. As the name suggests, micro braids are extremely thin, small braids created from very small sections of hair, often with the addition of braiding hair for length and thickness. The result is a head full of dozens — sometimes hundreds — of slim, delicate braids that can be worn loose, gathered into styles, adorned with beads and cuffs, or braided into larger patterns. They move beautifully, they last for weeks with proper care, and they photograph in the most stunning way because of the visual richness of all those individual strands catching the light differently.
Who Should Embrace Micro Braids At Coachella
Micro braids are a beautiful option for anyone, though they are most commonly seen on textured or natural hair where the braiding process aligns naturally with protective styling traditions. They are a genuine investment of time — proper micro braids can take eight hours or longer to install — but the payoff is extraordinary because you essentially have a festival-ready hairstyle for the entire event and beyond. For people who want the visual effect of micro braids without the full commitment, partial micro braids concentrated at the front sections of the hair while leaving the back loose or in another style is a wonderful compromise. The heat durability of this style is unmatched, making it one of the most practical choices for an outdoor festival environment.
My Tips For Keeping Micro Braids Fresh All Weekend
Before the festival, moisturize your scalp thoroughly and use a light oil along the parts between braids. This keeps your scalp comfortable and your braids looking fresh. During the festival, carry a small spray bottle with a diluted leave-in conditioner to mist over your braids if they start looking dry in the desert heat. Sleeping in a silk bonnet or on a silk pillowcase between festival days dramatically reduces frizz and maintains the integrity of each braid. To add festival flair, thread small gold or colored beads onto individual braids or scatter them throughout the look. Wrapping thin metallic thread around a few braids near the face creates a beautiful, customized accent that is distinctly Coachella.
Bubble Ponytail

The Bubble Ponytail Explained
The bubble ponytail is one of those styles that genuinely makes people stop and stare in the best possible way. It is created by making a regular ponytail and then securing small elastics at even intervals down the length of the ponytail, then puffing out the sections between each elastic to create round, voluminous bubbles. The finished look is playful, structural, and has a cartoonishly fun quality that lends itself perfectly to festival fashion. I absolutely adore styling bubble ponytails for festivals because they are so versatile — they can be sleek and polished, or loose and textured, depending on how much you puff each section. They also stay secure throughout a full day of dancing, which is practically as important as how they look.
Hair Lengths And Types That Shine In A Bubble Ponytail
The bubble ponytail requires a certain amount of length to show off its full potential. Ideally, the hair should fall at least to the mid-back when gathered into a ponytail, because shorter lengths will not have enough room to accommodate multiple bubbles. That said, a shorter ponytail can absolutely have two or three bubbles and still be incredibly charming. Thicker hair creates the most dramatic bubbles — those big, round, full shapes that look almost three-dimensional. For finer hair, backcombing each section before puffing it out and securing the elastic adds volume that otherwise would not be there naturally. This style works on straight, wavy, or curly hair, and it looks especially beautiful on curly hair because the bubbles have this gorgeous, textured fullness that is incredibly photogenic.
My Simple Approach To Creating Bubble Ponytail Magic
Start by pulling your hair into a high ponytail secured with a strong elastic. For extra grip, tease the hair at the base of the ponytail before securing it. Divide the ponytail into sections of about two to three inches each and place an elastic at the bottom of each section. Work your way down the entire length. Once all elastics are in place, go back to the first section and use your fingers to gently pull the hair outward on all sides, puffing it out into a round bubble shape. Do this for every section down the length. If sections feel flat, a small amount of dry shampoo worked in before puffing creates extra volume. Finish with a light hairspray to hold the bubble shapes without making them stiff.
Curtain Bangs With Loose Waves

Understanding The Curtain Bang And Wave Combination
Curtain bangs have had a major moment in recent years, and when they are paired with loose, flowing waves, the combination becomes one of the most effortlessly beautiful looks in the festival hairstyle world. Curtain bangs are center-parted bangs that fall softly on either side of the forehead, framing the face like — as the name suggests — a pair of parted curtains. They have this inherently vintage, romantic quality that feels incredibly aligned with the nostalgic, eclectic energy of Coachella fashion. When paired with loose waves flowing from the part, the whole look reads as natural, feminine, and deeply stylish without appearing to try too hard. It is one of those combinations where everything works together so harmoniously that the result feels inevitable.
Finding Out If This Style Matches Your Face Shape
Curtain bangs are widely considered one of the most flattering bang styles because of their softness and the way they frame rather than cover the forehead. They work particularly well for oval and heart-shaped faces, where the soft framing balances wider cheekbones or foreheads beautifully. For round faces, the center part of curtain bangs can actually elongate the face visually, which is a wonderful effect. Square faces benefit from the softness of the style — the gentle curve of the bangs against angular jawlines creates a lovely contrast. The loose waves beneath the bangs add softness and movement regardless of face shape, making this combination genuinely accessible to most people. The one consideration is for those with very small foreheads, where curtain bangs may feel slightly overwhelming — keeping them very minimal and brushed well to the sides helps.
How To Style Curtain Bangs That Last Through The Festival
The key to festival-proof curtain bangs is the preparation stage. After washing your hair, blow-dry the bang section first using a round brush, pulling the bangs away from the center part in both directions to establish that curtain shape. If your bangs tend to lose their shape in humidity or heat, setting them with a medium-hold mousse before blow-drying dramatically improves their longevity. To style the waves beneath, use a one-inch curling wand with the same alternating direction technique I mentioned earlier. Let everything cool before touching it. A light serum applied to the bangs keeps them smooth and frizz-free through the heat of the day. Carry a small travel-size hairspray for touch-ups if needed throughout the festival.
Knotless Box Braids

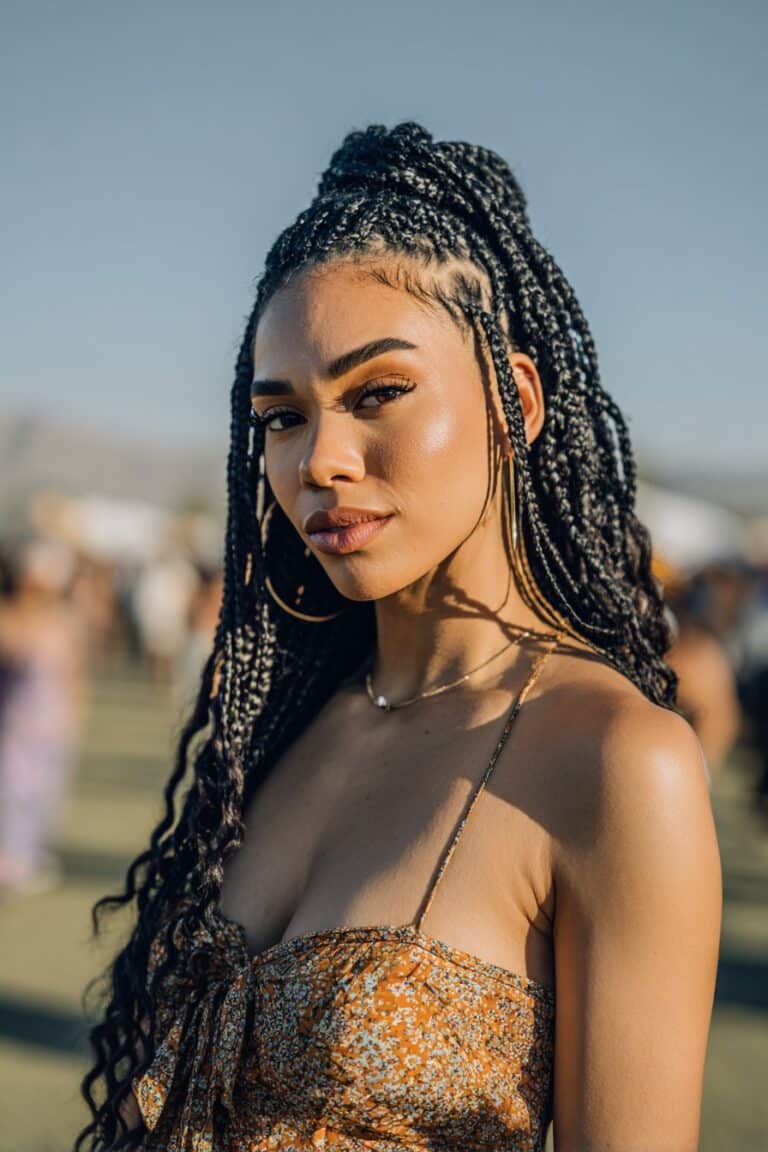
What Sets Knotless Box Braids Apart
Knotless box braids have completely changed the conversation around braided protective styles, and for very good reason. Unlike traditional box braids, which begin with a knot at the root that can cause tension and discomfort, knotless box braids start with your own natural hair and gradually feed in braiding hair as you work down the length. This technique eliminates the scalp tension and the distinct knot at the root, resulting in braids that lay flatter against the head, feel more comfortable to wear, and create a more natural-looking result overall. At Coachella, knotless box braids have become one of the most beloved hairstyle choices because they are stunning, protective, practical, and carry a beautiful cultural tradition of artistry and creativity in Black hair culture that deserves to be celebrated and honored.
The Best Candidates For Knotless Box Braids
Knotless box braids are primarily a protective style for natural or relaxed hair that has enough length and density for the braids to be installed properly. The installation process requires a skilled braider, and the time investment is significant — expect to spend many hours in the salon chair depending on the size and length of braids you want. Smaller, finer braids take longer but create a more intricate result. Larger braids install more quickly and create a bolder, more graphic look. For Coachella specifically, longer knotless box braids that hit the mid-back or waist are especially dramatic and beautiful, but any length works wonderfully. Many people choose to add color to their box braids — ombre effects, bold solid colors, or subtle highlights woven in with the braiding hair — for a truly festival-ready result.
How To Prep And Maintain Knotless Box Braids
The preparation stage before installing knotless box braids is crucial for both the quality of the installation and the health of your hair underneath. Wash and deep condition your hair thoroughly a day or two before your appointment. Detangle carefully and moisturize well. Do not use heavy products that might make the hair too slippery for the braiding hair to grip properly. Once your braids are installed, keep your scalp clean and moisturized by applying a diluted tea tree oil spray or a lightweight scalp oil to the parts every few days. At night, sleep in a satin bonnet or wrap your braids in a satin scarf. This simple habit makes an enormous difference in how long your braids stay fresh and how comfortable your scalp remains throughout the festival weekend.
Headscarf Wrap Styles

The World Of Headscarf Festival Styling
The headscarf has one of the richest and most culturally diverse histories of any hair accessory in existence, and at Coachella, it has found a particularly vibrant home. Headscarf wrap styles encompass a beautiful range of looks — from a simple silk square tied loosely at the back of the head to elaborate, sculptural wrap styles that elevate the entire outfit. What makes the headscarf so powerful as a festival hair option is its versatility. It can solve a bad hair day entirely. It can be the statement accessory that defines the whole look. It can provide sun protection while simultaneously being completely glamorous. I have wrapped headscarves on clients in dozens of different ways, and every single time, the result is something that feels both personal and fashion-forward.
Who Benefits Most From The Headscarf Look
The headscarf is genuinely one of the most inclusive hairstyle options because it works for almost any hair length, type, or situation. It is ideal for people who are between hairstyles, growing out a cut, or dealing with hair that is not cooperating in the heat. It is also a wonderful choice for people who want maximum sun protection for their scalp and hairline. For people with very short hair or shaved heads, the headscarf becomes the main event rather than an accessory, and the styling possibilities are extraordinary. For people with long hair, the scarf can be tied over a loose bun, integrated into a braid, or worn over flowing waves for a layered, textured look. Fabric choice matters enormously — silk and satin scarves feel luxurious and cause minimal frizz, while printed cotton scarves have a more casual, playful energy.
My Favorite Ways To Tie And Style A Festival Headscarf
One of my most-requested headscarf looks for festival season is what I call the turban tie — fold a long rectangular scarf in half lengthwise to create a thick band, center it at the back of your neck, bring both ends forward over the top of your head, cross them in the middle of your forehead, bring them back to the nape, and tie them in a knot. This creates a secure, structured wrap that looks intentional and chic. Another beautiful option is the hair-integrated scarf — braid a long silk scarf directly into a loose braid or ponytail so that the fabric becomes part of the hairstyle itself, with the ends trailing out at the bottom. For a simpler approach, fold a square scarf into a triangle, drape it over your head with the point facing back, and tie the two ends under your hair at the nape. Each technique creates an entirely different aesthetic, which is part of what makes scarf styling so endlessly exciting.
Conclusion
When I think about all of these hairstyles together — the braids and the buns, the glitter and the waves, the scarves and the box braids — what strikes me most is the sheer breadth of creativity that festival season invites. Coachella has always been a place where self-expression takes center stage, where you are actively encouraged to show up as the most vibrant, most intentional, most fully realized version of yourself. Hair is such an enormous part of that self-expression, and I feel incredibly fortunate to work in a field that lets me help people discover looks that make them feel genuinely powerful.
My philosophy has always been that the best hairstyle is the one that makes you feel most like yourself — amplified. It is not about chasing a trend for the sake of it, or replicating exactly what someone else is wearing. It is about looking at these options and asking yourself which one makes your heart beat a little faster. Which one makes you think, yes, that is the energy I want to bring this weekend. That instinct is always right.
Whether you are heading into the festival with knotless box braids you have been growing out for months, or you decide the morning of to throw your hair into a messy bun and scatter butterfly clips through it, both of those decisions deserve the same pride and confidence. Beauty is not about perfection. It is not about spending the most time or having the most product or achieving the most technically complex style. It is about feeling empowered to express yourself however you choose.
I hope this guide gives you exactly the inspiration and practical knowledge you need to walk into your festival experience feeling completely, beautifully, unapologetically yourself. From me to you — have the most incredible time, and let your hair be as free and joyful as the music around you.