
Every year, when the desert air fills with music, color, and creative energy, I find myself completely swept up in the magic of festival season. As a makeup artist who lives and breathes beauty, Coachella is one of my favorite times of the year — not just for the fashion and the music, but for the incredible nail art that floods my inspiration boards. I remember the first time I truly understood the power of festival nails. I was working backstage at a high-energy fashion event, and one of the models walked in with the most breathtaking holographic nails I had ever seen. Under the stage lights, her hands looked like they were made of liquid stardust. Right then, I thought to myself — nails are not just an accessory. They are a statement, a story, an extension of who you are.
Coachella nails are in a league of their own. They are bold, they are expressive, they are free. Whether you are heading to the festival yourself or simply want to bring that vibrant, sun-soaked energy into your everyday life, these ideas are going to ignite your creativity. I have pulled together thirteen of my absolute favorite Coachella-inspired nail looks, and for each one, I am walking you through the inspiration, the tools, and a simple step-by-step guide to help you bring the look to life. Let us dive in.
Desert Sunset Ombre Nails

Nails: Inspiration from the painted desert sky
There is nothing quite like watching the sky change colors over the desert at golden hour. The way the horizon melts from a deep burnt orange into soft coral, then into lavender and finally into a dusty rose — it is one of the most naturally beautiful things I have ever witnessed. I was sitting outside during a beauty retreat in the Southwest when this nail idea hit me like a wave of warm air. I thought, what if we could carry that sunset right on our fingertips?
Desert sunset ombre nails capture that magical transition of color. They feel warm, dreamy, and effortlessly beautiful — everything that Coachella stands for. The beauty of this look is that it works on any nail length and any skin tone. The colors complement everyone because they are drawn directly from nature. I love pairing this style with flowy boho dresses and layered gold jewelry. When the light catches your nails just right, it looks like you are literally holding a little piece of that desert magic in your hands.
Tools needed to create the nail design
To create desert sunset ombre nails, you will need a nude or peachy base coat, nail polishes in burnt orange, coral, dusty pink, and lavender, a makeup sponge or nail sponge for blending, a thin detail brush for any cleanup, a glossy top coat, and nail polish remover with a clean brush for edge cleanup.
Step by step guide to create the nail design
- Apply your base coat and let it dry completely, then paint your nails with the lightest color — the dusty pink or lavender — as your base layer.
- Dab the ombre colors onto a makeup sponge in blended strips, then gently press and dab the sponge onto the lower half of your nail, layering the colors until you achieve that beautiful gradient effect.
- Repeat the sponging process two to three times per nail, letting each layer dry slightly before adding the next, building depth and richness in the color.
- Clean up the edges with a brush dipped in nail polish remover, then seal everything with a generous layer of glossy top coat to make the colors pop and last through days of festival fun.
Boho Floral Nail Art

Nails: Inspiration from wildflower meadows
If there is one thing that takes me back to the carefree spirit of my early days working on editorial shoots, it is florals. I used to work with a stylist who would always bring wildflowers onto set for props, and I fell in love with how organic and joyful they made everything feel. Boho floral nails carry that same energy — they look hand-painted, a little imperfect, and completely enchanting.
For Coachella, boho floral nails are the perfect choice for someone who wants to look effortlessly artistic. Think tiny daisies, delicate roses, and wild poppies painted against a soft cream or nude background. The looseness of the brushstrokes is what gives this style its charm. You are not going for precision here — you are going for feeling. These nails pair beautifully with crochet tops, fringe bags, and stacked bracelets. Every time I do this look for a client, they always say the same thing: they feel like a free spirit, and that is exactly the goal.
Tools needed to create the nail design
You will need a cream or nude base polish, nail art brushes in varying sizes including a fine detail brush and a dotting tool, nail polishes in soft white, blush pink, butter yellow, sage green, and a touch of deep burgundy, a thin striper brush for stems and leaves, and a matte or satin top coat to finish the look with that soft boho feel.
Step by step guide to create the nail design
- Apply two coats of your cream or nude base and let them dry fully before beginning any floral detail work.
- Use your dotting tool to create small clusters of dots for flower centers, then use your fine detail brush to paint soft petals radiating outward from each center in loose, slightly uneven strokes.
- Add tiny leaves and thin curved stems using your striper brush with sage green polish, connecting the florals naturally across the nail surface.
- Finish with a matte top coat for that dreamy, velvety finish that makes the florals look like they were painted directly onto your skin.
Holographic Festival Nails

Nails: Inspiration from prisms and light reflection
The very first time I saw truly holographic nails in person, I was absolutely mesmerized. A client came into my studio wearing a chrome holographic manicure that shifted between pink, blue, gold, and green depending on how the light hit it. I had seen holo nails in magazines, but in real life the effect is something else entirely. It is like having a tiny rainbow living on each fingertip.
Holographic nails are made for Coachella. Under festival lights, in the desert sun, catching the flash of a camera — they are absolutely stunning from every angle. This look feels futuristic and otherworldly, yet somehow still wearable and chic. I love it on shorter, more rounded nails because the reflective surface catches light even more dramatically. Pair these with silver accessories, sheer fabrics, and a clean, luminous makeup look. Let the nails be the star of the show.
Tools needed to create the nail design
You will need a black or dark navy base coat as your foundation, holographic nail powder or a holographic gel polish, a silicone applicator or eyeshadow brush to rub in the powder, a no-wipe gel top coat if using powder, and a UV or LED lamp if working with gel products, plus a glossy standard top coat as an alternative for non-gel versions.
Step by step guide to create the nail design
- Paint your nails with the dark base coat and allow it to cure fully — this deep background is what makes the holographic effect really sing and stand out dramatically.
- Apply a sticky gel layer or a special chrome-ready base coat and cure it under your lamp, leaving it slightly tacky so the holographic powder has something to adhere to.
- Using a silicone applicator, rub the holographic powder onto the tacky surface in small circular motions, applying firm pressure and watching as the rainbow effect builds before your eyes.
- Seal with a generous no-wipe top coat, cure under the lamp, and step back to admire the magic — these nails will literally shimmer with every movement of your hands.
Glitter Fade Nails

Nails: Inspiration from stardust and galaxy skies
I have a deeply personal connection to glitter. When I was in beauty school, my instructor told me that glitter is the most democratizing thing in beauty — it makes everyone feel special. She was absolutely right. There is something about the way glitter catches light that feels almost electric, like you are carrying a little piece of the night sky with you everywhere you go.
Glitter fade nails, sometimes called glitter ombre or stardust nails, are one of my favorite ways to bring that magic to Coachella. The look features a sheer or nude base that gradually builds into a dense glitter tip or edge, creating a dreamy, faded effect that looks like your nails are dissolving into sparkle. It is glamorous without being over the top, and it works with almost every festival outfit. I often recommend this look to clients who want something that feels special but does not require a lot of upkeep — because glitter hides everything.
Tools needed to create the nail design
You will need a sheer or nude base polish, a fine glitter polish or loose nail glitter in gold, silver, or rose gold, a fan brush or small eyeshadow brush for applying loose glitter, a clear base coat to act as adhesive if using loose glitter, nail glue or a strong top coat, and a glossy or gel-finish top coat to seal and smooth the glitter surface.
Step by step guide to create the nail design
- Apply your nude or sheer base coat and let it dry, then paint a layer of clear adhesive base near the tips and edges where you want the glitter to concentrate.
- Pat loose glitter or apply the glitter polish starting from the tip and working inward, using lighter pressure toward the center of the nail to create a natural fade effect.
- Layer additional glitter at the tips to build density, making the sparkle feel intense at the edges and beautifully soft as it fades toward the cuticle.
- Seal with multiple layers of glossy top coat, allowing each layer to dry, until the glitter surface feels smooth and sealed — this step is essential for longevity and comfort.
Tribal Geometric Nail Art

Nails: Inspiration from ancient patterns and global textiles
When I travel for work, one of my favorite things to do is visit local markets and study the patterns in the textiles, pottery, and jewelry. There is a kind of storytelling in geometric and tribal patterns that I find endlessly fascinating. These designs have been used across cultures for centuries to represent identity, belonging, and spirit — and that energy translates beautifully onto nails.
Tribal geometric nails for Coachella draw from this rich tradition of pattern-making. Think bold zigzags, diamond shapes, cross-hatching, and repeating angular lines in earthy tones like terracotta, mustard, ivory, and deep brown. The result is something that feels ancient and fresh at the same time. I love doing this look on longer nails where you have more surface area to work with, but even on short nails a single bold geometric motif on an accent nail can make a powerful statement.
Tools needed to create the nail design
You will need a nude or ivory base polish, nail polish or nail art pens in terracotta, mustard yellow, deep brown, and white, a thin striping brush for crisp lines, nail tape or striping tape for clean geometric edges, a steady hand and a little patience, and a matte top coat to give the finished design an earthy, artisan quality.
Step by step guide to create the nail design
- Apply your base color and allow it to dry completely, then use nail tape to section off geometric areas on each nail, pressing down the edges firmly to prevent polish bleeding underneath.
- Paint your chosen pattern colors into each taped section, working carefully within the tape boundaries, and allow the polish to become tacky before slowly peeling the tape away.
- Use your thin striping brush to add freehand detail lines, zigzags, and dots over the dry base, layering colors to build the complexity and richness of the tribal pattern.
- Finish with a matte top coat for that perfectly earthy, handcrafted feel that makes these nails look like wearable art.
Celestial Moon and Stars Nails

Nails: Inspiration from desert night skies
One of the most magical experiences of my life was spending a night in the desert under a sky so full of stars it looked almost unreal. There was no light pollution, just darkness and an infinite sea of glittering points above me. I remember thinking that I wanted to bottle that feeling somehow, to carry it with me. Celestial nail art is the closest I have found to doing exactly that.
Celestial moon and stars nails are deeply romantic and mystical — perfect for the dreamy, spiritual energy that Coachella always seems to radiate. Crescent moons, tiny stars, sun symbols, and constellation lines painted against a deep navy, midnight black, or rich indigo base create a look that feels otherworldly and intimate at the same time. I love adding a touch of gold to the celestial details to make them feel precious and luminous. This style pairs beautifully with flowy maxi dresses, moon jewelry, and a smoky, sultry eye look.
Tools needed to create the nail design
You will need a deep navy, midnight blue, or black base polish, gold nail polish or a gold nail art pen, a fine detail brush for moon and star shapes, a dotting tool in varying sizes for stars and dots, a silver polish for accent details, and a glossy top coat to give the finished nails a smooth, glass-like finish.
Step by step guide to create the nail design
- Apply two coats of your deep base color and allow them to dry completely before beginning any celestial detail work on top.
- Use your fine detail brush with gold polish to paint crescent moon shapes on accent nails, keeping the lines fluid and slightly imperfect for an organic, handpainted quality.
- Scatter tiny stars and dots across the remaining nails using your dotting tool in different sizes, creating clusters and constellations that feel natural and unforced.
- Seal with a glossy top coat that enhances the depth of the dark base while making the gold celestial details shimmer like actual starlight.
Pastel Tie-Dye Nails

Nails: Inspiration from festival fashion and retro color waves
Tie-dye has had such a beautiful resurgence in fashion, and I am completely here for it. I remember when a client came in for a festival look and showed me her tie-dye jacket — every color you could imagine swirling together in the most organic, beautiful way. I thought, we need to get that energy onto her nails, and that is exactly what we did.
Pastel tie-dye nails bring the spirit of that swirling color energy into a soft, dreamy palette that feels completely Coachella. Imagine lilac, baby blue, mint green, soft peach, and blush pink all blending together in watercolor-like swirls across each nail. The result is playful, youthful, and joyfully unpredictable — because no two tie-dye nails ever look exactly the same. This look works beautifully on medium to long nails and pairs perfectly with white outfits that let the colors of your nails pop against a clean backdrop.
Tools needed to create the nail design
You will need a white or very light base coat, pastel nail polishes in your chosen colors such as lilac, mint, peach, and baby blue, a small brush or toothpick for swirling colors together while wet, a cup of water if using the water marbling technique, and a glossy top coat to seal and protect the soft swirling design.
Step by step guide to create the nail design
- Apply a white base coat and let it dry completely to ensure your pastel colors appear bright and true without being dulled by a darker background.
- Drop small amounts of different pastel polishes onto the wet nail surface and use a toothpick to gently swirl them together, working quickly before the polish begins to dry and set.
- Layer additional color drops and swirls across the nail, blending edges softly for a watercolor effect that feels organic and flowing rather than harsh or defined.
- Top with a glossy coat once completely dry to intensify the colors and give the finished look a smooth, polished finish that will carry you beautifully through the festival.
Crystal Embellished Nails

Nails: Inspiration from festival jewelry and gemstone adornment
I will never forget the feeling of placing the first crystal on a client’s nail during a bridal trial and watching her face light up like she had never seen anything more beautiful. There is something undeniably transformative about adding dimension and sparkle to nails through actual embellishments. For Coachella, crystals feel absolutely perfect — they catch the light, they feel luxurious, and they make you feel like royalty even standing in the middle of a dusty field.
Crystal embellished nails are glamorous, detailed, and completely show-stopping. You can go minimal with a few strategically placed gems for elegance, or go maximalist with full crystal coverage for pure drama. I love combining different crystal sizes and shapes — flatback rhinestones, teardrop gems, and tiny seed crystals — for a look that feels rich and layered. Pair with simple, monochromatic outfits so the nails remain the focal point, and stack delicate bracelets to complete the jeweled effect.
Tools needed to create the nail design
You will need a base coat in nude, white, or any color that complements your crystal palette, flatback rhinestones and crystals in varying sizes and shapes, nail glue or a thick clear gel adhesive, a dotting tool or orange stick to place crystals precisely, tweezers for handling larger gems, and a gel or strong top coat to secure everything in place.
Step by step guide to create the nail design
- Apply and cure your base color completely, then dot small amounts of nail glue exactly where you plan to place each crystal, working one gem at a time to avoid the adhesive drying before placement.
- Use your dotting tool or tweezers to carefully pick up each crystal and press it firmly into the glue, holding it for a few seconds to ensure a strong bond before moving to the next gem.
- Build your design by layering crystals in a gradual pattern — perhaps starting dense near the cuticle and fading out toward the tip, or creating a V-shape or diagonal sweep across the nail.
- Seal the design with a thick layer of gel top coat applied carefully around and over the crystals without fully drowning them, maintaining their dimensional sparkle while protecting the overall design.
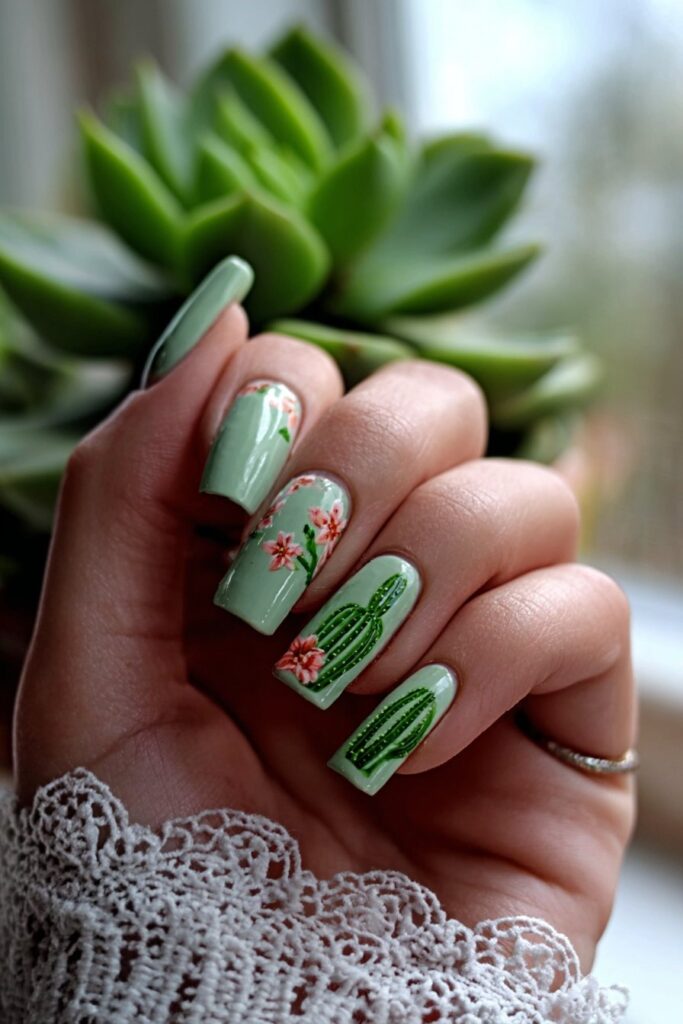
Cactus and Succulent Nail Art
Nails: Inspiration from desert flora and southwestern landscapes
Growing up in the South, I was always surrounded by lush greenery, so when I first visited the desert Southwest and saw those incredible cacti and succulents, I was absolutely captivated. There is something so quietly powerful about plants that thrive in conditions that seem impossible. That resilience and beauty inspired one of my most beloved festival nail designs.
Cactus and succulent nail art is charming, quirky, and deeply connected to the natural world that surrounds the Coachella Valley. Tiny illustrated cacti with arms reaching upward, round plump succulents in shades of sage and seafoam, and little desert blooms painted against a warm sandy or sky blue background create a nail look that is both playful and sophisticated. This style works on any nail length and pairs beautifully with earthy tones, fringe details, and natural fiber accessories that honor the desert environment.
Tools needed to create the nail design
You will need a sandy beige, dusty blue, or soft white base coat, nail art brushes in fine and medium sizes, nail polishes in multiple shades of green including sage, forest, and mint, a detail brush for cactus spines and texture lines, brown and yellow polish for earthy accents and blooms, and a matte top coat to give the finished art that soft, sun-dried desert quality.
Step by step guide to create the nail design
- Apply your base color in two even coats and let it dry fully, then sketch out the rough placement of your cactus and succulent shapes very lightly with a light-colored polish before filling them in.
- Fill in the cactus and succulent shapes with your green tones, using a dry brush technique to add texture by lightly dragging a nearly dry brush across the surface for a natural, organic effect.
- Add fine spines to the cactus using your detail brush with a pale brown or grey polish, and paint tiny flowers at the tips of the cacti in bright pink, yellow, or coral to bring the scene to life.
- Seal with a matte top coat that enhances the earthy, illustrated quality of the design and makes the whole nail feel like a tiny painted landscape.
Metallic Chrome Nails

Nails: Inspiration from futuristic festival fashion
Every Coachella season, I notice a handful of looks that feel completely ahead of their time — like people have arrived from a more beautiful, more daring future. Chrome nails belong firmly in that category. They are sleek, they are bold, and they reflect the world around them in the most literal and beautiful way possible.
Metallic chrome nails are one of the most striking looks you can wear to a festival. The mirror-like surface picks up every color and light source around you, meaning your nails are constantly changing and shifting as you move through the crowd. Gold chrome feels warm and luxurious, silver chrome feels cool and edgy, and rose gold chrome feels romantic and modern. These nails work best on smooth, well-shaped nails and pair powerfully with leather accents, structured silhouettes, and minimal but high-impact makeup.
Tools needed to create the nail design
You will need a base coat in the color closest to your chosen chrome tone such as black for silver or nude for gold, a chrome nail powder in your chosen metallic shade, a silicone finger applicator or soft eyeshadow brush, a no-wipe gel top coat for a sticky surface that holds the powder, a UV or LED lamp for curing, and a sealing top coat to protect the mirror finish.
Step by step guide to create the nail design
- Apply your base color and cure it completely under the lamp, then apply a thin layer of no-wipe gel top coat and cure again, leaving that slightly sticky surface that allows the chrome powder to adhere effectively.
- Dip your silicone applicator into the chrome powder and rub it onto the tacky nail surface using firm, circular buffing motions, watching as the mirror-like finish builds almost instantly.
- Continue buffing until the entire nail surface is covered in an even, reflective chrome finish with no bare spots, applying additional powder as needed to build the intensity.
- Seal with a gel top coat, cure under the lamp, and enjoy the absolutely mesmerizing metallic finish that will catch every eye at the festival.
Negative Space Nail Art

Nails: Inspiration from modern art and minimalist design
Some of my favorite art is the kind that uses absence as powerfully as presence — the kind where the empty space is just as intentional as what is filled in. Negative space nail art operates on exactly this principle, and I find it endlessly fascinating. The first time I created a negative space design for a client, she looked at her nails for a long time and then said they felt like tiny works of modern art. That response stuck with me.
Negative space nails for Coachella feel incredibly contemporary and cool. By leaving parts of the natural nail bare or using a sheer base, you allow the nail itself to become part of the design. Geometric cutouts, curved lines, abstract shapes, and minimalist patterns work beautifully in this style. The color palette can be anything — stark black and white, neon on skin tone, metallic on natural nail — the key is the intentional interplay between color and empty space. This look is perfect for the fashion-forward festival goer who wants nails that feel artistic rather than decorative.
Tools needed to create the nail design
You will need nail tape or vinyl nail stickers in your chosen geometric shapes, a clear or light base coat, your chosen contrast color in gel or regular polish, a striping brush for any freehand line work, nail polish remover for cleanup, and a glossy top coat to seal the design while keeping the negative space areas clean and smooth.
Step by step guide to create the nail design
- Apply a clear or very light base coat and let it dry, then carefully apply nail tape or vinyl stickers in your desired pattern, pressing down all edges firmly to prevent any color seeping underneath.
- Apply your contrast color over the tape, covering the exposed areas you want to fill, and let the polish become just slightly tacky before carefully peeling the tape away to reveal the clean negative space.
- Use your striping brush to add any additional freehand lines or details that enhance the geometric design, working with a steady hand and using tape guides if needed for perfectly crisp results.
- Seal with a glossy top coat that unifies the filled and empty areas of the design, creating a sleek, gallery-worthy finish that holds up beautifully through days of festival activities.
Butterfly Wings Nails

Nails: Inspiration from the delicate beauty of nature in flight
Butterflies have always felt deeply meaningful to me — they represent transformation, and as a makeup artist, transformation is at the heart of everything I do. I have painted butterfly wings on nails, faces, and even eyelids, and every time the result feels magical. For Coachella, butterfly nail art captures that spirit of metamorphosis and freedom that the festival season embodies so beautifully.
Butterfly wings nails can be interpreted in so many gorgeous ways. Realistic painted wings with intricate detail and natural coloring feel like wearable nature art. Abstract butterfly shapes in iridescent or holographic polish feel modern and mystical. Minimalist single wing silhouettes on negative space backgrounds feel elegant and restrained. My personal favorite for Coachella is a vibrant, maximalist butterfly design with rich jewel tones — deep sapphire, emerald, violet, and orange — that make the wings look like stained glass. Pair with flowing, feminine outfits and flower crowns for a look that feels like pure magic.
Tools needed to create the nail design
You will need a white or light base coat to make colors appear vibrant, nail polishes or gel polishes in your chosen wing colors, a fine detail brush for wing veining and edge details, a thin striper brush for delicate vein lines, iridescent or holographic glitter polish for shimmer accents, and a glossy top coat to protect the detailed work and enhance the dimensional quality of the wings.
Step by step guide to create the nail design
- Apply your white or light base and allow it to dry completely, then sketch the rough shape of the butterfly wing using a light-colored polish as a guide before committing to your main colors.
- Fill in the wing shapes with your chosen jewel tones, using a fine brush to stay within the outlines and adding a second layer for full opacity and richness of color across the wing surface.
- Add delicate vein lines using your striper brush with a very thin, darker shade, working outward from the center of the wing to the edges in a pattern that mimics actual butterfly wing anatomy.
- Finish with dabs of iridescent glitter polish along the wing edges and a glossy top coat to make the colors sing and the wings look luminous and alive on your fingertips.
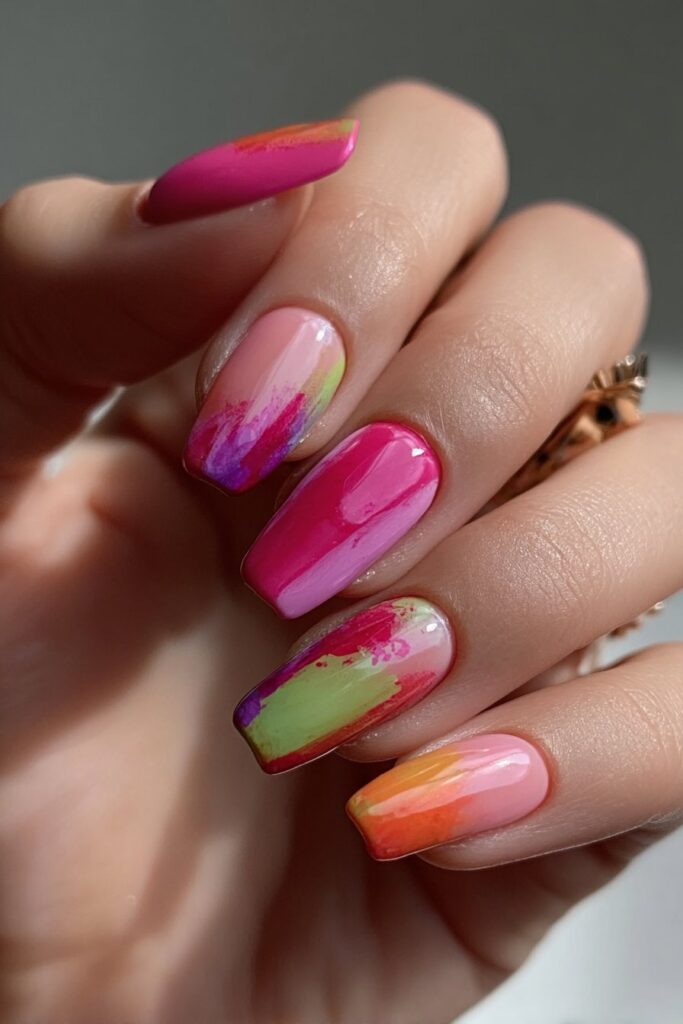
Neon Abstract Nails
Nails: Inspiration from modern art and electric energy
I saved this one for last because honestly, neon abstract nails are the ones I reach for when I want to make the biggest, boldest, most unapologetic statement possible. There is something about neon that refuses to be ignored — it demands your attention, it radiates energy, and it turns every dark space into a light show. For Coachella, that energy feels absolutely perfect.
Neon abstract nails are fearless and free. They are not about precision or realism — they are about expression. Bold brushstrokes of electric pink, acid yellow, neon green, and vivid orange layered over a black or white base create a look that feels like a painting in motion. Every nail can be completely different, or you can carry a loose theme across all ten for a cohesive but playful effect. I always tell clients who are nervous about bold looks to start with neon abstract nails — because when the colors are this vibrant and the design is this free, there are no mistakes. Only choices.
Tools needed to create the nail design
You will need a black or white base coat depending on your desired contrast level, neon nail polishes in at least three to four vivid colors, a medium and fine nail art brush for brushstroke work, a dotting tool for accent details, a UV-reactive neon top coat if you want your nails to glow under black light, and a glossy top coat to seal and intensify the neon hues.
Step by step guide to create the nail design
- Apply your base color in two even coats and allow it to cure completely — the contrast between your base and the neon colors is what gives this design its dramatic, electric quality.
- Load a medium brush with your first neon color and apply confident, loose brushstrokes across the nail, embracing the imperfect, painterly quality rather than trying to make perfectly clean lines.
- Layer additional neon colors over and beside the first strokes, allowing colors to blend slightly at their edges while keeping distinct areas of each vivid shade visible and bold across the nail surface.
- Seal with a glossy top coat or UV-reactive top coat for festival glowing magic, and step out knowing your nails are carrying the pure electric energy of Coachella on every single fingertip.
Conclusion
If there is one thing I hope you take away from this guide, it is this — your nails are a canvas, and Coachella is the perfect reason to treat them like one. I have spent years working in this industry, watching beauty evolve and transform, and the one constant I always come back to is this: beauty is most powerful when it is personal. When a look is chosen not because it is trending or expected, but because it genuinely reflects who you are and how you feel in that moment.
Every one of these thirteen nail ideas carries a different spirit. Some are dreamy and romantic, some are bold and futuristic, some are earthy and grounded, and some are purely joyful. The best Coachella nail for you is the one that makes you feel most like yourself — amplified. Maybe that is crystals catching the desert sunlight on your fingertips. Maybe it is neon brushstrokes that glow under the festival lights. Maybe it is a tiny cactus painted with love on each nail, a quiet nod to the beautiful landscape that hosts this extraordinary gathering every year.
I always say that makeup, and beauty more broadly, is not about hiding anything. It is about amplifying. It is about taking what is already there — your spirit, your personality, your energy — and giving it a visual form that the world can see and respond to. Your nails are one of the most intimate spaces for that expression. You see them all day long. They move with you, gesture with you, tell your story with every wave of your hand.
So as you prepare for festival season, I encourage you to be brave with your nails. Try the look that feels a little outside your comfort zone. Mix two of these styles together into something completely your own. Go bold when you feel uncertain — I promise the desert air gives everyone courage. And if a nail chips or a design does not come out exactly as planned, remember what I always tell my clients: imperfection is where the personality lives.
Thank you for joining me on this colorful, creative journey through thirteen of my favorite Coachella nail ideas. Whether you are a seasoned nail art enthusiast or someone picking up a nail art brush for the very first time, I hope these ideas inspire you to show up at the festival — or wherever life takes you — with nails that tell your story beautifully. Beauty is not about perfection. It is about confidence, creativity, and feeling empowered to express yourself however you choose. Now go paint something wonderful.