
May is honestly one of my favorite times of the year when it comes to nails. There is something about the way the world blooms in spring that just makes me want to reach for every pastel, every floral detail, and every sun-kissed shade in my kit. I remember sitting in my studio in Los Angeles one May morning, sunlight pouring through the windows, Luna curled up at my feet, and thinking — this season deserves nails that match its magic. And so, this article was born. Whether you are a seasoned nail enthusiast or someone who just wants to try something fresh this season, I have put together fourteen stunning May nail ideas that are creative, wearable, and absolutely on trend. Each look comes with the inspiration behind it, the tools you will need, and a simple step-by-step guide so you can bring it to life at home. Let us dive in!
Cherry Blossom Nails

Inspiration from the blooming cherry trees of spring
Every May, when I think of cherry blossoms, I think of softness, romance, and the kind of fleeting beauty that makes you stop and breathe. Cherry blossom nails are a timeless May classic, and I always find myself coming back to them. The look is delicate — soft pink petals scattered across a sheer or white base, with tiny golden centers that catch the light. What I love most about this design is how it feels effortlessly feminine without trying too hard. It reminds me of strolling through a park in a flowy dress, not a care in the world. The colors are gentle — blush pinks, soft whites, and the faintest hint of mauve — and the overall vibe is one of calm, blooming beauty. This is the nail design you wear when you want to feel like the season itself.
Tools needed to create the nail design
To recreate this look, you will need a sheer or white base polish, a light blush pink polish, a deep pink for petal depth, a small dotting tool or thin brush, a gold or yellow nail paint for the centers, a top coat, and a nail file and buffer to start with a smooth canvas.
Step by step guide to create the nail design
- Apply your sheer or white base coat evenly and let it dry completely before moving on.
- Using a thin brush or dotting tool, dab soft blush pink in a petal cluster shape, pressing lightly to create an organic, natural petal effect.
- Add a slightly deeper pink at the inner edges of the petals to create dimension and depth, blending gently so it looks like a real bloom.
- Dot a tiny yellow or gold center in the middle of each flower cluster, seal everything with a glossy top coat, and you are done.
Peach Ombre Nails

Inspiration from the soft gradient skies of spring mornings
I am absolutely obsessed with a good ombre moment, and May is the perfect time to pull this look out. Peach ombre nails are inspired by those early spring mornings when the sky transitions from pale lavender to soft peach, and everything feels gentle and warm. Think lilac melting into baby pink, or mint fading into soft yellow — the combinations are endless. I love this design for clients who want something that feels artistic but is still polished and elegant. It works beautifully on every nail shape, but especially on almond and oval nails where the gradient has room to breathe. This is the look that photographs beautifully and feels equally at home at a garden brunch or a day at the office.
Tools needed to create the nail design
You will need two or three Peach polishes in complementary spring shades, a makeup sponge, a base coat, top coat, nail tape or liquid latex to protect the skin around your nails, and acetone with a cleanup brush for any edges.
Step by step guide to create the nail design
- Apply a white or light base coat so your pastel colors show up bright and true rather than sheer.
- Paint both (or all three) polish shades next to each other in overlapping strips on your makeup sponge, then dab it gently onto the nail in a pressing motion.
- Repeat the sponging two to three times for opacity, allowing a few seconds to dry between applications.
- Clean up the edges with acetone and a thin brush, then seal with a glossy top coat for a smooth, blended finish.
Floral Garden Nails

Inspiration from wildflower meadows and cottage garden aesthetics
If there is one design that truly captures the spirit of May, it is the full-on floral garden nail. I think of cottage gardens bursting with poppies, daisies, and climbing roses when I create this look. The beauty of floral garden nails is that they are intentionally imperfect — every petal does not have to be symmetrical, and that looseness is exactly what makes it feel fresh and handpainted rather than stamped. I love doing these nails for clients who want a statement look that still feels wearable. A creamy white or sage green base works beautifully as the foundation, and then you layer on tiny blooms in every color of the spring palette. The result is like wearing a little painting on your fingertips.
Tools needed to create the nail design
You will need a white or sage green base polish, a selection of spring-colored polishes in red, yellow, pink, and purple, a very fine detail brush, a dotting tool, a top coat, and a steady hand or a little patience.
Step by step guide to create the nail design
- Start with your base color — either creamy white or soft sage — and allow it to fully dry.
- Use your fine detail brush to paint small simple flower shapes across the nail in clusters, varying the sizes so it looks natural and not too perfect.
- Add leaves and tiny stems using a thin green line brush, tucking them between flowers to fill any gaps.
- Finish with a matte or glossy top coat depending on your preferred finish — matte gives it a watercolor painting feel, while glossy makes the colors pop.
Butterfly Garden Nails

Inspiration from the graceful wings of spring butterflies
Butterflies are having such a major fashion moment, and nails are no exception. I first fell in love with butterfly nail art when a client of mine came in with a torn-out magazine page and said “I want this but more magical.” We spent the afternoon creating the most stunning butterfly nails either of us had ever seen. Butterfly garden nails for May are all about iridescent wings, delicate outlines, and the sense that something beautiful just landed on your fingertips. I love using a sheer, light-colored base — lavender or pale blue — and then painting just one or two detailed butterflies as accent nails while keeping the others minimal and clean. It is the kind of design that makes people do a double take.
Tools needed to create the nail design
You will need a sheer lavender or pale blue base, a fine detail brush, black nail polish or a nail art pen for outlines, iridescent or holographic glitter polish, a top coat, and patience because these little wings deserve attention.
Step by step guide to create the nail design
- Paint your base color and allow it to dry completely — a sheer lavender or sky blue works wonderfully.
- Using a fine brush or nail art pen, draw the wing outline of a butterfly in black, starting from a central body point and creating two sets of wings with organic, curved edges.
- Fill the wings with iridescent or holographic polish, letting it catch the light for that magical, translucent effect.
- Outline the wings again once dry for definition, add tiny dots along the edges for detail, and seal with a glossy top coat.
Sun-Kissed Coral Nails
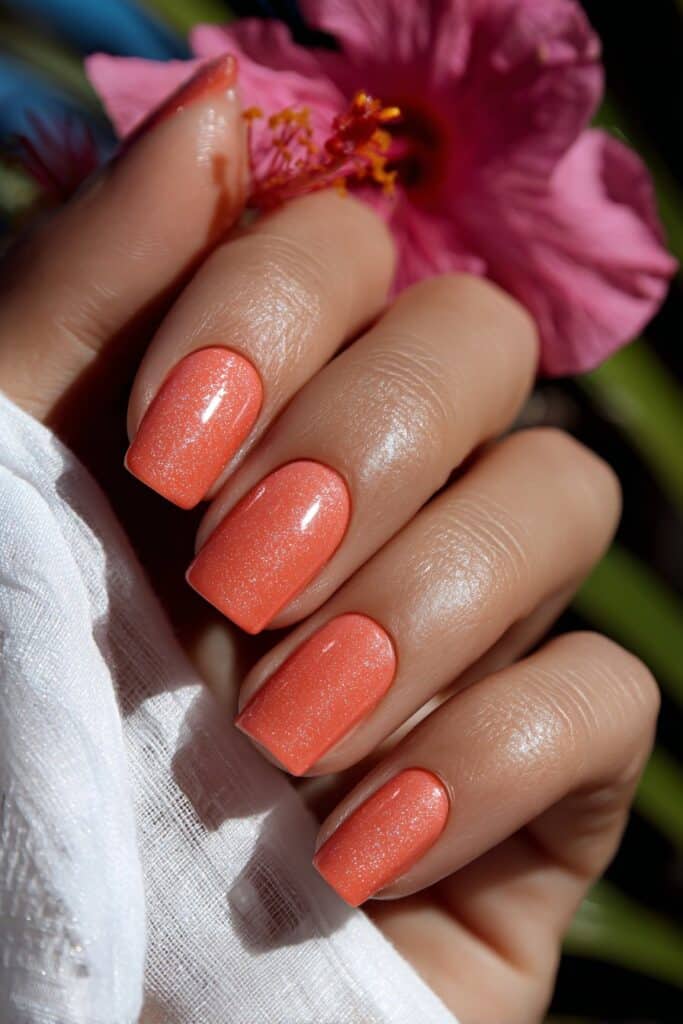
Inspiration from warm tropical sunsets and sun-drenched afternoons
Coral is the shade of May that makes everyone look like they just returned from a gorgeous trip somewhere warm and sun-filled. I personally reach for coral the moment the temperature starts climbing because it is one of those colors that flatters every skin tone beautifully. Sun-kissed coral nails are bold without being overwhelming, and they pair perfectly with gold jewelry and a breezy outfit. The look I love for May specifically is a glossy, deep coral on the nails with just a hint of gold foil or shimmer detail along one edge — it catches the light like the sun dancing on the water. Confidence is what this design is all about, and honestly, there is nothing like a bright coral nail to make you feel ready for anything.
Tools needed to create the nail design
You will need a vibrant coral nail polish, a gold foil sheet or gold leaf flakes, a gel base and top coat or regular base and top coat, a small pair of tweezers, and a soft brush to press the foil into place.
Step by step guide to create the nail design
- Apply your base coat, then layer on two even coats of coral polish, letting each coat dry fully before adding the next.
- While the last coat is still slightly tacky, use tweezers to place small irregular pieces of gold foil or gold leaf along one edge or the tip of the nail.
- Press the foil gently with a soft brush to help it adhere, then carefully remove any excess pieces with the tweezers.
- Seal with a shiny top coat, making sure to cap the edges to prevent chipping and extend the life of your beautiful coral moment.
Lavender Dream Nails

Inspiration from fields of lavender in full bloom
There is a reason lavender is the color of the season. Every May, I watch this shade take over and honestly, I am never upset about it. Lavender dream nails are soft, dreamy, and impossibly chic. The inspiration comes from those sweeping fields of purple lavender that bloom in late spring — there is a serenity and beauty to that image that translates perfectly onto nails. I love this shade on long nails especially because it has an almost ethereal quality, like your hands belong in a fairy garden. For this design, I keep things simple — a perfectly applied lavender base with a soft shimmer or a subtle French tip in white or lilac. Sometimes the most beautiful nails are the ones that do not try too hard.
Tools needed to create the nail design
You will need a lavender polish (either matte or shimmer depending on your preference), a white or lilac shade for the tip if you are going French style, a fine liner brush, base coat, and a glossy or matte top coat.
Step by step guide to create the nail design
- Apply your base coat, then paint two even coats of lavender, ensuring full opacity and smooth application.
- If you are adding a French tip detail, use a thin liner brush to paint a soft, curved line of white or lighter lilac across the tip of each nail.
- For a shimmer finish, apply a coat of lavender shimmer polish over the base before sealing for an added dimension of light.
- Finish with your preferred top coat — matte gives an ultra-modern vibe while glossy keeps it timeless and polished.
Mint Fresh Nails With Golden Thin Foil

Inspiration from cool spring breezes and fresh garden herbs
Mint green is one of those colors that just feels clean and alive the moment you put it on. I remember painting mint nails for a client who was heading to a spring outdoor event and she kept looking at her hands and grinning the entire time. That is the magic of mint — it is refreshing, unexpected, and quietly cheerful. For May, I love combining mint green with white Golden Foil designs or simple geometric lines that feel modern and editorial. This is not your grandmother’s nail color — mint in its current form is bold, intentional, and very now. Whether you go for a full-coverage mint or a minimalist negative space look with mint accents, this color is a May must-have.
Tools needed to create the nail design
You will need a mint green polish, white nail art pen or thin brush, a striping brush for lines, clear or white base coat, and a top coat to finish.
Step by step guide to create the nail design
- Apply a white base coat for the brightest mint payoff, then layer on two coats of your mint green, allowing each to dry.
- Using a white nail art pen or fine brush, draw thin diagonal or geometric lines across one or two accent nails for a modern negative space effect.
- Keep the remaining nails solid mint or add a simple Thin Foil detail at the cuticle area using a dotting tool for extra visual interest.
- Seal everything with a high-shine top coat and you have a look that is effortlessly cool and very much on trend for the season.
Daisy Field Nails

Inspiration from cheerful daisies scattered across spring lawns
Daisies are my happy flower. They are simple, they are joyful, and they never feel overdone. Daisy nails have been a staple of the spring season for a while now and I honestly never get tired of them because there are so many ways to reinterpret the design. For May, I love doing daisies on a yellow or soft white base — it gives the whole look a sunshine energy that feels completely in step with the season. The daisies themselves can be tiny and delicate for a more refined finish, or large and graphic for something bolder. I usually mix both on a set — a large daisy accent nail and smaller scattered petals on the others — and the result is always stunning. This is the design I reach for when I want to feel genuinely happy.
Tools needed to create the nail design
You will need a white or soft yellow base polish, white and yellow polish for the daisy petals and centers, a small dotting tool, a fine nail art brush, top coat, and a steady hand or a nail stamping plate if you prefer.
Step by step guide to create the nail design
- Apply your base color — white or pale yellow — and allow it to dry thoroughly before beginning the daisy work.
- Use a small dotting tool to create a circle of white dots around a central point on the nail, each dot representing a petal, pressing with even pressure for consistency.
- Add a yellow dot in the center of each daisy cluster, and if you want extra dimension, use a slightly darker yellow or orange for depth in the center.
- Seal with a glossy top coat to make those petals really pop and give the whole design a fresh, lively finish.
Watercolor Bloom Nails

Inspiration from soft watercolor paintings and botanical art prints
One of my absolute favorite nail aesthetics is the watercolor effect — it is artistic, romantic, and looks genuinely handcrafted. Watercolor bloom nails for May are inspired by those loose, impressionistic botanical paintings you find in vintage flower shops or art print stores. The technique involves diluted polish or carefully layered sheer colors that bleed softly into each other, creating a wash of color that feels painterly rather than precise. I love this look for anyone who wants their nails to feel like wearable art without committing to something too intricate. The beauty is in the imperfection — every nail looks slightly different, and that is exactly the point.
Tools needed to create the nail design
You will need sheer or diluted nail polishes in soft floral tones like blush, peach, and lilac, a wide flat brush or fan brush, nail polish remover to thin the polish if needed, a white base coat, and a top coat.
Step by step guide to create the nail design
- Start with a clean white base coat so the watercolor tones show up as soft and luminous as possible on the nail.
- Apply sheer strokes of your chosen colors using a flat or fan brush, working quickly and overlapping slightly while still wet to let the colors merge naturally.
- Allow the layers to dry and then add a slightly deeper tone in one area of each nail to create the impression of shadow and depth, like a real watercolor painting.
- Seal with a matte top coat for that authentic, paper-like finish, or use a glossy top coat if you prefer a more polished end result.
Garden Party Nails

Inspiration from elegant outdoor celebrations surrounded by blooms
Every May, I think about garden parties — those beautiful outdoor events with floral tablecloths, champagne, and everyone dressed in their most elegant pastels. Garden party nails are designed to complement exactly that kind of occasion. This design is elevated and detailed — think a soft neutral or blush base with hand-painted florals, gold accents, and maybe a single jewel or pearl detail on the ring finger. It is the kind of nail set that makes your hands look like they belong in a lifestyle magazine. I love creating this look for weddings, spring celebrations, or honestly any occasion where you want your nails to feel special and curated. A little extra effort goes a very long way here.
Tools needed to create the nail design
You will need a soft blush or nude base, gold nail paint, a fine detail brush, small nail gems or micro pearls, a dotting tool, nail glue or gel top coat to secure embellishments, and a final top coat.
Step by step guide to create the nail design
- Apply your blush or nude base in two even coats, letting each coat cure or dry completely before moving forward.
- Using a fine brush, paint delicate floral designs in soft white or pink on two or three nails, keeping the designs airy and light rather than heavy.
- Add thin gold lines, dots, or borders around the florals using your gold nail paint for a touch of elegance and luxury.
- Apply micro pearls or tiny gems on one accent nail using nail glue or a gel layer, seal everything with a durable top coat, and step out looking absolutely party-ready.
Tropical Sunset Nails

Inspiration from vibrant sunsets over warm, tropical horizons
May is the beginning of that warm, sun-soaked energy that I personally live for, and nothing captures that feeling better than a tropical sunset nail design. This look is inspired by those vivid, multi-colored sunsets that paint the sky in oranges, hot pinks, corals, and purples — it is bold, joyful, and unabashedly vibrant. I love doing this as a gradient that sweeps from a warm yellow at the base of the nail to a deep magenta or violet at the tip, with the colors blending together in the middle like a real sunset. You can add tiny palm silhouettes on an accent nail or keep it pure gradient — both versions are absolutely stunning.
Tools needed to create the nail design
You will need yellow, orange, coral, hot pink, and purple polishes, a makeup sponge for blending, a white base coat, nail art pen for any silhouette details, and a glossy top coat.
Step by step guide to create the nail design
- Apply a white base coat to ensure your sunset colors appear as vivid and saturated as possible against the nail.
- Paint bands of yellow, orange, coral, and pink onto your sponge in overlapping strips, then dab the sponge onto the nail to transfer the gradient, repeating two to three times for opacity.
- Add a strip of deep purple or magenta at the tip using the sponge or a brush, blending it softly into the pink for a seamless sunset transition.
- If desired, add a tiny palm tree or horizon silhouette on one accent nail using a black nail art pen, then seal the entire set with a high-gloss top coat.
Soft And Dreamy Nails with Spring Accents

Inspiration from minimalist spring aesthetics and clean beauty trends
Sometimes the most powerful statement is a quiet one. Soft nude nails with spring accents are for the person who loves a refined, understated look but still wants to nod to the season. I am a huge advocate for this style because it works on everyone — every skin tone, every nail length, every occasion. The approach is simple: a beautiful, perfectly applied nude base that complements your skin tone, with one or two tiny spring details added for personality. Maybe it is a single small flower on one nail, or a thin gold line along the edge, or a cluster of micro pearls near the cuticle. The minimalism is the point, and within that restraint, every small detail becomes incredibly intentional and beautiful.
Tools needed to create the nail design
You will need a nude polish that complements your skin tone, a fine detail brush, gold or white nail art pen, a dotting tool, optional micro pearls, and a high-shine top coat for that clean, polished finish.
Step by step guide to create the nail design
- Apply your nude base in two thin, even coats, ensuring there are no streaks or uneven areas — precision matters most with this look.
- On one or two accent nails, add a very small, delicate detail using your nail art pen — a single tiny flower, a thin curved line, or a few strategically placed dots.
- If using pearls, secure one or two near the base of one nail using gel top coat or nail glue, keeping the placement intentional and not overcrowded.
- Seal everything with a glossy top coat and spend a moment buffing your nails before you start so the final result looks completely smooth and professional.
Rainbow Swirl Nails
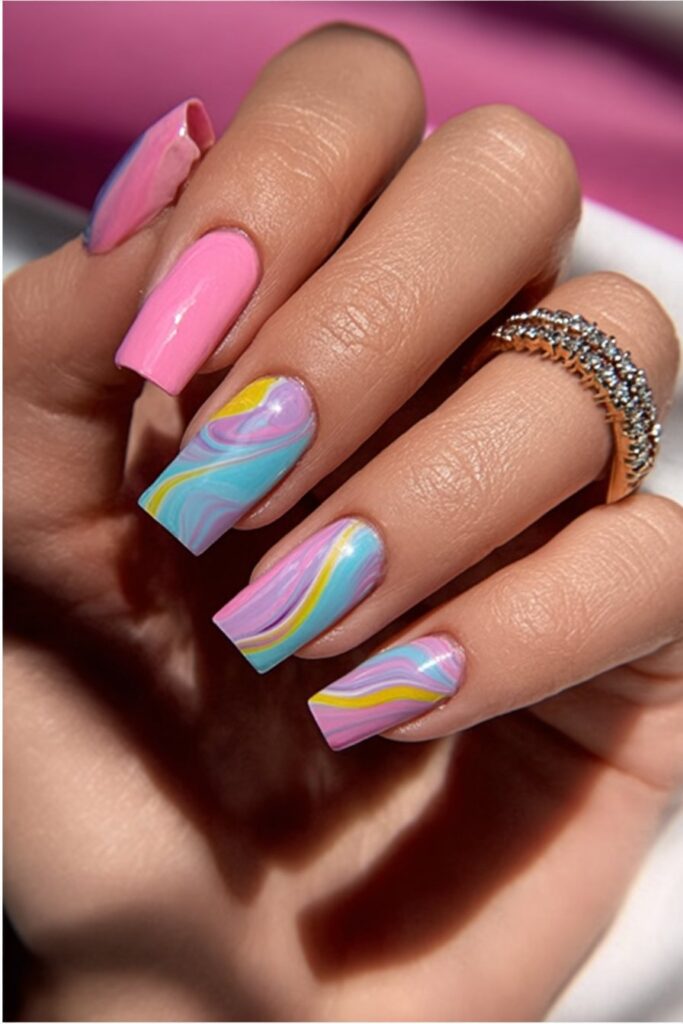
Inspiration from playful abstract art and the joyful colors of spring
Rainbow swirl nails are pure, unapologetic fun — and May is absolutely the right time for them. The inspiration comes from abstract art, the kind you find in a modern gallery where color and movement take center stage without any single element dominating the composition. Swirl nails are created using a marbling technique where polishes are swirled together while wet to create fluid, organic patterns across the nail. Each nail comes out slightly different, which is what makes the set so visually dynamic and exciting. The rainbow version uses every color of the spectrum — red, orange, yellow, green, blue, violet — swirled together in soft, flowing lines on a white base. It is maximalist, joyful, and guaranteed to get compliments.
Tools needed to create the nail design
You will need a white base polish, multiple rainbow-colored polishes, a thin swirling brush or toothpick, a top coat, liquid latex or nail tape to protect the skin around the nails, and acetone for cleanup.
Step by step guide to create the nail design
- Apply a thick white base coat and while it is still slightly wet, drop small amounts of different colored polishes onto the nail in loose clusters.
- Using a toothpick or thin brush, drag through the colors in soft, curving strokes to create the swirl effect, working quickly before the polish dries.
- Repeat the swirling in different directions until you achieve a fluid, organic marble-like pattern that feels dynamic and alive.
- Once dry, clean up any mess around the nails with acetone and a brush, then seal with a glossy top coat that will amplify the vibrancy of each color.
Vintage Botanical Nails

Inspiration from antique botanical illustrations and pressed flower art
The last look on this list is one of my personal favorites and arguably the most artistic of the fourteen. Vintage botanical nails draw their inspiration from those beautiful antique illustration books — the ones with meticulously detailed drawings of plants, leaves, and flowers rendered in earthy, muted tones. The palette here leans into sage, terracotta, dusty rose, cream, and deep forest green rather than the bright spring pastels of other May designs. The overall effect is intellectual, artistic, and deeply sophisticated. I love this look for clients who want something that feels elevated and different from the typical spring florals. It is the nail design equivalent of finding a beautiful old book in a secondhand shop — thoughtful, layered, and full of character.
Tools needed to create the nail design
You will need a cream or off-white base, muted earth-toned polishes in sage, terracotta, dusty rose, and forest green, a very fine detail brush, a brown or dark green nail art pen for outlines, and a matte top coat for that antique, vintage finish.
Step by step guide to create the nail design
- Apply your cream or off-white base and allow it to dry fully before beginning any illustration work on the surface.
- Using your fine detail brush, paint elongated leaves, botanical stems, and simple illustrated flowers in muted sage and forest green across the nail, leaving intentional white space for an airy feel.
- Add dusty rose or terracotta color to the flower petals and use your dark brown pen to draw thin, precise outlines around each element for that authentic illustrated botanical look.
- Seal the design with a matte top coat to evoke the feel of painted paper and give the whole look that gorgeous, vintage, pressed-flower quality that makes this nail design truly unforgettable.
Conclusion
As I sit here looking at all fourteen of these May nail designs, I feel exactly the same way I did that morning in my studio with Luna at my feet — completely in love with this season and everything it makes possible. May nails are not just about color or design; they are about how you want to feel when you step into the world. Whether you are drawn to the quiet elegance of soft nude with spring accents, the bold joy of rainbow swirls, or the artistic depth of vintage botanical designs, there is something on this list for every version of you.
What I want you to take away more than any specific technique or color combination is this — your nails are a form of self-expression, and there is no wrong way to use them. I have always believed that makeup and beauty, including nails, are tools for amplifying who you already are. They are not about covering something up or following a trend blindly. They are about choosing something that makes you feel confident, creative, and empowered to show up as your most authentic self.
May is a month of new beginnings. The flowers are blooming, the days are getting longer, and there is this beautiful, collective exhale that happens as the world moves fully into spring. Let your nails be part of that celebration. Try a design you have never attempted before. Use a color outside your usual comfort zone. Take your time with the process — because the act of creating something beautiful, even something as small as a nail design, is a quiet act of self-love.
I hope these fourteen ideas inspire you to get creative this May. Whether you are doing them yourself at home or bringing this article to your next salon appointment as inspiration, know that every single one of these looks was chosen with care and genuine excitement. And if you ever feel stuck or unsure where to begin, start with the design that made you smile the widest when you first read about it. That is always your answer.
Happy May, beautiful — now go paint something wonderful.