May is honestly one of my favorite months to get creative with nails. There is something about the shift in the air — the blooming flowers, the warmer breeze, and that fresh sense of possibility — that just makes me want to paint the world on my fingertips. And if you have been following my beauty journey for a while, you know that almond nails hold a very special place in my heart. They are elegant, flattering on virtually every hand shape, and give you just enough canvas to play with without going too dramatic. I remember the first time I shaped a client’s nails into almonds for a spring shoot — she looked at her hands and literally gasped. That shape has a way of making everything feel more refined, more intentional, more beautiful.
So today, I am sharing 14 of my absolute favorite almond nail ideas for May. Each one is unique, wearable, and packed with personality. Whether you are heading to a garden brunch, a casual weekend hangout, or just want your everyday nails to feel a little more elevated, there is something here for every mood and every vibe.
Soft Lavender Floral Almond Nails

There is something about lavender that feels perfectly made for May. It is soft, it is romantic, and it carries this dreamy quality that I am completely obsessed with. When I do lavender floral almond nails on a client, I always see their face light up because it feels both feminine and fresh without trying too hard.
Inspiration from soft spring garden blooms
My inspiration for this look came from walking through a garden early one morning, when the light was still golden and the lavender bushes were swaying gently. I wanted to capture that feeling — the softness, the calm, the sense of things coming into bloom. Delicate hand-painted florals in white and lilac over a sheer lavender base give this design that ethereal, just-woke-up-in-a-garden energy. It is the kind of look that feels like a poem on your fingertips.
Tools needed to create the nails design
You will need a lavender gel or regular polish as your base, a fine nail art liner brush for the florals, white and soft lilac nail paint for detailing, a dotting tool for flower centers, and a high-shine top coat to seal everything beautifully.
Step by step guide to create nails design
- Apply two coats of lavender base polish and let it cure fully before any art work begins.
- Using your fine liner brush dipped in white, paint small five-petal flowers scattered across each nail, varying their sizes for a natural look.
- Add tiny lilac dots in the center of each flower using your dotting tool for dimension.
- Seal with a glossy top coat and finish with a drop of cuticle oil for that polished glow.
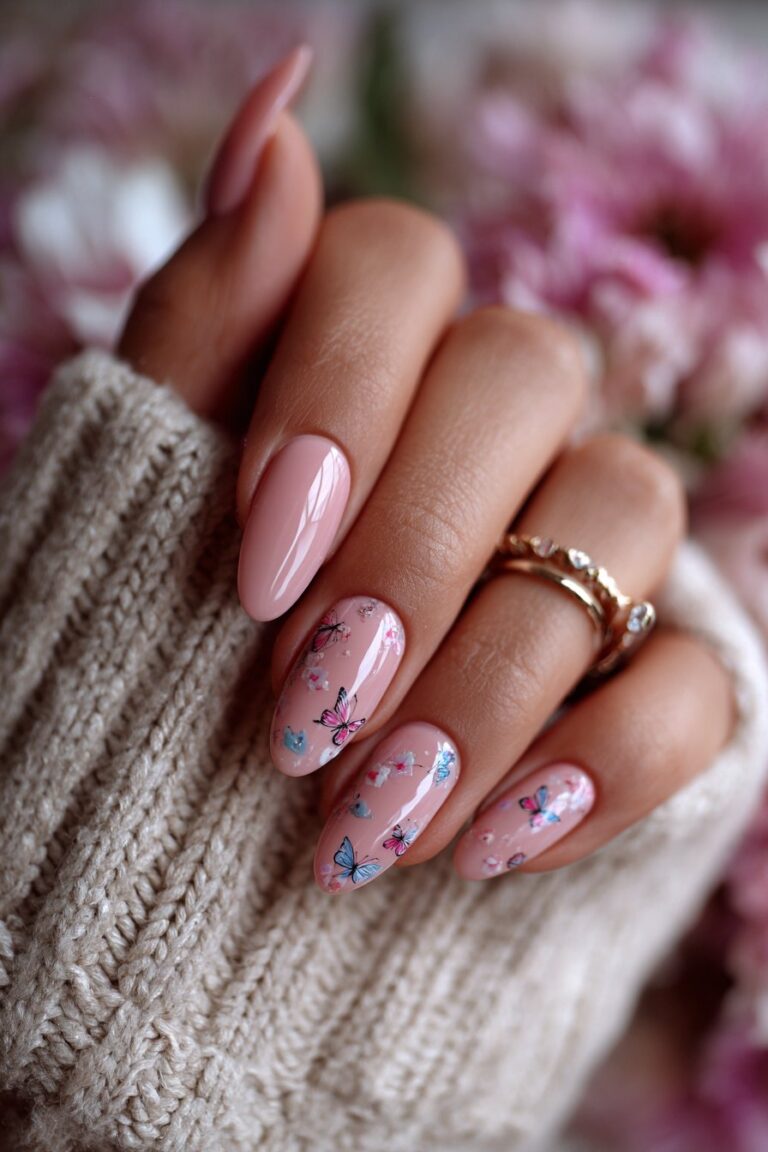
Butterfly Almond Nails

Butterflies are having their moment every May, and honestly, I am here for it every single time. There is a symbolism to butterflies that I personally connect with — transformation, beauty, and the courage to become something new. I painted my own nails with this design before a major beauty event one year, and I could not stop staring at my hands the entire evening.
Inspiration from delicate wings in bloom
The inspiration here is all about the magic of metamorphosis. Imagine a warm nude base — think the color of bare skin with the softest hint of warmth — adorned with iridescent butterfly wing details on the accent nails. The wings catch the light differently depending on the angle, which makes them feel alive and in motion. This design is minimal enough to be work-appropriate but special enough to make a real impression.
Tools needed to create the nails design
You will need a nude base polish in your preferred skin-matching tone, an iridescent or holographic nail foil, nail glue or foil transfer gel, a small flat brush for pressing the foil, and a matte or glossy top coat depending on your final finish preference.
Step by step guide to create nails design
- Apply your nude base and allow it to dry completely before adding any design elements.
- Apply a thin layer of foil transfer gel on the accent nails and wait until it turns slightly tacky.
- Gently press the iridescent foil onto the nail and peel it back in one swift motion to reveal the wing-like pattern.
- Seal with top coat and use a fine brush to add delicate antennae details in black or gold if desired.
Pastel French Tip Almond Nails

I have given the classic French tip so many makeovers in my career, but the pastel version for May is the one I keep coming back to. It is the kind of nail that photographs beautifully, feels polished in real life, and never, ever gets old. I once did an entire bridal party in this style and the photos were absolutely stunning.
Inspiration from modern bridal elegance
My inspiration for pastel French tips comes from the idea of updating something timeless. The original French tip is clean and crisp, but when you replace that stark white with a wash of baby pink, mint, peach, or sky blue, it transforms into something softer and more current. Mix and match different pastel shades across each finger for a playful yet cohesive look that feels very May.
Tools needed to create the nails design
You will need a sheer or milky nude base coat, a selection of pastel nail polishes in your chosen shades, French tip guides or nail tape for clean lines, a thin brush for freehand application, and a glossy top coat.
Step by step guide to create nails design
- Apply the milky nude base across all nails and let it dry completely before proceeding.
- Place French tip guides near the smile line of each nail and paint the tips with your chosen pastel shades, using a different color for each finger.
- Remove the guides slowly while the polish is still slightly wet for the cleanest edge possible.
- Finish with a glossy top coat to blur the line slightly and give that seamless modern French tip effect.
Rose Gold Glitter Almond Nails

If there is one client request I get every single May, it is something that involves rose gold. And honestly, I totally understand why. Rose gold is warm, it is glamorous, and it has this special quality of making hands look luminous. When you pair it with glitter on an almond shape, the result is pure magic.
Inspiration from golden hour sunsets
Everything about this look is inspired by the sky right before the sun dips below the horizon — that warm, glowing, pink-gold light that makes everything look cinematic. I use a rose gold glitter gel that catches every light source beautifully, layered over a warm nude base so it does not feel too heavy or costume-y. This is the nail you wear when you want to feel like the most radiant version of yourself.
Tools needed to create the nails design
You will need a warm nude base polish, a rose gold chunky glitter polish or gel, a fine detailing brush, an ombre sponge for gradient glitter application, and a thick no-wipe top coat to smooth out any texture.
Step by step guide to create nails design
- Apply the warm nude base and cure or dry fully before beginning the glitter work.
- Dab rose gold glitter polish onto a sponge and gently press it from the tip down, building up the intensity toward the free edge.
- Layer two to three passes of glitter for maximum sparkle without losing the gradient effect.
- Seal with a thick top coat applied in multiple coats to bury the glitter and create a smooth, glass-like finish.
Mint Green Daisy Almond Nails

Mint green is one of those colors that I discovered relatively recently for nails, and now I cannot imagine spring without it. It is fresh, it is cheerful, and when you add hand-painted daisies on top, it becomes an entire mood. I wore this exact design to a garden-themed event one May and the compliments were absolutely endless.
Inspiration from wildflower meadows in spring
There is a kind of joy in wildflowers that I have always admired — the way they grow freely, without rules or structure, just full of life and color. Mint green nails with hand-painted white and yellow daisies capture that exact energy. I like to paint the daisies slightly off-center and overlapping, as if they have just tumbled onto your nails straight from a meadow.
Tools needed to create the nails design
You will need a mint green base polish, a fine nail art brush for petal details, white and yellow polish for the daisies, a small dotting tool for pollen centers, and a glossy top coat to make the florals pop.
Step by step guide to create nails design
- Apply two even coats of mint green and allow to dry completely before starting the floral work.
- Using your fine brush and white polish, paint five elongated petals per flower on one or two accent nails, keeping the strokes light and even.
- Add a yellow dot cluster in the center of each daisy with your dotting tool for that realistic wildflower look.
- Top coat generously to smooth and seal, giving the entire design a fresh, lacquered finish.
Peachy Ombre Almond Nails

Peachy ombre is my go-to recommendation for anyone who tells me they want something beautiful but low-key. It is the nail equivalent of effortless beauty — that kind of look where people assume you spent a lot of time when really the technique is surprisingly approachable. May is the perfect month for peach because it mirrors the warmth of the season without being too bold.
Inspiration from soft sunrise tones
My inspiration here is the sky in the very first minutes of dawn — that gradual transition from pale cream to warm apricot to soft coral. Translated onto an almond nail, this ombre effect feels incredibly natural, as if the color is just part of your skin. I love pairing this with a hint of shimmer in the darker end of the gradient for extra depth and dimension.
Tools needed to create the nails design
You will need a sheer cream base, two to three peach-toned polishes ranging from light to deep, a makeup sponge cut into small pieces, nail polish remover and cleanup brush for the edges, and a glossy or satin top coat.
Step by step guide to create nails design
- Apply your cream base and let it cure, as this will give the ombre something to grip onto and keep it looking clean.
- Paint two or three stripes of your peach shades side by side on the sponge so they are slightly overlapping at the center.
- Dab the sponge onto the nail with a gentle bouncing motion, building up the gradient in thin layers.
- Clean up the edges with a brush dipped in remover, then seal with top coat for a seamless blended effect.
White Lace Almond Nails

White lace nails feel incredibly romantic and are one of those designs that I consider timeless. Every May, when garden parties and outdoor gatherings start picking up, I find myself doing this design over and over because it is universally loved. There is something about lace on nails that feels like wearable art.
Inspiration from vintage bridal lace textiles
I am absolutely inspired by vintage fabrics for this look — intricate patterns, delicate threading, and that sense of heirloom elegance. On a sheer or milky white base, I use a fine liner brush to recreate lace-like filigree patterns. The trick is to keep the lines thin and the spacing open, so it reads as lace rather than just squiggles.
Tools needed to create the nails design
You will need a sheer white or milky base polish, a very fine nail art liner brush, white nail art gel or polish for the lace details, a steady hand or a nail art stamping kit if you prefer, and a no-wipe top coat to keep the details crisp.
Step by step guide to create nails design
- Build your milky white base in two coats and ensure it is completely smooth and dry before beginning the lace work.
- Using your liner brush with white art gel, start from one corner and draw thin curved lines that branch and connect like a lace pattern.
- Add tiny loops, swirls, and dots to fill in the design, keeping the pattern flowing and organic rather than rigid.
- Seal carefully with top coat, applying it in one smooth stroke to avoid smearing the delicate line work underneath.
Coral Sunset Almond Nails

Coral is the May nail color I recommend most often when someone asks for something vibrant without going full neon. It is warm, it is confident, and it looks stunning against every skin tone I have worked with. When you take coral to an almond shape, it becomes instantly sophisticated.
Inspiration from vibrant tropical horizons
My inspiration for this look comes from the richness of a tropical sunset — deep coral fading into hints of orange and gold at the edges. I like to pair a bold coral base with a subtle golden shimmer at the tips or along the center for that sun-kissed, glowing effect. This is the nail you wear when you want your hands to look like they just returned from somewhere beautiful.
Tools needed to create the nails design
You will need a coral gel or regular polish in a vivid warm tone, a gold shimmer polish for accent work, a fan brush or fine detailing brush, and a glossy top coat to deepen the richness of the coral color.
Step by step guide to create nails design
- Apply two full coats of coral base and ensure even coverage across the entire nail before adding shimmer.
- Dip your fan brush lightly into gold shimmer and sweep it across the center of the nail in a vertical stroke to mimic sunlight.
- Build the shimmer gradually by adding one to two more light passes until you achieve the desired luminosity.
- Seal with a high-shine top coat to bring out the depth of the coral and make the gold accents truly glow.
Baby Blue Cloud Almond Nails

Cloud nails are one of those trends that I fell in love with the moment I first saw them, and baby blue clouds on almond nails feel like wearing a little piece of the May sky on your hands. I have done this look for so many clients over the years and it never fails to create a feeling of pure joy.
Inspiration from open sky daydreaming
There is something profoundly calming about a wide open blue sky with soft white clouds drifting through it. That is exactly the feeling I wanted to bottle up in this nail design. The base is a soft, almost powdery blue — not too saturated, not too pale — and the clouds are built up with white using a dry-brush or sponge technique that creates fluffy, dimensional texture.
Tools needed to create the nails design
You will need a powdery baby blue base, a small piece of makeup sponge for cloud texturing, white nail polish, a fine brush for refining cloud edges, and a glossy or satin top coat depending on whether you want a dreamy matte or classic shine.
Step by step guide to create nails design
- Apply your baby blue base in two smooth coats and allow to dry fully before cloud application.
- Dab a small piece of sponge into white polish and press it onto the lower third of the nail in irregular circular motions to build cloud shapes.
- Layer the white in multiple light dabs to create fluffy, uneven cloud texture rather than flat shapes.
- Seal with your preferred top coat and add tiny star or sun details with a dotting tool if you want extra whimsy.
Sage Green Minimalist Almond Nails

Sage green is a color that feels inherently May to me. It is earthy, it is sophisticated, and it has this quiet confidence that I deeply admire. When I keep the design minimalist — a clean base with maybe a single thin line or a negative space detail — the result is nail art that feels very current and very intentional.
Inspiration from botanical studio aesthetics
My inspiration here comes from the kind of aesthetic you see in a beautifully curated plant shop or a botanical illustration — clean, green, and incredibly refined. I love sage because it bridges the gap between neutral and colorful effortlessly. A single accent nail with a thin gold line or a stamped botanical leaf motif is all this design needs to feel complete.
Tools needed to create the nails design
You will need a sage green gel or regular polish, a thin striping brush, gold nail polish for line details, a leaf-shaped nail stamp and stamping polish if desired, and a matte or glossy top coat based on your preferred finish.
Step by step guide to create nails design
- Apply two coats of sage green base and smooth out any bubbles or brush strokes before proceeding to any accent work.
- On one or two accent nails, use your striping brush and gold polish to draw a single thin vertical or diagonal line down the center of the nail.
- If using a stamp, press the leaf motif firmly onto the nail and lift cleanly to transfer the design.
- Apply a matte top coat for a modern editorial finish or a glossy one for a classic polished look.
Blush Pink Marble Almond Nails

Marble nails are something I have been perfecting for years, and the blush pink version feels tailor-made for May. It is elegant without being cold, which makes it the perfect alternative to traditional white marble. The warmth of the blush base makes marble veining look softer and more romantic.
Inspiration from rose quartz crystal formations
Everything about this design was inspired by rose quartz — that beautiful pale pink stone with its soft inner glow and its subtle veining. I wanted to create the same feeling on a nail: a peachy blush base with delicate white and gold veining that catches the light in unexpected ways. This is truly one of those designs where people always ask if you went to a professional salon.
Tools needed to create the nails design
You will need a blush pink base polish, a thin nail art brush or a toothpick for veining, white and gold nail paint, a small piece of plastic wrap for creating organic texture, and a high-shine glossy top coat.
Step by step guide to create nails design
- Apply your blush pink base in two smooth coats and allow it to dry before starting the marble effect.
- Using a fine brush or toothpick with white nail paint, draw thin diagonal lines across the nail, branching slightly like veins in real stone.
- Add thinner gold veining lines parallel to the white ones to mimic the mineral inclusions found in rose quartz.
- Seal generously with a high-gloss top coat to give the stone-like depth and polish that makes this design so extraordinary.
Golden Foil Abstract Almond Nails

Abstract nail art is something I encourage every single one of my clients to try at least once, because it is completely forgiving and endlessly expressive. Golden foil abstracts on almond nails for May feel luxurious, artistic, and refreshingly unique. No two nails come out exactly alike, which is part of the beauty.
Inspiration from modern fine art expressionism
I am deeply inspired by abstract fine art for this look — bold, intuitive gestures that create beauty through feeling rather than precision. Gold foil pieces scattered across a deep or neutral base create the impression of light catching on a painting. I love pairing this with a dark burgundy, forest green, or even black base so the gold truly pops against the contrast.
Tools needed to create the nails design
You will need a deep base color of your choice, gold foil sheets or flakes, nail adhesive or base gel for foil placement, a silicone tipped cuticle pusher or orange stick for pressing, and a no-wipe gel top coat to seal without disturbing the foil.
Step by step guide to create nails design
- Apply your chosen deep base and cure or dry completely before any foil work begins, as adhesion is crucial for this design.
- Apply small dots of nail adhesive across the nail in an abstract, irregular pattern and wait until the adhesive becomes tacky.
- Press small pieces of gold foil onto the sticky areas and remove gently to reveal the metallic transfer.
- Seal with a no-wipe gel top coat in a single smooth pass to keep the foil secure and give it that gallery-worthy finish.
Cherry Blossom Almond Nails

Cherry blossoms are perhaps the most iconic symbol of spring, and every May I find myself wanting to bring them to life on my nails. There is something deeply beautiful and slightly melancholic about cherry blossoms — they are magnificent but fleeting, which makes them feel even more precious.
Inspiration from Japanese sakura season beauty
My inspiration for this design comes from the breathtaking tradition of appreciating cherry blossom season — that cultural moment of pausing to acknowledge beauty in its most temporary form. On a soft white or pale grey base, I paint delicate pink blossoms with five petals each, clustered together with tiny branches reaching across the nail. It is painterly, it is poetic, and it is one of my most requested May nail designs.
Tools needed to create the nails design
You will need a white or pale grey base, a fine nail art liner brush, light pink and deep rose nail paint for petal dimension, a tiny dotting tool for stamen details in yellow or gold, and a glossy top coat to bring the florals to life.
Step by step guide to create nails design
- Apply your pale base in two coats and ensure a perfectly smooth surface before beginning the cherry blossom detail work.
- Using your liner brush and light pink, paint small five-petal flower clusters, starting from the outer petals and working inward, on one or two accent nails.
- Add depth by brushing a slightly deeper rose pink at the base of each petal to create a gradient effect within the flower.
- Use your dotting tool to add tiny yellow or gold dots in the flower centers and finish with a glossy top coat for a fresh, luminous result.
Dusty Rose Negative Space Almond Nails

I saved what I personally consider one of the most sophisticated May nail designs for last. Negative space nail art is something I am genuinely passionate about because it takes confidence to leave part of your nail bare and let that emptiness become part of the design. Dusty rose combined with negative space on almonds is the perfect balance of modern and feminine.
Inspiration from contemporary minimalist nail art
My inspiration here comes from the world of contemporary art and design — the idea that what you choose not to include can be just as powerful as what you do. A soft dusty rose polish placed strategically on the nail, leaving deliberate bare patches at the cuticle, sides, or center, creates a design that looks architectural and intentional. I love adding a single thin gold line at the boundary between color and skin to make the negative space feel deliberate rather than accidental.
Tools needed to create the nails design
You will need a dusty rose gel or regular polish, nail tape or liquid latex for masking negative space sections, a thin striping brush for gold line accents, gold nail polish, and a glossy or matte top coat depending on the finish you prefer.
Step by step guide to create nails design
- Apply liquid latex or place nail tape along the sections of the nail you want to keep bare and allow it to adhere fully before applying polish.
- Apply dusty rose polish over the exposed areas of the nail in smooth, even strokes, covering right up to the edge of your tape or latex.
- While the polish is still wet, carefully remove the tape to reveal the crisp negative space lines beneath.
- Use your striping brush and gold polish to add a thin accent line along the edge of the colored section, then seal with top coat for a refined, gallery-quality finish.
Conclusion
I have genuinely loved walking you through every single one of these designs, and I hope you felt my excitement through each description because this is truly one of my favorite topics to talk about. Almond nails are more than just a shape to me — they are a statement of intention. When you choose an almond shape, you are choosing something that says: I care about how I present myself, and I am not afraid to be beautiful.
May is the perfect month to experiment because the season itself is an invitation to bloom. The colors, the textures, the patterns — everything that May offers in nature can translate directly onto your nails in the most breathtaking ways. Whether you gravitated toward the romantic cherry blossoms, the bold coral sunset, the chic negative space, or the playful daisy design, know that the most important ingredient in any nail look is confidence.
I have worked with so many clients over the years who sat down in my chair and said “I don’t know, maybe something simple.” And by the time we got talking, by the time we looked at references together and I understood what they truly felt inside, we always landed on something that made their whole face light up. That is the magic of nail art — it is a form of self-expression that you carry with you everywhere, on the ends of your very own hands, visible to you every single moment of every day.
My advice to you is this: do not be afraid to try something that excites you. If the gold foil abstract speaks to your soul, go for it. If the pastel French tip feels like the version of you that you want to show the world this May, then that is exactly right. Beauty is not about following trends blindly — it is about finding the trend that aligns with who you are and making it entirely your own.
As I always say, makeup and beauty are not about hiding. They are about amplifying. And the same is absolutely true for nails. Every shape, every color, every brushstroke is a way of saying — here I am, and I am beautiful, and I know it. That is the energy I want you to carry into May and every month that follows.
So file those nails into your perfect almond shape, gather your tools, follow the guides I have shared, and create something that makes you gasp when you look at your hands. Because you deserve that feeling. Every single day.