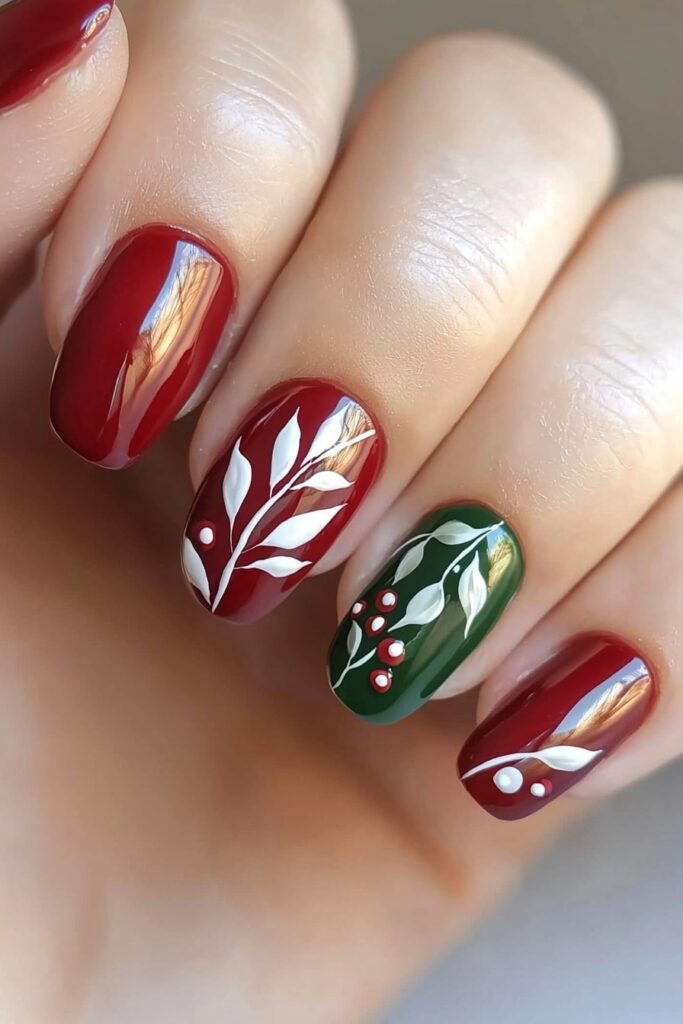
Your nails can become the highlight of every holiday party. Red and green Christmas nail designs create magical holiday spirit, and I’ve witnessed this magic countless times as a professional nail artist.
The collection features 23 stunning designs. These range from beginner-friendly red and green Christmas nails to dazzling glitter creations that will amaze guests at any celebration. My experience with celebrity makeup artist Belle Hathaway during holiday photoshoots has taught me professional techniques. These tricks help create salon-quality results at home, especially with classic red and green french tip nails or more detailed patterns. Each design comes with clear step-by-step instructions that make the process simple.
These festive designs will reshape the scene and turn your nails into perfect holiday accessories. The best part? People will ask you for your nail artist’s contact details, and you’ll get to surprise them – it’s all your own work!
Classic Candy Cane Stripes

The classic candy cane pattern captures the true spirit of Christmas! This design has been a studio favorite, and it never fails to spread holiday cheer. Working with Belle Hathaway on holiday photoshoots taught me that this timeless pattern suits both casual gatherings and glamorous events.
Candy Cane Design Tutorial
A clean base coat is vital for lasting results. Apply two thin coats of white polish to create your canvas. Let it dry (10-20 minutes with a quick-dry top coat), then place striping tape diagonally across your nails. Paint alternating red stripes, remove the tape while the polish remains slightly wet, and voilà!
Candy Cane Polish Recommendations
These products create the perfect candy cane look:
- Base: Cuccio Base Coat for lasting wear
- White: OPI Alpine Snow for crisp stripes
- Red: Revlon’s Real Red for that perfect candy cane shine
- Top Coat: ORLY SEC N’ DRY for quick setting
Candy Cane Application Tips
Perfect stripes depend on timing. A fast-drying top coat between layers prevents color bleeding. Liquid latex around your cuticles (Bliss Kiss is my go-to) makes cleanup easy. Your design needs a quality top coat seal to last up to 7 days.
Pro Tip: New to striping? Practice the pattern on paper first. This approach helped me master my technique early on, and now I test patterns this way before client sessions.
Elegant Holly Berry French Tips
My experience working with Belle Hathaway on celebrity holiday shoots showed me that elegant holly berry French tips strike a perfect balance between sophistication and festive charm. After doing countless red carpet events, I’ve refined this design and can’t wait to share my professional secrets with you!
Holly Berry Design Steps
A sheer base coat comes first, followed by creating your classic French tip with a guide to ensure precision. The free edge needs pure white polish as the initial layer. After it dries, grab a thin brush with green polish to add delicate holly leaves near the tip. The berries make this design special – a dotting tool helps create three perfectly placed red dots that give it that signature holly cluster look.
Holly Berry Color Combinations
These polish combinations never disappoint:
- Traditional: Sheer pink base, snow white tips, forest green leaves, ruby red berries
- Modern Twist: Nude base, pearl white tips, emerald green leaves, metallic red berries
Holly Berry Maintenance Tips
Your holly berry French tips will stay salon-fresh with a quality top coat right after completing the design. Belle taught me that staying away from hot water for 6-8 hours after application is vital for lasting results. The design lasts longer when you apply it before bed – this lets the adhesive set overnight. A top coat on the free edges prevents lifting and chipping.
Pro Tip: Moisturized hands look best, but keep lotions away from the nail art to prevent the design from becoming tacky.
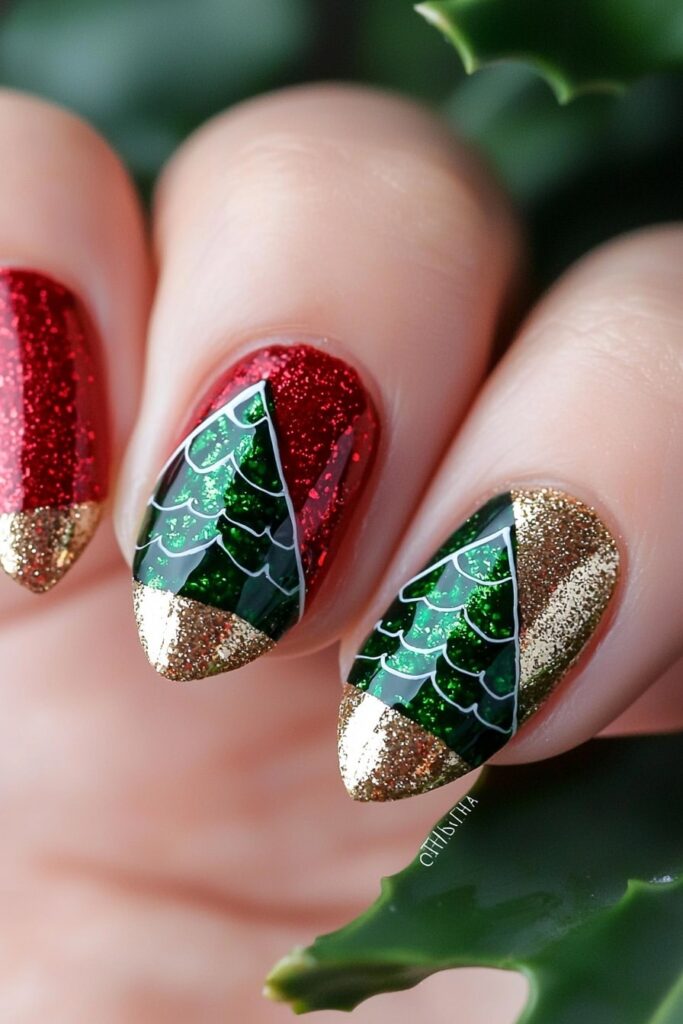
Sparkling Christmas Tree Art
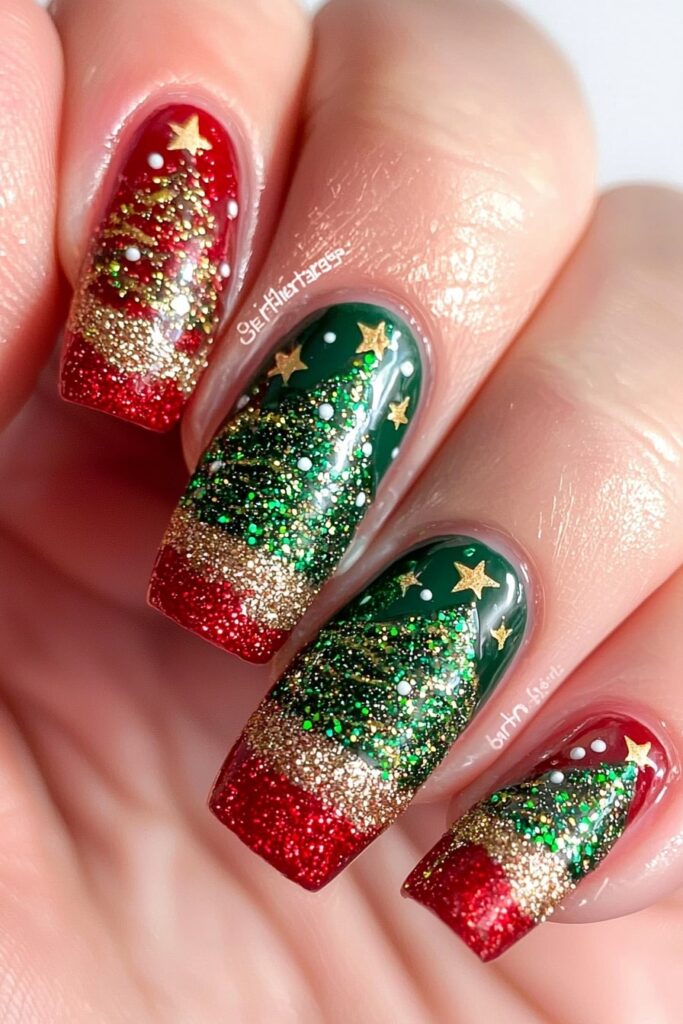
My clients’ eyes light up whenever I create Christmas tree nail art at my studio. I recently worked with Belle Hathaway on a holiday campaign photoshoot, and now I’m excited to share our design secrets with you!
Christmas Tree Design Tutorial
Apply a protective base coat first, then paint your chosen background shade on each nail. Create triangular tree shapes with dark green polish using a thin nail art brush. You should work from the base up and make shorter strokes as you reach the top. Belle taught me that trees of different sizes on each nail make the design look more interesting.
Christmas Tree Embellishments
Add these magical touches while the polish is still slightly wet:
- Gold glitter for a twinkling effect
- Two red dots as ornaments
- A tiny gold star at the top
- Optional white dots for “snow”
Christmas Tree Polish Selection
ORLY’s Mermaid Tale makes an excellent emerald green base. SEA SIREN Mystical Atlantis works great for gradient effects with its gold and turquoise particles. ISADORA Emerald Crush gives your trees a textured effect that sparkles beautifully in the light.
Pro Tip: Your detailed design will stay perfect if you apply the top coat in thin layers. This simple trick has saved many of my red carpet manicures!
Festive Plaid Pattern
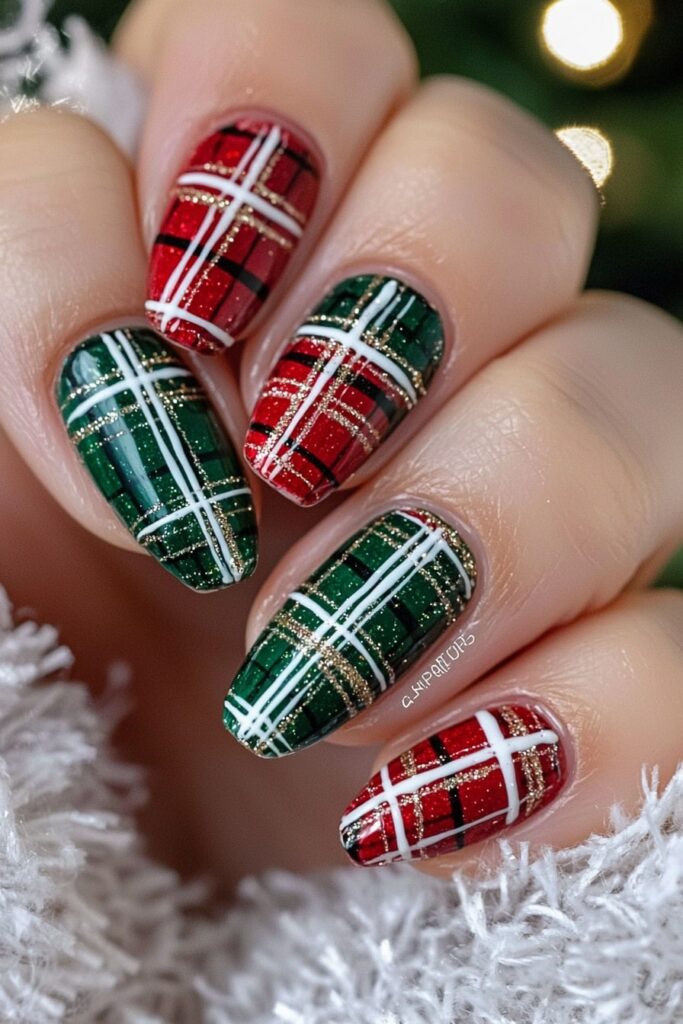
A holiday photoshoot with Belle Hathaway led to creating this beautiful plaid pattern that everyone loved on social media. The classic design adds such a warm, festive touch to holiday looks!
Plaid Pattern Tutorial
Choose a solid base color (red or green). A thin striping brush helps create two horizontal lines in a darker shade. Add a vertical stripe that crosses them. Belle taught me to use a detailing brush for black squares at line intersections. White lines add the final dimensional touch.
Plaid Color Combinations
These festive combinations work beautifully:
- Traditional: Red base with darker red stripes and black accents
- Modern: Forest green base with emerald stripes and gold details
- Chrome fusion: White base with red plaid and chrome accents
Plaid Design Tips
Perfect plaid comes with patience and practice. Paper practice works best – something I learned while working with Belle early in my career. Straight lines come easier by placing a small mark at your nail’s tip as a guide. A matte top coat between layers stops colors from bleeding together.
Pro Tip: New artists should try one or two accent nails before attempting a full set. This builds confidence while creating a beautiful look!
Glittery Ornament Accents
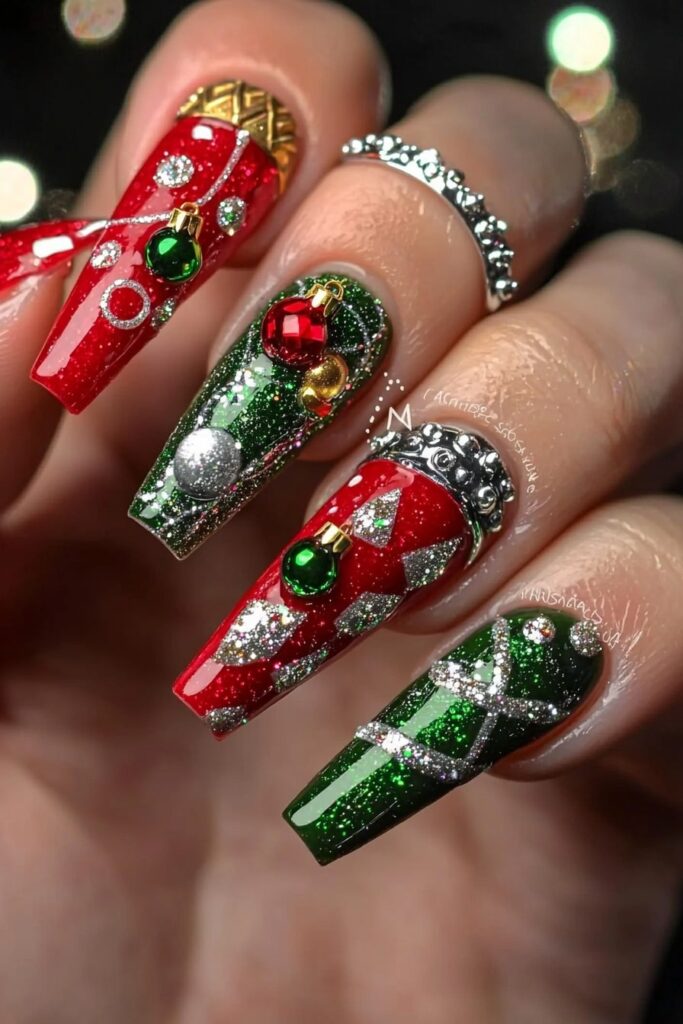
I want to share my favorite holiday nail design from a glamorous Christmas editorial shoot! Beautiful ornament accents need the right balance of sparkle and sophistication.
Ornament Design Steps
A matte base coat works best – my work with Belle Hathaway showed it creates an ideal canvas for 3D ornaments. Your chosen base color should cure for 30 seconds. Perfect circles become ornaments with a dotting tool. Small sections work best when you add dimension through multiple polish layers.
Ornament Glitter Options
These combinations will give your design that show-stopping sparkle:
- Super sparkly chunky glitter for maximum visual appeal
- Iridescent shimmer for subtle elegance
- Metallic foils for a modern twist
Ornament Placement Guide
The design’s success depends on strategic placement. Belle taught me that larger ornaments near the cuticle add depth, while smaller ones at the tip create dimension. Your design needs alternating solid color and glitter ornaments for balance. Each layer should freeze-cure to prevent smudging and keep your design flawless.
Pro Tip: Soft-textured glitter shapes naturally to your nail’s curve. A light application gives the best results!
Peppermint Swirl Design
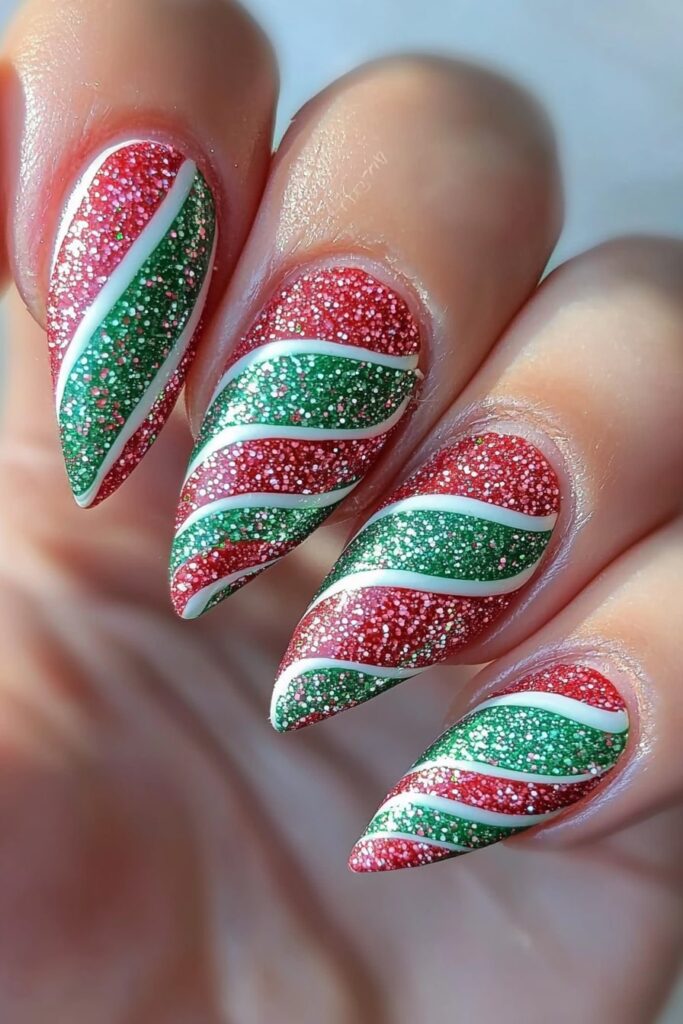
I worked with Belle Hathaway on a holiday magazine shoot recently, and our peppermint swirl design became an instant hit. This festive pattern captures Christmas’s playful spirit and remains doable for DIY enthusiasts.
Peppermint Swirl Tutorial
Mark the center of your nail as your guide. Use a red striper brush to create curved lines from your cuticle to the tip that meet in the middle. The secret is in the curves – they should flow like a candy swirl. Your hands should rest on the table to get the stability you need for perfect curves.
Peppermint Color Selection
A classic candy look needs:
- Pure white base coat for crisp definition
- Bright red for traditional stripes
- Light pink for subtle accent lines
- Clear top coat with shimmer to add festive touch
Peppermint Design Tips
My work with celebrity clients taught me that timing makes all the difference. Add your fast-drying top coat between layers to stop bleeding. Pro tip: A toothpick works best for cleanup around the cuticles – I learned this trick during a rushed red-carpet prep with Belle, and it’s now my trusted solution.
Your design will look more interesting if you alternate the direction of swirls on different nails. This change creates a stunning look, especially with a glossy top coat that makes the design stand out.
Holiday Polka Dots
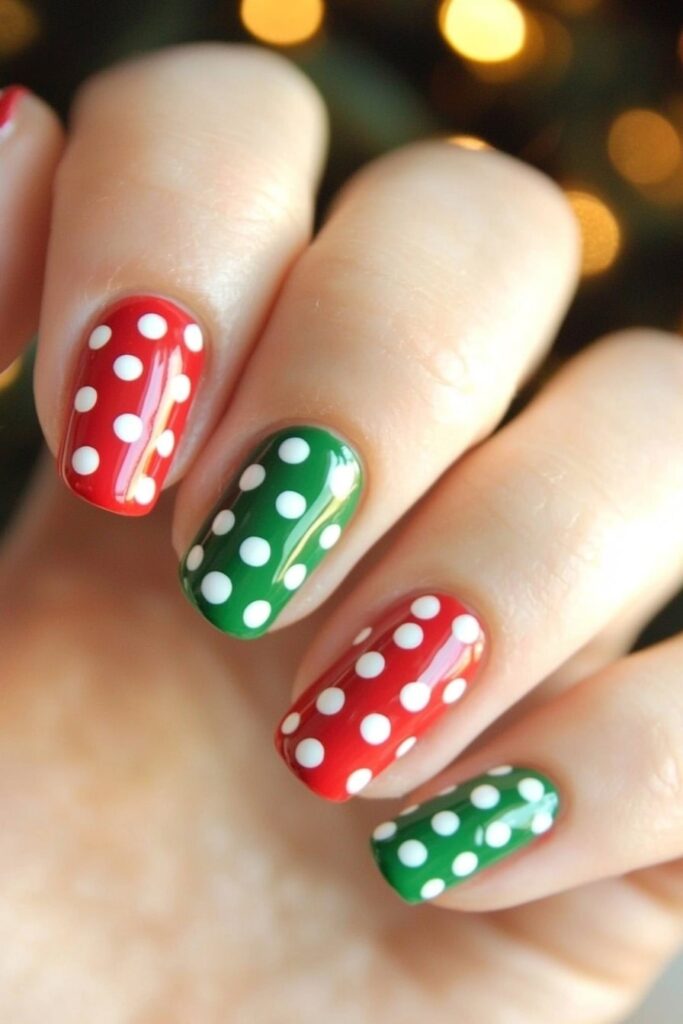
Polka dots are my signature holiday design. Last month’s celebrity holiday campaign with Belle Hathaway showed how these playful dots can become sophisticated festive artwork. Let me share my professional tips to create the perfect holiday polka dot manicure!
Polka Dot Placement
My experience shows that random dotting motions create the most natural-looking pattern. A clean white base works best, followed by alternating red and green dots. The diagonal lines of dots across each nail create a more structured look – this technique became a favorite during our recent holiday photoshoot.
Polka Dot Size Guide
Professional-looking dots depend on size variation. A dual-sided dotting tool helps create:
- Large dots for statement pieces
- Tiny dots for filling spaces
- Medium dots for balance
Polka Dot Color Combinations
Years of practice have led me to these perfect festive combinations:
- Classic: White base with alternating dark green and bright red dots
- Modern: Red base with metallic green dots
- Elegant: Green base with white and red dots
Pro Tip: My work with Belle taught me a valuable secret. A fast-drying top coat between layers prevents color bleeding and keeps dots perfectly round. Your dotting tool needs cleaning between colors to achieve the crispest results!
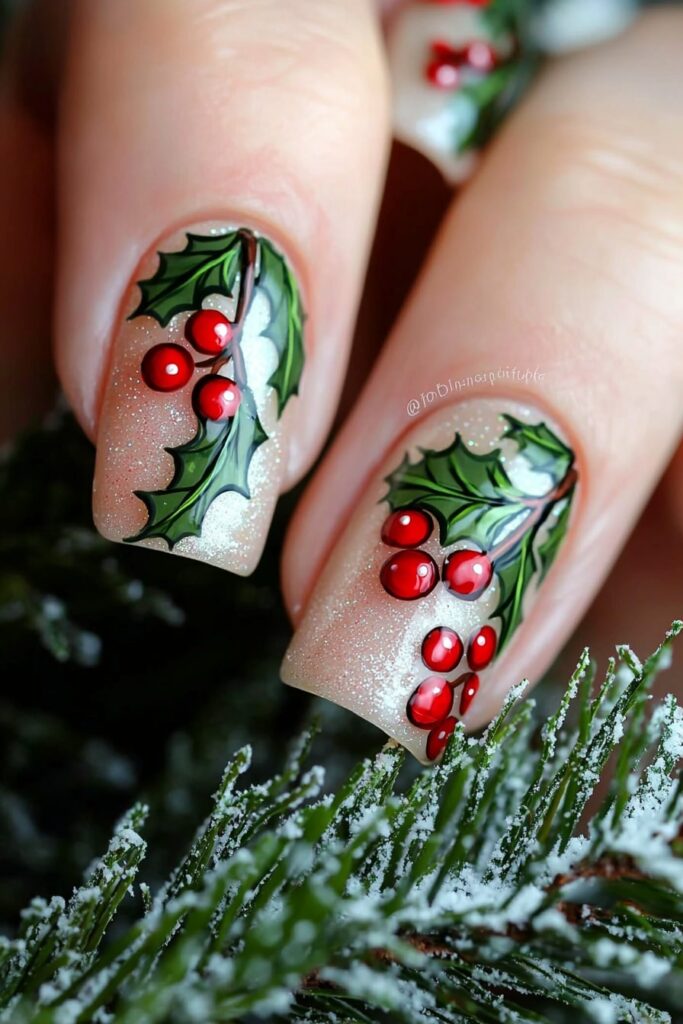
Mistletoe Accent Nails
A celebrity holiday campaign showed me that mistletoe nail art brings together romance and festive charm perfectly. The design I created for Belle Hathaway’s winter photoshoot helped me develop a technique that makes this sophisticated look easy to achieve at home.
Mistletoe Design Tutorial
A sheer nude base creates an elegant foundation. Creating delicate mistletoe leaves needs a thin brush and steady hand. Deep green polish works best to paint small curved lines in pairs. Adding tiny white highlights brings dimension to the design. The berries are the best part – a dotting tool helps create perfect red spheres that shimmer beautifully.
Mistletoe Color Selection
These holiday combinations work best:
- Base: Sheer nude or pink adds sophistication
- Leaves: Forest green with emerald highlights
- Berries: Ruby red with pearl shimmer
- Accents: White creates subtle highlights
Mistletoe Placement Tips
My work with Belle showed that strategic placement is vital. The mistletoe design looks best slightly off-center on accent nails and creates maximum effect. Pro tip: A quick-dry top coat between layers prevents smudging – this technique saved many red carpet manicures! The design lasts longer when you seal the edges with an extra layer of top coat.
Red Velvet Matte Finish

Velvet matte finish nails have become my signature holiday look in the studio. Belle Hathaway asked me to create this style for her winter campaign, and we achieved the perfect balance of sophistication and festive charm.
Red Velvet Application
Creating the perfect velvet effect demands precision. A dip-friendly base coat serves as the foundation, and you should apply the specialized velvet powder while the base remains wet. The secret lies in the technique – shake off excess powder gently and allow it to dry. The magnetic finish requires holding the magnet close to each nail for three seconds without touching the wet polish.
Red Velvet Polish Options
These products create that rich, velvety finish:
- F.U.N Lacquer’s Velvet Matte Collection – perfect for all skin tones
- Safe, 5-free formulas without harmful ingredients
- Quick-dry options with smooth, velvety finish
Red Velvet Maintenance
Pro tip: The matte effect lasts longer if you apply cuticle oil higher than usual. Belle’s photoshoot taught me that powder method works best without base and top coats. Magnetic polish looks need a specialized top coat to seal. The stunning velvet texture stays pristine if you keep hand creams away from the nail surface.
Green Glitter Gradient
My signature technique of creating glitter gradients emerged after a challenging holiday shoot with Belle Hathaway. The dimensional effect caught everyone’s attention at the time the studio lights hit these sparkly creations, and the photographer couldn’t stop raving about it!
Gradient Application Steps
The sponging technique delivers stunning gradients. A makeup sponge works best because its density creates smooth blends. You should apply thin coats of polish to the sponge and start with the darkest green at the tip. Pro tip: Let each layer dry slightly before adding more polish. This prevents smudging and creates clean color transitions.
Glitter Selection Guide
These types of glitter will get you started in thinking about holiday sparkle:
- Chunky glitter to add dimension
- Fine shimmer to create elegance
- Iridescent particles to build depth
- Metallic flakes to enhance drama
Gradient Maintenance Tips
Working through countless celebrity manicures taught me that proper maintenance is a vital part of the process. Multiple thin coats work better than one thick layer – a technique that proved successful during Belle’s winter campaign photoshoot. Your hands should stay dry for the first few hours after application. The tips need an extra layer of top coat every two days. Note that practice builds skill, so don’t feel discouraged if your first attempt isn’t salon-quality!
Christmas Light String Art
My recent collaboration with Belle Hathaway on a holiday special led me to find that Christmas light nail art adds pure magic to festive manicures. The late-night prep for our December cover shoot helped us create this illuminating design that makes nails glow!
Light String Tutorial
A matte base coat creates the perfect canvas for the light string effect. Take a fine liner brush with black gel paint to create curved string patterns on your nail. Pro tip: Small sections work better than one continuous line. Place tiny black dots along the string to mark your light positions.
Color Combinations
These combinations create the perfect festive glow:
- Yellow and purple to maximize brightness
- Blue and green to achieve cool undertones
- Red and white to capture classic charm
Design Placement
Realistic light strings need the right spacing. Belle’s photoshoot taught us that irregular spacing creates a more natural look than evenly arranged dots. Your string should sit slightly off-center to add dimension. A touch of white beneath each colored light makes colors pop in any lighting condition.
Designer’s Secret: Apply the top coat carefully within black lines to seal your design. This technique keeps colors from bleeding and maintains your light string’s crisp outline.
Gingerbread Man Accent
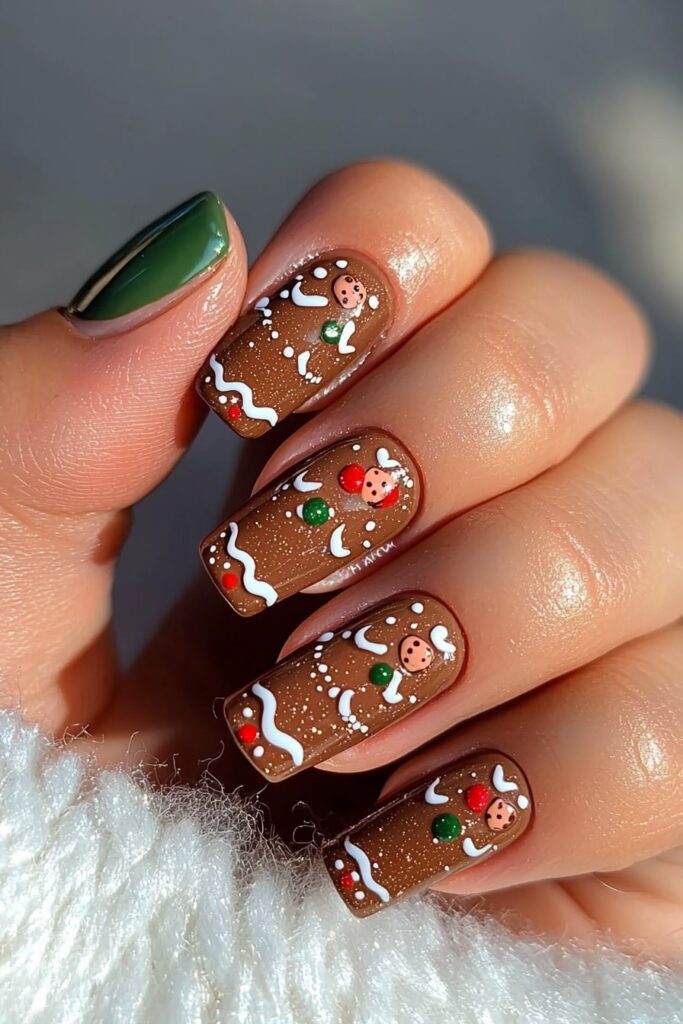
The gingerbread man accent nail design caught my eye at the time I was getting ready for a festive photoshoot with Belle Hathaway last holiday season. This charming design became our favorite holiday creation and added a playful twist to classic red and green Christmas nail art.
Gingerbread Design Steps
Sally Hansen’s bamboo base coat creates the perfect canvas to start with. The soft cookie effect comes alive with Rimmel’s “Shout out loud” as your base color. Pro tip: Two thin coats will give a better result than one thick layer to achieve that authentic gingerbread tone.
Color Selection
My tried and tested gingerbread palette includes:
- Catrice Cucuba that creates the cookie outline
- Rimmel Jazz Funk to add details
- ORLY white striper that produces the icing effect
Detail Work Tips
The details make this design special. Belle’s winter campaign taught me that a simple bow, tiny buttons, and a squiggly icing line along the bottom breathe life into the design. Always work in sections to add the white icing details – this technique prevents smudging and creates clean lines. Designer’s secret: A dotting tool dipped in white polish creates perfectly round buttons that look deliciously realistic!
Geometric Christmas Trees
A recent winter editorial shoot revealed an exciting modern twist on traditional Christmas designs. Belle Hathaway couldn’t take her eyes off our geometric Christmas trees! This minimalist approach adds sophistication to festive nail art and remains surprisingly easy to create.
Geometric Pattern Tutorial
The process starts with a rich wine-colored base on all nails. Striping tape helps create precise triangular shapes. Placing the tape at different angles forms modern, abstract tree silhouettes. Gold glitter polish adds a striking touch to accent nails and creates a minimal Christmas tree design.
Color Placement
These combinations work beautifully for this geometric masterpiece:
- Deep wine base with gold geometric accents
- Forest green base with silver linear details
- Navy base with rose gold patterns
Line Work Tips
Perfect geometric lines depend on proper tape application. Belle’s holiday campaign taught us that firm tape pressure against the nail stops polish from bleeding. Pro tip: Sharp edges come from removing the tape while polish stays slightly wet. Tiny gold studs at specific points add dimension – a technique that got amazing feedback during our last photoshoot.
A fast-drying top coat seals your design and keeps those crisp lines shining throughout the holiday season.
Snowflake and Holly Mix
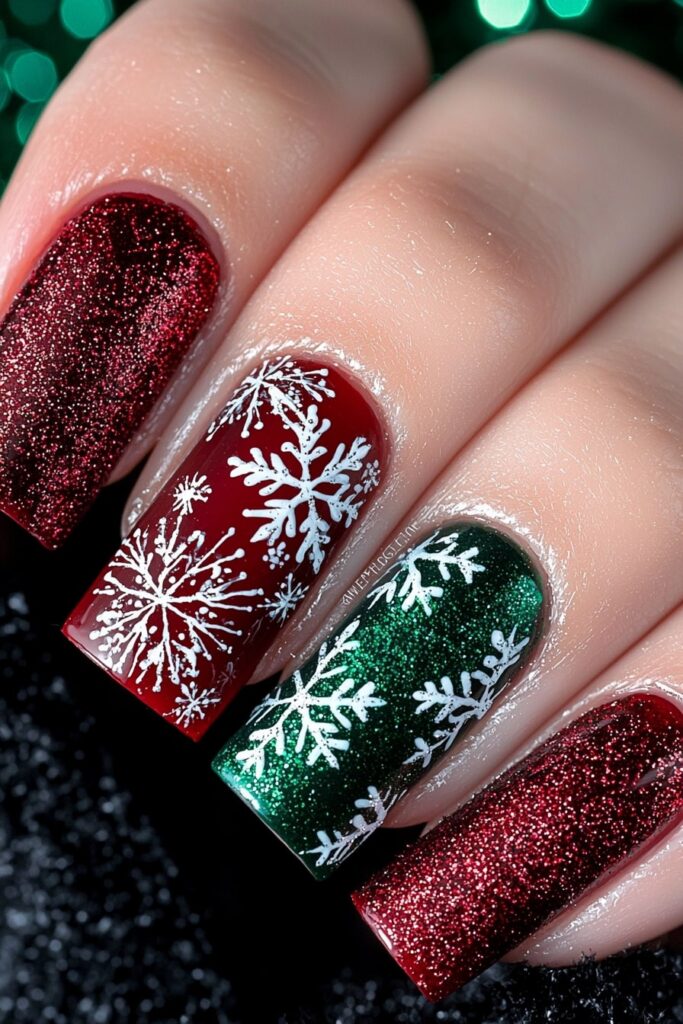
I became skilled at geometric designs and found that mixing soft snowflakes with holly creates an enchanting winter wonderland on nails. A recent holiday editorial with Belle Hathaway helped us perfect this design. We used simple craft paint and achieved stunning results!
Design Combination Steps
A velvet-red burgundy base gives that luxurious winter feel. The secret to perfect snowflakes comes from starting at the center and working outward with thin, precise strokes. Small clusters of three berries surrounded by delicate green leaves make the holly accents. Pro tip: A matte topcoat between layers prevents bleeding and adds depth.
Color Selection
Our winning combination has:
- Deep burgundy base with gold glitter accents
- Forest green holly leaves with bright red berries
- Pearl white snowflakes with champagne highlights
- Purple stones that add dimension
Pattern Placement
A balanced design needs thoughtful placement. Belle’s winter campaign taught me that larger snowflakes near the cuticle create depth, and smaller ones toward the tip enhance dimension. Holly clusters fit naturally in spaces between snowflakes and create a flowing look. Always remember that a quality top coat seals your design and ensures a professional finish throughout your holiday celebrations.
Red and Green Marble Effect
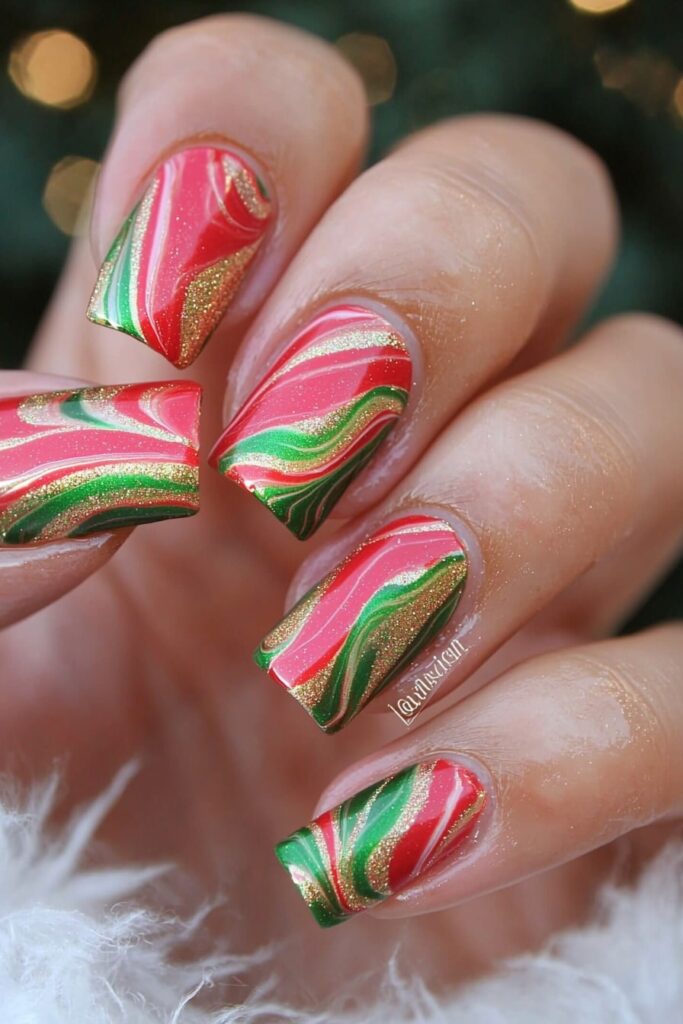
I was working on a winter editorial with Belle Hathaway when I found that there was water marbling that creates the most mesmerizing red and green Christmas nail designs. The swirling patterns look just like ribbon candy, which makes them perfect for holiday celebrations!
Marble Technique Tutorial
A protective base coat goes on first, followed by preparing a small cup with room-temperature filtered water. The secret to perfect marbling comes down to temperature – lukewarm water works best, as I learned during Belle’s photoshoot. The process starts by dropping alternating colors of red and green polish onto the water’s surface to create a bullseye pattern. A toothpick helps create swirls, and then you dip your nail at a 45-degree angle.
Polish Selection
The best marble effects need:
- Fast-drying polishes that create crisp patterns
- Metallic finishes that add dimension
- Gel-based formulas that last longer
- Shimmer-infused colors that create depth
Marbling Tips
My sessions with celebrity clients have taught me some game-changing techniques. Pro tip: A drop of hairspray on the water surface before dipping creates fascinating patterns – Belle loved these during our holiday campaign. Liquid latex around your cuticles helps with precision. Each layer needs to dry before you add another coat.
Santa Hat Design
I found a charming design that became an instant hit – the Santa hat nail art! This creative idea came up through collaboration with Belle Hathaway during my holiday break. My clients love this festive look because it strikes the right balance between playful and elegant.
Santa Hat Tutorial
A quick-drying top coat base ensures maximum durability. The red polish goes on like a French tip but extends higher than normal. Belle showed me a special dabbing technique that creates perfect fluffy texture for the white trim. The hat’s signature curve comes from a gentle sweep at the tip.
Color Combinations
These color pairings create the perfect Santa hat look:
- Classic: Deep red base with snow-white trim
- Glamorous: Ruby red glitter with pearl white accents
- Modern: Metallic red with iridescent white details
Detail Work Guide
The secret to perfect pom-poms comes down to proper technique. Start with a small white dot at the tip and add texture with dabbing motions. Belle’s winter campaign taught me that a matte top coat creates a beautiful velvet effect on the red portion. Pro tip: The white trim should be slightly raised to create a stunning 3D effect in photos.
Winter Sweater Pattern
One winter evening with Belle Hathaway, we tried creating perfect sweater-textured nails for her holiday campaign. I became skilled at making ordinary polish look like a knitted masterpiece!
Sweater Pattern Steps
A gel polish base starts the magic. Belle’s photoshoot taught me that perfect texture needs patience. The first step applies a light matte top coat and cures it for 60 seconds. A fine detail brush helps create delicate criss-cross patterns that look like knit stitches. Pro tip: Small sections work best to keep control and consistency.
Color Selection
The perfect holiday sweater look needs these shades:
- Deep burgundy with gold accents
- Forest green with pearl shimmer
- Classic red with white detailing
- Emerald with silver highlights
Pattern Variations
My celebrity client sessions helped me find that pattern variations add stunning dimension. The squiggle technique creates a casual cable-knit effect, while precise crossed lines give a more structured look. Tiny hearts between patterns add charm – Belle loved this trick during our winter campaign. A specialized matte top coat seals your design and keeps that cozy sweater texture intact.
Metallic Christmas Baubles
Belle Hathaway and I stumbled upon the captivating world of metallic bauble nail art. The winter campaign photoshoot helped us find that chrome powders create the most realistic ornament effect that ever spread across nails!
Bauble Design Tutorial
A dark base coat serves as the foundation before applying thin gold lines in a curved pattern. The transformation begins as different colored chromes get rubbed at the end of each line. Pro tip: The perfect bauble-like dimension that Belle loved comes from placing a thick blob of top coat on chrome areas and curing it for 60 seconds.
Metallic Polish Options
The perfect holiday shine needs:
- Holographic silver polish for full coverage (2-3 coats)
- Micro-fine glitters for subtle shimmer
- Diamond-like topcoat for extra sparkle
- Chrome powder for mirror finish
Application Tips
The secret to perfect baubles starts with proper preparation. Belle’s holiday shoot taught me that sanded surfaces create the ideal grip for embellishments. Resin glue ensures maximum hold for crystals. Designer’s secret: Details need small section-by-section work, and a specialized top coat seals everything without dulling your chrome finish.
Reindeer Silhouette Art
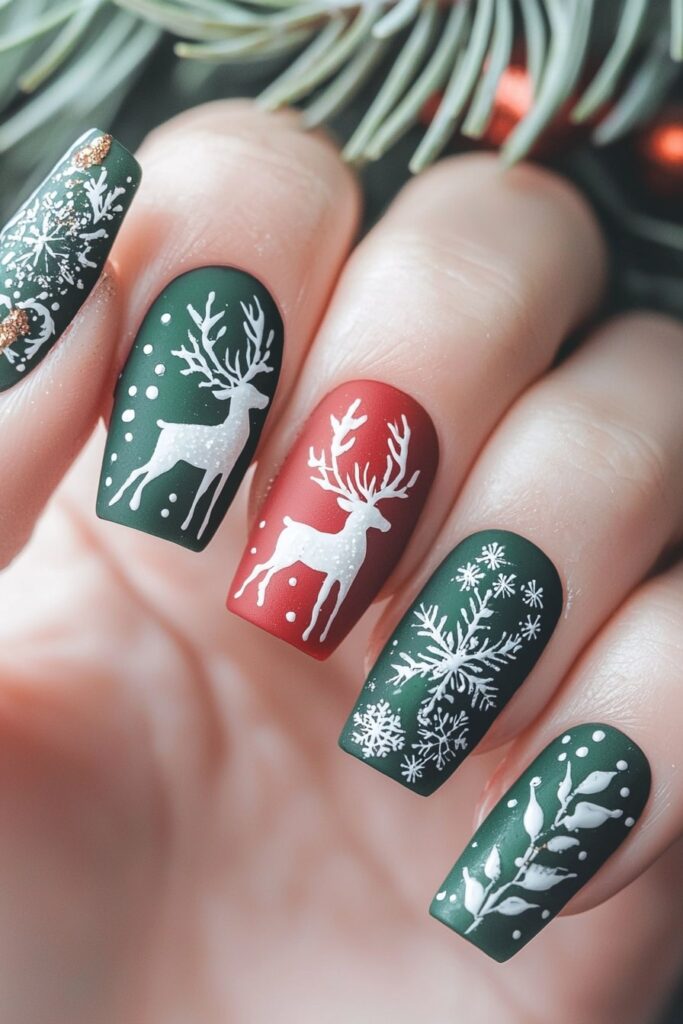
My studio experiments with holiday designs led me to a beautiful technique that blends silhouette art with festive elements. Belle Hathaway picked the reindeer silhouette as her favorite piece from our winter collection shoot.
Silhouette Tutorial
The process starts with a shimmering background using Nail Chemi gel paints. Pro tip: The smoothest finish comes from working with wet gel paint. The perfect reindeer outline needs patience. My technique starts with antlers as a guide before adding the head and body. A black permanent marker creates crisp, professional edges that complete the look.
Color Selection
The perfect holiday silhouette needs these colors:
- Deep forest green base with gold shimmer
- Matte black for the reindeer outline
- Pearl white for subtle highlights
- Ruby red to accent the nose
Placement Guide
The secret to perfect placement comes from positioning the reindeer slightly off-center. Belle’s holiday campaign showed that an inward-facing silhouette creates an elegant look. Double-curing the design in the lamp will give your artwork lasting beauty through the festivities. Designer’s secret: Belle loves how tiny white dots around the silhouette create a magical snowy effect.
Wrapped Present Design
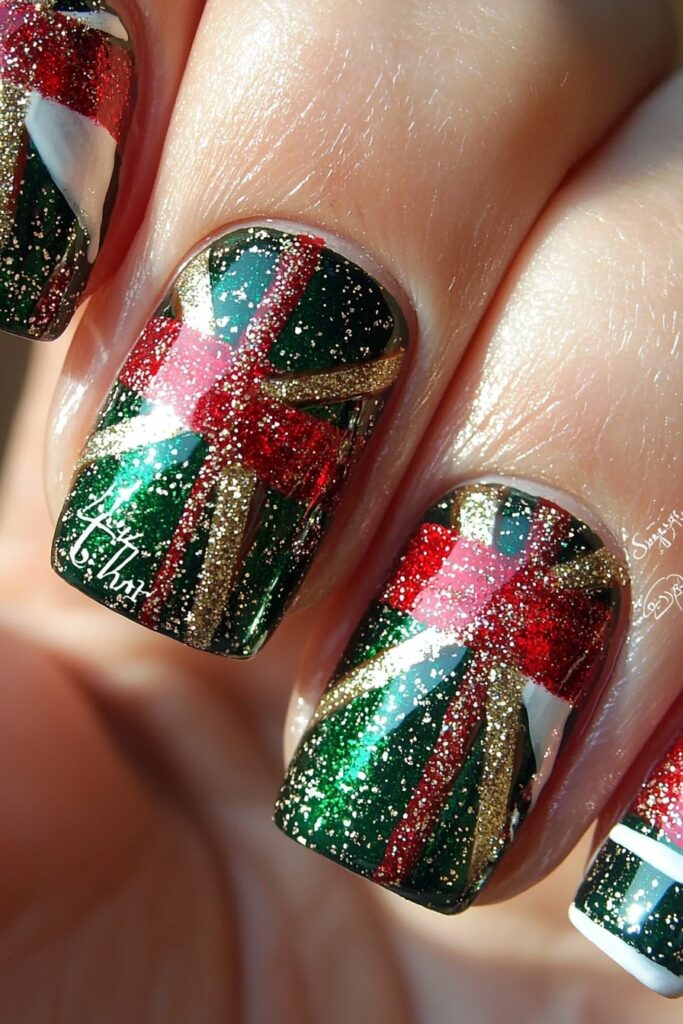
A glamorous holiday photoshoot with Belle Hathaway led me to find that wrapped present nail designs capture Christmas morning’s excitement perfectly. We spent hours getting this technique just right for her winter collection, and it has become my clients’ favorite festive design.
Present Pattern Steps
The perfect gift wrap illusion starts with a clean, precise line slightly off-center. The secret to crisp lines depends on how you control the pressure of your brush strokes. A horizontal line goes across the nail, and subtle shadows add that 3D wrapped effect. Pro tip: Striping tape helps you achieve perfectly straight lines.
Color Combinations
These color pairings create the perfect present-wrapped look:
- Classic: Red base with gold ribbon details
- Modern: Green base with silver crossing lines
- Luxe: Deep burgundy with rose gold accents
- Playful: Pearl white with red and green ribbons
Bow Detail Guide
The perfect bow needs patience and a steady hand. My work on Belle’s holiday campaign taught me that gentle, curved lines create the most realistic bow shape. The magic happens in the small details – shadows beneath the loops make the bow appear to float above the wrapped present design. Designer’s secret: Studio lights make the bow’s highest points stunning when you add a touch of shimmer powder.
Christmas Wreath Accent
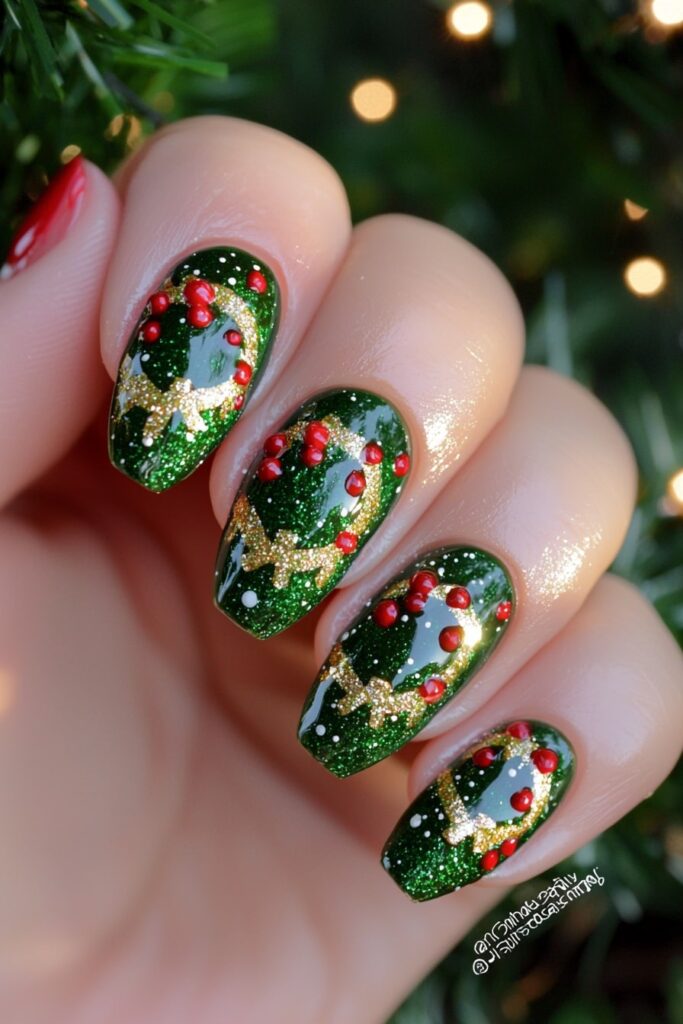
Creating holiday nail art has taught me that wreath designs add an elegant touch to festive manicures. A blooming gel technique developed through collaboration with Belle Hathaway creates the most life-like wreaths you’ll see.
Wreath Design Tutorial
The process begins on a clean, dry nail with a specialized base coat. Small brush strokes in a circular pattern create the wreath shape using Zooty Nails’ Hooker green. The blooming gel technique makes all the difference. Small dots of white polish (Revel’s Emily works best) add depth that resembles holly leaves.
Color Selection
A perfect holiday wreath needs:
- Deep forest green base with gold accents
- Pearl white highlights for dimension
- Ruby red for tiny berries
- Optional shimmer top coat for extra sparkle
Detail Work Tips
Details transform this design into something special. Triple D’s Bella glitter adds sparkle to selected wreath areas. Pro tip: A no-smudge top coat between layers prevents bleeding. Maniology’s dotting tool creates the most realistic berries. Essie Gel Setter seals everything perfectly and ensures the design lasts longer.
North Pole Sign Design
The magical North Pole inspired me to create this stunning design while working with Belle Hathaway on a winter wonderland-themed shoot. Our studio’s holiday showcase immediately embraced the icy blue and silver metallic finish combination.
North Pole Tutorial
A specialized base coat ensures maximum durability. Layering makes this design special – a shimmering blue base sets the foundation before using a fine detailing brush to create the North Pole sign post. My experience with Belle’s winter campaign taught me that small snowflakes around the sign bring the arctic atmosphere to life.
Color Combinations
The authentic North Pole sparkle comes from:
- Icy blue base with silver metallic accents
- Pearl white for snowflake details
- Deep navy for contrast elements
- Iridescent top coat for frost effect
Lettering Guide
Perfect lettering emerges from steady hands and patience. A thin striping brush helps create “North Pole” in white, followed by tiny silver highlights that add dimension. Pro tip: My late-night prep sessions with Belle taught me to practice lettering on paper first. The design transforms magically once you dust iridescent powder over the slightly tacky letters.
Glam Christmas Stars
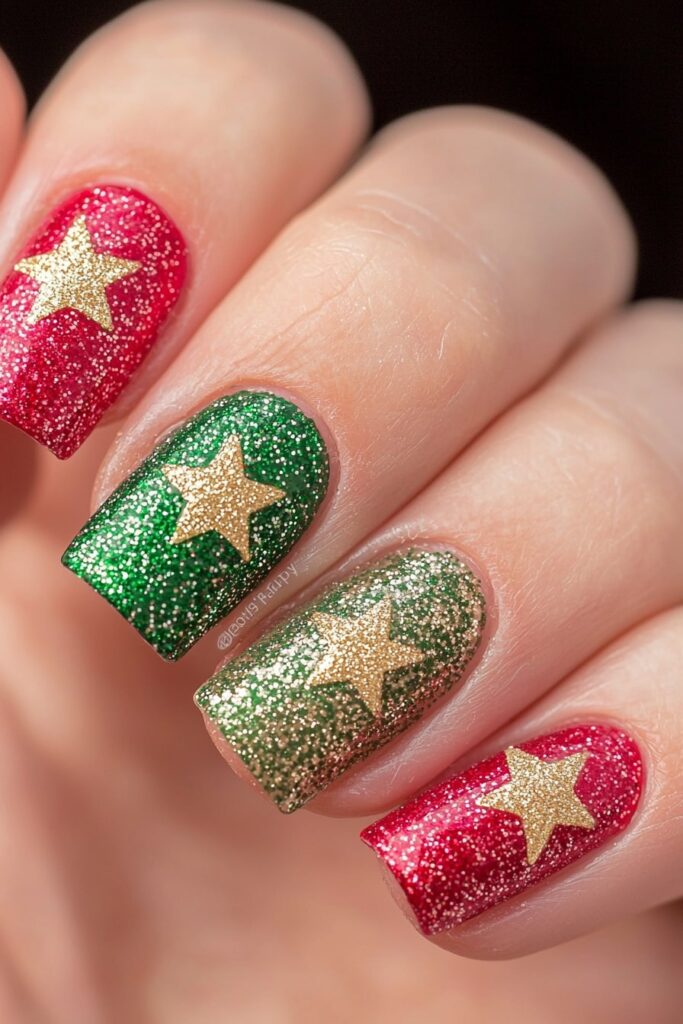
A late-night session prepping Belle Hathaway’s holiday campaign showed me something amazing – star designs with the right glitter create stunning holiday manicures. Belle couldn’t take her eyes off how the studio lights caught each carefully placed star!
Star Pattern Tutorial
The perfect canvas starts with a color-neutralizing base coat. My thin brush dipped in base coat helps map out precise star patterns. Pro tip: The photoshoot with Belle taught me that stars concentrated toward the nail tip create an elegant gradient effect in photos.
Glitter Application
These professional-grade glitters deliver perfect holiday sparkle:
- Chunky star shapes for statement pieces
- Fine shimmer for subtle depth
- Holographic particles for dimension
- Metallic flakes for extra drama
Design Placement
The secret to perfect placement comes from creating a natural gradient flow. Larger stars work best near the tip, with smaller ones scattered toward the cuticle. Belle’s winter campaign taught us that a thin base coat layer helps secure stubborn glitters. Two thin layers of quick-dry top coat seal everything – this technique kept Belle’s manicure perfect through three days of non-stop shooting.
Conclusion
My experiences creating these festive masterpieces with Belle Hathaway remind me why red and green christmas nail designs are timeless favorites. Through countless photo shoots and celebrity sessions, we’ve found that these classic holiday colors can become sophisticated works of art that suit every style and occasion.
“Beauty isn’t about perfection,” Belle often reminds me during our late-night creative sessions, “it’s about expressing your holiday spirit in your unique way.” The elegance of holly berry French tips and the playful charm of candy cane stripes make these designs perfect for everyone.
These festive nail designs are truly special because of their versatility. A simple red and green french tip can become an elaborate Christmas tree masterpiece, and basic polka dots turn into impressive ornament designs. Belle taught me during our winter campaign that the magic comes from the confidence it brings to the wearer, not the complexity of the design.
The goal isn’t perfection – it’s about enjoying the creative process and showing your holiday spirit. My clients know they should start with simple designs and gradually work toward more intricate ones. The joy of holiday nail art comes from experimenting and making each design uniquely yours.