
Black dress nail designs attract more than 600 active searches from people looking for their perfect match. My work as a professional makeup artist shows how black prom nails can raise any formal look from basic to breathtaking.
The search for the right design can feel daunting – from classic black and silver prom nails to unique formal styles. My years of experience with black nail designs have taught me which styles look elegant and stay perfect through dancing and photos.
These 17 black prom nail ideas blend classic elegance with modern trends. Each design in this collection has passed real-world testing during special moments when everyone’s attention focuses on you. The styles range from subtle shimmer effects to bold statement pieces.
Classic Black French Tips with a Twist
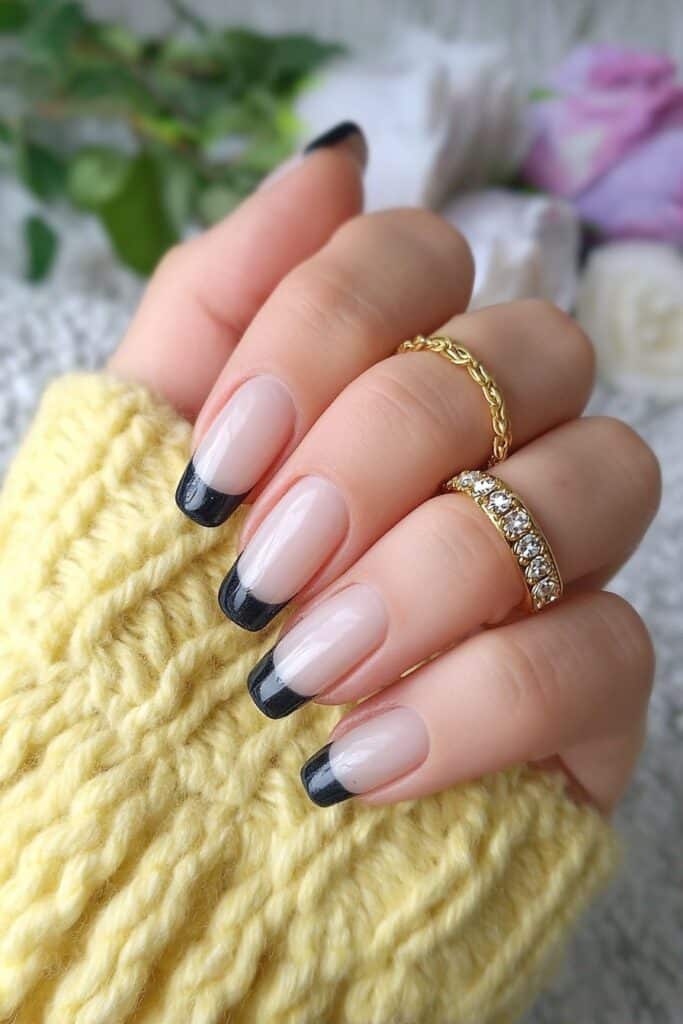
French manicures stand out as a cornerstone of formal nail art. My experience as a makeup artist creating countless prom looks tells me that black French tips can revolutionize this classic style into something both sophisticated and bold.
Why French Tips Never Go Out of Style
French tips remain timeless because they make fingers look longer while keeping their elegance. My career has seen countless trends fade away, yet French manicures show up consistently at red carpets and formal events. These tips create a balanced look that catches attention without overpowering your style, unlike full-color nails. They also look amazing in photos – something you’ll appreciate on prom night when everyone’s taking pictures.
My Favorite Twist on Traditional French Tips
Classic white tips look lovely, but black French tips bring an edgy sophistication that works perfectly for prom. My clients can’t get enough of these variations:
- Varying tip widths – from delicate micro-lines to bold statements
- Metallic accents – adding silver or gold strips along the black edge
- Textural contrast – pairing glossy tips with matte bases
To name just one example, see this design I created for a client wearing a backless black gown. I used thin black tips with tiny scattered rhinestones that looked like stars. The delicate nude base and sharp black edge went together with one another with her dramatic dress.
How to Make Black French Tips Last All Night
Your prom-worthy nails need:
Thin polish layers instead of thick ones that peel faster. A high-quality top coat seals your design and prevents chipping while adding shine. You should do your nails before prom night and add an extra layer of top coat on the big day. Hot water weakens polish, so stay away from excessive water exposure before the event.
Perfect Pairing with Any Prom Dress Style
Black French tips showcase confidence and individuality while matching any outfit effortlessly. They create a chic monochromatic look with black dresses. These tips provide sophisticated contrast with vibrant colors. You’ll find them perfect for any dress style—from ballgowns to sleek silhouettes. These tips look especially stunning with backless dresses or gowns that have intricate detailing because they enhance without competing.
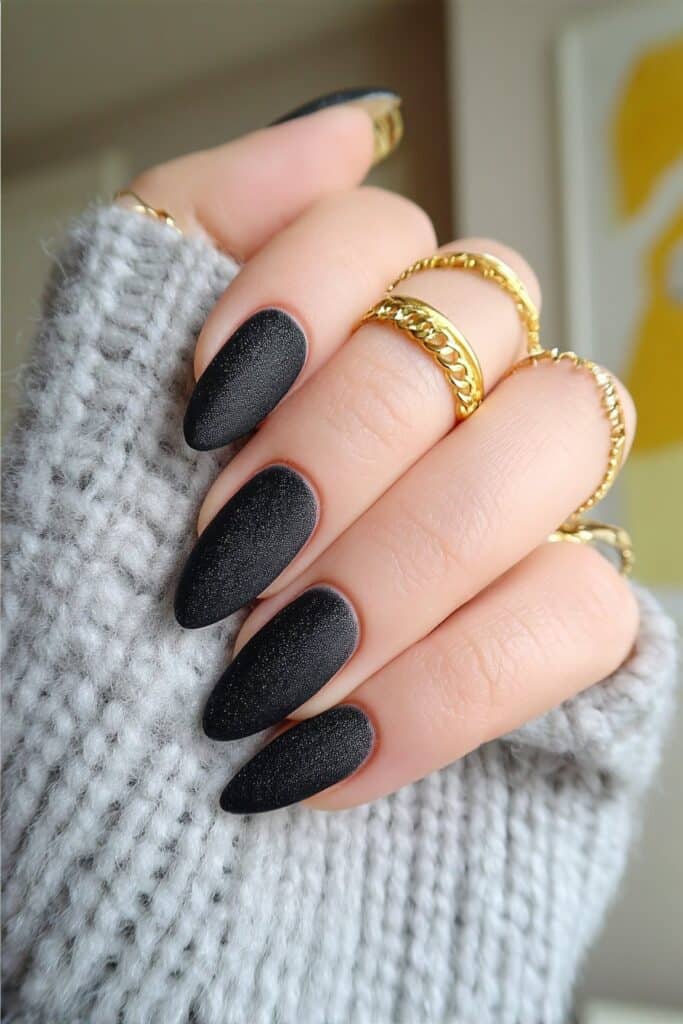
Matte Black Elegance
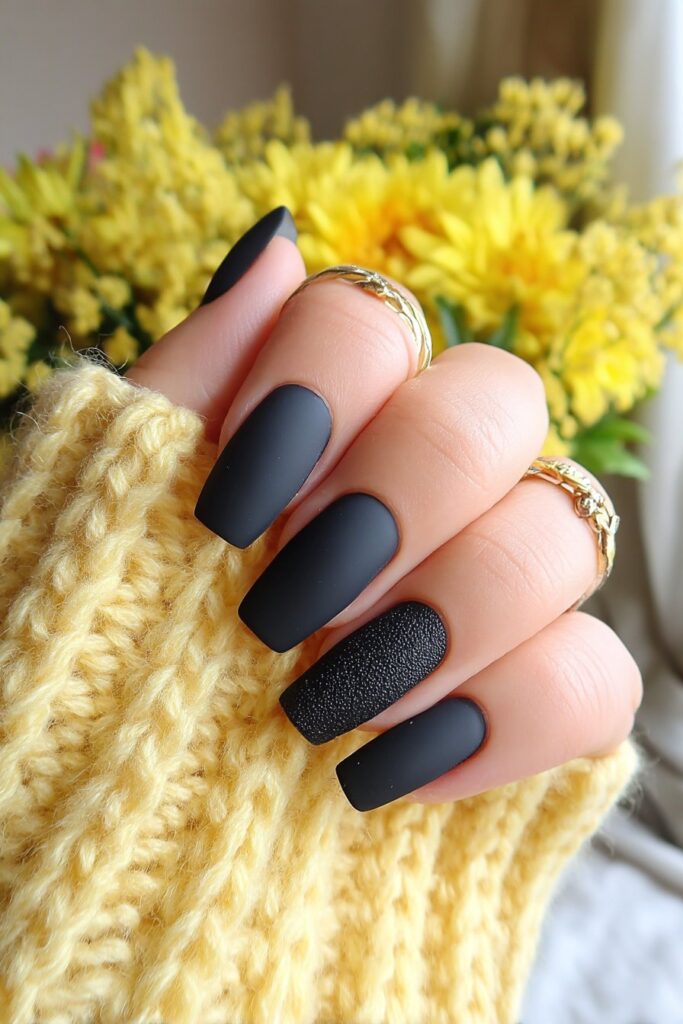
My years of working with prom clients have taught me that matte black nails have an undeniable sophistication that glossy finishes can’t match. The velvety texture absorbs light instead of reflecting it. This creates a look that’s both bold and refined.
The Power of Matte Black for Formal Events
Matte black nail polish hits the sweet spot between boldness and subtlety. It offers timeless charm that works beautifully for formal occasions. I tell my prom clients to try this finish because it goes together naturally with any outfit—from a sleek black gown to a vibrant colored dress. Matte black brings a depth that glossy alternatives just can’t match. Your photos will look amazing too.
Matte black nails create a stunning, elegant look on darker skin tones. But clients with very fair skin might find matte black too stark. I usually suggest adding subtle accents like delicate gold foil or a minimalist design to soften the contrast.
Application Techniques for a Flawless Finish
Here’s how to get perfect matte black prom nails:
- Start with good prep—clean, file, and buff your nails to create a smooth canvas.
- Use a quality base coat to protect your nails and make polish last longer.
- Put on thin, even coats of black polish—this stops bubbling and helps quick drying.
- Let each coat dry fully before the next layer.
- End with a specialized matte top coat, applying it thinly for the best effect.
The sort of thing I love about doing nails is learning from experience. I found that thick matte top coat can leave uneven finish or glossy patches. Less really works better with matte products!
Maintaining Your Matte Look Through Prom Night
Matte finishes show wear faster than glossy ones, especially at fingertips. Here’s my advice to my clients for prom night:
- Put on an extra layer of matte top coat on the big day
- Keep hands moisturized but avoid oil-based products near nails
- Be gentle with your manicure and wear gloves for any pre-prom cleaning
- Try a black-on-black French manicure with matte base and glossy tips—it hides tip wear really well
My career has shown me that this elegant look always photographs beautifully. It creates a sophisticated backdrop for corsages, rings, and those special prom photo moments.
Black Chrome Mirror Nails
Chrome mirror nails have become my signature style for clients at formal events. The reflective finish turns ordinary black polish into something extraordinary. It creates a futuristic elegance that draws everyone’s attention.
Why Chrome Finishes Photograph Beautifully
Chrome powder creates a mirror-like surface that catches and reflects light from all angles. This quality makes chrome nails look stunning in photographs—a vital feature for prom night memories. Black chrome nails add dimension and depth to photos that other finishes can’t match.
Last prom season, I did black chrome nails for a client who wore a sleek, backless gown. Her nails sparkled in professional photos like captured starlight on her fingertips.
Application Process for Perfect Chrome
A flawless chrome nail finish needs these precise steps:
- Apply a high-quality base coat, followed by two thin layers of black polish
- Cure each layer properly—30 seconds for first coat, 15 seconds for second
- Apply a no-wipe top coat and cure for just 15 seconds (not fully hardened)
- Use a foam eyeshadow applicator to tap chrome powder onto the nail surface
- Buff the powder with light pressure to avoid denting
- Seal with top coat and fully cure
People often make the mistake of pressing too hard while buffing. Light strokes create that perfect mirror finish better than heavy pressure.
Complementing Your Black Dress with Mirror Nails
Chrome nails go perfectly with black formal wear. They add visual interest without overshadowing your outfit. The reflective surface creates a sophisticated contrast to most formal dresses’ matte or satin texture.
My clients wearing black dresses can choose between full chrome coverage for drama or strategic chrome placement for subtle elegance. Silver chrome creates a modern elegance that makes black attire stand out.
Here’s a pro tip: Your jewelry should match your chrome nails. Silver accessories blend naturally with the metallic finish, creating a look that feels purposeful rather than random.
Black Nails with Negative Space
Negative space nail designs have become my signature technique to create elegant black prom nails. The unpainted portions of natural nail create a striking contrast that looks beautiful in photographs. These designs make perfect additions to those prom night memories you’ll treasure forever.
Creating Sophisticated Geometric Patterns
The versatility makes negative space designs stand out. Geometric patterns work well with black polish because crisp lines create dramatic contrast. My experience shows that triangular shapes near the cuticle or asymmetrical designs make sophisticated statements. A client wearing a sleek black gown once requested alternating negative space rectangles on each nail—the contrast looked stunning in her photos.
Black dress prom nails look best with undulating shapes that mirror waves or organic lines. The placement can vary on each finger with more negative space on some nails and less on others. This creates a cohesive yet unique look on your hands.
Tools Needed for Precise Lines
Clean lines need the right tools:
- Fine liner brushes – I prefer detailing brushes with precise tips to create straight edges
- Precision nail art pens – Look for pens with a 0.01mm tip to make the thinnest lines
- Stainless steel nail tools – These help create even spacing in geometric designs
A dual-ended pencil stamper with a clean-up brush is my go-to tool. Silicone nail art tools help create unique patterns without advanced freehand skills.
How to Keep Your Design Intact All Night
Negative space designs have an advantage with longevity—chipping becomes less noticeable because of the intentional bare areas. Your designs can last through every dance with these steps:
Start by buffing the nail surface to create a clean base. Apply a high-quality base coat before adding black polish. After creating your design, float (don’t drag) a clear top coat over the entire nail. This prevents smudging the crisp edges of your geometric shapes.
The day of the event, apply a quick-dry top coat. This refreshes shine and adds extra protection to capture those many photo opportunities throughout the night.
Subtle Black Glitter Ombré

The magic of glitter ombré nails comes from balancing subtle elegance with captivating sparkle. My experience as a makeup artist who specializes in formal looks has taught me that black glitter ombré adds depth and dimension that complements your prom style perfectly.
Creating the Perfect Glitter Gradient
A flawless glitter gradient needs the right technique. My first attempts weren’t perfect, but I found these professional methods that work:
- Apply two coats of black polish as your base and let it dry for 5-10 minutes
- Create the gradient by sponging glitter polish onto the upper third of your nail, with more concentration at the tip
- Take a small makeup sponge to soak up excess clear base from your glitter polish before you apply it – this stops thick, uneven layers
My favorite trick works every time: after adding glitter to the nail tip, dab the sponge slightly downward to create a cascading glitter effect. This technique worked beautifully for a client who wore a sleek black gown with shimmer details – her nails matched her dress’s elegant sparkle.
Choosing the Right Glitter Density
Your glitter density makes or breaks a sophisticated prom look:
Black formal nails look best when you start with fine glitter at the tip and add larger pieces strategically for dimension. Using multiple glitter sizes creates more depth that photographs beautifully, rather than sticking to just one type.
Silver or gold microglitter creates stunning contrast against black polish that works with any black dress. My clients with backless gowns love extra glitter at the tips because it draws attention to their hand movements throughout the evening.
Making Your Ombré Last Through Dancing
Glitter ombré nails last longer than solid colors because tip wear blends with the glitter placement. Your prom night nails need:
A quality base coat under your black polish to prevent chips A fast-drying topcoat between base and glitter layers for a smooth surface Two thin topcoat layers after your gradient to seal everything
Dancing all night needs properly prepared nails. My clients get the best results when they schedule their nail appointment 1-2 days before prom. This gives enough time for the polish to set completely.
Black Marble Effect
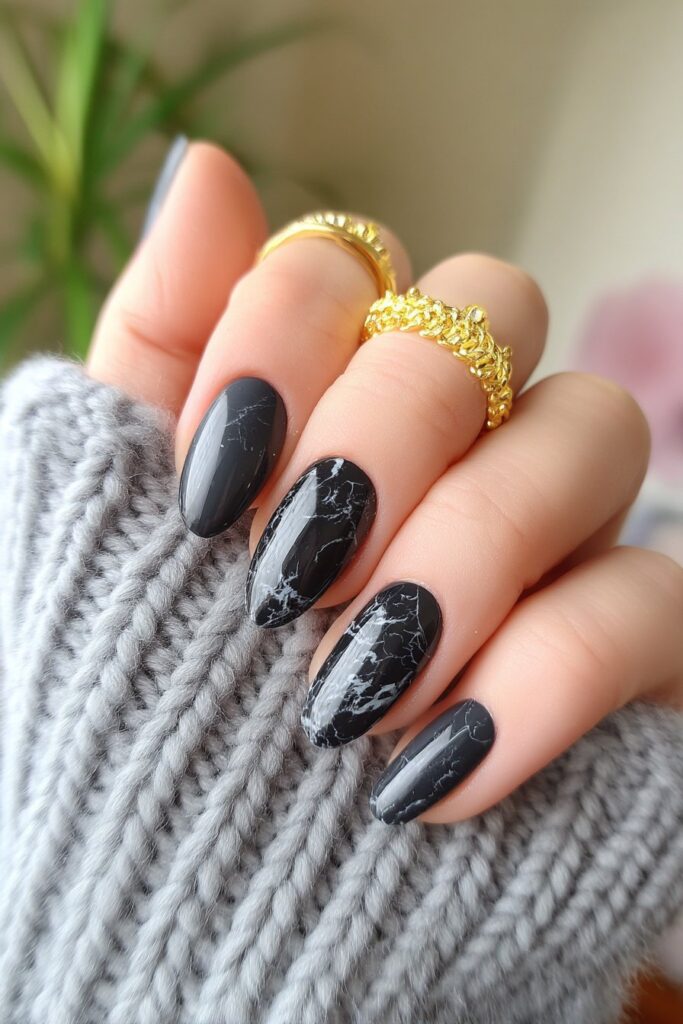
Marble nail designs make a luxurious statement that pairs beautifully with formal attire. My prom clients love black marble nails because they look sophisticated yet unique. These designs have always been a hit during my years as a makeup artist.
Techniques for Authentic Marble Patterns
You need precision and the right approach to create authentic marble patterns. The process starts with a solid black base coat that must dry completely. Here are two main techniques I use:
The gel nail method begins with a thin layer of blooming gel spread across the nail (don’t cure it yet!). A detail brush helps create irregular, wavy white lines across the black base. A clean brush gently blends and drags these lines to create that signature marble veining. The design needs a full minute of curing once it looks perfect.
Regular polish works differently. You’ll need a scrunched piece of plastic wrap dipped in dark gray polish. Dab off extra polish and press it lightly against the black base. This creates a natural stone texture. Thin, irregular white lines added with a detailing brush make it look like real marble.
Color Combinations That Boost Black Marble
Black and white combinations give you timeless elegance and the most authentic marble look. These colors photograph amazingly and work with any prom dress color.
My favorite ways to add dimension include:
- Subtle gray veining that creates depth
- Delicate gold or silver accents to add luxury
- Nude undertones for a softer, natural stone look
A client wearing a sleek black gown recently got black marble nails with gold foil accents. The marble pattern flowed from dark to light and matched her dress’s shimmer details perfectly.
Sealing Your Design for Longevity
Your design needs to last through every dance and photo op. Here’s how to seal your marble masterpiece:
A high-quality top coat should float gently over your design. Don’t drag it – that smudges the delicate lines. Let the first coat dry completely before adding a second thin layer. Prom night needs nails that stay perfect!
My clients get another top coat on prom day. This brings back the shine and adds extra protection. This trick has saved many designs from chipping during those special celebration moments.
Black with Gold Foil Accents

Black polish paired with gleaming gold foil makes an unforgettable statement. This combination has become my go-to suggestion when clients want dramatic yet sophisticated black prom nails.
Why Gold and Black Create Timeless Elegance
Black and gold together create a striking visual that everyone loves. This combination gives you something unique in nail design – a bold look that never goes overboard. The black base works as a perfect canvas that lets the metallic gold foil pop beautifully.
A client once came to me wearing a sleek backless gown for prom. We did black and gold foil nails that caught the light magically during photos. Her nails went together with her outfit perfectly without stealing the show. These colors give you a classic style that’s never boring. You can wear it to special events and it works just as well for everyday looks.
Application Methods for Clean Foil Placement
Here’s how to place gold foil perfectly:
- Start with two coats of black polish and let them dry fully
- Put a thin layer of foil adhesive where you want the gold
- Press gold foil firmly on the tacky adhesive
- Brush away extra foil with a soft brush
- Add a quality top coat to protect your design
My clients’ biggest mistake? They rush the base coat drying time. Your black base needs to be completely dry for the foil to stick properly.
Keeping Your Foil Accents from Lifting
I’ve found that sealing your design right makes your foil last longer. Your prom night nails need a two-step sealing process: put on regular clear top coat over the foil, then add matte top coat if you want it.
Your edges need special care to stop lifting. Either keep foil away from the tips or seal the free edge well with top coat. Good nail prep (dehydration before starting) plus these tricks will keep your black and gold prom nails looking perfect from your first photo until your last dance.
3D Black Floral Design
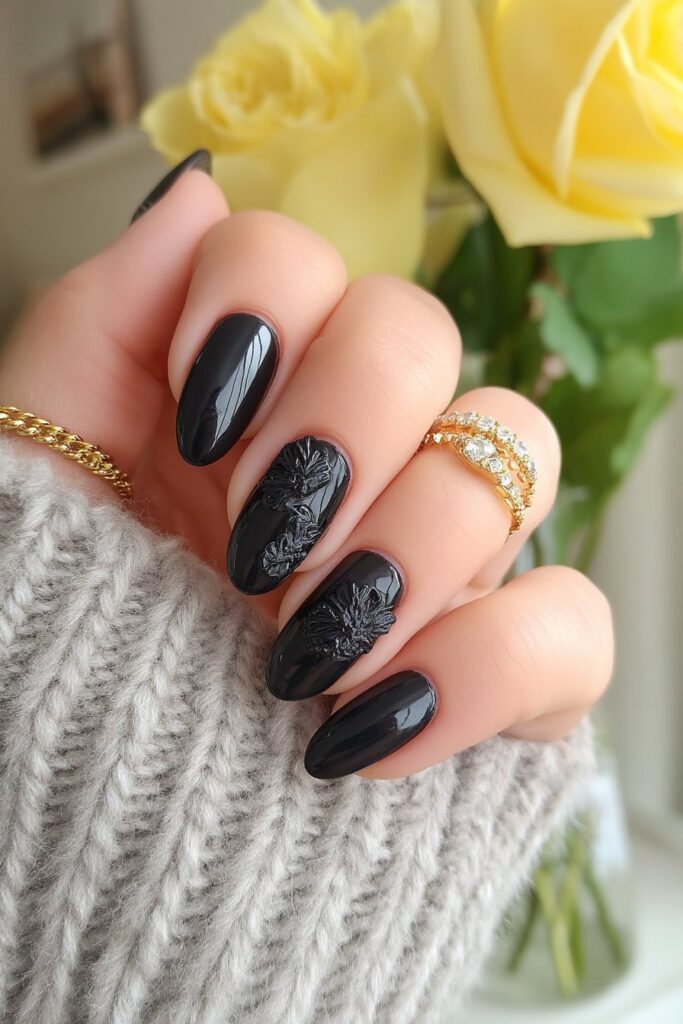
Black 3D floral designs are my favorite recommendation to create dramatic prom nails that really engage. My experience as a professional makeup artist has shown me how these dimensional details create show-stopping formal nails without looking over-the-top or impractical.
Creating Dimension Without Bulk
The magic behind elegant 3D floral nails comes from creating dimension without too much bulk. I use a layering technique with black gel polish to build petals step by step. Roses are my clients’ most requested 3D flower, so I apply thin layers of acrylic or gel to create delicate petals that naturally rise from the nail surface.
My clients often worry about their 3D flowers catching on fabric. The “half-flower” technique works great here – dimensional elements seem to emerge from the nail’s edge. Smaller floral elements on accent nails (ring fingers or thumbs) create a stunning look without getting in the way.
Flower Patterns That Complement Formal Wear
Black roses remain the perfect choice to create prom nail art because of their timeless sophistication. Black orchids offer a slightly edgier yet equally elegant option. My current favorite design combines transparent 3D rose elements against a matte black background—the contrast between textures looks amazing in photos.
A recent prom styling session had me creating subtle 3D black flowers with minimalist silver accents for a client’s sleek backless gown. Her dimensional flowers sparkled as she danced and went together with her outfit perfectly.
Ensuring Your 3D Elements Stay Secure
Your nails need to last through prom night. Here’s how to keep those 3D elements firmly attached during dancing and photos:
- Start with proper nail preparation—really buff and clean your nails
- Pick specialized nail adhesive made for 3D elements
- Add a thicker gel top coat for extra protection
I tell my clients to get their 3D floral designs done 1-2 days before prom. This gives everything enough time to cure completely. This timing sweet spot will keep your beautiful black floral nails perfect from your first corsage photos until the last dance.
Black Velvet Nails
Black velvet nails stand out magically from other formal nail designs. My prom clients react with wide eyes and ask “How did you make them look so soft?” The secret lies in an optical illusion created through special magnetic techniques, not actual texture.
Achieving the Perfect Velvet Texture
The perfect velvet nails need specific products and techniques. I start with a black base coat and apply magnetic nail polish with metallic particles. The magic happens when I hold a magnet near the wet polish for about 15-30 seconds. Experience has taught me that positioning makes a huge difference. The magnet’s distance controls the effect – closer creates intensity while further away adds subtle dimension.
These looks can be created in several ways:
- Using magnetic polish with a specialized magnet
- Applying flocking powder for actual texture (though this isn’t ideal for prom)
- Creating a matte top coat over metallic polish
My clients need to let the polish dry completely. The velvet effect disappears if someone disturbs the magnetic particles too soon.
Why Velvet Nails Stand Out in Photos
Black velvet nails catch light uniquely, just like black velvet fabric. My clients learn that these nails create dimension through light reflection rather than actual texture before their formal events.
The optical illusion makes photos look almost three-dimensional while keeping a sleek surface. These nails work like the “little black dress” of manicures – sophisticated yet captivating against any gown color.
Maintaining the Plush Effect All Night
Clients often ask how velvet nails last through dancing. Quality preparation starts with thorough cleansing and a good base coat. A high-quality top coat seals and protects the magnetic pattern without losing the velvet effect.
Prom clients should get their manicure 1-2 days before the event. This gives enough time for the polish to set completely. The dimensional quality stays elegant all night if they avoid hand sanitizer.
Minimalist Black Line Art
Black minimalist nail art stands out as my go-to recommendation for prom clients seeking elegance without extra flash. My years of creating detailed designs have taught me that a simple black line on a nude base speaks volumes compared to complex patterns.
Simple Designs with Maximum Impact
Minimalist black line art adds a playful spin to classic black manicures yet keeps its sophisticated appeal. Sleek single lines and abstract swirls offer endless design possibilities. These designs shine through their subtle elegance mixed with a dash of fun.
My clients love these pattern variations:
- Graphic block designs with sharp angles against white backgrounds
- Contrasting black waves that catch the eye on square-shaped nails
- Abstract swoops flowing smoothly from nail bed to tip
- Playful squiggles that show personality without taking over your look
Your bold dress deserves nail art that enhances rather than fights with your outfit.
Tools to Create Perfect Lines
Perfect lines need the right tools. Thin-tip brushes are vital—they form the foundation of any line art design. My professional kit includes super fine liner brushes with long bristles that help steady my hand for straight lines.
The cleanest results come from:
- Using a long liner brush since shorter bristles shake with hand movement
- Applying manicure tape to achieve straight lines
- Getting a quality dotting tool for delicate accents
Pairing Line Art with Your Dress Style
Minimalist designs blend well with any prom dress style. Simple black lines on a nude base balance intricate gowns beautifully. A sleek black dress pairs wonderfully with white negative space that photographs like a dream.
A recent prom styling session featured thin black lines in abstract geometric shapes against a cream background. This sophisticated yet simple design matched my client’s backless gown perfectly. The result was understated and elegant.
The best looks often embrace simplicity—this rings true for both fashion and nail art.
Black with Crystal Accents

Black nails adorned with perfectly placed crystals never fail to engage my prom clients. These sparkling accents against the dark backdrop add depth and glamor that pairs beautifully with formal wear. Your special prom photos will showcase this sophisticated yet eye-catching look.
Selecting the Right Crystals for Your Look
Crystal selection can make or break your black formal nails. Experience has taught me that each crystal type creates its own unique effect. Acrylic gems fit most budgets and come in many colors, but they don’t last as long or shine as brightly. Glass or synthetic crystals shine brighter and stay put longer, though they cost more.
My prom clients usually get these recommendations:
- Size matters: Keep flatback stones under 8mm to prevent snagging on fabric
- Shape varieties: Mix rounds, squares, teardrops, or stars for visual interest
- Look for slightly curved bottoms on larger gems to reduce catching on hair or clothing
A client wearing a backless gown came to me. We created black nails with small, clear crystals in different sizes. The result looked like a constellation that matched her dress’s subtle sparkle—perfect for her black prom nails.
Secure Application Techniques
“Will these crystals last all night?” My clients ask this question more than any other. With the right application method, they definitely will.
Standard nail glue isn’t your best bet for securing crystals. I use thicker hard gel or specialized gem gel that provides strong adhesion without spreading too much. The right consistency helps secure crystals without messy edges.
Let the black polish dry completely first. A precision tool works better than fingers to place each crystal. My crystal katana or similar pick-up tool helps me place crystals exactly where I want them without dulling their sparkle.
Creating Balance with Crystal Placement
Strategic placement plays a vital role in both looks and durability. Crystals placed near the cuticle area (but not too close) stay put longer because this part of the nail doesn’t flex as much. My prom clients often get designs with crystal clusters near the cuticle that spread out toward the tip.
Your dress style and event should guide your crystal placement on black formal nails. A simple black dress pairs well with minimal crystal accents, while elaborate gowns might need bold statement nails with more crystals.
Different crystal density on each nail creates better balance than uniform coverage. This approach adds visual interest while keeping an elegant, cohesive look. Your friends will want to know who created these stunning black prom nails.
Black Stiletto Nails with Silver Tips

Stiletto nails stand out as one of the most dramatic choices for black prom nails. My salon clients increasingly request these sharp, pointed creations for formal events. They look stunning with silver tips that catch the light.
Why Stiletto Shapes Create Drama
These nails get their name from their sharply pointed shape that looks just like stiletto heels. Your hands immediately grab attention with this distinctive silhouette. My experience as a makeup artist shows how stiletto nails turn simple designs into bold fashion statements. They make fingers look longer and more elegant, which photographs beautifully during prom.
A recent styling session comes to mind where I created black stiletto nails with silver tips for a client’s backless gown. Her sleek dress balanced perfectly with the dramatic points, adding just enough edge without going overboard. Fashion sites often recommend stiletto nails “for those looking to make a bold statement” at formal events.
Balancing Length with Practicality
Dramatic stilettos look amazing, but my prom clients need to dance and take corsage photos!
Here are my professional tips for wearable stilettos:
- Medium-length points work best for first-timers
- Gentler side angles provide more stability
- Almond-stiletto hybrids offer a softer yet dramatic look
Proper fitting matters most with stiletto-shaped press-ons, which many clients prefer for temporary wear. Some clients worry these nails feel awkward. I show them how medium-length stilettos create drama without sacrificing comfort.
Silver Accents That Complement Black Formal Wear
Black and silver together create “a stunning contrast that exudes elegance and sophistication”. Silver tips against black nails offer a striking yet refined accent that works with any formal wear, especially black dresses.
My recommendations for clients wearing black include:
- Metallic silver chrome tips that sparkle beautifully
- Thin silver lines along the stiletto point’s edge
- Subtle silver ombré that fades from tip to middle
Deep black paired with reflective silver creates what I call “wearable drama.” The look makes a statement yet stays sophisticated enough for formal events. “Black and silver nail designs are versatile, elegant, and perfect for any occasion”. These memorable black prom nails will have your friends asking for the same design.
Glossy Black with Subtle Shimmer
Black nails with shimmer remain one of my favorite timeless recommendations from my years doing prom manicures. Simple yet sophisticated, this style catches light beautifully – making it perfect for formal photos and those special moments under venue lighting.
Creating Depth with Shimmer Topcoats
My clients often think all black polishes look identical – but that’s nowhere near true. The real magic comes from picking the right shimmer topcoat. Black polish with built-in shimmer particles works great for formal events. You can also layer a clear shimmer topcoat over a solid black base. Recently, I created a stunning look for a client’s backless prom dress by adding silver micro-shimmer over jet black. The final effect looked just like stars against a midnight sky, which added depth without overpowering her elegant style.
Application Techniques for Even Distribution
You’ll need these specific techniques to get that perfect shimmer distribution:
- Two thin layers of black base coat should go on first, with complete drying time between them
- Give pre-mixed shimmer polishes a gentle roll – shaking creates bubbles
- Dab loose shimmer instead of stroking to avoid streaks
- Burnish shimmer particles into semi-cured gel polish so they stick better
People often press too hard when applying shimmer. A lighter touch creates that sophisticated sparkle that makes black formal nails stand out.
Making Your Nails Catch the Light on the Dance Floor
Prom night’s manicure must last. A high-quality top coat will make your shimmer nails sparkle beautifully all evening without dulling the effect. This ensures your nails will gleam from every angle on the dance floor.
Strategic placement makes black prom nails truly striking. A bit more shimmer concentrated at each nail’s center creates a subtle spotlight effect. This technique makes hands look incredibly elegant in photos, whatever your prom dress color might be.
Black Geometric Cutouts
Geometric nail designs have changed how I approach formal manicures. My experience creating countless prom looks has taught me that black geometric cutouts blend modern edge with timeless sophistication. These designs photograph beautifully on prom night.
Creating Precise Geometric Patterns
Geometric designs catch everyone’s eye with their bold yet refined look. Black geometric patterns give a modern touch without going overboard. My clients love these styles:
- Minimal line art with metallic accents against black backgrounds
- Negative space triangles that create visual interest
- Abstract color blocks that complement formal attire
- Delicate grids that catch light during photos
One of my favorite techniques uses triangles on each side of a French tip with contrasting polish. A smooth, even base coat sets the foundation for any successful geometric design.
Tools for Clean Cutout Edges
Perfect, crisp lines need the right tools. Years of experience have shown me what makes the biggest difference:
Striping tape helps me create flawless geometric patterns. I place the tape in the desired pattern, paint over it, and remove it while the polish is still wet. This gives me the sharpest possible lines. Fine nail art brushes are vital—quality striping brushes make thin, straight lines much easier to achieve.
A detailer brush with a precise tip creates clean edges that set professional designs apart. I always keep a cleanup brush nearby to fix any small mistakes around the edges.
Design Placement for Maximum Impact
The right placement turns simple geometric designs into eye-catching art. For black formal nails, an accent nail approach works best. I often apply the full geometric pattern to one or two fingers while keeping others solid black or minimally accented.
My clients with backless gowns ask for geometric designs that highlight their hands in photos. I create bold patterns on the thumb and ring finger since these naturally show up in poses.
Note that contrast elevates the design—black geometric cutouts look stunning against nude bases. This creates sophisticated definition that works with any prom dress while making a modern statement.
Black Nails with Delicate Lace Effect
Black lace nail art has become my signature style that clients love when they want romantic and sophisticated prom nails. These intricate patterns blend vintage elegance with a modern twist, making them a perfect choice to add subtle glamor at formal events.
Techniques for Creating Lace Patterns
You need precision and patience to create authentic-looking lace. My approach varies based on the effect I want to achieve:
The hand-painted lace starts with an opaque nude base coat. I create a fishnet pattern with a fine liner brush dipped in metallic black polish. Diagonal criss-cross lines are the foundations, and I add four-dot “clover” shapes at each intersection. A mix of black polish with nail polish remover (3:1 ratio) creates delicate “x” shapes within each diamond section when I want sheer effects.
Encapsulation gives your nails amazing dimension. This technique uses pre-cut black lace fabric attached to the nail with resin and covered with clear acrylic. Your nails will look delicate yet stay really durable with this method.
Matching Lace Designs to Your Dress
Your lace nail design should complement your dress style. Black lace nails and black dresses create sophisticated monochromatic elegance – I call this the “texture on texture” effect. My clients with sleek black gowns look stunning with black lace against a nude base, which photographs beautifully.
Floral lace patterns look amazing with dresses that have botanical elements or delicate beading. A recent prom client’s design featured black French tips with delicate lace overlay that matched her backless gown’s lace detailing perfectly.
Ensuring Your Intricate Design Lasts
Your prom night design needs to stay perfect. Here’s what I suggest:
- Start with a quality base coat before any lace design
- “Float” your top coat over detailed work instead of dragging the brush to prevent smudging
- Let the first top coat dry completely before adding a second thin layer
Gel polish lace designs last longer than regular polish. Each layer needs thorough curing and a no-wipe top coat seals the design. Book your appointment 1-2 days before prom to give your nails enough time to set completely.
Midnight Sky Nails
he magic of a starlit sky has always sparked my creativity in nail art. My galaxy-inspired designs on black nails create a dramatic yet sophisticated look that turns heads at prom night. I like to call it “wearable cosmic elegance.”
Creating a Starry Night Effect
You need specific techniques to achieve an authentic midnight sky effect. A deep black base coat becomes your universe’s canvas. I layer lighter colors—deep blues, purples, and unexpected pinks—with a makeup sponge across parts of the nail. This adds depth that looks just like space.
Small specks of silver, white, or light blue make the stars pop when applied with a fine detail brush. Some specks become stars when extended into cross-like shapes, with varying sizes. These variations create a 3D effect that mirrors the real night sky.
Color Combinations for Depth
The beauty of midnight sky nails comes alive through careful color layering. Black sets the stage, while other colors add amazing dimension:
- Deep blues and purples provide depth and cosmic clouds
- Metallic blues add cool, icy comet effects
- Subtle pink surprisingly enhances nebula effects
- Gold accents create striking contrast against the dark background
One of my prom clients wore a backless gown, so I created a “monochrome cosmos”—a matte black base with silver stars of different sizes and subtle embossing. This simple design let her jewelry shine while keeping visual interest.
Making Your Galaxy Design Photograph Well
A good seal protects your cosmic creation and makes it photo-ready. A holographic top coat adds multi-dimensional shimmer that dances in the light, making it stunning in prom photos. Small rhinestones placed strategically catch light on the dance floor and boost the overall impact in photographs.
Midnight sky nails strike the perfect balance between drama and sophistication on prom night. They’re like wearing a piece of the cosmos on your fingertips, and your friends will definitely want the same look at their next formal event.
Black Nails with Hidden Glitter Placement
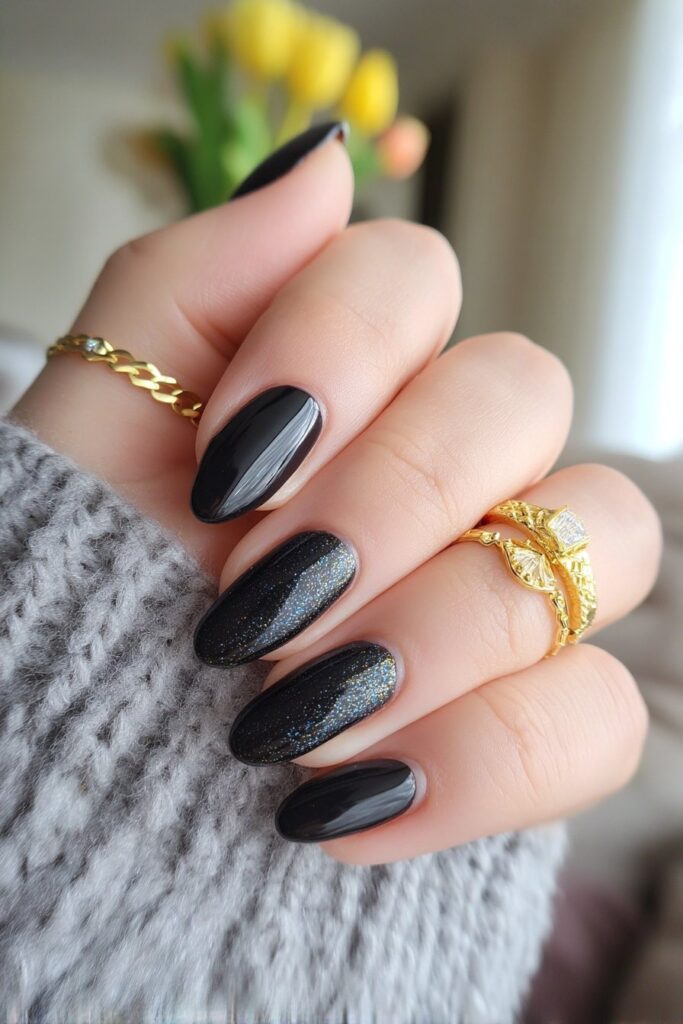
Black prom nails with subtle glitter are my signature style. My clients love the elegant sparkle that catches light at just the right moment. These techniques have evolved from my experience as a makeup artist to create the perfect balance of sophistication and shine.
Strategic Glitter Placement for Subtle Glamor
The right placement can turn basic black nails into stunning conversation pieces. My top recommendation is to apply glitter near the cuticle area. This spot doesn’t flex much, which helps prevent chipping. I create “celestial” patterns by carefully placing micro-glitter clusters that look like constellations.
A recent prom client wore a backless dress, so I added fine black glitter to the tips. This created a subtle gradient that looked like a starry night sky. The secret lies in moderation – focus on specific areas instead of covering the entire nail. All but one of these designs work well as accent nails. The ring finger becomes a beautiful focal point with extra sparkle.
Glitter Types That Complement Black Polish
Black polish doesn’t work with every type of glitter. My experience shows:
- Fine glitter: A sophisticated shimmer that’s perfect to formal events, with barely visible particles
- Black-on-black glitter: Adds dimension without contrast—perfect for subtle elegance
- Holographic micro-particles: Shine beautifully on the dance floor while staying sophisticated
Formal events call for fine glitter to create “texture on texture.” This technique adds depth without overpowering the look. Black glitter on black polish creates sophisticated “hidden glamor” that only shows when light hits your hands.
Sealing Techniques for Long-Lasting Sparkle
Your prom night deserves nails that last. These steps will keep your hidden glitter design perfect through dancing and photos:
Start with a base coat before black polish. This promotes nail health and helps polish stick better. A makeup sponge works best to apply glitter – it absorbs clear base and leaves just the sparkle, preventing thick layers. Multiple thin top coat layers work better than one thick coat. This stops bubbling and protects your design.
My prom clients get a fresh top coat on event day. This extra step gives maximum shine under venue lights and keeps black prom nails flawless from corsage photos to the last dance.
Conclusion
Black nail designs are still my most requested styles for formal events, even after years of creating stunning prom looks. My clients love how these elegant options look amazing in photos and stay perfect through every dance and special moment.
The possibilities with black nails are endless. You can go from classic French tips to modern geometric patterns. My work as a professional makeup artist has shown that the best formal nail designs need to match sophistication with personal style. It’s great to hear clients say their friends asked about similar designs after seeing their prom photos.
The right preparation and application techniques really matter. Quality base coats, proper tools, and long-lasting top coats will give you a flawless design that lasts all night. My clients love learning these professional tips during their appointments.
Your dress style, comfort level, and desired look should guide your design choice. Simple elegant nails work great with detailed gowns, while bold nail art can enhance minimalist dresses. Your hands will be in countless photos – from corsage moments to dance poses.
These black nail designs show that sophistication stays timeless. Creating prom looks is amazing because I get to see my clients’ confidence soar when their nails match their whole outfit perfectly. Pick a design that makes you feel elegant and ready for your special night.