Halloween polka dot nails are my absolute favorite way to get into the spooky season spirit without spending hours on complicated designs! I’ve discovered that these dotted designs are surprisingly popular, with 473 people actively searching for this style.
Honestly, I love finding nail art that’s both festive and actually doable at home. These polka dot designs are perfect for beginners and anyone who wants to participate in Halloween season without creating something overly scary. Plus, they’re especially great for kids who want to show off their festive nails during the upcoming school year. From classic orange and black combinations to neon polka dot nails that glow in the dark, I’ve gathered 17 designs that are both fun and simple enough for even first-timers. Whether you’re looking for adorable kids fall nails or how to do polka dot nails with a spooky twist, these ideas will definitely satisfy your Halloween nail art cravings!
Classic Black and Orange Polka Dots
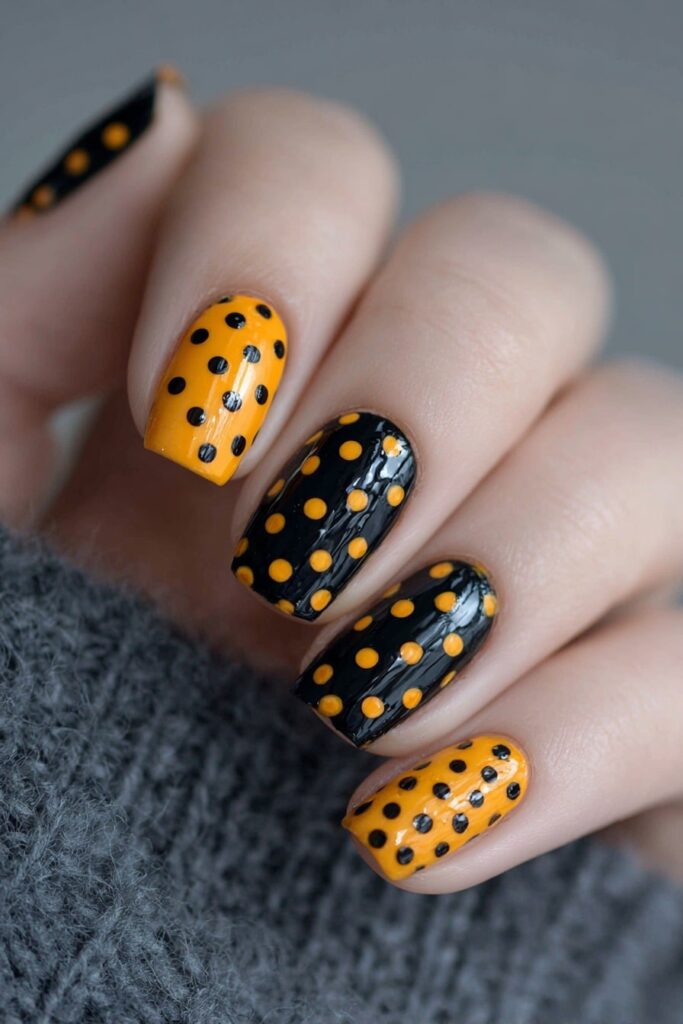
The iconic pairing of black and orange is my go-to Halloween nail design that never goes out of style. For fall 2025, black and orange polka dot nails are trending everywhere—from runways to TikTok tutorials, giving your manicure a retro vibe while maintaining a modern feel.
Classic Black and Orange Polka Dots Inspiration
When I’m looking for Halloween nail ideas that are both festive and wearable, I always return to this classic combination. The pattern is simple yet bold, perfect for those who want to participate in the Halloween season without going overboard. Additionally, this design works wonderfully for both short and long nails.
What I love most about these nails is their versatility—they’re appropriate for office settings but still capture the Halloween spirit. The contrast between bright orange and deep black creates a striking look that’s unmistakably seasonal.
Classic Black and Orange Polka Dots Tools Needed
To create this timeless design, you’ll need:
- Clear base coat
- Black and orange nail polish
- Dotting tool (or alternatives like a bobby pin or toothpick)
- Clear top coat
- Cotton swabs and nail polish remover for cleanup
For beginners, I recommend investing in a proper dotting tool set. These come with different tip sizes, allowing you to create various dot dimensions. However, a bobby pin works surprisingly well in a pinch—just use the straight part as it’s longer.
Classic Black and Orange Polka Dots Step-by-Step Guide
- Start by prepping your nails and applying a clear base coat. Let it dry completely.
- Paint most nails black, leaving one or two accent nails in orange for contrast.
- Once dry, dip your dotting tool into the orange polish. The pin should hold only a small drop of nail polish.
- Carefully place dots on your black nails in a pattern of your choice. I like creating diagonal rows for a playful look.
- For your orange accent nails, repeat the process with black polish for the dots.
- To ensure neat application, dab once for each dot and make sure to apply dark color over light color for visibility.
- Finally, seal your design with a glossy or matte top coat for longevity.
If you make mistakes, don’t worry! Simply dip a cotton swab in nail polish remover to clean up any stray marks around your cuticles.
Purple and Green Witchy Dots
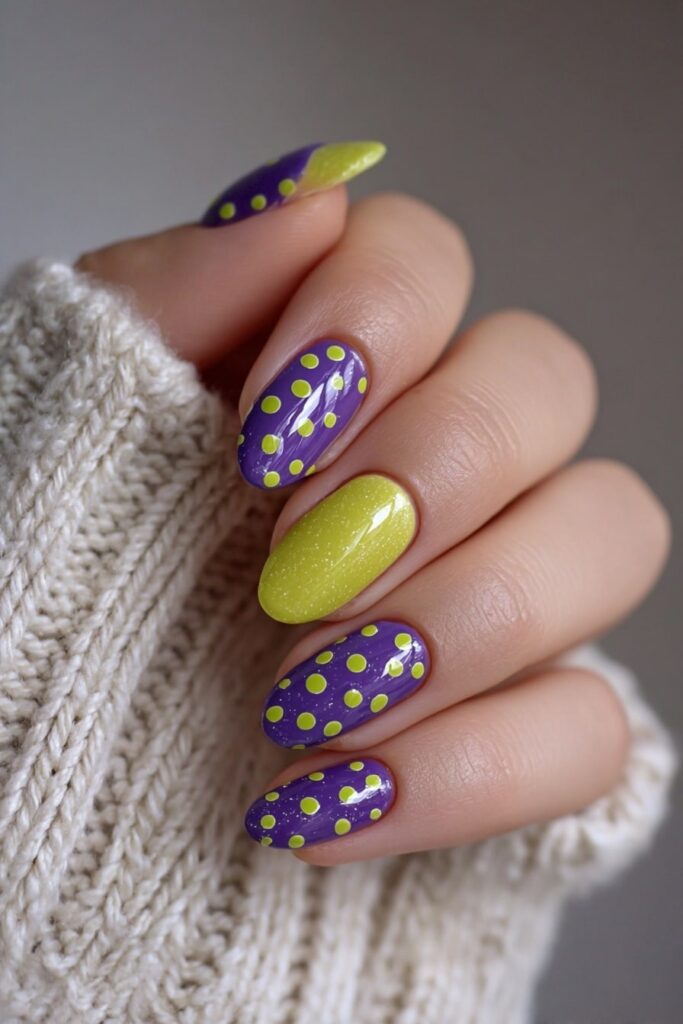
For witches-in-training looking for spellbinding nail art, I’ve fallen head over heels for purple and green polka dots—one of my favorite color pairings that absolutely screams Halloween. This bewitching combination offers a fun twist on traditional Halloween colors yet maintains that undeniably magical vibe.
Purple and Green Witchy Dots Inspiration
Whenever I create this look, I’m going for that perfect witchy ombré effect—starting with a vibrant purple base that gradually blends into a dark green hue at the tips. What makes this design truly special is how versatile it can be. For a more subtle approach, I sometimes use a white base which creates amazing contrast and really makes the purple and green dots pop.
Moreover, I love adding magical elements alongside the dots—tiny stars, bat silhouettes, or even miniature witch hat accents take this manicure to another level. These designs perfectly capture that mystical witch esthetic without being too complicated for home application.
Purple and Green Witchy Dots Tools Needed
To conjure up this magical manicure, gather these essentials:
- Base coat
- Vibrant purple and dark green crème polishes
- Metallic purple polish (adds wonderful dimension and texture)
- Dotting tools in various sizes
- White polish (optional for base or accent dots)
- Small nail art brush for detailing
- Stamping plates with witchy motifs (stars, bats, books, quills)
- Water-based top coat (prevents smudging on stamped elements)
- Quick-dry glossy top coat
Purple and Green Witchy Dots Step-by-Step Guide
- Apply your base coat and let it dry completely.
- Paint your nails with your preferred base color—either a bold purple or white for maximum impact.
- Once dry, use your dotting tool to create polka dots in alternating purple and green.
- For a dimensional effect, mix in some metallic purple dots alongside your crème polish dots.
- On accent nails (typically middle and ring fingers), add stamped witch-themed designs like swirling stars, bats, or spellbooks.
- First, seal your stamped designs with a water-based top coat to prevent smudging.
- Lastly, finish all nails with a generous layer of quick-dry glossy top coat for shine and longevity.
Although this design looks elaborate, it’s remarkably forgiving for beginners. The imperfect nature of hand-placed dots actually enhances that homemade witchy charm!
Glow-in-the-Dark Neon Polka Dots

Taking Halloween nail art to the next level, glow-in-the-dark neon polka dots have become my secret weapon for truly show-stopping manicures that literally light up the night. These designs create that perfect wow factor when transitioning from daylight to darkness.
Glow-in-the-Dark Neon Polka Dots Inspiration
I first tried these electrifying nails at a friend’s Halloween party, and guests couldn’t stop talking about them! What makes this style so special is the transformation—under normal lighting, you see simple dotted patterns, but turn off the lights and suddenly your fingertips illuminate with an eerie green glow.
The beauty of glow-in-the-dark polish lies in its versatility. You can create anything from ghostly patterns to simple dots that radiate in the darkness. Furthermore, these designs work wonderfully on both natural and acrylic nails, making them accessible regardless of your nail type.
Glow-in-the-Dark Neon Polka Dots Tools Needed
To create this illuminating look, gather these essentials:
- Clear nail polish (partly full bottle)
- Glow-in-the-dark pigment powder (approximately 1 teaspoon)
- White opaque polish as base
- Dotting tools in various sizes
- Small ball bearings (2-3) for mixing
- Clear top coat
- Optional: funnel or paper cone for pouring powder
Glow-in-the-Dark Neon Polka Dots Step-by-Step Guide
- Prep your nails thoroughly—this ensures adhesion and long-lasting wear.
- Apply white polish as your base color for maximum glow effect.
- If using store-bought glow polish, shake well. If making your own, add ball bearings to your clear polish, then carefully add glow powder and shake until thoroughly mixed.
- Once your base is dry, use dotting tools to create polka dot patterns.
- For extra dimension, vary the dot sizes or create gradient patterns.
- Seal your design with a clear top coat to protect against chips.
- Activate the glow by charging your nails under bright light for at least 30 seconds.
Glow-in-the-Dark Neon Polka Dots Halloween Vibe
Certainly, these nails create the ultimate spooky season accessory! I love telling ghost stories with friends while showing off my glowing fingertips in the darkness. Kids especially adore this effect—it’s like carrying tiny flashlights on each finger!
For maximum impact, I charge my nails with my phone flashlight right before trick-or-treating begins. Consequently, my nails glow brightly for hours through the evening. Unlike temporary glow sticks, these polishes maintain their illuminating properties indefinitely with proper recharging.
Spider Web and Dot Combo

Spider web designs paired with polka dots create one of my most requested Halloween nail combinations. This spooky-elegant design pairs beautifully with the polka dot theme yet adds that perfect touch of Halloween flair that’s both festive and sophisticated.
Spider Web and Dot Combo Inspiration
I first fell in love with this design after seeing how versatile it can be—from a single accent web on the thumb to multiple webs spanning across all fingers. What makes this design truly special is its adaptability. You can place webs at the tips, cuticles, or centered on the nail depending on your preference. Additionally, these webs look fabulous against any background color, though I find black bases with white webs create the most dramatic contrast.
Spider Web and Dot Combo Tools Needed
For this bewitching design, gather:
- Your favorite black polish (I use Wet n Wild Blackmail for a rich finish)
- White striping polish or acrylic paint
- Dotting tool or mechanical pencil (honestly, mechanical pencils work better than toothpicks!)
- Striper brush or nail art brush for web details
- Top coat to seal your masterpiece
- Optional: silver striping polish for added dimension
Spider Web and Dot Combo Step-by-Step Guide
- Start with your base color—typically black for classic Halloween vibes.
- Using your striper brush, draw three lines extending from one corner of your nail, creating a “Y” shape.
- Between each line, draw small curved “C” shapes connecting the lines (like a smiley face).
- Continue adding curved lines outward, creating that classic web pattern.
- Once your web is complete, use your dotting tool to add polka dots in contrasting colors around the web.
Spider Web and Dot Combo Optional Add-ons
To take this design up a notch, try adding tiny dangling spiders as accents. For extra sparkle, rhinestones placed strategically along the web create beautiful dimension. Alternatively, try using holographic chrome powder over your web design for a modern twist that catches light beautifully. Even matte top coat can transform this look, giving it a velvety finish that really makes the web pattern stand out.
Pumpkin Patch Polka Dots

Creating a pumpkin patch on my nails has become a fall tradition! As DIY-friendly nail art, these festive polka dots transform basic manicures into a seasonal statement without requiring salon-level skills.
Pumpkin Patch Polka Dots Inspiration
First of all, pumpkin polka dots offer versatility beyond the classic jack-o’-lantern designs. I’ve experimented with different looks—from cute miniature pumpkins scattered across a neutral base to more elaborate designs with tiny faces. What makes this design special is its adaptability; you can create a single pumpkin accent nail or transform your entire nail set into a miniature pumpkin patch!
Pumpkin Patch Polka Dots Tools Needed
To create your personal pumpkin patch, gather these essentials:
- Orange nail polish (bright or pastel tones work beautifully)
- Green polish for stems
- White polish for highlights or polka dots
- Base and top coat
- Thin nail art brush
- Dotting tool (essential for perfect circles)
- Optional: brown polish for a more subtle seasonal look
Pumpkin Patch Polka Dots Step-by-Step Guide
- Apply your base coat, followed by a neutral background (gray works wonderfully as it makes orange pop)
- Using orange polish, create small pumpkin shapes with your brush (similar to cloud technique)
- Once dry, add dimension with darker orange lines down the pumpkin (optional)
- Add tiny green stems with a nail art brush or small dotting tool
- For classic polka dots, add white dots around your pumpkins
- Seal everything with top coat for longevity
Obviously, this design can be customized—try pastel hues instead of traditional orange for a modern twist!
Candy Corn Dot Gradient
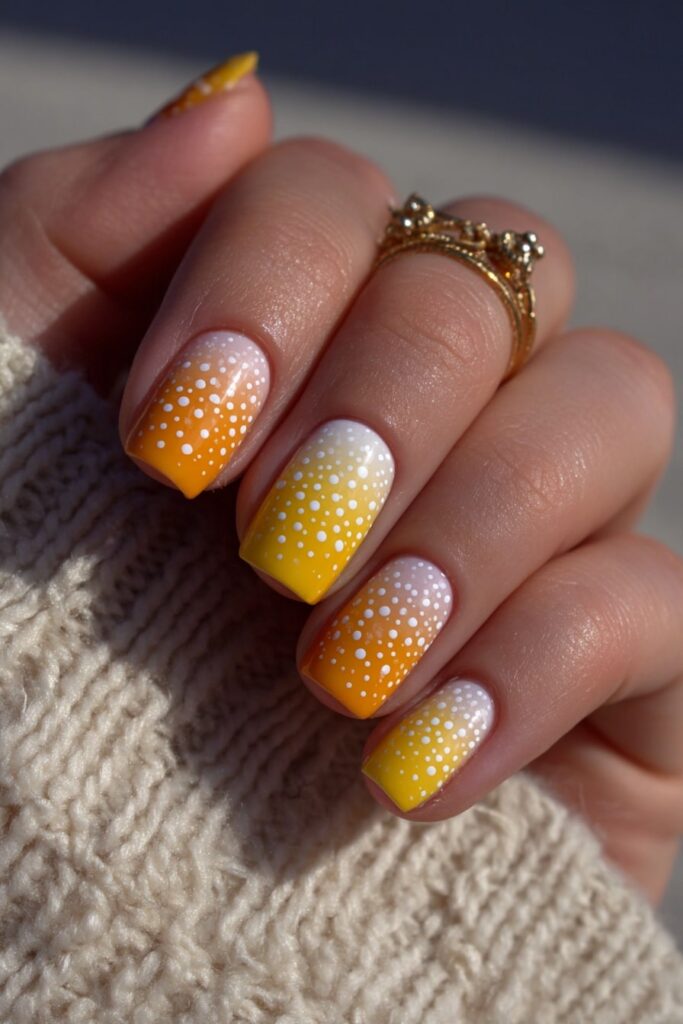
Every Halloween, candy corn inspires my nail designs with its iconic tri-color pattern! This sweet treat makes for an absolutely adorable dot gradient that’s surprisingly simple to achieve at home.
Candy Corn Dot Gradient Inspiration
The classic candy corn color scheme—white, orange, and yellow—offers a perfect palette for creating a festive gradient effect using dots. What I adore about this design is how the polka dots blend together, creating that signature candy corn ombré look. Initially, I was intimidated by gradient techniques, until I discovered this dotting method that mimics the beloved Halloween candy without requiring complex sponge work.
Candy Corn Dot Gradient Tools Needed
To create this sugary-sweet design, gather:
- White nail polish as base
- Yellow nail polish
- Orange nail polish
- Dotting tool (various sizes work best)
- Clear top coat
- Base coat
- Clean-up brush with acetone
Candy Corn Dot Gradient Step-by-Step Guide
- Apply two coats of white polish as your base and let dry completely.
- Paint yellow polish over the tips of your nails—this creates a guide and enhances vibrancy.
- Using your dotting tool with orange polish, make dots around the middle of your nail, concentrating them at the edge of the yellow section.
- Once dry, add yellow dots moving up into the orange section.
- Bring a few orange dots down into the yellow section to blend colors.
- Seal with top coat to smooth the design and add shine.
This playful design captures Halloween’s sweetness without spookiness—perfect for kids fall nails too!
Minnie Mouse Halloween Dots

Disney characters make the cutest addition to Halloween nail art, and Minnie Mouse dots have always been my go-to design for combining spooky season with adorable polka dots.
Minnie Mouse Halloween Dots Inspiration
Typically, I draw inspiration from Minnie’s signature colors and iconic silhouette. The classic combination of black, red, and white creates a recognizable yet festive look. What makes this design stand out is how versatile it can be—from subtle Mickey-shaped dots on black nails to full Minnie-themed accent nails with bows. In essence, this style works perfectly for both adults and as kids fall nails since Disney appeals to all ages.
Minnie Mouse Halloween Dots Tools Needed
To create this magical manicure, you’ll need:
- Black, white, and red nail polish
- Base coat and top coat
- Dotting tool or bobby pin
- Fine detailing brush
- Optional: pink polish for bows
Minnie Mouse Halloween Dots Step-by-Step Guide
- Apply base coat, then paint thumb and ring finger white, remaining nails red
- Once dry, use your dotting tool to create Mickey head shapes with black polish—one large dot with two smaller dots above for ears
- On accent nails, draw tiny bows using pink or red polish
- Add white polka dots around your Mickey silhouettes for contrast
- Seal with top coat for longevity
Minnie Mouse Halloween Dots Tips for Beginners
Given that precise dots can be tricky, start with just one accent nail featuring Minnie’s silhouette. Ordinarily, I recommend practicing the Mickey shape on paper first. For Halloween flair, try adding ghost Minnies on black nails or orange bases with Mickey pumpkin designs.
Blood Red and Black Dots
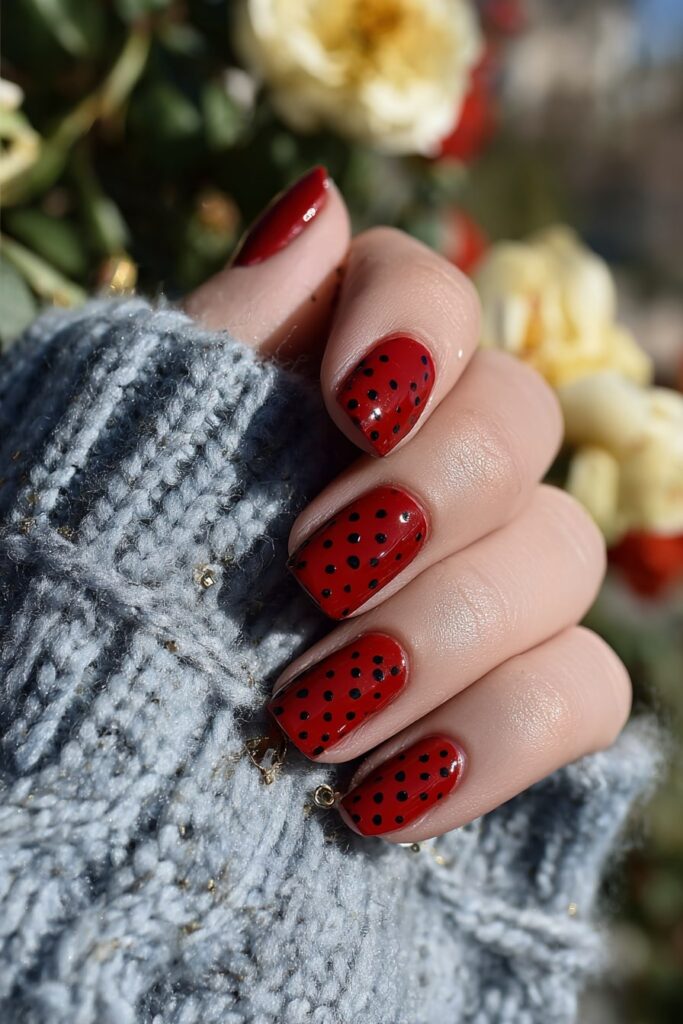
Vampire-inspired blood red and black dots bring a deliciously dark twist to Halloween polka dot nails! I became obsessed with this dramatic look after seeing how the crimson dots against black create that perfect spooky season esthetic.
Blood Red and Black Dots Inspiration
The dangerous-looking combination of blood red and black evokes classic vampire vibes in various renditions, from aura to ombré to stiletto designs. What draws me to this macabre manicure is how it balances sophisticated darkness with playful polka elements. Essentially, these nails capture Halloween’s sinister side without requiring professional skills. The stark contrast between deep black and vivid red creates a striking look that’s unmistakably Halloween yet elegant enough for any autumn occasion.
Blood Red and Black Dots Tools Needed
To create this bloodthirsty look, gather:
- Base coat
- Black nail polish
- Essie red nail polish
- Fine line detailer brush
- Dotting tool (alternatively, an empty pen or slightly open bobby pin works perfectly)
- Top coat
- Cuticle oil
- Optional: red glitter for added dimension
Blood Red and Black Dots Step-by-Step Guide
- Prep nails by filing and pushing back cuticles
- Apply base coat followed by black polish for dramatic contrast
- Using a detailer brush with red polish, draw three vertical lines in varying lengths
- Connect lines with small arches to form drip shapes
- Create three dots at the edge of each line
- Connect dots to lines with precise strokes, rounding edges for realistic blood drips
- Once dry, seal with top coat and apply cuticle oil
Ghostly White on Matte Black
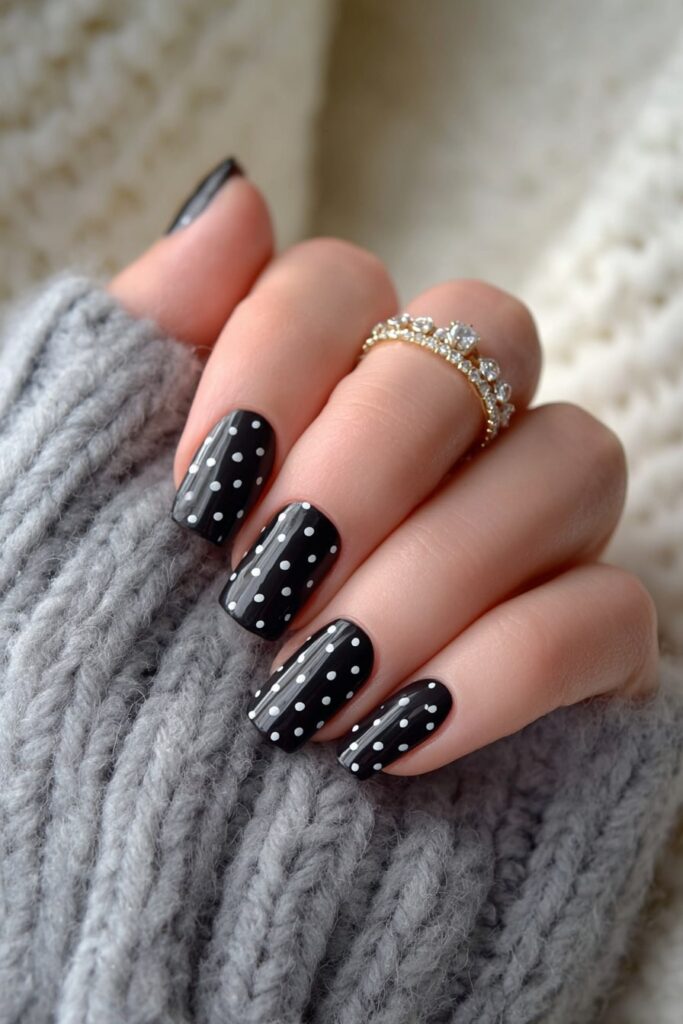
Matte black polish paired with ghostly white designs has quickly become my signature Halloween nail art! This hauntingly beautiful combination creates the perfect backdrop for spooky season while maintaining that polka dot theme we all love.
Ghostly White on Matte Black Inspiration
I first discovered this spine-tingling design while browsing for Halloween nail ideas that weren’t overly complicated. What makes ghost nail art so appealing is its versatility—you can create friendly Casper-inspired ghosts or eerier specters depending on your mood. Naturally, the stark contrast between the white ghosts and matte black background creates a dramatic look that’s perfect for Halloween parties yet simple enough for everyday wear.
Ghostly White on Matte Black Tools Needed
For this otherworldly manicure, gather:
- Base coat (I use Essie’s Here To Stay)
- Matte black polish (Essie’s Licorice works perfectly)
- White polish (Essie’s Blanc White or Kiki London’s Coconut)
- Small nail art brush (Le Mini Macaron Le Liner Brush is ideal)
- Dotting tool for eyes
- Top coat (Essie Speed Setter)
- Nail file and buffer set
- Cuticle oil
Ghostly White on Matte Black Step-by-Step Guide
- First, file your nails into your desired shape—rounder edges work best for this design
- Clean nails with acetone-soaked cotton pad
- Apply base coat, subsequently paint alternating nails with white and black polish
- Using your small brush, outline ghost shapes on each nail
- Fill in the white outlines, applying thin layers to avoid gloopiness
- Once dry, add two black dots as eyes using your dotting tool
- Seal with top coat for longevity and shine
- Finish with cuticle oil to keep nails healthy
Orange and Purple Kids Fall Nails

For kids who want to join the Halloween fun without scary designs, orange and purple nail combos offer a playful alternative that’s both festive and adorable! These complementary colors sit opposite each other on the color wheel, creating vibrant designs that children absolutely love.
Orange and Purple Kids Fall Nails Inspiration
As a nail enthusiast, I’ve discovered that children are naturally drawn to the brightness of purple and orange together. This combination works beautifully for kids who want Halloween-themed nails without spooky elements. Indeed, when my friend’s daughter requested “fall nails,” we opted for these shades that remind her of autumn leaves and candy rather than ghosts or monsters. The squoval shape works particularly well for children’s tiny fingers, giving enough space for simple polka dot patterns while remaining practical for daily activities.
Orange and Purple Kids Fall Nails Tools Needed
For this child-friendly manicure, gather: non-toxic nail polish in purple and orange shades, base coat, top coat, small dotting tool (or bobby pin), and nail stickers for those with limited patience. As an alternative, consider pre-designed press-on nails specifically made for children—they’re no-glue, mom-approved, and come with a mini file.
Orange and Purple Kids Fall Nails Step-by-Step Guide
First, apply a clear base coat. As such, paint alternating nails in purple and orange. Once dry, create simple dots using the opposite color—orange dots on purple nails and vice versa. For younger children, apply just three dots per nail for a neat finish. All in all, seal with a kid-friendly top coat or consider the peel-and-press option for fuss-free application and removal.
Skull Accent with Polka Dots
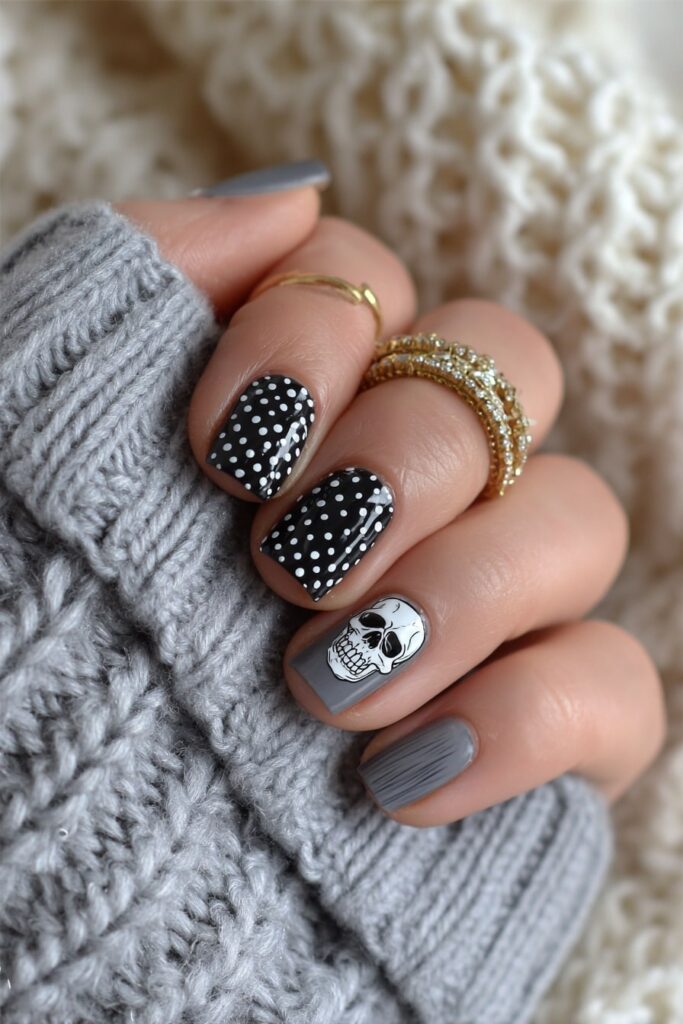
Skulls paired with polka dots create a nail design that adds just the right amount of spooky to my Halloween manicure collection! This edgy-meets-playful combo has become increasingly popular among nail enthusiasts searching for something beyond the ordinary.
Skull Accent with Polka Dots Inspiration
The beauty of skull accent nails lies in their versatility. Sometimes I opt for a colorful approach with orange, white, and black skull patterns on a purple background for a vibrant look. Alternatively, I adore pairing skull designs with silver accents for a more sophisticated edge. What I find most appealing about this design is how it balances the edgy skull element with playful polka dots—perfect for those who want Halloween flair without going too extreme.
Skull Accent with Polka Dots Tools Needed
To create this balanced design, gather:
- Black, white, and silver nail polishes
- Thin detail brush for skull outlines
- Dotting tool in various sizes
- Base and top coats
- Optional: RGB Oxblood polish for blood-red accents
- Nail adhesive tabs (for 1-2 days wear) or nail glue (for 2-3 weeks longevity)
Skull Accent with Polka Dots Step-by-Step Guide
- Apply base coat followed by your preferred background color
- Using white polish, create a skull shape on your accent nail
- Outline with black for definition
- Add dots around your skull using contrasting colors
- Consider adding tiny silver accents for dimension
- Seal with top coat to protect your design
Striped and Dotted Combo Nails
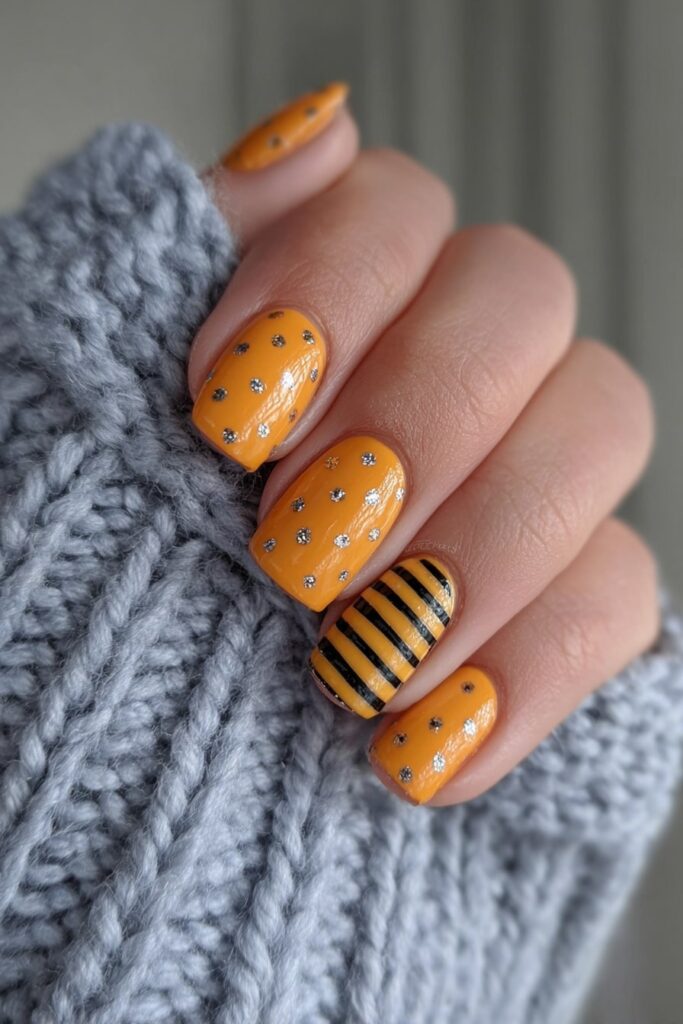
I’m absolutely in love with combining geometric patterns for Halloween nails – stripes and dots together create a nostalgic yet playfully spooky vibe!
Striped and Dotted Combo Nails Inspiration
My fascination with this style began after discovering 1980’s inspired geometric nail art that brings unlimited possibilities to Halloween designs. The beauty of this combination lies in how the structured lines of stripes contrast perfectly against playful dots. Even better, this retro-inspired look allows me to incorporate traditional Halloween colors while maintaining a fun, artistic approach. Plus, these patterns work wonderfully on both short and long nails, making them accessible for everyone.
Striped and Dotted Combo Nails Tools Needed
For this retro-meets-spooky design, gather:
- Dotting tool or stylus for creating not-quite-perfect circles
- Thin brush for stripe creation
- Halloween color palette (orange, black, purple, teal)
- Base and top coat
- Small squares of paper for practice
Striped and Dotted Combo Nails Step-by-Step Guide
- Apply base coat, letting it dry completely
- Create geometrical dot designs using your stylus—they shouldn’t be perfect circles
- Once dry, add stripes between sections using your detail brush
- Create tiny squares in some areas for added dimension
- Use opposite colors on alternating nails for a party-like effect
- Seal with top coat
As soon as you’re done, you’ll have a big celebration on your fingertips!
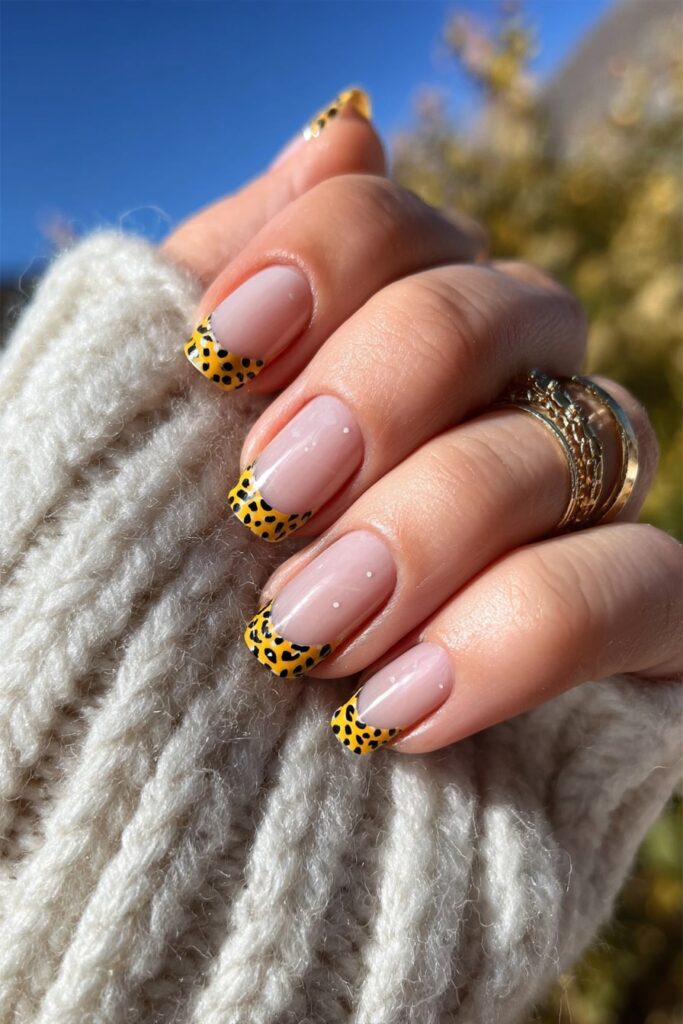
Polka Dot French Tips
I’ve recently rediscovered French tips with a spooky twist—adding polka dots transforms this classic style into a Halloween-worthy look! This technique has gained popularity on nail art platforms because it combines elegance with playfulness.
Polka Dot French Tips Inspiration
French tips with polka dots offer striking versatility for Halloween designs. The contrast between clean white tips and colorful dots creates visual interest without overwhelming the nail. What I find most appealing is how this design works equally well with traditional Halloween colors or more subtle autumn tones. Accordingly, you can customize your dots—whether scattered randomly or placed strategically along the tip line—to match your personal style.
Polka Dot French Tips Tools Needed
To create this look, gather these essentials:
- Base coat
- Your preferred base color (milky pink works beautifully)
- White or colored polish for tips
- Contrasting polish for dots
- Thin nail art brush
- Dotting tool (various sizes)
- Top coat
Polka Dot French Tips Step-by-Step Guide
First, apply base coat followed by your chosen base color. Once dry, create your French tip using a thin brush. Next, use your dotting tool to add dots along the French tip line—varying the sizes creates dimension. Thereafter, seal with top coat for longevity and shine. For a Halloween twist, try orange tips with black dots or vice versa!
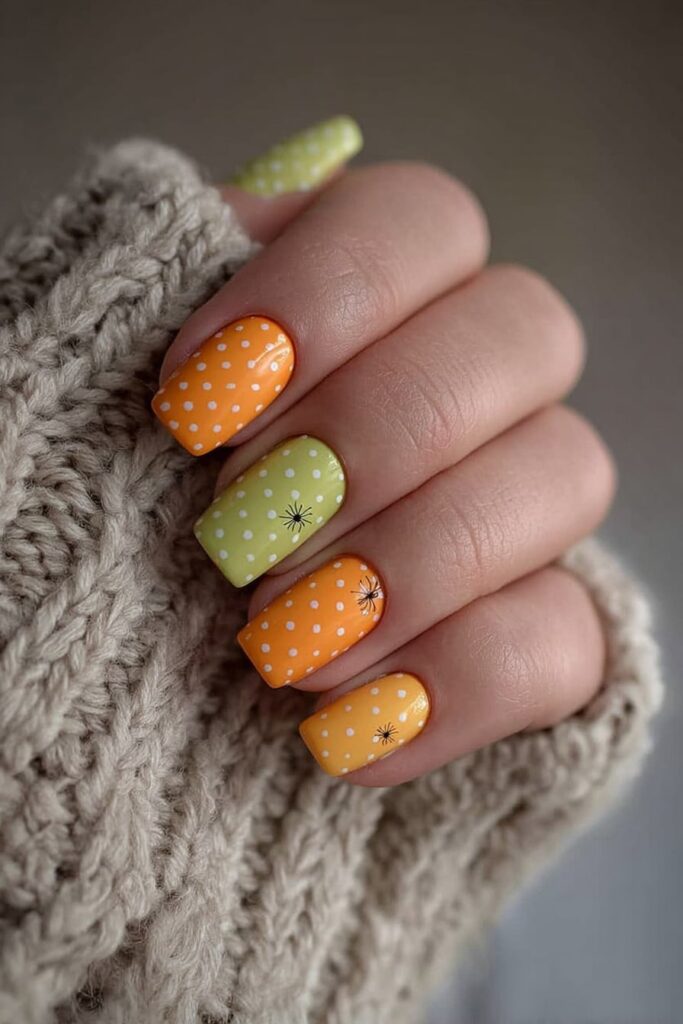
Spider Accent with Neon Polka Dots

The electrifying combination of creepy crawlers and vibrant dots makes spider accent with neon polka dot nails the perfect statement for Halloween parties! Uniquely blending spooky elements with playful pops of color, this design captures attention even in dim lighting.
Spider Accent with Neon Polka Dots Inspiration
Notably, these nails create stunning contrast—dark spiders against bright backgrounds make the design pop dramatically. I discovered that UV neon colors add an extra dimension, occasionally glowing under blacklights at Halloween events. The pattern works wonderfully as an accent nail paired with complementary neon polka dots across other fingers, creating balance between festive and frightful.
Spider Accent with Neon Polka Dots Tools Needed
To recreate this eye-catching look, gather:
- Black polish for spider details
- Neon polishes (green, pink, orange)
- White polish for highlights
- Thin nail art brush for webs and legs
- Dotting tools in various sizes
- Clear base and top coat
- Optional: UV-reactive polish for glow effect
Spider Accent with Neon Polka Dots Step-by-Step Guide
- Apply base coat, then paint most nails with your favorite neon shade
- For spider accent nails, use black polish to create a dot in the center for the body
- Add a smaller dot for the head
- Using your thin brush, draw eight legs extending from the body
- Add white dots for eyes
- On remaining nails, create polka dots using contrasting neon colors
- Seal with top coat for protection and shine
Generally, this design looks most striking against a black background, letting both spider and neon dots truly stand out.
Glow-in-the-Dark Green Dots
Ghostly green glow dots on my nails never fail to spark conversations at Halloween gatherings! These luminous designs transform from subtle patterns in daylight to electrifying displays once the lights dim.
Glow-in-the-Dark Green Dots Inspiration
As an avid Halloween nail enthusiast, I’ve discovered that green glow pigments produce the brightest, most intense effect among all glow colors. In fact, after properly charging under UV light, these ghoulish green dots can illuminate for hours! One time, after my nails baked in natural sunlight during a full day at an amusement park, they continued glowing until 1:00 a.m. despite sunset occurring around 6:00 p.m.
Glow-in-the-Dark Green Dots Tools Needed
To create this spellbinding effect, you’ll need:
- White opaque polish (crucial for maximum glow impact)
- Glow-in-the-dark green pigment powder or polish
- Dotting tools in various sizes
- Clear top coat
- UV light or phone flashlight for charging
Glow-in-the-Dark Green Dots Step-by-Step Guide
- Firstly, thoroughly prep your nails for adhesion and longevity
- Apply white polish as your base – this intensifies the glowing elements
- Paint dots using your glow-in-the-dark polish in various sizes
- Seal with clear top coat to protect against chips
- Charge under bright light for at least 30 seconds before entering darkness
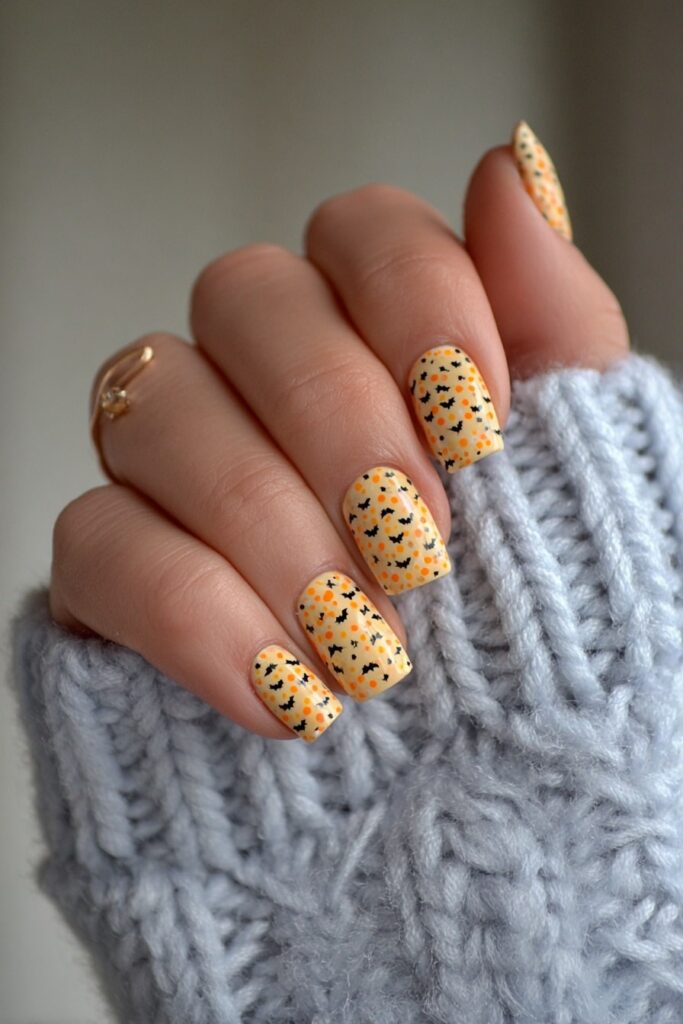
Cute Bat and Dot Combo
Bat designs paired with polka dots offer an irresistibly cute take on Halloween nail art! Unlike scarier Halloween motifs, these adorable flying friends bring playfulness to spooky season manicures.
Cute Bat and Dot Combo Inspiration
For my latest Halloween party, I wanted something festive yet whimsical. As such, I drew inspiration from kawaii-style bats – those adorable, non-frightening versions that add charm rather than fear. What makes this design special is how the bat silhouette creates an instantly recognizable Halloween motif while maintaining a cute esthetic. The contrast between the defined bat shape and random polka dots creates visual interest that’s both festive and stylish.
Cute Bat and Dot Combo Tools Needed
To create this charming design, gather:
- Black polish (I use Ugly Duckling Black for one-coat coverage)
- Base color (purple or nude works beautifully)
- Fine liner brush
- Dotting tool (or bobby pin)
- Matte top coat (optional but recommended)
- No-wipe top coat
Cute Bat and Dot Combo Step-by-Step Guide
First, apply your base color and let it dry completely. Next, mark the center of your nail where the bat will be positioned. Using your liner brush with black polish, create a small circle for the bat’s head. Afterward, draw two tiny points extending upward for ears. To complete the body, paint small half circles connecting to the head. Once satisfied with your bat outline, fill it in completely. After the bat design dries, add polka dots in contrasting colors around it. Seal your creation with top coat for longevity.
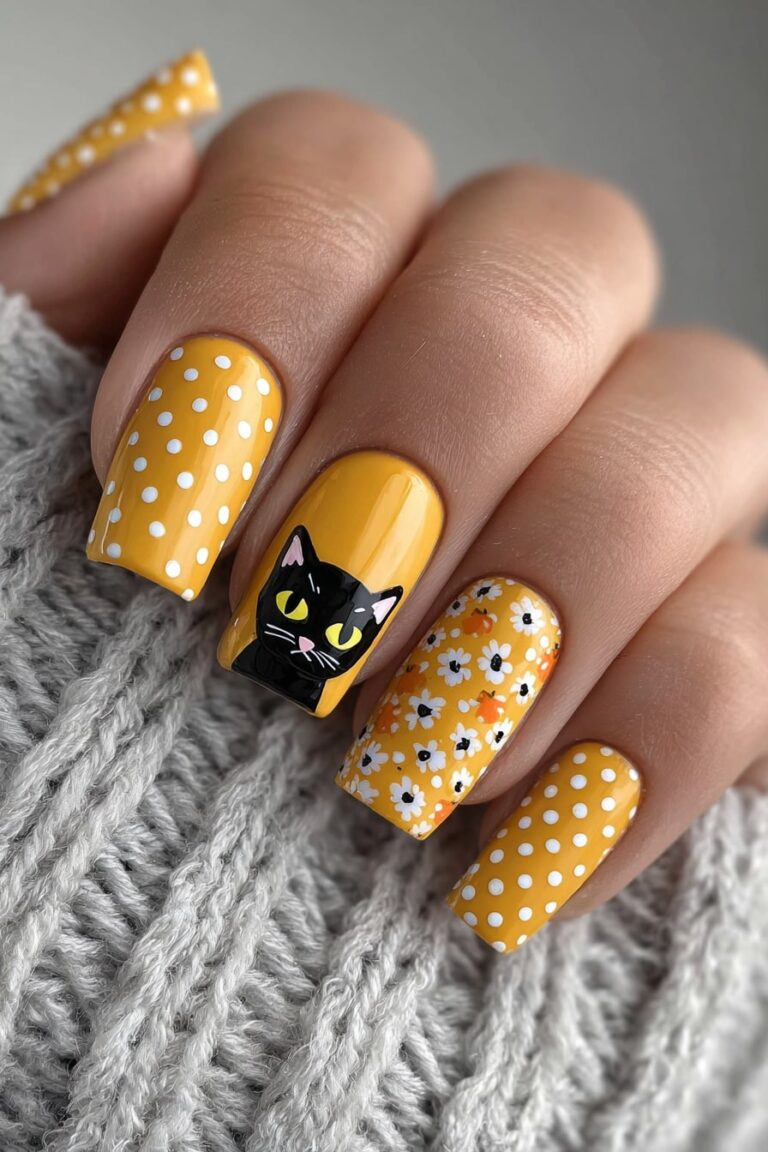
Black Cat Polka Dot Nails

Black cats have traditionally been symbolic Halloween figures that I adore incorporating into my seasonal nail art! These feline-inspired designs paired with polka dots create a purr-fectly festive manicure that captures Halloween spirit without being too intimidating.
Black Cat Polka Dot Nails Inspiration
I’m constantly drawn to sleek retro cat silhouettes against contrasting backgrounds. As a matter of fact, what makes these designs special is their versatility—you can create whimsical kitties with different personalities simply by adjusting head size, eye direction, and whisker placement! The stark contrast between a black cat and colorful polka dots creates a playful yet sophisticated Halloween esthetic.
Black Cat Polka Dot Nails Tools Needed
For this feline design, you’ll need:
- Black nail polish
- White nail polish (for eyes and polka dots)
- Dotting tool (or bobby pin)
- Thin nail art brush
- Base and top coat
- Optional: yellow or neon background color
Black Cat Polka Dot Nails Step-by-Step Guide
First, apply your base coat followed by two coats of your background color. Once dry, use your dotting tool to create an oval for the cat’s head. Simultaneously, with a thin brush, draw the cat’s neck and shoulders in a T-shape. Next, add triangular ears on the outer edges of the head. After that, create whiskers using the tip of a fine brush. Finally, add white dots for eyes, followed by pupils, and seal with top coat.
Conclusion
Halloween polka dot nails have truly become my go-to seasonal manicure, and I hope you’re feeling inspired to try some of these festive designs! After experimenting with countless styles over the years, I’ve found these dotted patterns offer the perfect balance of spooky fun and achievable technique.
Actually, what makes these designs so special is how adaptable they are for every skill level. Whether you’re a nail art beginner or someone with years of experience, the humble dotting tool (or even a bobby pin!) opens up endless possibilities for Halloween creativity.
My personal favorites change every season – sometimes I’m drawn to the classic orange and black dots for their timeless appeal, while other times I crave the excitement of glow-in-the-dark designs that transform as night falls. Undoubtedly, the ghost patterns on matte black have sparked the most conversations at Halloween parties!
Additionally, these polka dot designs work beautifully for both adults and children. Kids especially love the bright colors and simple patterns they can show off to friends at school. Though some designs might look complicated at first glance, breaking them down into simple dots makes them surprisingly manageable, even for little hands with some adult help.
Halloween nail art allows us to carry a bit of seasonal spirit wherever we go. Therefore, don’t be afraid to mix and match these ideas or add your own spooky twist! Perhaps try combining the spider web technique with glow-in-the-dark elements, or add tiny bat accents to your candy corn gradient.
Most importantly, have fun with the process! Nail art should be enjoyable, not stressful. Some of my favorite designs have emerged from happy accidents or experimental color combinations. Furthermore, polka dot patterns are wonderfully forgiving – if a dot isn’t perfect, just add another one nearby to balance it out!
These seventeen designs are just the beginning of what you can create. With a few basic tools and some Halloween imagination, your fingertips can showcase everything from subtle autumn nods to full-on spooky statements. Happy Halloween painting!