
If there is one color that has completely stolen my heart over the years, it is amethyst. As someone who has spent years in the beauty industry crafting looks that make people feel absolutely radiant, I can tell you with full confidence that amethyst nails are one of those timeless, versatile choices that never go out of style. Whether you love soft lavender whispers or deep, jewel-toned purple, this color family has something magical to offer every single person who chooses to wear it. Today, I am walking you through fourteen of my absolute favorite amethyst nail designs, and trust me, by the end of this article, you are going to be reaching for your nail kit with so much excitement and inspiration.
I remember the first time I truly fell in love with the amethyst color palette. I was working on a creative shoot where the entire mood board was built around gemstones and earth tones, and the moment I painted the model’s nails in that deep, rich purple, everything clicked. It was like the nails completed the entire look in a way nothing else could. Since then, I have been obsessed with finding new and creative ways to incorporate this gorgeous hue into nail art, and I want to share every single discovery with you. So grab your favorite snack, get comfortable, and let us dive into fourteen breathtaking amethyst nail designs.
Classic Solid Amethyst Nails

Inspiration
Sometimes the most powerful statement is the simplest one, and classic solid amethyst nails are my go-to recommendation for anyone who appreciates clean, polished elegance. This look is rooted in the beauty of restraint. There is something deeply confident about wearing a single, rich amethyst shade from cuticle to tip without any distractions. I love this look for its incredible versatility because it works just as beautifully at a brunch with friends as it does at a formal evening gathering. My inspiration for this design comes from the gemstone itself. An uncut amethyst crystal is stunning in its natural form, and your nails can embody that same raw, effortless elegance. The key with this look is choosing the right shade of amethyst for your skin tone, because I have always believed that nail color should celebrate your natural beauty, not compete with it.
Tools needed to create the nail design
To achieve perfect classic solid amethyst nails, gather your essentials before you begin. You will need a quality base coat to protect your natural nails, a creamy opaque amethyst nail polish in your preferred depth of purple, a thin nail brush for clean edges near the cuticle, a glossy top coat for that lasting shine, and nail polish remover with a few cotton swabs for clean-up around the skin. Investing in a high-quality formula makes a world of difference, and I always remind my students and followers that good tools produce great results.
Step by step guide to create the nail design
- Prep your nails by pushing back cuticles, filing to your desired shape, and applying a thin base coat. Allow it to dry completely before moving on.
- Apply your first coat of amethyst polish in smooth, even strokes from base to tip, starting at the center and working outward. Let it dry for two minutes.
- Add a second coat for full opacity and that rich jewel-like depth, cleaning any edges with a cotton swab dipped in remover.
- Seal with a glossy top coat and allow everything to dry fully before using your hands.
Amethyst Ombre Nails

Inspiration
Ombre nails have always had a very special place in my heart because they feel like a wearable piece of art. When you apply the gradient technique to the amethyst color family, the results are absolutely breathtaking. I love creating amethyst ombre nails that transition from the softest lilac at the base to the deepest, most intense purple at the tips, creating a dimensional effect that looks like the nails are glowing from within. My inspiration for this style honestly came from watching the sky shift colors during golden hour, where the atmosphere moves from soft pink into lavender and then settles into that deep, moody purple at the horizon. Nature is genuinely the best nail artist, and ombre nails are my way of bringing that atmospheric energy right onto your fingertips. This look is beautifully forgiving because the blending disguises small imperfections, making it wonderful for beginners who want something that looks more advanced than it actually is.
Tools needed to create the nail design
For amethyst ombre nails you will need a base coat, two to three shades of amethyst nail polish ranging from light lilac to deep purple, a makeup sponge for blending the gradient, a flat cleanup brush, a generous top coat, and nail polish remover for tidying up the edges after application.
Step by step guide to create the nail design
- Apply base coat and then paint your entire nail with the lightest amethyst shade as your base. Allow this layer to dry completely before moving forward.
- Dab two or three amethyst shades side by side with slight overlap onto a makeup sponge, then gently press and rock the sponge onto each nail, repeating two to three times for depth and saturation.
- Clean up the edges with a small brush dipped in nail polish remover to remove sponged color from the surrounding skin.
- Apply two thin coats of glossy top coat to smooth the texture and seal in the gorgeous gradient you just created.
Amethyst Glitter Nails

Inspiration
Oh, glitter nails. They have a reputation for being a little extra, and honestly? That is exactly why I love them so much. Amethyst glitter nails take everything wonderful about the purple color family and amplify it with sparkle and dimension that genuinely catches light from across the room. I remember doing a glitter amethyst nail look for a client heading to a milestone birthday celebration, and when she saw her finished nails under the studio lights, she actually teared up a little. That reaction right there is why I do what I do. The inspiration behind this design is quite literally the way amethyst crystals catch sunlight, sending tiny rainbow flashes in every direction. Glitter nails channel that same magic in wearable form. You can go for subtle fine glitter mixed into a sheer amethyst base for daytime elegance, or full chunky glitter for an all-out party-ready nail that demands attention and gets it every single time.
Tools needed to create the nail design
You will need a base coat, a sheer amethyst base polish, fine or chunky purple and violet glitter polish or loose glitter, a small detailing brush for precision placement, a thick gel-like top coat to seal and smooth the glitter texture, and remover for clean-up.
Step by step guide to create the nail design
- Apply your base coat and follow with one or two coats of your sheer amethyst base color to create a foundation that the glitter will sit against beautifully.
- Apply your glitter polish over the dried base, concentrating the glitter toward the tips for a glitter fade effect, or coat the entire nail for maximum sparkle impact.
- Use a small detailing brush to pick up and place individual glitter pieces near the cuticle or tip for a more intentional, editorial look if desired.
- Apply two generous coats of a thick, smoothing top coat to lock in all the glitter and create a glass-like, snag-free finish that lasts.
Amethyst Marble Nails

Inspiration
Marble nail art is one of those techniques that looks impossibly difficult but is actually more approachable than people think, especially once you understand the process. Amethyst marble nails combine the cool sophistication of natural stone with the dreamy romance of purple, and the results are consistently stunning. I first experimented with this technique during a slow afternoon in my personal studio when I was playing around with water marbling, and I was genuinely surprised by how organic and beautiful the veining looked. The inspiration comes directly from real amethyst geodes, those incredible natural formations where deep purple crystals are intersected by white or silver mineral veins that look like they were painted by hand. On your nails, you can recreate those delicate veins using a thin striper brush, creating a look that is both luxurious and deeply artistic. This is one of those designs that makes people stop mid-conversation to grab your hand for a closer look.
Tools needed to create the nail design
Gather a base coat, a medium-toned amethyst polish for the base, white or silver nail polish for veining, a very thin striper brush or nail art liner brush, a matte or glossy top coat depending on your preference, and a steady hand with a lot of patience and love for the process.
Step by step guide to create the nail design
- Apply your base coat followed by two coats of your chosen amethyst shade, making sure coverage is even and fully opaque before you begin adding details.
- Using your thin striper brush loaded with white or silver polish, draw irregular, diagonal veins across the nail in light, confident strokes, crossing them slightly for a natural stone effect.
- Soften the veins slightly by lightly brushing a clean, dry brush over them before they fully dry to create that blurred, organic marble look rather than a sharp painted line.
- Finish with your preferred top coat and allow to dry fully, admiring the absolutely gorgeous result you just created with your own hands.
Amethyst French Tip Nails

Inspiration
I adore a reimagined French manicure more than almost anything in the nail world, because it takes a classic that everyone knows and loves and makes it feel completely fresh and modern. Amethyst French tip nails replace that traditional white tip with a rich purple shade while keeping the nude or soft pink base that makes French manicures so universally flattering. I started recommending this look to clients who wanted something professional enough for the workplace but still expressive and personality-filled, and the response has been incredible every single time. The inspiration for this modern twist is rooted in the idea of subtle surprise, where at first glance nails look refined and polished, but then you notice the gorgeous amethyst tips and suddenly the whole look comes alive. You can play with the thickness of the French tip too, going for a thin, delicate line for an understated effect or a chunkier, more dramatic tip for a bolder statement that really commands attention.
Tools needed to create the nail design
You will need a base coat, a sheer nude or soft pink base polish, an amethyst polish for the tips, French tip guides or nail tape for clean lines, a thin nail art brush for freehand application if preferred, a glossy top coat, and remover for any touch-ups.
Step by step guide to create the nail design
- Apply base coat and paint two coats of your nude or soft pink base across all nails, allowing full drying time before you move on to the tips.
- Place French tip guides just below the free edge of each nail, pressing firmly to prevent the amethyst polish from bleeding underneath, then paint the exposed tip with your amethyst shade.
- Remove the guides carefully while the polish is still slightly wet for cleanest results, then allow the tips to dry before touching up any uneven edges with a thin brush.
- Apply a glossy top coat over the entire nail to unify the base and tip into one seamless, polished finish.
Amethyst Floral Nails

Inspiration
Floral nail art holds a deeply personal place in my creative journey. Growing up in Savannah, Georgia, I was surrounded by the most breathtaking gardens, magnolias, wisteria, and jasmine climbing every fence and trellis. When I began incorporating florals into nail art, I wanted to capture that same sense of lush, organic beauty that I grew up with, and amethyst florals do exactly that. There is something incredibly romantic and feminine about painting delicate flowers in varying shades of purple and violet against a complementary background. Amethyst floral nails can range from simple, single-flower accent nails to elaborate all-over botanical designs that feel like tiny paintings on your fingertips. I particularly love pairing deep amethyst petals with fine gold accents that make the flowers feel elevated and precious. Whether you go for wisteria-inspired drooping clusters or simple five-petal blooms, this design brings an effortless beauty to your hands that feels both artistic and deeply personal.
Tools needed to create the nail design
You will need a base coat, an amethyst or contrasting base polish, multiple shades of purple nail polish for petals, a very fine detail brush, a dotting tool for flower centers, gold or white polish for accents, a glossy top coat, and remover for precision clean-up.
Step by step guide to create the nail design
- Apply base coat and your chosen background color, whether that is a soft nude, a deep amethyst, or a crisp white that will make the purple florals truly pop.
- Using your fine detail brush, paint small five-petal flowers by making five short strokes fanning outward from a central point, varying the pressure for petals of different sizes and shapes.
- Add depth to each flower by shading one side of the petals with a slightly darker amethyst shade, then place a tiny dot of gold or white in the center of each bloom using your dotting tool.
- Seal with a glossy top coat to bring the florals to life and protect all your beautiful detailed work from chipping.
Amethyst Geometric Nails

Inspiration
I went through a phase a few years back where I became completely obsessed with graphic, architectural nail art, and geometric amethyst nails were born right in the middle of that creative obsession. There is something so striking about the combination of sharp angles and clean lines against a rich, saturated purple that feels simultaneously bold and sophisticated. My inspiration for geometric amethyst nails comes from the structure of amethyst crystals themselves, which naturally form in angular, hexagonal prisms. By recreating those geometric shapes on nails using nail tape and a steady hand, you end up with a design that feels both natural and incredibly intentional. This style is perfect for someone who loves modern, architectural aesthetics and wants their nails to feel like a piece of contemporary art. You can keep it simple with a single diagonal line dividing the nail into two amethyst tones, or get more complex with triangles, hexagons, and negative space cutouts that really showcase your artistic fearlessness.
Tools needed to create the nail design
You will need a base coat, two or more shades of amethyst nail polish in light and dark tones, nail tape or striping tape for crisp geometric lines, a thin striping brush, a glossy or matte top coat, and remover for any clean-up after removing the tape.
Step by step guide to create the nail design
- Apply your base coat and paint the nail with your lighter amethyst shade as the base, allowing it to fully cure so the tape does not lift the color when removed.
- Press your nail tape firmly onto the nail in your desired geometric pattern, creating triangles, diagonal splits, or any angular shape you love, then paint over the exposed area with your deeper amethyst shade.
- Remove the tape carefully and slowly while the second color is still wet for the sharpest, cleanest geometric lines possible, then allow everything to dry completely.
- Apply a matte or glossy top coat depending on the aesthetic you prefer, with matte top coat giving geometric designs an especially modern, editorial finish.
Amethyst Chrome Nails

Inspiration
The first time I applied chrome powder to an amethyst nail, I genuinely gasped. The effect is unlike anything else in the nail world because chrome turns an already beautiful purple into something that looks liquid, metallic, and completely otherworldly. Amethyst chrome nails catch light in a way that is almost hypnotic, shifting between deep violet and bright silver-purple as the hand moves. I did this look on a client before a major red carpet appearance and the amount of attention her nails received throughout the night was truly something. My inspiration for chrome amethyst nails comes from the concept of transformation. The amethyst crystal has long been associated with spiritual energy and transformation in many cultures, and chrome takes that theme and turns it into something visually electric. This is not a subtle nail look by any stretch of the imagination, and that is exactly the point. Chrome amethyst nails say, “I am here, I am confident, and I am absolutely not hiding.”
Tools needed to create the nail design
For chrome amethyst nails you will need a base coat, a gel amethyst nail polish, a UV or LED lamp for curing if using gel, chrome powder in silver-violet or purple mirror finish, an eyeshadow applicator or chrome rubbing tool, a no-wipe gel top coat, and a UV lamp for final curing.
Step by step guide to create the nail design
- Apply and cure your base coat under the UV lamp, then apply two thin coats of gel amethyst polish, curing between each layer for a fully solid, non-tacky base.
- Apply your no-wipe gel top coat and cure it under the lamp, leaving a slightly tacky layer that will act as the bonding surface for your chrome powder application.
- Using an eyeshadow applicator or chrome rubbing tool, press and buff the chrome powder onto the nail surface in small circular motions until the mirror-like chrome finish appears and intensifies.
- Seal with another layer of no-wipe gel top coat and cure fully under the lamp to lock in your stunning chrome amethyst finish and protect it for weeks of wear.
Amethyst Galaxy Nails

Inspiration
Galaxy nails are one of those designs that genuinely make me feel like a painter every single time I create them, and when the color palette centers around amethyst and deep space purples, the results are nothing short of cosmic. I absolutely love galaxy amethyst nails because they combine multiple shades of purple, midnight blue, black, and scattered silver or white glitter to recreate the feel of looking up at a night sky full of stars and nebulas. My inspiration for this design is very literal. I have always been captivated by images of deep space, particularly those stunning photographs of nebulas where gases swirl in shades of violet, indigo, and pink that look like they were hand-painted by some cosmic artist. Recreating that on a nail canvas is one of my favorite creative challenges, and the sponging technique makes it far more achievable than it might look at first glance. This design is perfect for someone who wants their nails to start conversations, because I promise you, nobody can look at galaxy nails without wanting to ask about them.
Tools needed to create the nail design
You will need a base coat, a black nail polish for the base, multiple shades of amethyst and blue nail polish, a makeup sponge, fine white or silver glitter polish, a small dotting tool for stars, a glossy top coat, and remover for clean-up.
Step by step guide to create the nail design
- Apply your base coat followed by two coats of black nail polish to create that deep, dark space background, allowing full drying time before you begin adding color.
- Sponge your amethyst and indigo shades onto the dried black base in soft, swirling patches, layering the colors and blending slightly where they meet to create that nebula cloud effect.
- Add tiny star details by dipping a very thin brush or toothpick into white or silver polish and flicking small dots of varying sizes across the nail surface to mimic a star field.
- Seal with a glossy top coat to give your galaxy the luminous depth and shine that makes it truly look like you have captured the universe on your fingertips.
Amethyst Negative Space Nails

Inspiration
Negative space nail art is one of the most clever and modern techniques in the contemporary nail world, and when combined with amethyst shades, it creates a look that is simultaneously minimal and striking. The concept is simple but impactful. Instead of covering the entire nail with polish, you intentionally leave portions of the natural nail bare, creating a design made partly of polish and partly of empty space. I fell in love with this technique during a period when I was really exploring minimalist beauty, and I found that leaving that negative space actually drew more attention to the nail than a fully painted look sometimes would. My inspiration comes from modern graphic design and architecture, where empty space is used as a design element rather than a mistake to be filled. Amethyst negative space nails feel incredibly current and sophisticated, perfect for someone who wants a nail look that whispers rather than shouts but still communicates a very clear and confident sense of personal style that people cannot help but notice and admire.
Tools needed to create the nail design
You will need a base coat, nail tape or hole reinforcer stickers for clean negative space shapes, an amethyst nail polish in your chosen shade, a thin striping brush, a glossy or matte top coat, and remover for refining edges after tape removal.
Step by step guide to create the nail design
- Apply a single coat of clear base coat to the entire nail, then place your nail tape or stickers in the desired pattern, leaving the areas where you want negative space uncovered by the tape.
- Paint your amethyst shade over the entire nail including the tape, making sure coverage is even and opaque across the painted portions.
- Remove the tape carefully while the polish is still slightly wet to reveal clean, crisp lines between the painted amethyst sections and the bare negative spaces.
- Apply a top coat only over the painted amethyst sections to maintain the visual contrast between the polished areas and the matte natural nail showing through.
Amethyst Rhinestone Nails
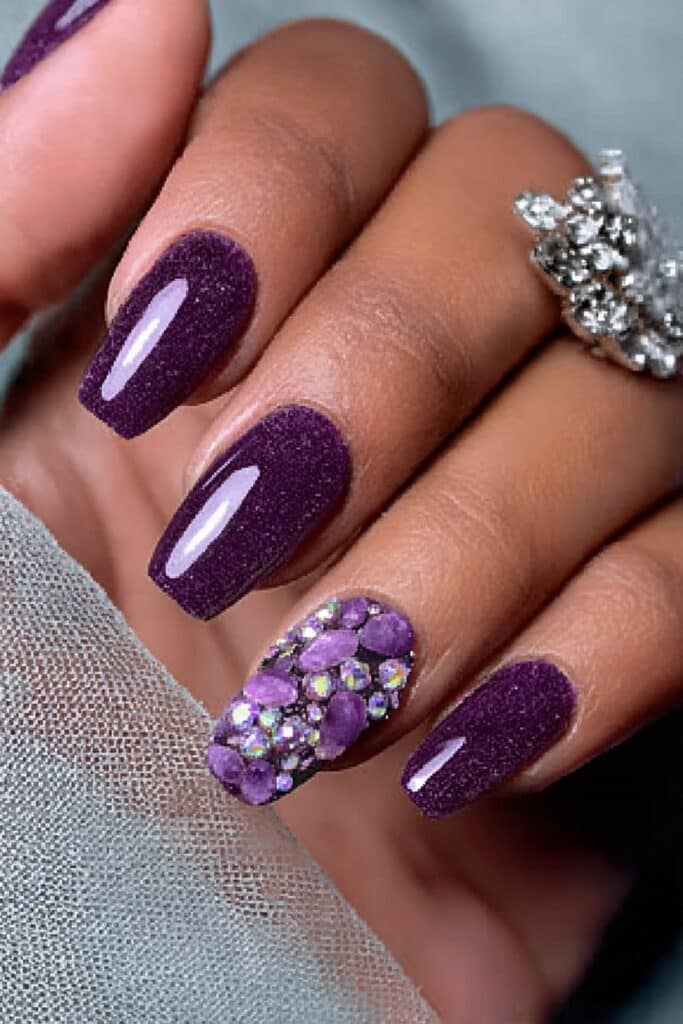
Inspiration
If there is one thing I know about my clients and followers after all these years, it is that people love a nail look that feels genuinely luxurious and special. Amethyst rhinestone nails deliver that feeling in the most generous and glamorous way possible. I created my first rhinestone amethyst nail set for a client attending a milestone celebration, and the moment she held her hands up under the venue lighting, those little rhinestones caught every beam and sent tiny flashes of light across the room like a personal disco effect on her fingertips. The inspiration behind this design is rooted in jewelry, because amethyst has been used in fine jewelry for centuries and rhinestone nails are essentially wearable gemstone accessories. You can keep rhinestone placement delicate and intentional with just a few stones near the cuticle for an elegant accent, or go full maximalist with an encrusted nail that makes an absolute statement. Either approach is valid and absolutely stunning in its own way.
Tools needed to create the nail design
You will need a base coat, your amethyst base polish, a variety of rhinestones in clear, purple, and violet tones in different sizes, a nail glue or thick top coat for adhering stones, a wax pencil or dotting tool for picking up and placing rhinestones, and a top coat for sealing the stones into place.
Step by step guide to create the nail design
- Apply your base coat and two coats of amethyst nail polish, allowing full drying time before you begin placing any rhinestones to prevent smudging the base color.
- Apply a small drop of nail glue or thick gel top coat to the areas where you plan to place rhinestones, working in small sections so the adhesive does not dry before you place the stones.
- Use a wax pencil or dotting tool to pick up rhinestones one at a time and press them gently but firmly into the adhesive in your desired pattern, whether clustered, scattered, or in a deliberate row.
- Apply a generous layer of top coat over the entire nail and around the base of each rhinestone to seal everything in place and prevent stones from catching and lifting during daily wear.
Amethyst Abstract Art Nails

Inspiration
Abstract nail art is where I truly get to be fully myself as an artist, because there are no rules, no boundaries, and no wrong answers. Amethyst abstract nails combine free-form brushstrokes, swirls, splashes, and shapes in varying shades of purple to create something that looks like a tiny abstract painting on every nail. I love this style for the creative freedom it offers and for the way it always turns out slightly different every single time, making each set genuinely one of a kind. My inspiration for amethyst abstract nails comes from the abstract expressionist art movement, where emotion and energy are communicated through bold, unrestrained mark-making rather than precise representation. When I am in the mood to play with nail art purely for the joy of it, abstract is always where I land, and amethyst gives me such a rich and versatile color palette to work with, from pale lavender whispers to deep, passionate violet strokes that communicate mood and energy in a way that feels very alive and very real. This is the nail look for the person who is not afraid to be seen.
Tools needed to create the nail design
You will need a base coat, a light or neutral base polish, multiple shades of amethyst nail polish, a small fan brush and round detail brush for different mark-making effects, gold or white foil pieces for texture, a glossy top coat, and remover for clean-up.
Step by step guide to create the nail design
- Apply base coat and one to two coats of your chosen neutral or light amethyst base color, allowing it to dry before you begin building your abstract design on top.
- Using your fan brush and detail brush, apply loose, gestural strokes of varying amethyst shades across the nail, overlapping colors and allowing them to blend slightly at the edges for an organic, painterly feel.
- Press tiny pieces of gold or silver foil onto any areas of the still-tacky polish to add unexpected texture and dimension that elevates the abstract design from simple to absolutely editorial.
- Seal with two coats of glossy top coat to protect all the layered detail work and give the finished abstract nail that professional, gallery-worthy finish.
Amethyst Holographic Nails

Inspiration
Holographic nail polish is hands down one of the most exciting innovations in the nail world in recent years, and combining it with amethyst creates a look that is genuinely mesmerizing. Amethyst holographic nails shift and scatter rainbow light with every movement, creating a prism effect against the purple base that looks like you have captured actual magic on your fingertips. I remember wearing this exact look during a particularly creative period in my work, and at every event, someone would catch my nails moving in the light and immediately stop to ask about them. Holographic nails work because the micro-fine metallic particles in the formula break light into a spectrum of colors while the amethyst base keeps the overall palette grounded and cohesive. The result is a nail look that feels futuristic, feminine, and completely extraordinary all at the same time. If you have ever wanted your nails to look like they belong in a fashion-forward editorial spread, amethyst holographic nails will absolutely deliver on that fantasy without requiring an advanced skill level to achieve.
Tools needed to create the nail design
You will need a base coat, a holographic amethyst nail polish or a regular amethyst polish paired with holographic topcoat, a UV lamp if using gel formula, a glossy top coat, and remover for any clean-up around the nail edges.
Step by step guide to create the nail design
- Apply your base coat and allow it to dry, then apply two thin, even coats of your holographic amethyst polish, allowing each coat to dry fully before adding the next to build depth and intensity.
- Apply a third coat if needed to maximize the holographic effect, making sure not to over-brush the polish as this can disrupt the holographic particles and reduce the light-scattering effect you are aiming for.
- Apply a single thin layer of holographic top coat over your dried polish to amplify the prism effect even further, adding an extra dimension of sparkle that takes the design to a completely new level.
- Seal with a final glossy top coat to lock everything in and give your nails that glass-like, high-shine finish that makes the holographic effect pop even more under different lighting conditions.
Amethyst Geode Nails

Inspiration
I saved this one for last because it is genuinely my absolute favorite amethyst nail design of all time, and I wanted to end this list on the highest possible creative note. Amethyst geode nails are inspired directly by the natural beauty of amethyst geodes, those breathtaking geological formations where crystals grow inside hollow rock and create these incredible, cavity-shaped formations filled with glittering purple crystals. Recreating this effect on a nail is a true labor of love, involving layers of color, foil, glitter, and carefully placed rhinestones that together build something that looks genuinely like a wearable piece of the earth’s geology. I did this design for the first time as a personal project on a slow Sunday afternoon, and I was so moved by the result that I took photographs of it immediately and shared it everywhere because it felt too beautiful to keep to myself. Geode nails celebrate the raw, organic beauty of the natural world in the most intimate and personal way, because you carry that beauty with you wherever you go, on your very own hands. This design takes patience and creativity, but the finished result is so profoundly rewarding that every minute spent is completely worth it.
Tools needed to create the nail design
You will need a base coat, black or deep navy nail polish for the geode cavity base, multiple shades of amethyst nail polish from pale to deep, gold nail foil and gold striping polish for the geode rim, fine amethyst glitter, small rhinestones, a thin detail brush, a dotting tool, and a glossy gel top coat for depth and shine.
Step by step guide to create the nail design
- Apply your base coat and paint the nail with a deep navy or black polish as the outer base, then use your fine detail brush to paint the oval or irregular geode shape in a lighter amethyst shade toward the center of the nail, building the inner cavity shape that defines the geode effect.
- Layer progressively lighter amethyst shades inside the geode cavity shape, adding fine amethyst glitter inside the lightest area to create the glittering crystal cluster effect that gives geode nails their unmistakable natural magic.
- Outline the edge of the geode cavity with thin gold striping polish and press small pieces of gold foil along this border to recreate the gold and mineral deposits found in natural geodes, adding dimension and a fine jewelry aesthetic.
- Place tiny clear or purple rhinestones within the crystal cluster area, then apply a thick glossy gel top coat over the entire nail to create the deep, glassy look of real crystal enclosed within stone, curing under a lamp if using gel formula for maximum durability and depth.
Conclusion
As Belle Hathaway, I want to leave you with something that goes a little beyond just nail polish and techniques. Throughout my entire career, whether I have been backstage at fashion events, in my Los Angeles studio, or teaching students who are just beginning their beauty journeys, the most important lesson I have learned is that beauty is never just about the surface. It is about the joy you feel when you look down at your hands and see something that genuinely reflects who you are in that moment.
Amethyst nails hold a very personal significance for me. Purple has long been associated with creativity, wisdom, and transformation, and those are three values that have guided every step of my professional life since I left Savannah at eighteen years old with nothing but ambition and a deep love for the artistry of beauty. When I paint or when I teach, I am always trying to channel something real, something that makes the person wearing the look feel more like themselves, not less.
What I hope you take away from this article is not just fourteen beautiful nail designs but the permission to experiment, play, and express yourself freely through your beauty choices. Whether you are someone who meticulously recreates a geode design with rhinestones and gold foil or someone who simply swipes on a single coat of solid amethyst because it makes you feel good, both choices are equally valid and equally beautiful. The technique matters, yes, and I hope the step-by-step guides in this article make each design feel accessible and achievable for you regardless of your skill level. But the spirit behind the technique matters even more.
My mother used to say that when a woman takes time to make herself feel beautiful, she is not being vain. She is practicing self-care in its most ancient and human form. I think about that often when I am sitting across from a client or filming a tutorial for my community, and I think about it when I am encouraging young women in the workshops I support to see their own beauty as something worth investing in and celebrating.
Amethyst nails are for everyone. They are for the person heading to a creative job interview, the person celebrating a personal milestone, the person who simply wants something beautiful to look at when they are having a hard week. They are for you on your most confident days and your quietest ones. Beauty in all its forms, from a full geode nail set to a single polished coat of classic purple, is always worth your time and attention.
So go ahead and pick your favorite from these fourteen stunning styles. Try something you have never tried before. Make a mess, start over, laugh at the smudges, and keep going. That is what beauty is about. Not perfection. Confidence, creativity, and the courage to express yourself however you choose, one nail at a time.