I have spent years working with color in every possible form — on faces, on sets, and yes, absolutely on nails. And if there is one color that consistently stops me in my tracks, it is amethyst. There is something deeply magnetic about this particular shade of purple. It lives in that beautiful space between mystical and sophisticated, between bold and wearable. The first time I truly experimented with amethyst on almond acrylic nails, I was sitting in my studio late at night with a cup of tea and a collection of purple swatches spread across my table. Something clicked. The almond shape, with its soft pointed tip and curved sides, carries amethyst purple in a way that no other nail shape does — it elongates the fingers, adds elegance, and gives the color room to breathe. What followed that quiet night became one of my most beloved creative journeys. This article is my love letter to amethyst nails, thirteen of the most stunning, unique, and personally meaningful looks I have ever created and shared. I hope they inspire you as much as they continue to inspire me.
Amethyst Geode Almond Nails

If you have ever seen a geode split open for the first time, you understand the kind of awe I am talking about. The jagged outer shell gives way to the most breathtaking crystal formations inside — rich purples, deep violets, sparkling whites all living together in perfect, natural harmony. Geode nails have been a favorite of mine for years, and in amethyst tones on almond acrylics, they are nothing short of extraordinary. This look is detailed, artistic, and deeply rewarding to create and wear.
Inspiration from the raw beauty of split geode crystals
My inspiration for this look came from a small amethyst geode that sits on the corner of my makeup station. A client gifted it to me years ago, and I have stared at it thousands of times during long work sessions. One afternoon I found myself really looking at it — studying the way the color moved from deep violet at the outer edges to pale lavender in the center, the way the crystalline formations caught the light like tiny mirrors. I thought — this is exactly what nails should look like. Natural, layered, dimensional. There is so much personality inside a geode, and that is exactly the kind of nail art I love creating: looks that tell a story and make people stop and ask questions.
Tools needed to create the nail design
You will need a white or pale nude acrylic base, deep amethyst and violet gel paints, metallic silver or gold nail liner for the geode outline, clear iridescent glitter or micro crystals for the interior sparkle, a thin detail brush, and a glossy top coat to give the finished look that polished, stone-like quality.
Step by step guide to create the nail design
- Prep and apply your almond acrylic nails, then paint the base in white or a very pale lavender to create contrast for the geode design, allowing it to fully dry.
- Using a thin detail brush, paint an irregular, organic ring shape in the center of the nail in deep amethyst, leaving the inside of the ring open to show the lighter base.
- Fill the outer ring area with deeper violet and add iridescent glitter or micro crystals along the inner edge of the ring to mimic crystalline formations.
- Outline the geode shape with a fine metallic liner, seal everything with glossy top coat, and apply cuticle oil to complete the look.
Twilight Sky Amethyst Almond Nails

There is a specific moment at dusk — right after the sun has set but before the sky goes fully dark — where the sky turns this impossible shade of purple. It is the most fleeting and beautiful color in nature, and it has inspired more creative work for me than I can even count. Twilight sky amethyst nails capture that transient magic on an almond acrylic canvas, blending deep indigo, true amethyst, and soft dusty lavender in a way that feels like wearing a painting.
Inspiration from the purple hour between sunset and night
I was on location for a shoot when I first noticed the exact quality of light I wanted to translate into this nail look. We had been working outdoors all day, and as the light faded, the sky shifted into these layered bands of color — dusty mauve at the bottom, rich amethyst in the middle, and a deep blue-violet at the very top. Everyone on set stopped for a moment, just looking up. I quietly took a photo on my phone, and that image became the reference for what is now one of my most beloved nail designs. Beauty is everywhere if you pay attention, and this look is living proof of that.
Tools needed to create the nail design
You will need three polish or gel shades — a soft dusty mauve, a true amethyst purple, and a deep indigo — a makeup sponge for blending, a thin brush for detailing, fine silver glitter for stars, and a glossy top coat to bring the whole sky to life.
Step by step guide to create the nail design
- Apply your almond acrylic nails and start with the dusty mauve shade as your base coat, applying it across the lower third of the nail nearest the cuticle.
- Using a makeup sponge, layer the true amethyst shade over the middle section and blend it into the mauve below with gentle dabbing motions to create a seamless gradient.
- Add the deep indigo toward the tip of the nail and blend it into the amethyst middle section, then use a fine detail brush to flick tiny silver glitter dots as stars across the upper portion.
- Seal with a glossy top coat, working carefully over the entire nail to preserve the gradient blending and the sparkle of the stars.
Amethyst Lace Almond Nails

Lace is one of those materials that I have always found incredibly inspiring — it is delicate, intricate, and carries with it a sense of romance and history. Lace nail art in amethyst tones on almond acrylics is one of the most elegant things you can put on your fingertips. I have created this look for weddings, editorial shoots, and special events, and every single time it receives the most wonderful reactions. It is femininity at its most refined.
Inspiration from vintage lace fabric and bridal fashion
I first became obsessed with lace nail art after spending a morning at a vintage fabric shop sourcing texture references for a shoot. I was flipping through bolts of antique lace — ivory and cream patterns in the most intricate floral and geometric arrangements — and I kept thinking about how those patterns would look in deep amethyst purple on an almond nail. The contrast of delicate lace with such a rich, bold color seemed exciting and unexpected. When I finally tried it, I immediately understood why it works so beautifully — the intricacy of the lace pattern balances the depth of the amethyst, and the result is genuinely breathtaking.
Tools needed to create the nail design
You will need a sheer nude or soft white base coat, deep amethyst acrylic paint or gel, a very fine nail art brush for lace detailing, a lace nail stamp or stencil if preferred for beginners, and a matte or glossy top coat depending on whether you want a vintage or modern finish.
Step by step guide to create the nail design
- Apply your almond acrylic base and coat it with a soft nude or white base shade, allowing it to cure or dry completely before beginning the lace design.
- Using a fine nail art brush and deep amethyst paint, carefully draw lace patterns — small flowers, dots, and connecting lines — starting from one corner of the nail and working outward.
- Build the pattern gradually, keeping the lines light and fluid to mimic the organic nature of real lace fabric, and fill in with slightly heavier strokes for depth.
- Seal with a matte top coat for a vintage, fabric-like finish or a glossy coat for a more modern, polished look, and finish with cuticle oil.
Purple Smoke Almond Nails

Sometimes the most captivating beauty looks are the ones that feel slightly undone — a little smoky, a little mysterious, like something just caught in motion. Purple smoke nails are exactly that. They have this ethereal, diffused quality that I find absolutely magnetic, like looking at amethyst through a soft lens. On an almond acrylic nail, the smoke effect flows beautifully with the curved shape of the tip, creating something that feels alive.
Inspiration from perfume and atmospheric photography
My inspiration for this look came from the world of atmospheric photography — specifically from the kind of images used in perfume and fragrance campaigns where the product is surrounded by colorful wisps of smoke or mist. Deep purple smoke curling against a dark background has this seductive, mysterious quality that I find deeply compelling from a creative standpoint. I wanted to bring that feeling to nails. The result is a design that feels like it belongs in an editorial shoot while being completely wearable in everyday life.
Tools needed to create the nail design
You will need a black or deep charcoal base coat, amethyst and light lavender acrylic paints, a fan brush or a soft makeup brush for blending, a small sponge for dabbing color, and a glossy top coat to give the finished look its depth.
Step by step guide to create the nail design
- Apply your almond acrylic nails and paint them entirely in deep black or charcoal as your base, allowing this to fully cure or dry before adding any color.
- Load a fan brush with amethyst purple paint and sweep it across sections of the nail in light, soft strokes, allowing the black to show through and creating a smoky, translucent effect.
- Add hints of lighter lavender with a small sponge in certain areas to create variation in the smoke tones, blending the edges so there are no harsh lines.
- Finish with a super-glossy top coat to add the sense of depth that makes the smoke effect look truly dimensional and alive.
Amethyst Butterfly Wing Almond Nails

Butterfly nails are one of those trends that I fully embraced the moment I saw them because they combined two things I love deeply — nature and color. Butterfly wing patterns in amethyst tones are particularly special because the wing markings of many purple and violet butterflies are genuinely extraordinary — intricate, asymmetrical, and rich in color. This design brings that natural artistry to your almond acrylics in the most beautiful way.
Inspiration from the wing patterns of purple butterflies in nature
I keep a small collection of reference images in my creative files, and butterfly wings have been in that collection for years. The detail in a butterfly wing is remarkable — the way color gradients from the body outward, the fine veining lines, the occasional iridescent shimmer along the edges. In amethyst and violet tones, these patterns translate into something genuinely magical on an almond nail. I find this look especially meaningful because it connects to the idea of transformation, which is something I think about constantly in my work helping people discover and express their best selves.
Tools needed to create the nail design
You will need a nude or white base, amethyst, deep purple, and black nail art paints, a fine liner brush for wing veining details, iridescent glitter or shimmer powder for the wing edges, and a glossy top coat to make the wings look vibrant and alive.
Step by step guide to create the nail design
- Apply your almond acrylic nails with a clean nude or white base coat and let it dry completely so the colors of the butterfly wings pop against the background.
- Using amethyst and violet paints and a medium nail art brush, paint the upper wing shape across the top half of the nail and the lower wing shape across the lower portion, following a natural butterfly silhouette.
- Add fine black veining lines throughout the wings using a thin liner brush, and dust iridescent shimmer along the outer edges of the wing pattern for that authentic butterfly sheen.
- Seal with a high-gloss top coat to make the design vivid and jewel-like, and add cuticle oil for a beautifully finished look.
Frosted Amethyst Almond Nails

There is something deeply satisfying about a frosted finish — it has this cool, wintry quality that makes me think of the most beautiful mornings in January when everything is slightly glazed and the light is soft and diffused. Frosted amethyst nails on almond acrylics capture that same quiet, ethereal energy. This look is subtle enough for everyday wear but distinctive enough to draw compliments wherever you go.
Inspiration from frost on glass and winter mornings
My inspiration for this look was born during an early morning in winter when I pressed my hand against a frosted window and watched the warmth of my palm melt a perfect handprint into the ice. The way the frost caught the pale morning light — slightly opaque, slightly luminous, casting this beautiful blueish-lavender glow — was stunning. I carried that image with me for months before finally translating it into a nail look. Frosted amethyst nails feel like winter captured in polish form, and wearing them always makes me feel a certain kind of quiet, elegant calm.
Tools needed to create the nail design
You will need a pale lavender or icy amethyst base coat, a white shimmer or pearl powder, a frosted or satin finish top coat, a soft brush for applying the pearl powder, and a standard base coat to start. Avoid glossy top coat as it will remove the frosted effect entirely.
Step by step guide to create the nail design
- Apply your almond acrylic base and coat with a pale, icy lavender or amethyst shade, keeping the coat thin and even so the color looks translucent rather than opaque.
- While the last coat is still slightly tacky, brush a fine white pearl or shimmer powder over the entire nail surface using a soft eyeshadow brush in gentle, circular motions.
- Build the pearl effect gradually until the nail surface has a soft, frosted luminosity — more shimmer near the tip and lighter toward the base for a dimensional effect.
- Apply a satin or frosted finish top coat to lock in the pearl powder and preserve that beautiful icy texture that makes this look so distinctive.
Amethyst Watercolor Almond Nails

Watercolor is my favorite traditional art medium, and translating it into nail art has been one of the most creatively fulfilling things I have done in my beauty career. Amethyst watercolor nails have this gorgeous, translucent quality — colors bleeding into each other softly, edges diffused and organic, the overall effect gentle and painterly. On almond acrylics, this look has an almost impressionist quality that I find deeply beautiful.
Inspiration from watercolor painting and fine art studios
I grew up watching my aunt paint watercolors at a wide wooden table covered in brushes and small jars of water tinted with different colors. The way the pigment would bleed into the wet paper, creating soft halos of color, was one of the most magical things I witnessed as a child. Years later, I found myself recreating that same feeling on nails, using thin washes of amethyst and violet to build layers of translucent color that shift and blend just like real watercolor paint. This look is an homage to that childhood memory and to the beauty of fine art in everyday life.
Tools needed to create the nail design
You will need a clean white base coat, amethyst and lavender acrylic paint thinned with water or a clear medium, a soft watercolor-style nail brush, a dotting tool for color blooms, and a glossy top coat to seal the delicate, paint-like finish.
Step by step guide to create the nail design
- Apply your almond acrylic nails with a bright white base coat, which is essential for the watercolor effect as it allows the transparent washes of color to show their true tones.
- Thin your amethyst acrylic paint with a few drops of water until it has a very fluid, transparent consistency, then apply loose washes of color across sections of the nail with a soft brush.
- Layer additional washes of lavender and deeper violet in places, allowing the colors to bleed naturally into each other while still wet for authentic watercolor blending.
- Once fully dry, seal gently with a thin layer of glossy top coat applied in a single pass to avoid disturbing the delicate paint layers underneath.
Deep Plum Velvet Almond Nails

Deep plum is a shade that lives at the darker, moodier end of the amethyst family, and I am completely in love with it. When applied in a way that evokes velvet texture — rich, light-absorbing, and dimensional — deep plum on almond acrylics becomes one of the most luxurious nail looks I have ever created. This is a look for someone who wants to feel genuinely powerful and elegant every time they glance at their hands.
Inspiration from luxury velvet interiors and jewel-toned fashion
My inspiration for this look comes directly from the world of interior design and fashion — specifically the trend of deep, jewel-toned velvet in everything from sofas to evening gowns. There is a richness to deep plum velvet that I find almost edible — it is lush in a way that very few colors manage to be. When I saw a velvet deep plum coat at a fashion event that I was attending for a beauty collaboration, something in my creative mind immediately translated it to nails. That coat became the direct reference for this design, and I have not stopped creating it since.
Tools needed to create the nail design
You will need a deep plum gel or acrylic polish, velvet flock powder in a matching or slightly darker plum tone, a gel adhesive for flock application, a matte top coat for a velvet alternative without flock, and cuticle oil for finishing.
Step by step guide to create the nail design
- Apply your almond acrylic base and coat it with two rich, even coats of deep plum gel polish, curing between each layer for full, saturated color coverage.
- Apply a thin layer of gel adhesive over the cured nail and while it is still tacky, generously dust velvet flock powder over the entire surface using a soft brush.
- Press the flock powder gently into the adhesive with your fingertip or a silicone tool to ensure it bonds evenly, then tap away the excess powder over a clean surface.
- If using the matte top coat method instead of flock, simply apply a high-quality matte coat in a single thin layer and avoid reworking any areas once applied.
Amethyst Aurora Almond Nails

The aurora borealis is possibly the single most beautiful natural light phenomenon on earth, and I say that as someone who has been fortunate enough to see it in person. The way the lights move — shifting from green to purple to violet and back again, fluid and luminous and alive — is something I will never forget. Aurora amethyst nails try to capture even a fraction of that magic, and while nothing can truly replicate the real thing, this nail look gets beautifully close.
Inspiration from the northern lights and natural light phenomena
I was at a creative retreat in Iceland when I saw the northern lights for the first time. Standing outside in the cold, watching violet and teal ribbons of light ripple across the sky, I felt a creative energy that I hadn’t experienced in years. I took dozens of photographs, but none of them captured it the way my memory did. When I returned home, I went straight to my nail supplies and started experimenting with amethyst, teal, and iridescent pigments on almond acrylics. The aurora nail look was born from that night, and it carries that same feeling of wonder every time I create it.
Tools needed to create the nail design
You will need a deep black or navy base, amethyst and violet gel paints, a teal or emerald accent color, iridescent or color-shifting pigment powder, a fan brush and sponge for blending, and a glossy top coat to give the aurora its luminous glow.
Step by step guide to create the nail design
- Apply your almond acrylic nails in a deep black or midnight navy base coat, curing fully to create the dark sky backdrop that makes the aurora colors pop.
- Using a fan brush, sweep amethyst and violet paint across sections of the nail in long, fluid strokes, leaving some of the dark base visible in between.
- Add a teal or emerald green accent sweep in one or two areas with the same fan brush technique, then dust iridescent pigment over the wet colors for shimmer.
- Blend the edges where colors meet very softly with a dry fan brush to keep the transitions fluid, then seal with a glossy top coat that enhances the glow.
Amethyst Foil Almond Nails

Foil nails are one of those looks that I remember discovering and thinking — why have I not been doing this all along? The metallic, crinkled texture of nail foil creates this incredibly unique visual effect that photographs magnificently and looks even better in real life. Amethyst foil on almond acrylics has this luxurious, almost royal quality that I find deeply compelling, especially when paired with a deep purple base.
Inspiration from metallic fabrics and editorial fashion photography
My love for foil nails was born on a fashion shoot where the stylist had dressed the model in a metallic purple lamé jacket that caught every bit of available light in the most extraordinary way. The crinkled metallic surface of that fabric — the way it created random patterns of light and shadow — immediately translated in my mind to nail art. I knew I wanted to recreate that same tactile, metallic luxury on almond acrylics, and amethyst foil turned out to be the perfect vehicle for that editorial energy.
Tools needed to create the nail design
You will need a deep amethyst gel base, purple or holographic nail transfer foil, foil adhesive gel, a gel top coat, a UV lamp, and a cuticle pusher or silicone tool for applying the foil smoothly.
Step by step guide to create the nail design
- Apply your almond acrylic base in a rich amethyst gel polish, cure fully, and then apply a thin layer of foil adhesive gel over the area where you want the foil to appear.
- Allow the adhesive gel to become slightly tacky, then press the foil sheet face-down firmly onto the nail and rub over it with a silicone tool in circular motions for good adhesion.
- Peel the foil back quickly in one smooth motion, leaving the metallic transfer behind on the nail — repeat in different areas for full coverage or keep it partial for an artistic effect.
- Seal with a gel top coat and cure to lock in the foil and prevent lifting at the edges.
Amethyst Drip Almond Nails

Drip nails are one of the most visually dynamic looks I have ever created, and in amethyst tones they are genuinely stunning. The drip design — where paint appears to drip down the nail from the tip in long, uneven streams — has this bold, graphic quality that I find both artistic and modern. It is the kind of nail look that people notice from across a room, which is exactly the kind of impact I love to create.
Inspiration from abstract painting and drip art techniques
I have always been fascinated by the abstract expressionist painting technique of drip art — the way paint falls and flows in unpredictable patterns that somehow come together into something visually powerful. I incorporated this concept into nail art after spending an afternoon at an art gallery, watching a video installation of paint being dripped in slow motion onto a white canvas. The amethyst drip nail look is my wearable interpretation of that art movement, and it brings a little bit of gallery-worthy drama to everyday life.
Tools needed to create the nail design
You will need a white or pale nude base coat, deep amethyst gel paint, a thin nail art brush for drawing drip lines, a slightly thicker detail brush for the tip line, and a glossy top coat to make the drips look dimensional and wet.
Step by step guide to create the nail design
- Apply your almond acrylic nails with a clean white or pale nude base, which creates the contrast needed for the amethyst drips to stand out dramatically.
- Using a medium nail art brush, paint a thick band of deep amethyst across the tip of the nail as the source of the drips, keeping the edge uneven and organic.
- From the bottom edge of the tip band, draw long, irregular drip lines downward toward the cuticle using a thin brush, varying the length and thickness of each drip.
- Seal with a high-gloss top coat that enhances the three-dimensional, wet paint effect of the drips and makes the whole design look freshly painted.
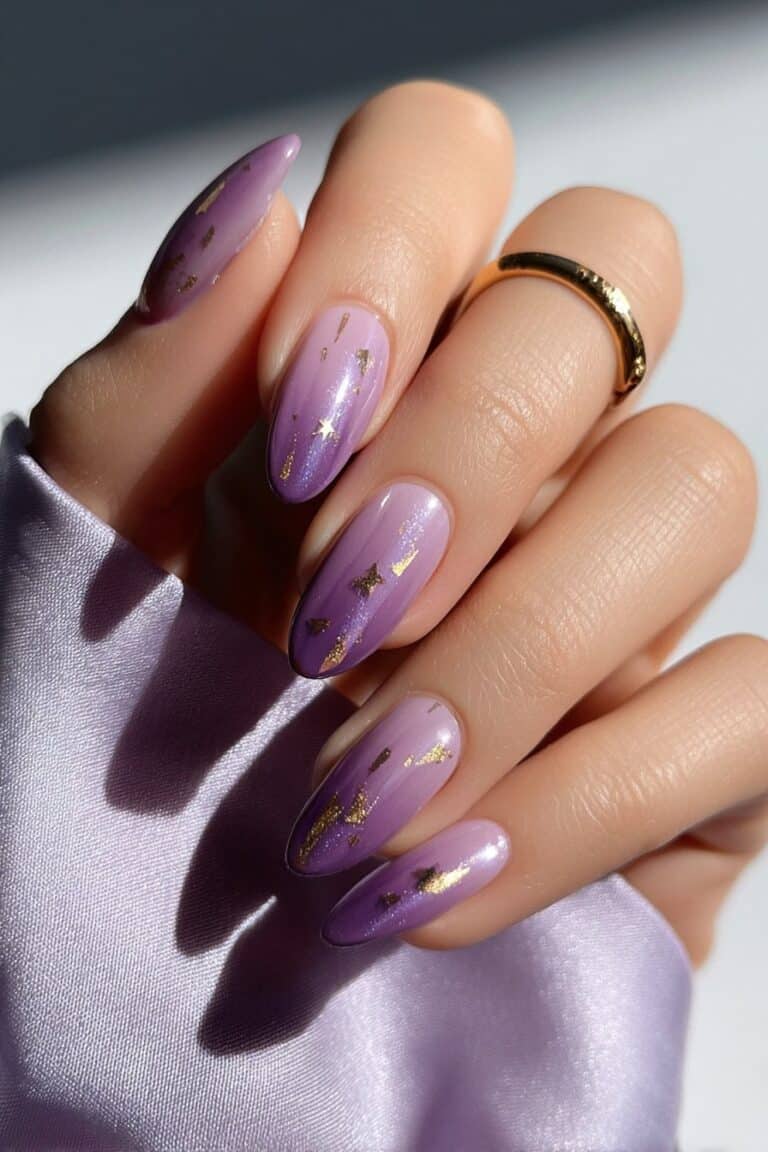
Lavender Mist Amethyst Almond Nails

Not every amethyst nail look needs to be deep and dramatic — and this is something I have to remind my clients of regularly when they assume amethyst only means dark purple. Lavender mist nails live at the softer, dreamier end of the amethyst spectrum. They are pale, ethereal, and impossibly romantic. On almond acrylics, this look creates an almost otherworldly elegance that I associate with quiet mornings, blooming gardens, and the kind of beauty that whispers rather than shouts.
Inspiration from lavender fields and early morning light
I spent a summer morning years ago driving past fields of lavender in full bloom, and the color of those fields — pale, slightly misty, softly purple — has stayed with me ever since. There is a particular quality of light in early morning that makes lavender look almost translucent, as though the color itself is being filtered through gauze. That quality of soft, luminous, barely-there purple is exactly what I tried to capture in this nail look. It is delicate in the most confident way — understated but unmistakably beautiful.
Tools needed to create the nail design
You will need a pale lavender gel or polish, a white shimmer or milky base to mix with for the mist effect, a soft fan brush, iridescent micro glitter for the occasional sparkle, and a satin finish top coat that keeps the look soft rather than overly shiny.
Step by step guide to create the nail design
- Apply your almond acrylic base and coat it with a milky white or pale lavender polish as the base layer, keeping everything sheer and translucent rather than fully opaque.
- Mix a tiny amount of pale lavender with your milky base on a nail palette and apply an uneven wash of this mixture across the nail with a fan brush for the mist effect.
- While still slightly wet, dust a very small amount of iridescent micro glitter over sections of the nail for subtle sparkle, concentrating it near the tip.
- Finish with a satin top coat to maintain that soft, diffused quality that makes the lavender mist effect so beautifully gentle and distinctive.
Amethyst Stained Glass Almond Nails

I am finishing this collection with what I consider to be the most artistic and show-stopping of all thirteen looks. Stained glass nails in amethyst tones are a true labor of love — they require patience, precision, and a genuine appreciation for the craft. But the result is so extraordinarily beautiful that every minute of effort is completely worth it. When light passes through stained glass, it transforms into something magical, and this nail look captures that same luminous, colorful magic on your fingertips.
Inspiration from cathedral stained glass windows and mosaic art
My inspiration for this look is deeply rooted in my love of architecture and sacred art spaces. I have visited cathedrals in several cities throughout my career, and the stained glass windows in those spaces are among the most beautiful things I have ever seen. The way the colors are separated by those dark leading lines — creating distinct pools of ruby, amber, cobalt, and amethyst — is visually intoxicating. I translate this concept onto almond acrylic nails using amethyst as the dominant color family, and the result looks like wearing a tiny cathedral window on each fingertip.
Tools needed to create the nail design
You will need a black base coat, amethyst, violet, lavender, and pink gel or acrylic paints, a thin liner brush for the black leading lines, a small detail brush for filling in the color sections, and a high-gloss top coat to give the stained glass its characteristic luminous quality.
Step by step guide to create the nail design
- Apply your almond acrylic nails with a full black base coat and cure or dry completely, as this black will become the leading lines that define your stained glass pattern.
- Using a thin liner brush and black paint, draw irregular but intentional geometric divisions across the nail — think angular sections of varying sizes rather than perfectly regular shapes.
- Fill in each section between the black lines with different amethyst family colors — deep violet, bright amethyst, pale lavender, and hints of pink — using a small detail brush to keep colors within their sections.
- Apply two coats of a super-glossy top coat to give the design the translucent, glowing quality of real stained glass, and admire the extraordinary result.
Conclusion
Writing this guide has reminded me of exactly why I fell in love with nail art in the first place — the way it takes color, creativity, and technique and transforms something as small as a fingertip into a canvas for genuine self-expression. Amethyst nails in the almond acrylic shape are, to me, one of the most powerful combinations in nail art. This color carries such a sense of magic and individuality, and the almond shape gives every design a natural grace and elegance that I think is unmatched.
What I want you to remember as you explore these thirteen looks is that your creative instinct matters more than perfection. I have been doing this professionally for years and I still make mistakes, still experiment, still discover new things in the process of creating. The most beautiful results I have ever achieved — both in makeup and in nail art — have come from moments of creative courage where I tried something I had never done before and trusted the process.
Whether you gravitate toward the quiet elegance of frosted amethyst, the bold drama of stained glass, the romance of lace, or the cosmic wonder of aurora nails — there is a version of amethyst nail art here that was made for you. Take your time, invest in quality tools, follow the steps with patience, and above all, enjoy the journey of creating something beautiful. Your nails are an expression of who you are, and amethyst is one of the most expressive colors in the entire spectrum. As I always believe in everything I do — beauty is not about looking like someone else. It is about discovering the most radiant, confident, and authentic version of yourself. These nails are a wonderful place to start that journey.