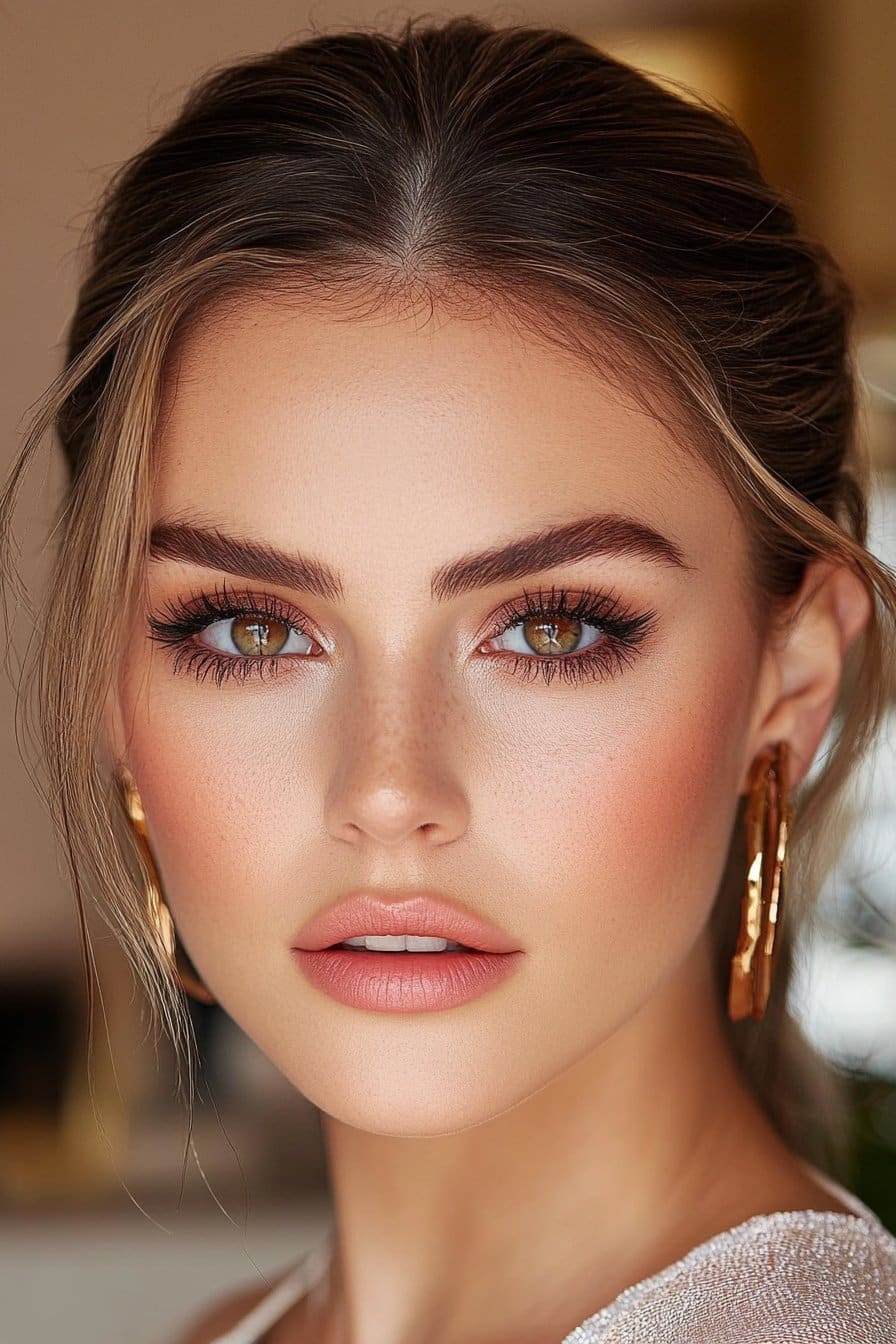
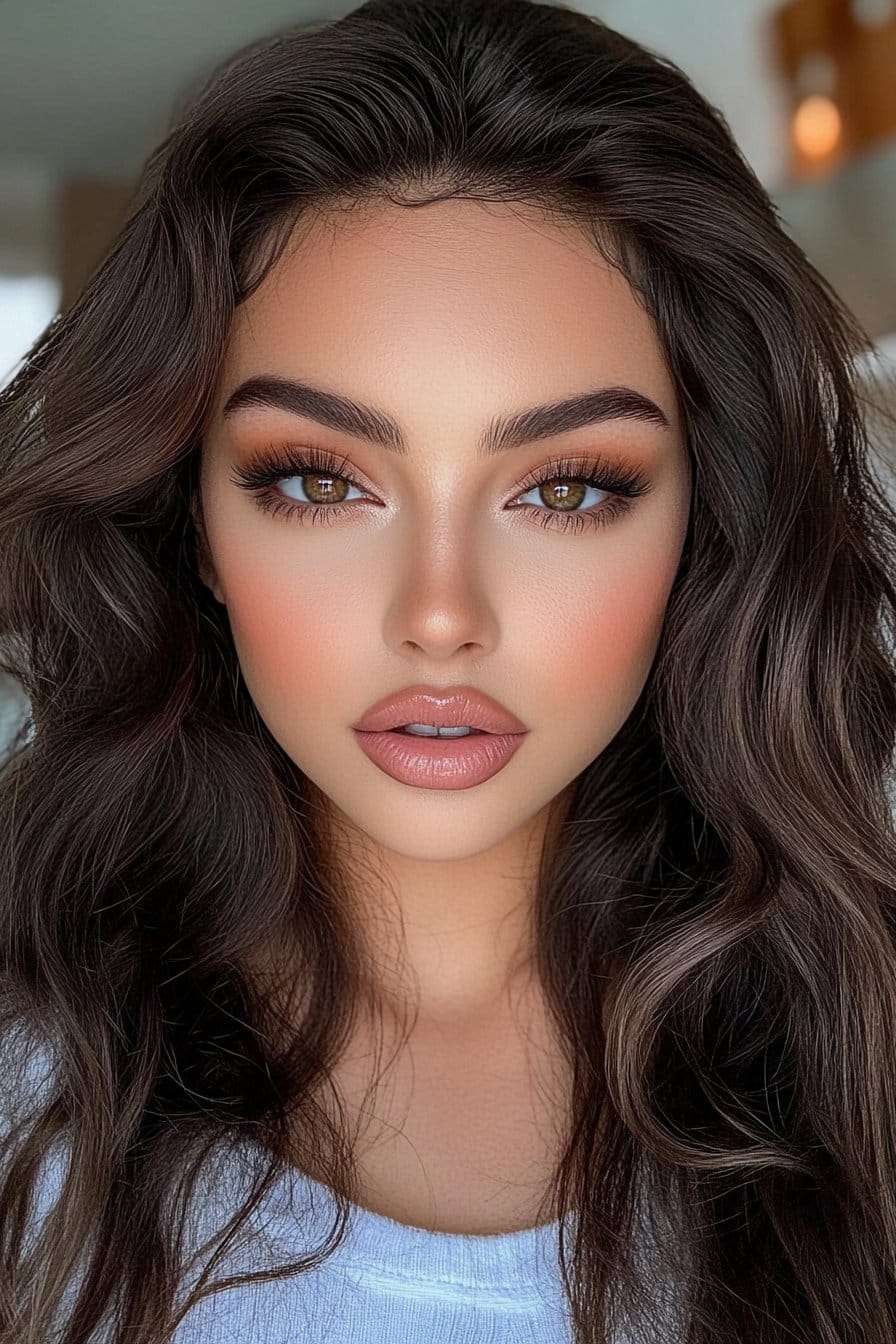
Baddie makeup looks dominate social media these days. Hashtags like #BaddieMakeup and #SlayAllDay inspire thousands of beauty enthusiasts. My work as a celebrity makeup artist has let me watch this trend transform from basic glam into a powerful way people express themselves.
The baddie makeup community still loves classic bronzy skin and bold 25mm lashes. They’ve grown to celebrate what makes each person unique. You can create these looks with budget-friendly brands like e.l.f. Cosmetics or adapt them for different seasons. My professional experience helps me guide others toward these stunning styles.
Los Angeles’s beauty scene has taught me so much about combining timeless techniques with 2025’s hottest trends. These 25 stunning baddie makeup looks will help raise your makeup game. My expert-approved styles work perfectly for everything – casual photoshoots to glamorous events.
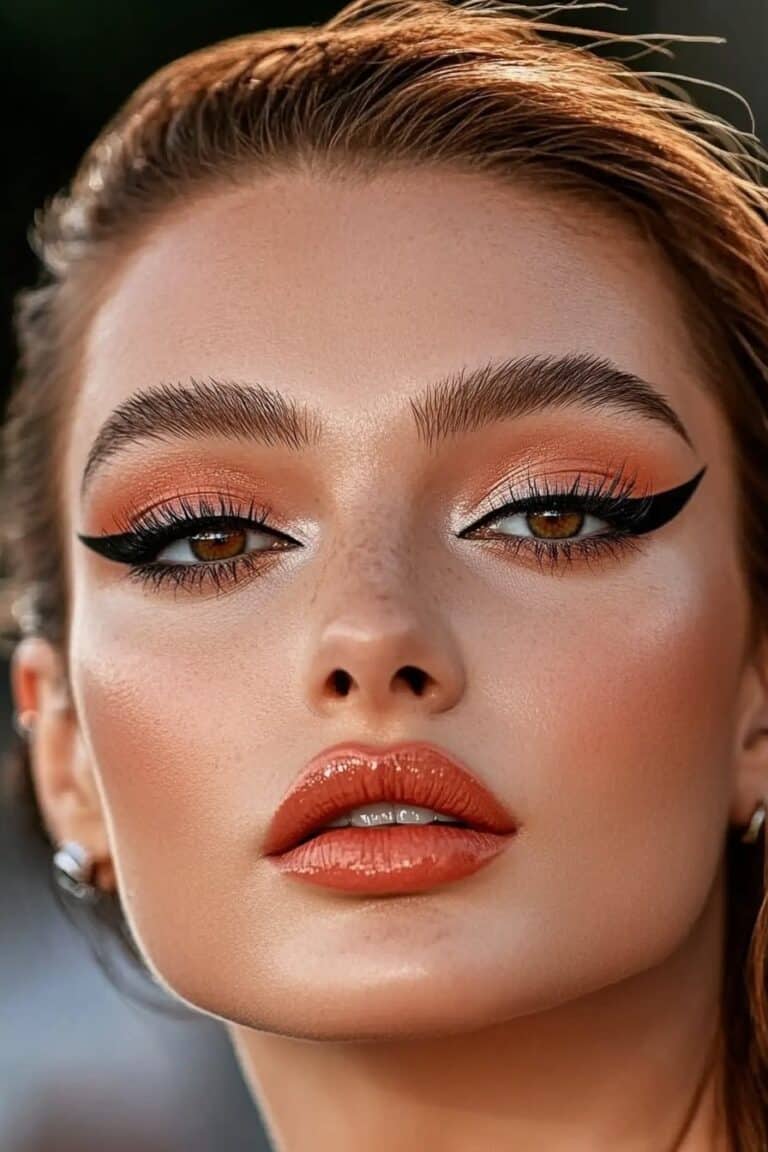
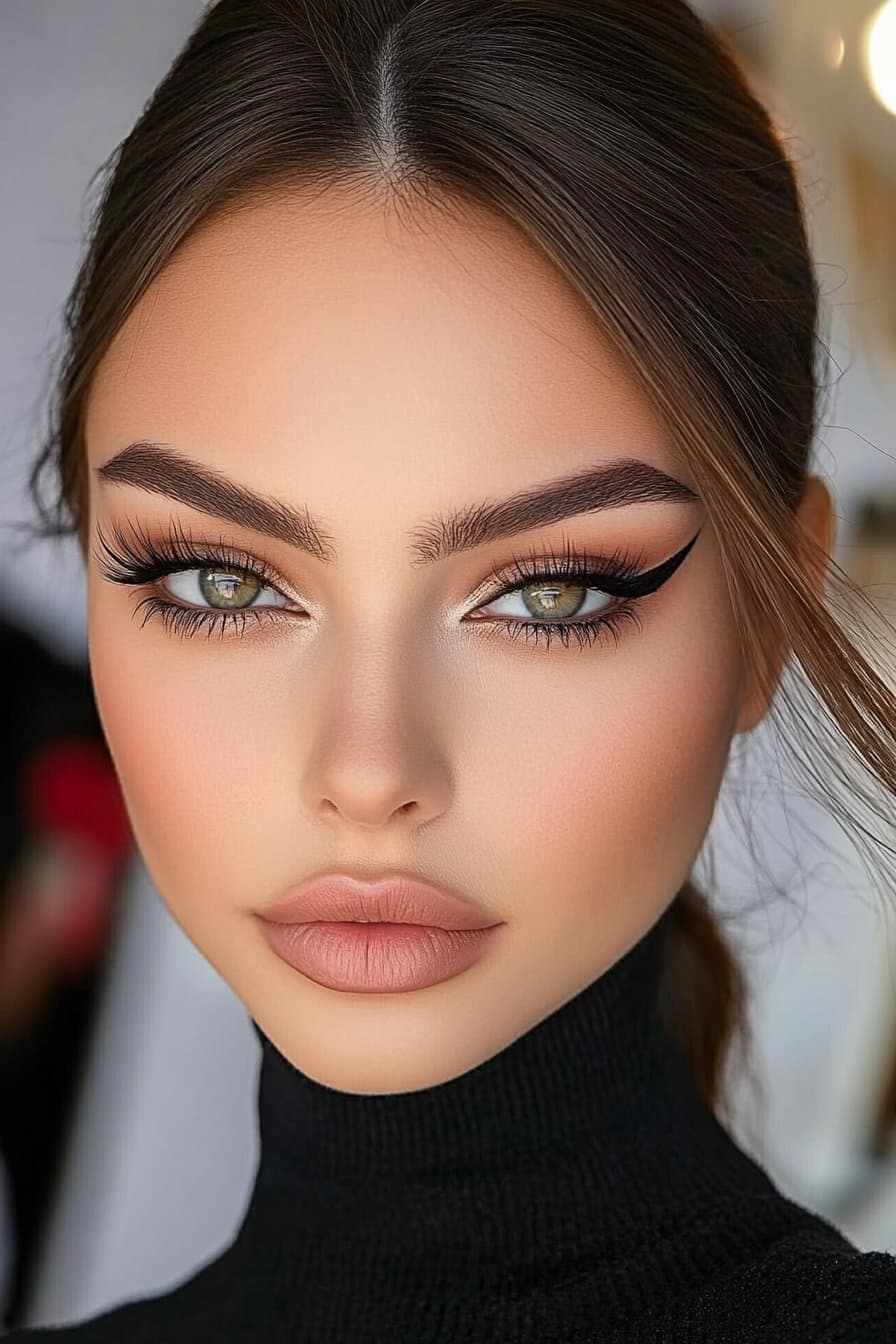
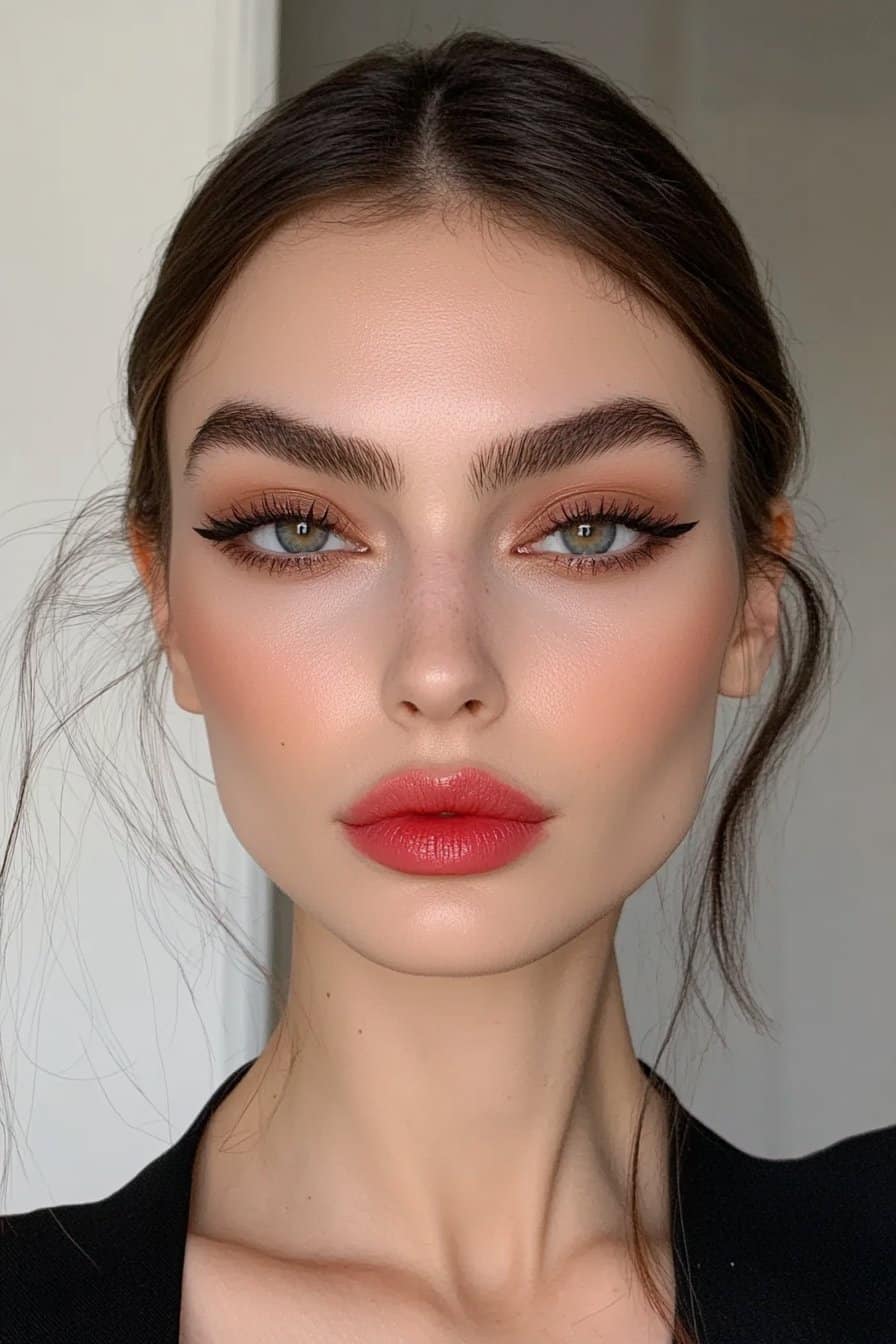
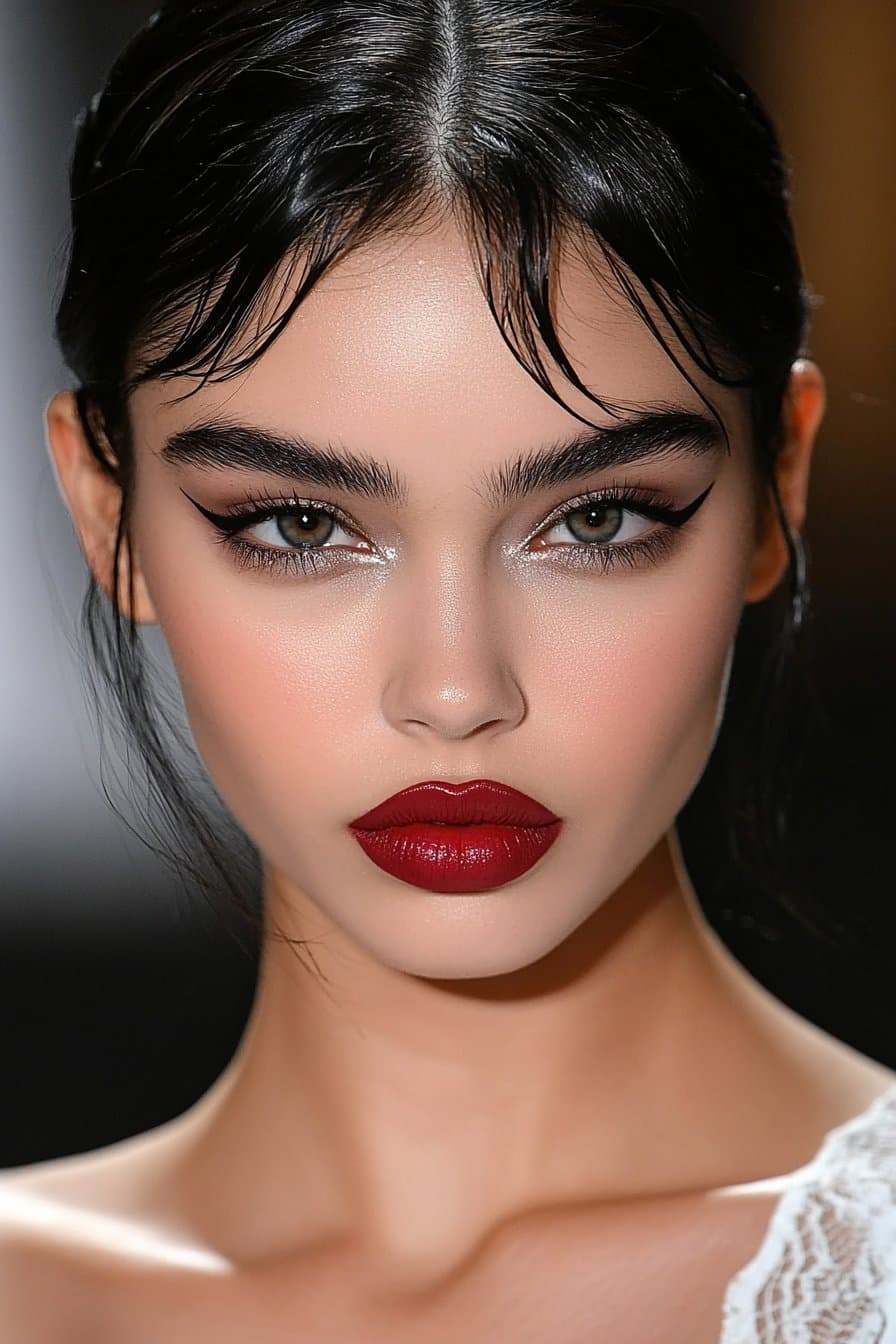
Bold Winged Liner Baddie Look
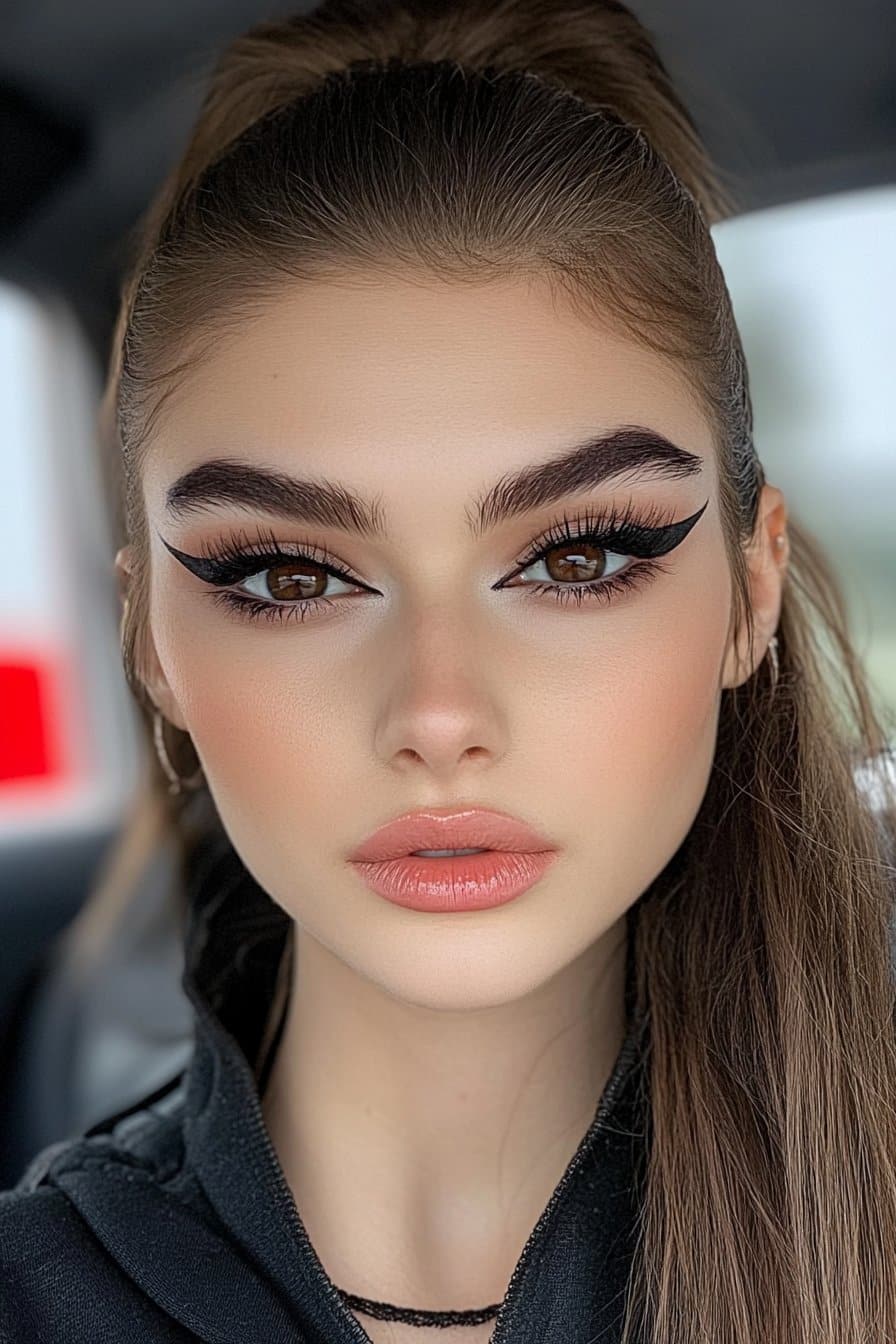
A bold winged liner tops the list of most requested baddie makeup looks my clients ask for. The right wing can raise any makeup style to new heights, especially when you have other baddie elements in play.
Winged Liner Application Tips
My first step to create the perfect wing starts with placing my elbow on a stable surface. Looking straight into a tilted mirror works best while applying the liner, especially when you have hooded eyes. Here’s a great trick I love: use household tape as a guide by placing it below your wing area to get clean, sharp lines.
Best Products for Wing Liner
Over the last several years, I found that there was these game-changing products to achieve the perfect wing:
- Maybelline’s liquid liner with its supersharp tip and easy-control grip
- Sigma winged liner E6 brush paired with gel liner to get precise lines
- Tarte’s dual-ended eyeliner that comes with both gel pencil and liquid felt tip
Winged Liner Variations
Your unique eye shape should determine your wing style. So for hooded eyes, the “bat wing” technique works best – the liner dips into the outer corner crease. On top of that, almond-shaped eyes look best when you start thin at the inner corner and gradually thicken the line toward the wing.
My clients with monolids often get better results with a reverse wing – the liner goes on the lower lash line instead of the upper one. Creating an outward-extending wing helps make close-set eyes appear more spaced apart.
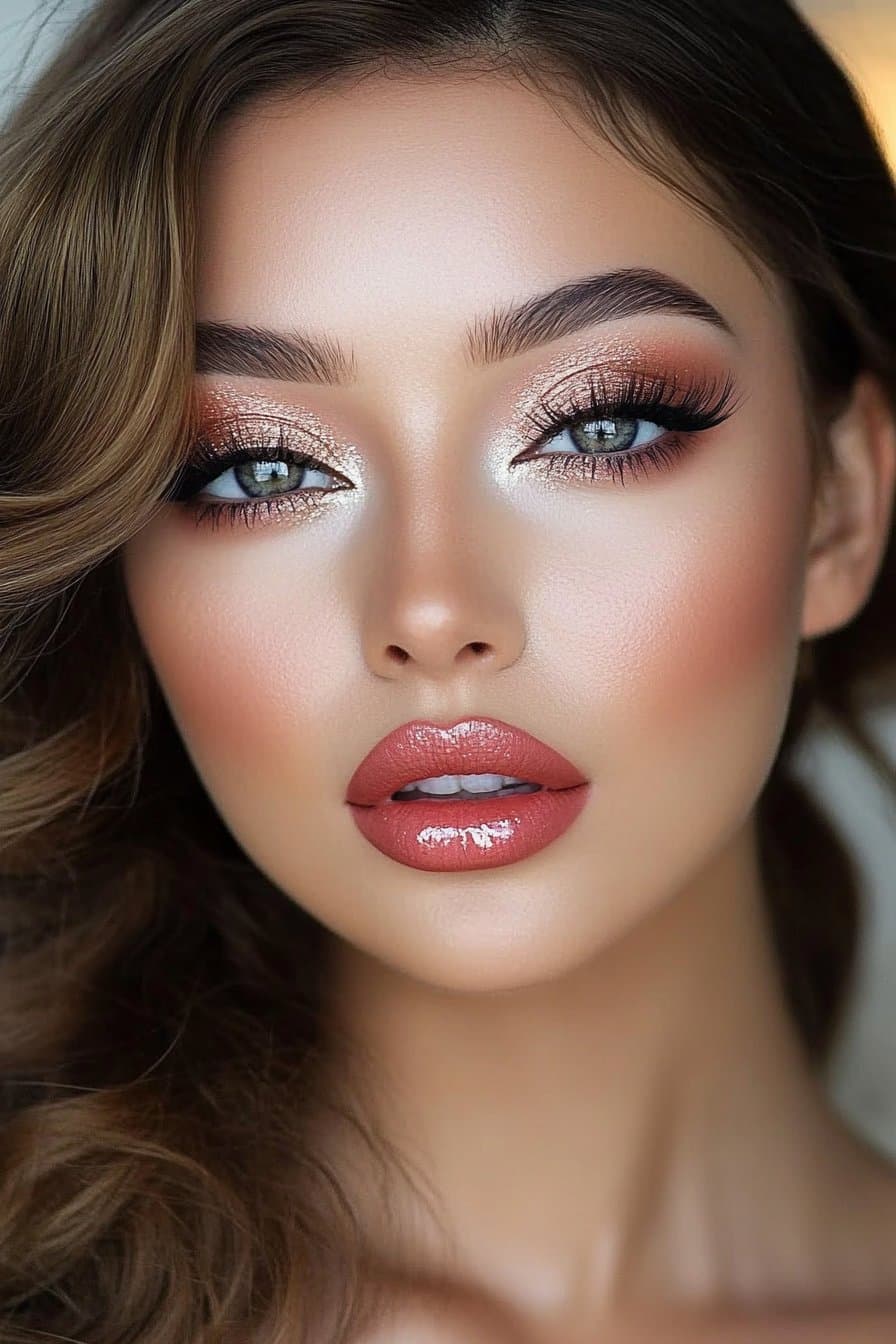
Glossy Nude Lips Baddie Style
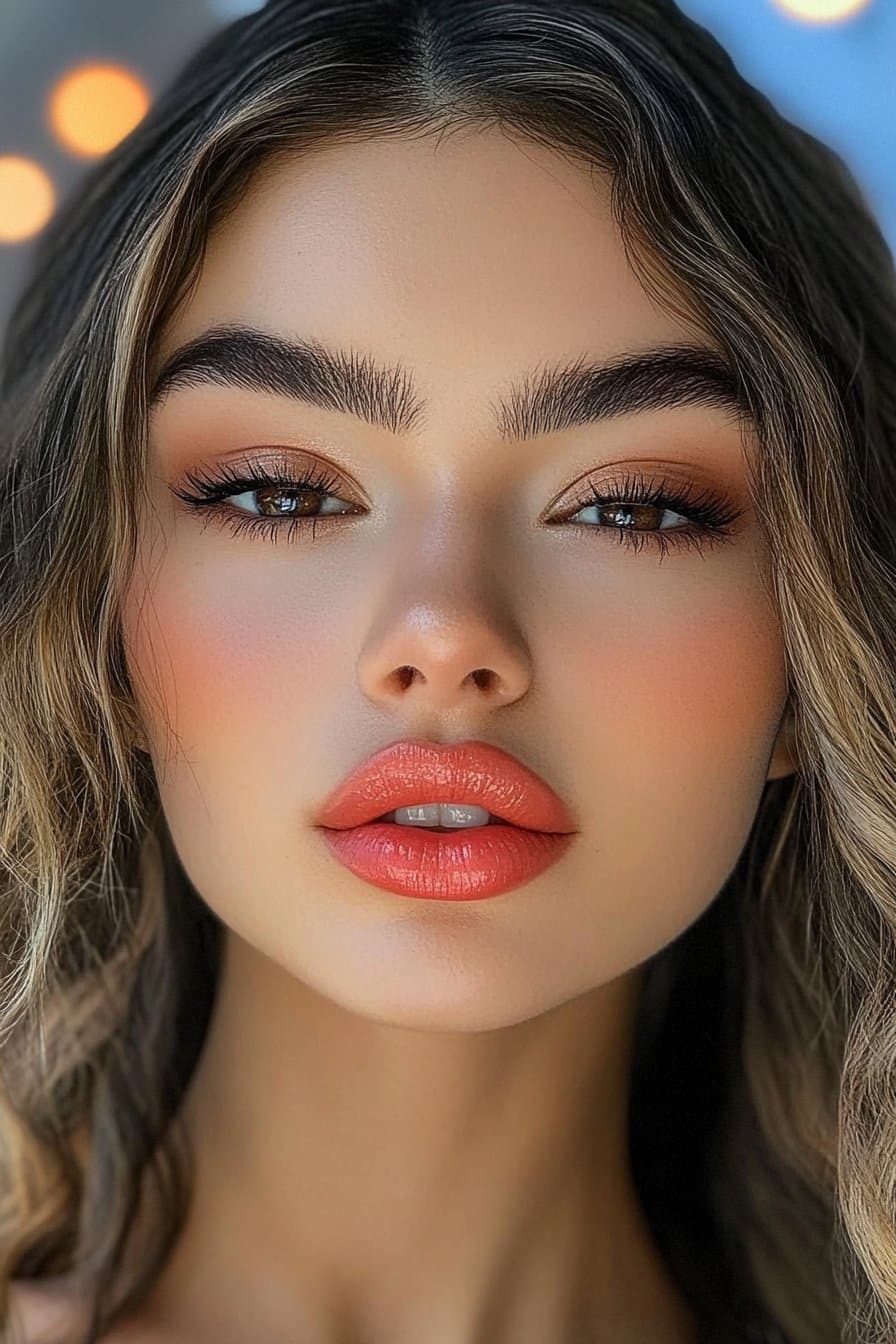
The glossy nude lip has become my signature look in baddie makeup. My work with celebrities in Los Angeles helped me become skilled at picking and applying nude lip products that boost natural beauty.
Nude Lip Product Selection
Your ideal nude shade depends on your skin’s undertone. Warm undertones look great with peachy or golden-toned nudes, while cool undertones work beautifully with pink or rosy nudes. A shade slightly darker than your natural skin tone will avoid that washed-out look.
Lip Prep Techniques
A flawless nude lip starts with proper preparation. My routine includes a gentle sugar scrub once or twice weekly to exfoliate. Hydration is significant – I use a lip mask overnight to keep my lips smooth. A hydrating lip balm with SPF protects and primes the lips before makeup.
Glossy Finish Application
Red carpet clients taught me this foolproof application technique. The process starts with outlining lips using a nude liner slightly darker than the chosen gloss shade. The perfect baddie style comes from applying gloss to the center of the bottom lip, then pressing lips together spreads it evenly. A touch of highlighter on the cupid’s bow makes the glossy effect pop.
Strategic product layering creates lasting results. Translucent powder around the lip line stops any feathering. A lip oil under your gloss keeps that hydration and shine going all day. This technique has become my go-to move to create that baddie esthetic that stays perfect through photoshoots and events.
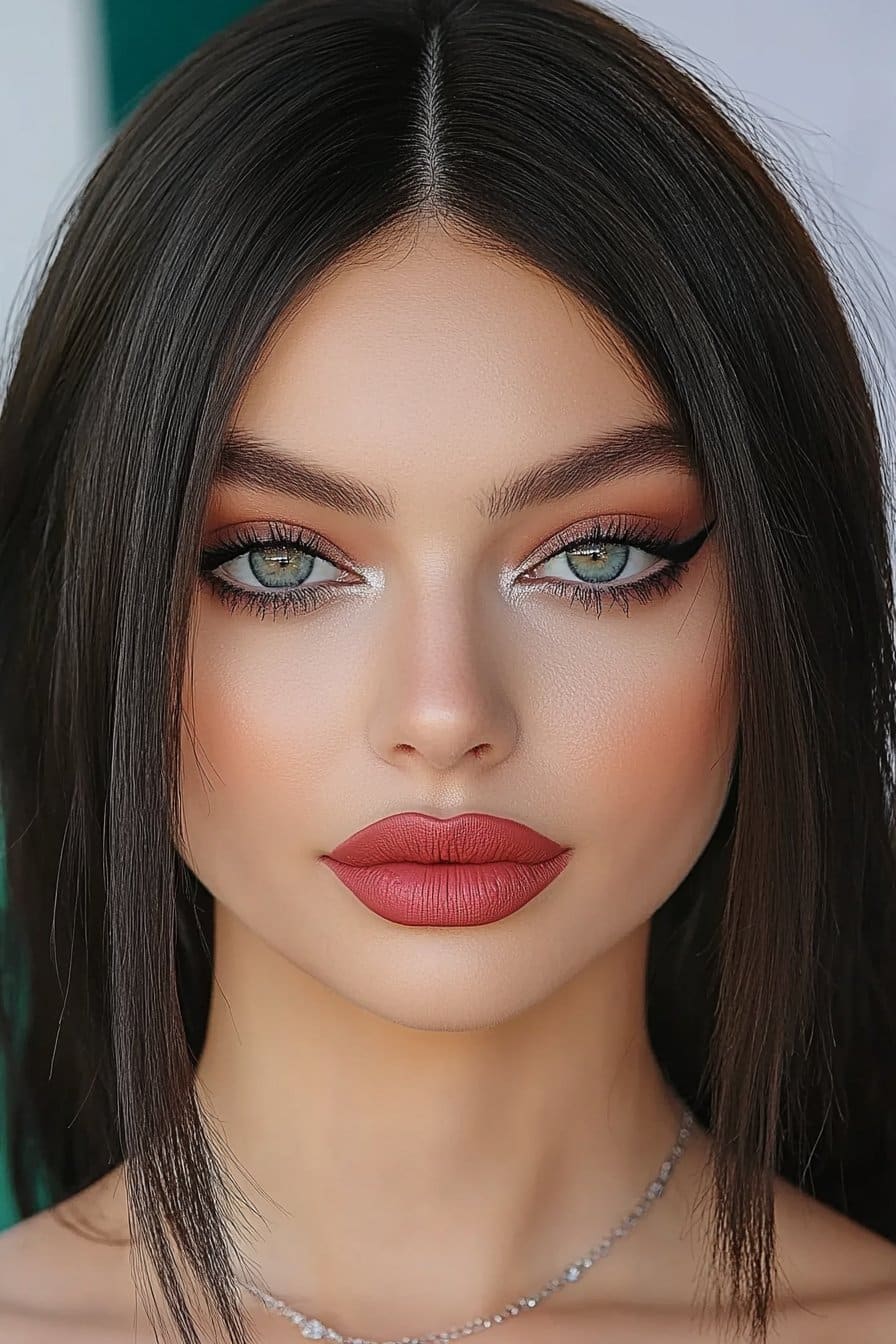
Smokey Eye Baddie Glam
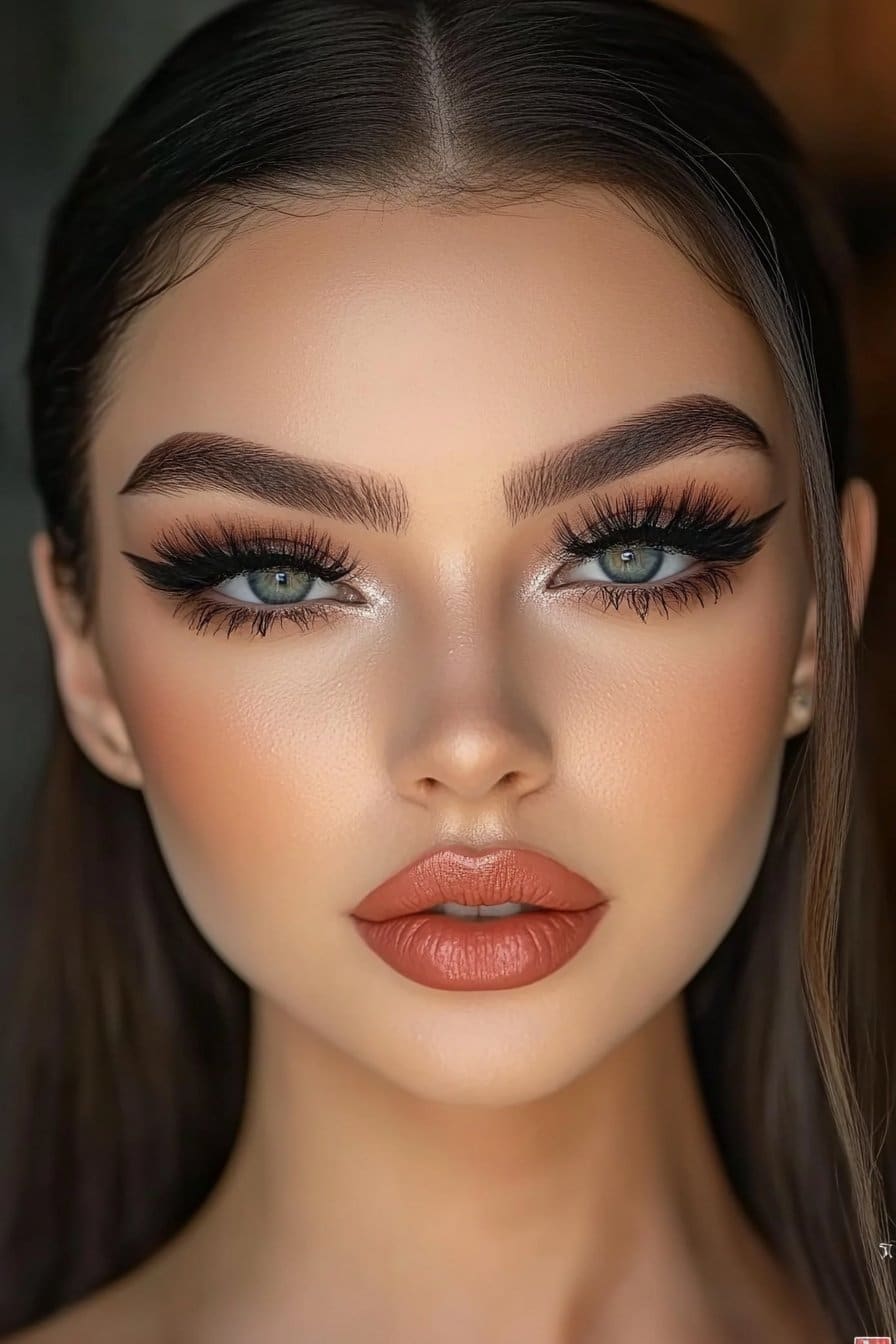
My career as a celebrity makeup artist has taught me that the smokey eye is one of the most versatile baddie makeup looks around. I’ve worked countless red carpet events and photoshoots to perfect techniques that work for every eye shape and color.
Smokey Eye Color Combinations
A stunning smokey eye starts with picking the right color palette for your eye color. Brown eyes look amazing with deep plums, navy blues, and rich bronzes. Of course, blue eyes pop beautifully with copper and rose-bronze hues, while green eyes come alive with purple and maroon tones. Black and gray are classic choices, but warm browns often create a more natural baddie look.
Blending Techniques
I always start by applying a mid-tone neutral shade on the entire lid as a base. The next step is to pack darker shadow at the lash line and blend it upward and outward with a fluffy brush. One trick I’ve learned is to layer shadow over liner before it sets – this creates that signature smokey effect.
Product Recommendations
After testing countless products on my clients, these items deliver the best results:
- Long-Wear Cream Shadow Stick for the base application
- Ultra Fine Eye Liner Brush for precise blending
- Smokey Eye Mascara for finishing touches
A more dramatic effect comes from hybrid powder-cream formulas that minimize fallout. Your eyes need primer as a base – this will give your baddie smokey eye the staying power to last through any event.
Flawless Base Baddie Look
My work with A-list clients in Los Angeles has taught me that a flawless base is the life-blood of any baddie makeup look. Red carpet events have shown me how proper skin prep can transform the final result.
Base Prep Steps
The perfect baddie esthetic begins with deep cleansing. Hydration is vital – I make sure to use a lightweight moisturizer that matches my client’s skin type. The next step involves choosing a primer that tackles specific issues – mattifying products for oily zones and hydrating ones for dry areas.
Foundation Application
I’ve developed a simple yet effective method to create the perfect baddie base. The process starts at the face’s center and moves outward with gentle tapping motions. My pro kit has:
- Synthetic fluffy brush to create an airbrush effect
- Damp beauty sponge that blends smoothly
- Clean fingers to warm up the product
The coverage adjusts based on what each skin area needs instead of using foundation everywhere. This approach creates the signature baddie look while keeping things natural.
Setting Techniques
The base needs to last through photoshoots and events. Blotting papers help absorb extra oils. A light dusting of translucent powder follows, with focus on crease-prone areas – under eyes and around the nose. Clients with dry skin should press the powder into their skin rather than sweep it across.
Glass Skin Highlight Effect

My experience with countless celebrities shows that the glass skin highlight effect is the life-blood of modern baddie makeup looks. Korean beauty trends sparked this technique that creates a complexion so luminous it resembles glass.
Highlight Placement
Perfect glass skin effect demands smart placement. We applied highlighter to the face’s high points – cheekbones, brow bone, and down the nose bridge. My clients learn to avoid highlighting the face’s center because shine in this area looks greasy.
Product Layering
Glass-like finish success depends on proper product layering. Cream formulas create that glassy, glossy glow best. A translucent-based highlighter goes next and lets natural skin shine through. My signature touch adds a hydrating essence beneath the highlighter that creates extra radiance.
Glow Maintenance
Celebrity clients benefit from specific techniques that keep their glass skin effect flawless all day. A hydrating facial mist works great for quick touch-ups, especially in dry or air-conditioned spaces. Dewy setting spray locks the look in place and improves hydration. Moisture balance makes all the difference – powder should only touch specific areas like under-eyes and around the nose to control unwanted shine.
Fox Eye Makeup Style
My recent celebrity masterclass showed that fox eye makeup style was one of the most requested baddie makeup looks. Yes, it is a technique that creates an elongated, almond-shaped appearance that’s both striking and sophisticated.
Eye Shape Techniques
The client’s natural eye shape helps customize the fox eye effect. Hooded eyes need a higher crease illusion, while almond eyes look better with subtle elongation. My signature mapping technique uses marked points along the lash line and focuses on the outer corners to create that lifted appearance.
Lash Application
We found that there was a significant connection between strategic lash placement and the fox eye effect. Here’s what I recommend:
- L-curl lashes for dramatic lift
- Individual lashes concentrated on outer corners
- Graduated lengths from inner to outer corner
We focused the bulk of the lashes on the outer corners and gradually decreased their length toward the inner eye. This creates that coveted upward sweep without overwhelming the eye shape.
Brow Styling
The fox eye look comes together with precise brow manipulation. The natural brow arch needs assessment before creating an upward angle that complements the eye shape. Concealer helps reshape the tail end toward the temple instead of downward. This technique lifts the entire eye area and enhances the fox eye effect without permanent brow alterations.
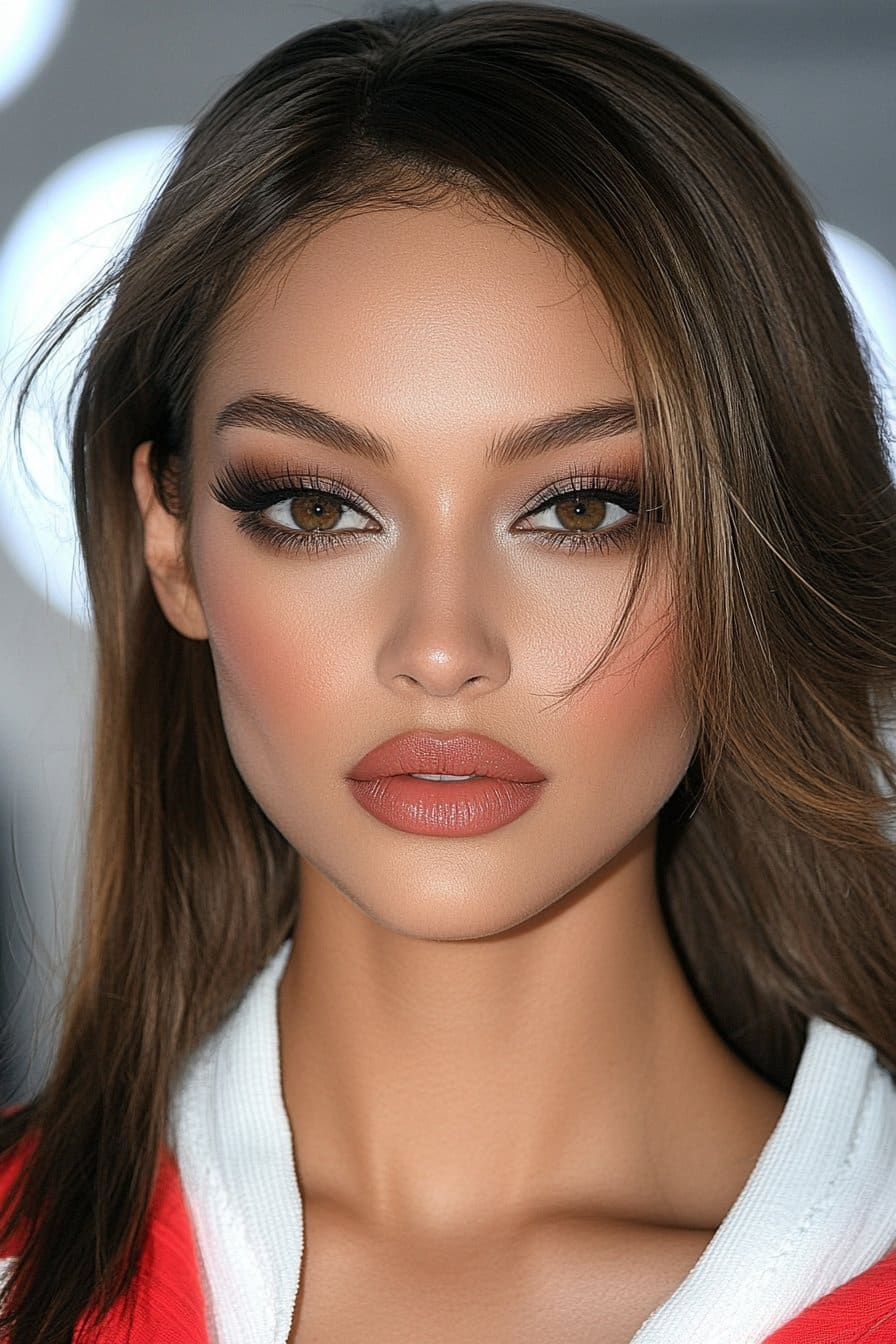
Soft Glam Baddie Look
Soft glam baddie makeup has become my signature style. I create understated elegance with a bold edge for celebrities. My work at New York Fashion Week and red carpet events helped me become skilled at techniques that blend sophistication with that coveted baddie esthetic.
Color Selection
Natural beauty shines through neutral and soft tones in my soft glam looks. My go-to eyeshadow combinations include warm, hazy eyes with muted, monochromatic colors. Pastels work best for lighter complexions. Rosy tones complement medium skin tones, while rich golds bring out deeper skin tones beautifully.
Blending Methods
Smooth blending creates that perfect soft glam look. A luminous base starts with sheer foundation. Everything blends together – contour, concealer, and shadow – to create a barely-there effect without harsh lines. Circular motions help merge products together and create that signature soft filter look.
Finishing Touches
Dimension comes alive through smart product layering in soft glam baddie looks. Glowing skin pairs perfectly with glossy lips and fluffy brows. Setting spray goes on the face’s sides, not the center, which keeps that dewy finish lasting longer. This technique balances matte and luminous areas to create that coveted soft glam effect. The results photograph exceptionally well.
Cut Crease Drama Look
My clients at New York Fashion Week love the striking baddie esthetic that cut crease technique delivers. This dramatic eye makeup style creates depth and dimension through precise shadow placement and careful blending.
Cut Crease Steps
A blurring primer creates long-lasting results. We mapped out three strategic points – one in the center above the eyeball and two in the corners. The process continues with blending a transition shade into the crease while gradually building intensity with darker hues. Clients with hooded eyes need the cut slightly above their natural crease to create more visible lid space.
Color Combinations
My signature baddie cut crease looks showcase these striking combinations:
- Maroon with rose gold for warm undertones
- Navy blue paired with silver for cool tones
- Deep plum with champagne for universal appeal
Neutral tones like honey brown and beige work best for daytime events. Metallic and matte finishes create stunning dimension during evening glam sessions.
Precision Tips
Perfect cut crease results depend on proper tool selection and technique. A flat synthetic brush helps apply concealer with sharp lines. Clients with hooded eyes should look straight ahead while mapping the crease to prevent transfer. Cream shadows before powder products give better control and longevity.
A lash curler serves as an excellent stencil when its curved edge is saturated with concealer for precise stamping. This method ensures both eyes’ symmetry and creates that signature baddie cut crease definition.
Snatched Contour Style
Fashion Week taught me that becoming skilled at snatched contour is vital to achieve that signature baddie esthetic. My work with celebrity clients has helped me develop foolproof techniques that create sculpted, defined features while keeping a natural appearance.
Contour Mapping
We analyze each client’s face shape to determine the best contour placement. Round faces need focus on the temples and under cheekbones. Rectangular faces look better with contouring high around the forehead and under the jaw. The best approach is to start with small amounts of product because building up is easier than fixing heavy application.
Product Selection
The perfect baddie contour depends on your skill level when choosing products. Cream contours give you precise application, but beginners might find powder formulas more forgiving. The best results come from selecting a shade that is:
- 2-4 shades darker than your foundation
- Cool-toned to create natural shadows
- Matte finish to add authentic dimension
Blending Methods
A snatched contour depends on your blending technique. Small circular motions with a fluffy brush create the most natural finish. My signature lifted effect comes from blending the cheek contour upward and outward. The snatched look lasts all day when you set cream products with a matching powder shade, especially in areas that move frequently.
Monochrome Pink Baddie
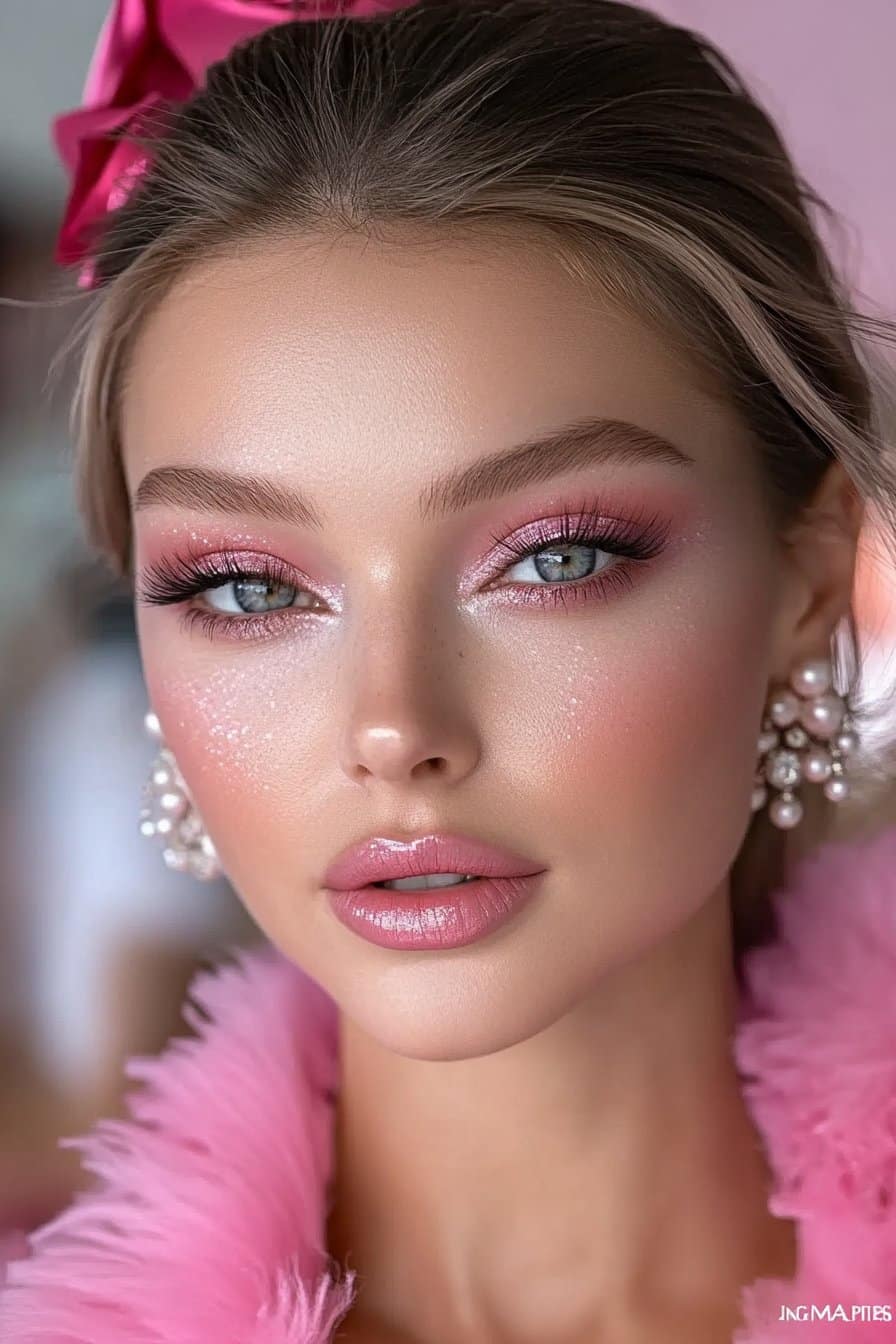
My pink monochromatic baddie looks turned heads at Paris Fashion Week with their fresh, modern appeal. Years of working with celebrity clients helped me become skilled at creating this striking yet wearable style.
Color Coordination
We assessed each client’s undertones to find the perfect pink selection. Cool undertones work best with baby pink or berry shades. Warm undertones create beautiful combinations with coral and magenta hues. Deeper skin tones need more vibrant pinks to prevent a washed-out look.
Application Techniques
My signature technique relies on layered application. A sheer foundation base creates the canvas, and a generous amount of pink-toned blush enhances the cheeks. Rosy eyeshadows build intensity from lid to crease. The magic happens with uninterrupted blending – circular motions merge products naturally.
Product Recommendations
The perfect pink baddie look requires:
- Cream or liquid blush matching your skin’s undertone
- Shimmery rose gold highlighter that adds dimensional glow
- Hydrating pink-toned lip products ensuring lasting wear
The look ended up complete with a dewy finishing spray, which I keep away from the face’s center to maintain that coveted glow. This technique balances matte and luminous areas perfectly, creating that signature baddie esthetic that photographs beautifully under any lighting.
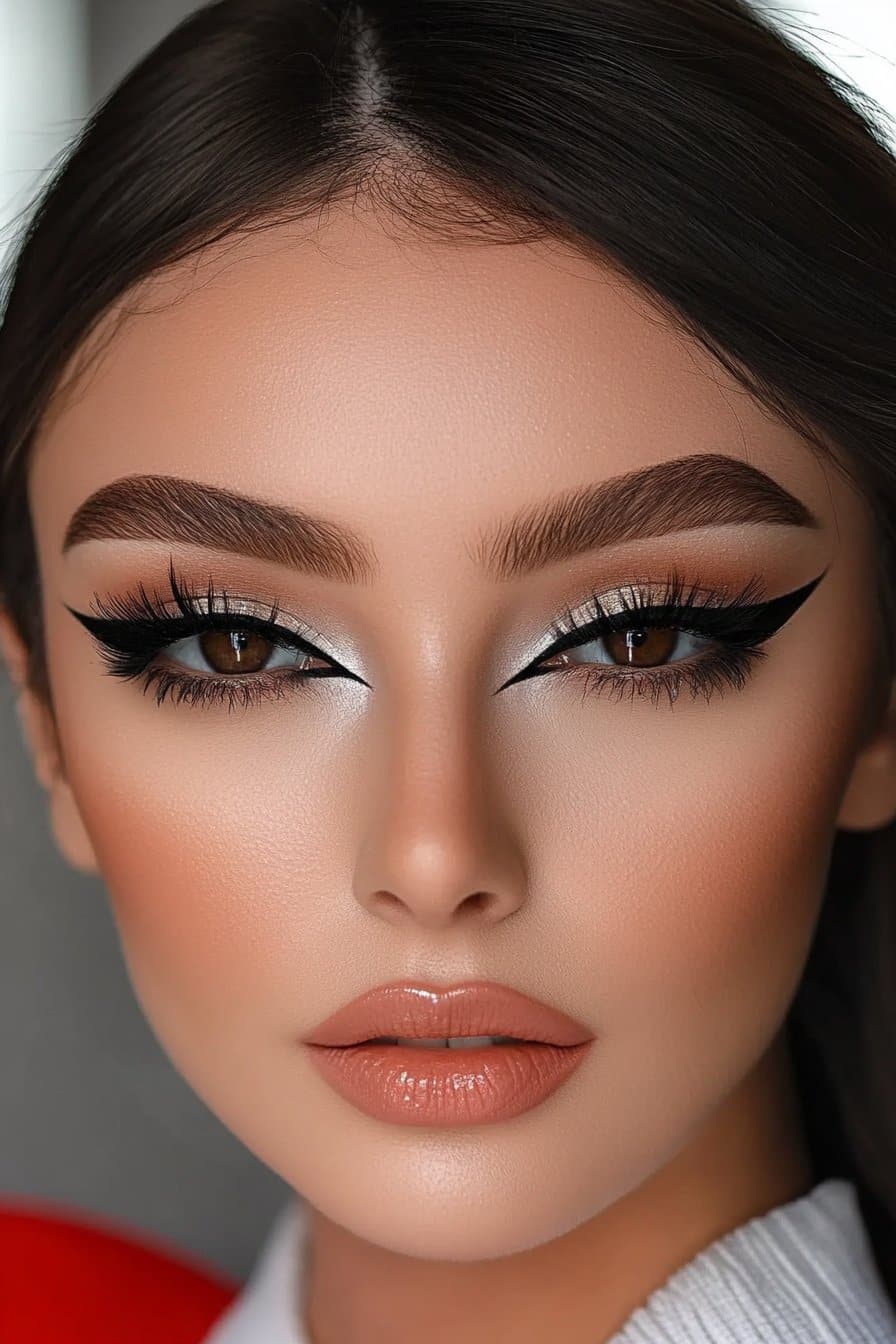
Graphic Liner Art Look
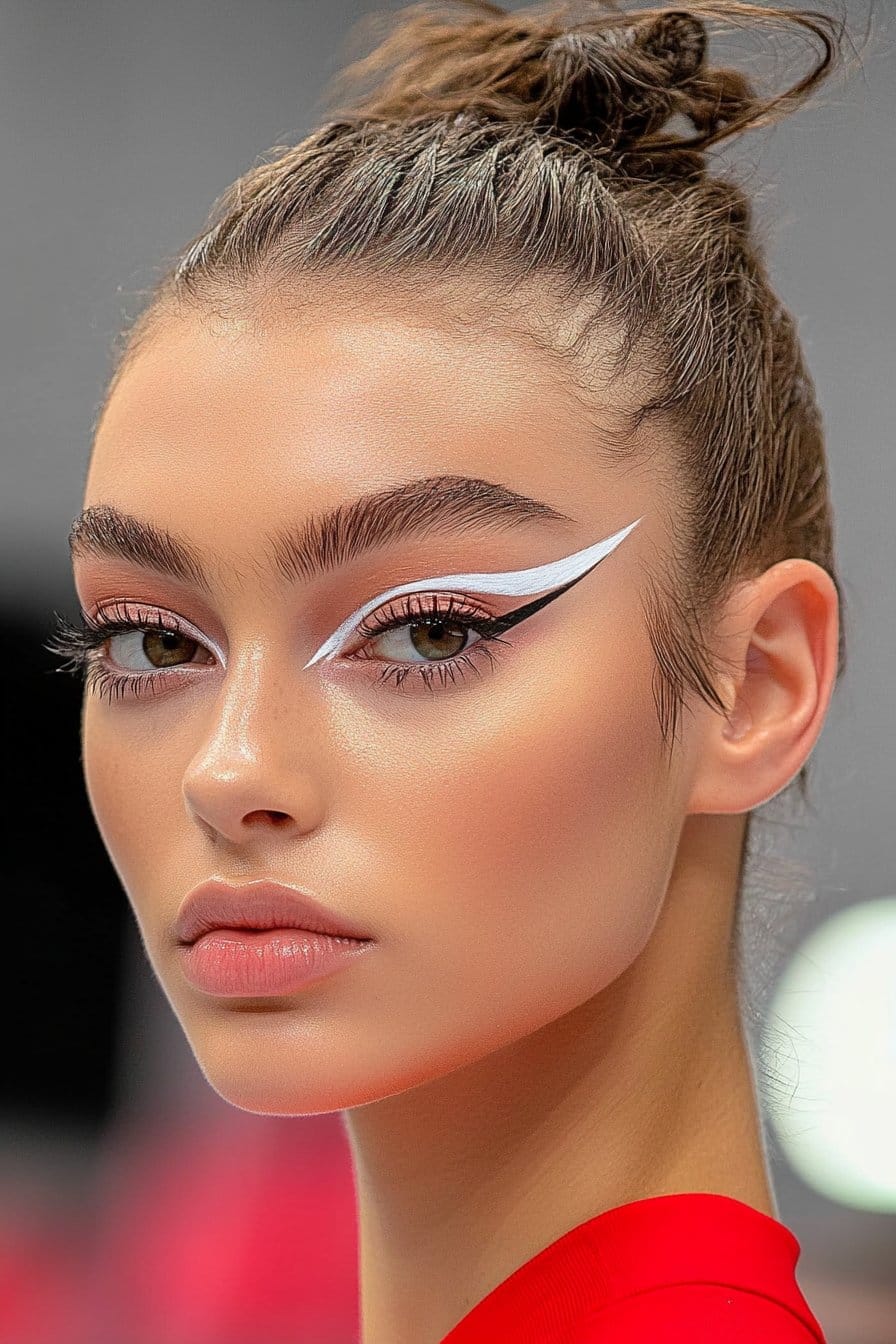
My signature baddie makeup technique comes from years of runway shows and editorial shoots. This bold approach breaks traditional eyeliner rules and creates stunning geometric patterns that make a powerful statement.
Design Ideas
Simple shapes work best before you move to complex patterns. Beginners should try floating lines just above the crease. You can create striking contrast with negative space designs – I leave centers blank and outline bold shapes along the lash line. My favorite look features geometric angles with triangles, rectangles, and chevrons on the lids.
Application Tools
You need the right tools to achieve precise graphic liner looks. These are my must-haves:
- Liquid liners to get intense pigmentation
- Gel liners that offer flexibility
- Fine-tipped brushes to create intricate details
A smooth, crease-free base needs eyeshadow primer. I keep cotton swabs and makeup remover close by to fix any mistakes quickly.
Color Options
Classic black never goes out of style, but bold hues help raise the baddie esthetic. My Fashion Week experience has shown that metallic shades add dimension, while neon colors create show-stopping effects. I love creating color block effects with two complementary shades – pairing metallic with matte looks modern and fresh. The perfect look comes from choosing colors that complement your skin tone and make a bold statement.
Glitter Glam Style
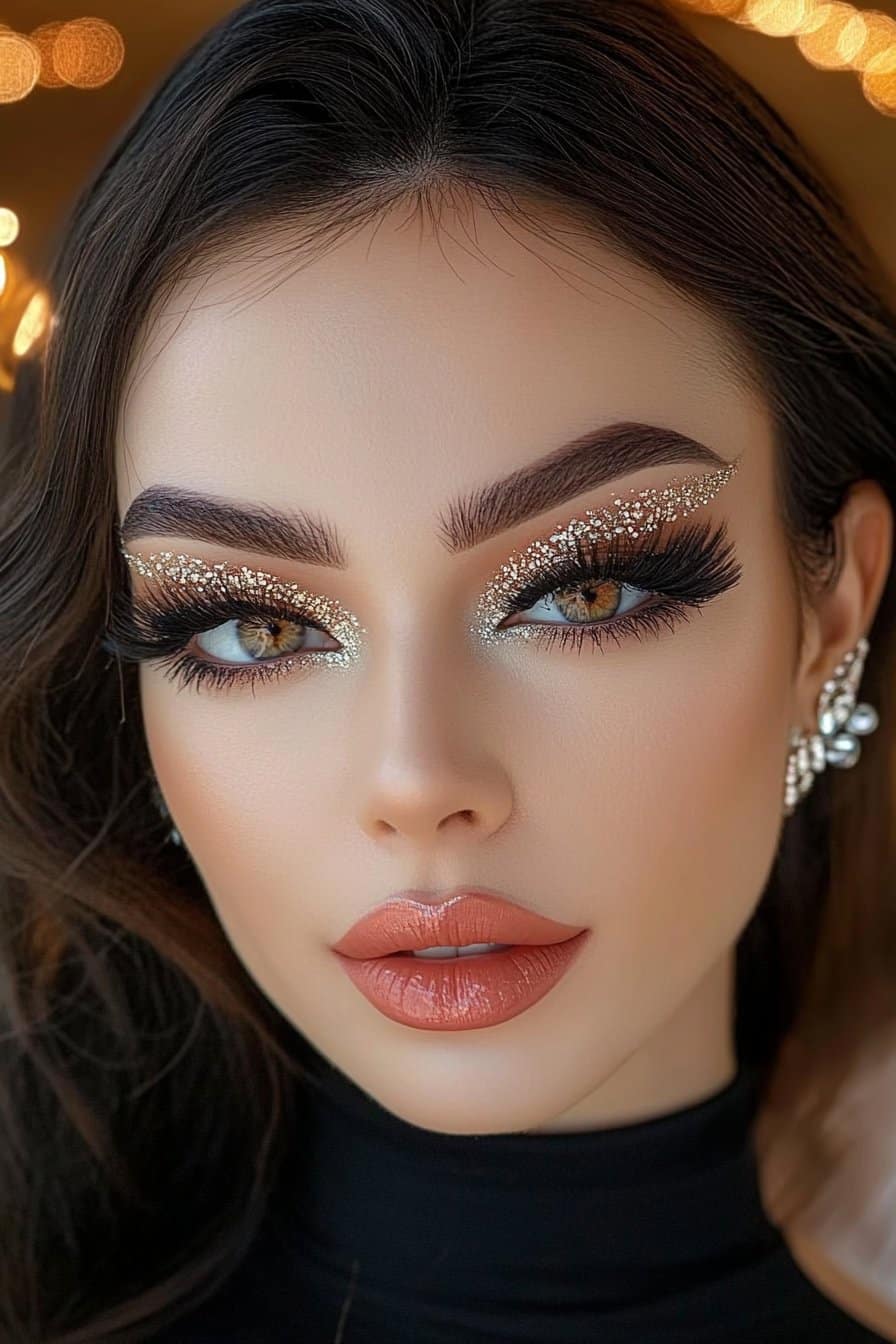
My extensive work at Fashion Week has taught me that glitter makeup is one of the most influential elements in creating stunning baddie makeup looks. Working with A-list clients over the last several years has helped me become skilled at applying and removing glitter safely.
Glitter Application
We recommend using cosmetic-grade glitter formulas specifically designed for facial application. Products like Urban Decay Moondust Liquid Glitter Eyeliner or Danessa Myricks Infinite Chrome Flakes work perfectly for that baddie esthetic. The core team focuses on proper adhesive selection – specialized glitter primers or diluted lash glue provide maximum staying power.
Product Safety
Safety is essential in makeup artistry. I ended up learning that craft glitter can cause skin irritation, so it’s best to avoid it on the face. Chunky glitter flecks work better than fine ones because they lift off easily. A balm base like Elizabeth Arden Eight Hour Cream gives the glitter something to grab onto and prevents fallout.
Removal Tips
Red carpet preparations have taught me the quickest way to remove glitter. The process starts with an oil-based makeup remover that you gently massage into the skin. Medical tape wrapped around your finger with the sticky side out works for precise removal. Stubborn pieces need:
- Coconut oil for gentle dissolution
- Micellar water as a second step
- Cold cream for final cleansing
Your skin needs protection, so avoid makeup wipes with alcohol that can cause dryness and irritation. This approach will give a thorough removal while protecting your skin and maintaining that signature baddie glow.
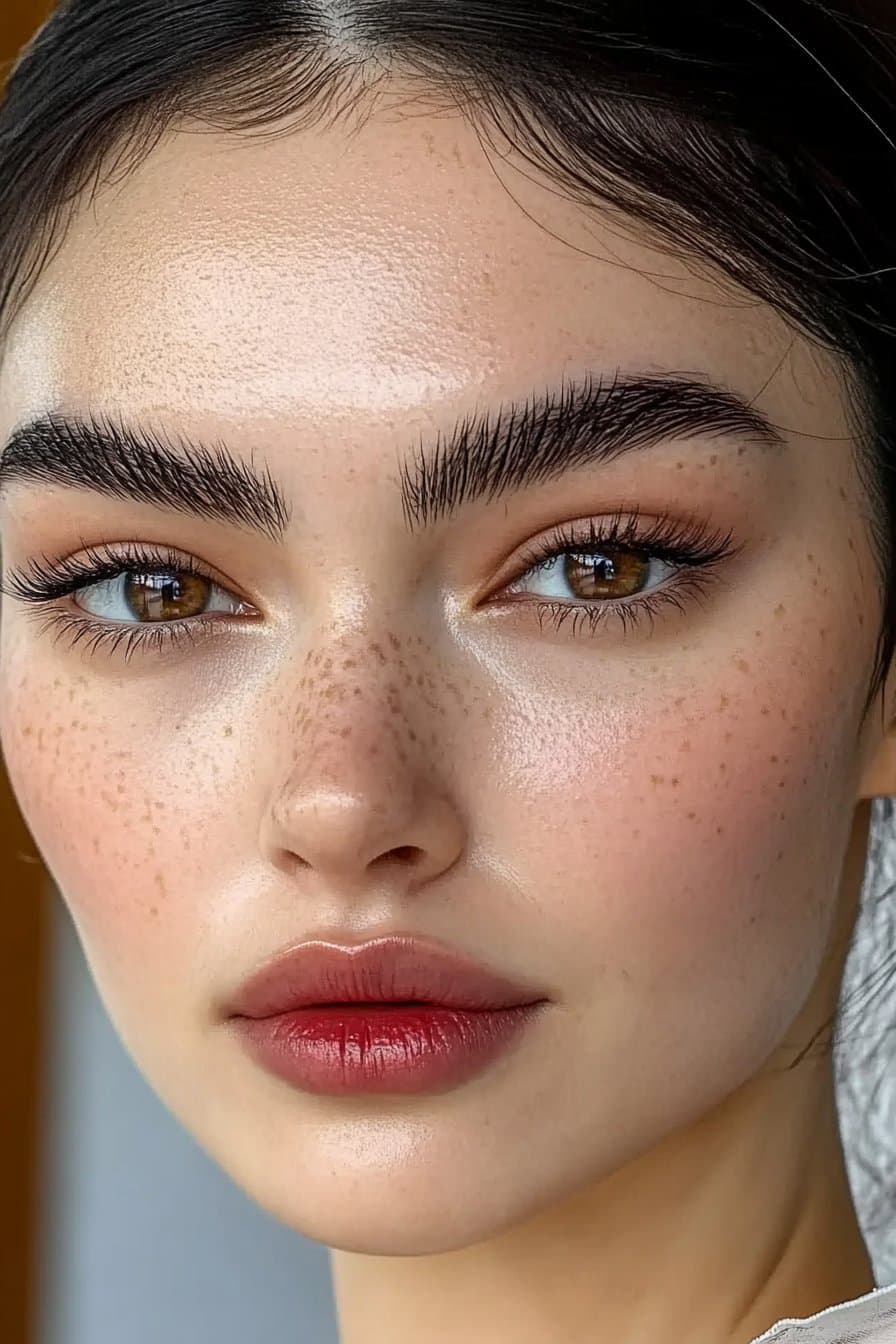
Faux Freckles Baddie
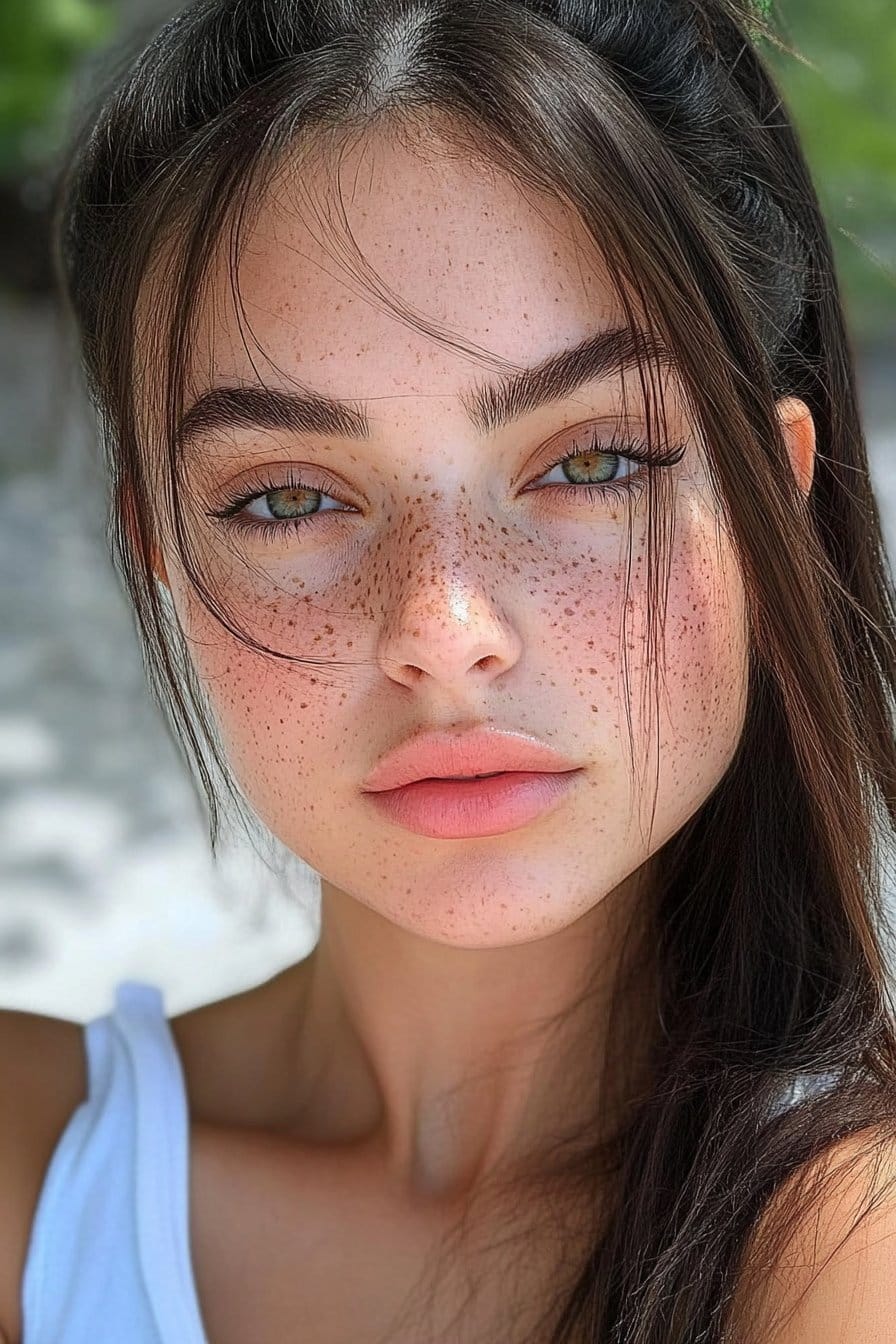
I’ve become skilled at creating faux freckles that perfectly match any baddie makeup look as a celebrity makeup artist. My work with A-list clients has taught me that natural, sun-kissed looks boost features without going overboard.
Freckle Placement
We focus on spots where sunlight naturally touches the face. The most authentic look comes from concentrating freckles on the nose bridge and upper cheeks. A light dusting on the forehead and chin adds dimension. Random spacing makes them look real – symmetrical placement gives away their artificial nature.
Product Selection
My testing shows these tools give the best results:
- Matte brown eyeshadow for a soft, natural finish
- Fine-tipped paint brush or trimmed eyeliner brush
- Waterproof mixing medium for longevity
Pick a shade slightly warmer than your natural brow color. Orange-brown undertones work better than cool browns for deeper skin tones.
Natural-Looking Tips
Proper blending is vital to achieve realistic faux freckles. Light dots in random patterns should be pressed with your fingertip before they dry. This creates a more diffused, lived-in look. A plain makeup brush helps press the freckles into the foundation and creates that desired “beneath the skin” effect.
A light dusting of translucent powder sets the look without hiding the freckles. This technique creates that perfect baddie esthetic and gives you a believable, sun-kissed look that stays put throughout any event.
Ombre Lip Effect
My experience creating red carpet looks has taught me that ombre lips are one of the most striking elements in baddie makeup. The gradient effect adds dimension and makes lips look fuller – something my celebrity clients love.
Color Selection
The perfect ombre effect starts with two shades that blend naturally together. We recommend picking colors from the same family – a darker shade around the edges and a lighter one for the inner lips. These combinations never fail to deliver amazing results:
- Deep brown with nude for classic appeal
- Wine shade with red for drama
- Pink with orange for a fresh twist
Blending Technique
A flawless ombre lip depends on precise application and blending. I start by applying the darker shade around the lip line, making it thicker at the corners and thinner as I move inward. A fine-point lip brush helps me apply the lighter shade to the lip’s center with precision. This creates that beautiful gradient effect that looks stunning in photos.
Long-lasting Tips
The ombre effect needs proper maintenance to stay vibrant during events. I start with a good lip scrub and moisturizer. The look lasts longer when I add clear lip gloss to the center, which locks everything in place and adds extra dimension. My clients always carry a hydrating lip balm to touch up their gradient effect and keep it fresh throughout any event.
Neon Eye Pop Look
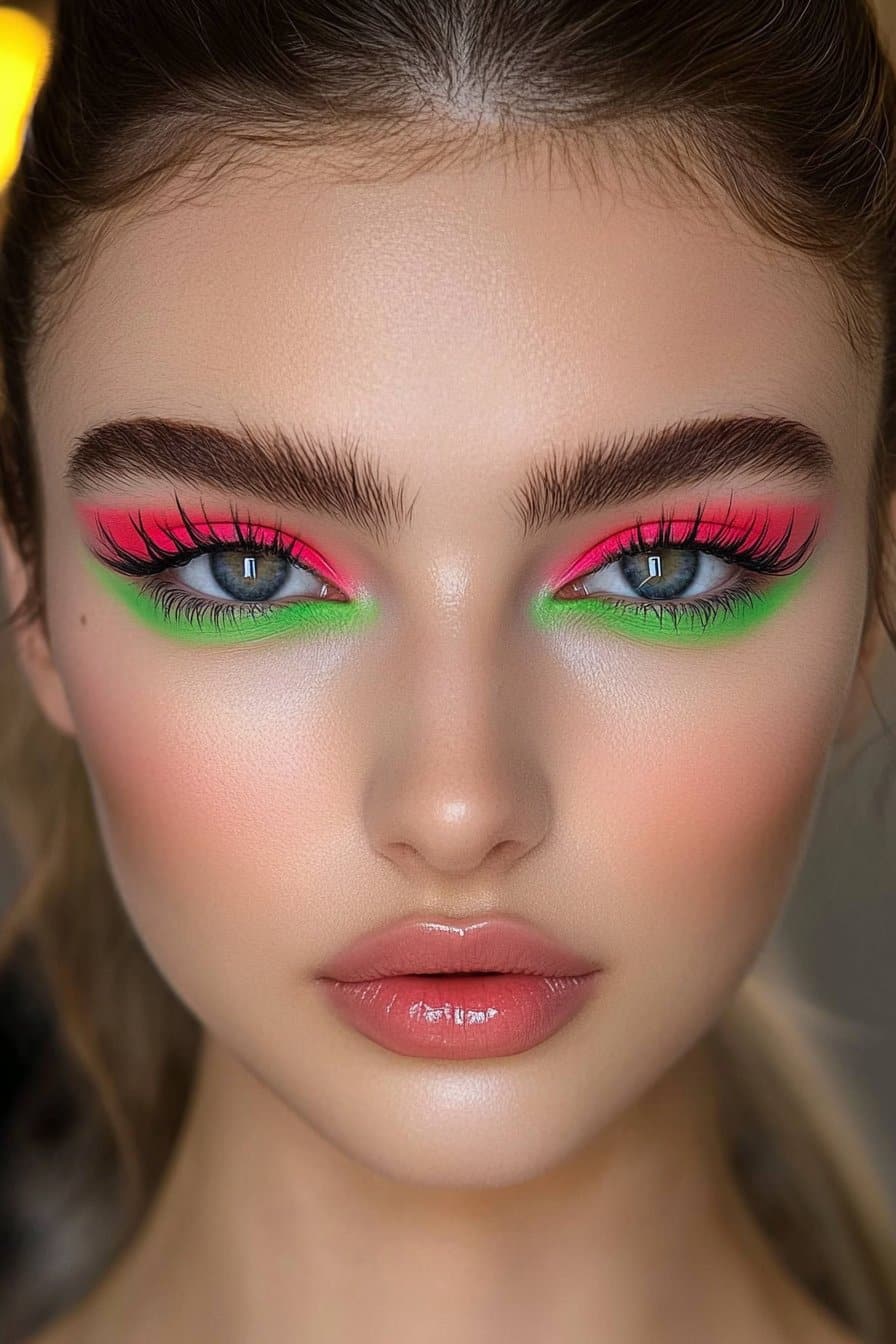
My recent runway shows have generated huge interest in neon eye makeup that fits perfectly with the baddie esthetic. Working at Laboratory of Fun has helped me become skilled at techniques that make neon wearable for any occasion.
Color Combinations
Neon looks need much of either color. We paired neon orange with Yves Klein blue to create striking contrast. Warm orange tones naturally complement cooler blues and create balance without overwhelming the face. Newcomers should start with a single vibrant shade before they try color blocking effects.
Application Methods
Perfect neon application starts with proper preparation. A white or light beige primer makes the shadows appear more vibrant. You’ll need these tools to get started:
- Small flat eyeshadow brush to pack color
- Clean fluffy brush to blend edges
- White eye pencil to map the base
The neon shade should be applied in thin layers. Building intensity gradually works better than applying too much at once. This approach will give better control and prevent any muddy appearance.
Setting Techniques
I’ve developed specific setting methods to keep neon shadows vibrant throughout events. A sticky base will give you the best pigment payoff. The product should stay away from the lash line to prevent transfer. The look ended up with a volumizing mascara that defines the eyes without overwhelming the neon effect.
Dewy Skin Finish
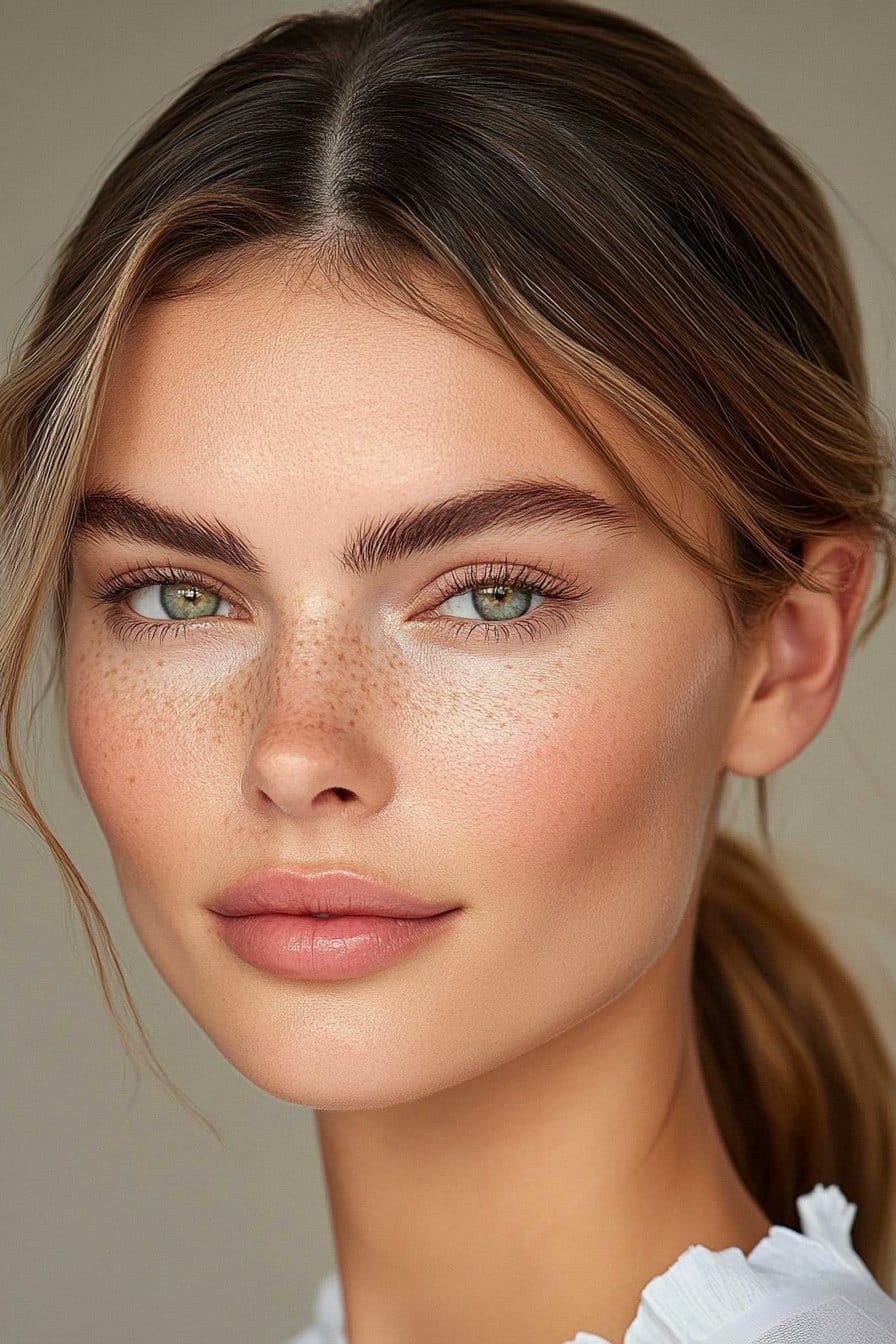
My students in exclusive masterclasses always want to learn one thing – how to get that perfect dewy skin finish. It’s one of the most popular baddie makeup techniques they ask about. I’ve worked with a variety of skin types and found that there was a simple secret: proper prep work and smart product layering.
Skin Prep Steps
We focused on getting a full picture with gentle, hydrating cleansers. The best results come from double cleansing – start with an oil-based cleanser and follow up with a water-based formula. Exfoliation is a vital part of getting that coveted glow because it removes dead skin cells that make skin look dull.
Product Layering
Getting dewy skin depends on how you layer your products. Start with a hydrating essence, then add serums that contain hyaluronic acid and niacinamide. These products give the best results when you:
- Put them on damp skin to maximize absorption
- Layer them from thinnest to thickest
- Lock everything in with an oil-based moisturizer
Maintenance Tips
My celebrity work has taught me specific strategies to make that dewy look last. Keep a hydrating facial mist handy for quick touch-ups. You can also spray a water-based face mist before applying hyaluronic acid serum to lock in moisture. The real secret ended up being smart powder placement – just set under-eyes and around the nose while letting the high points stay naturally dewy.
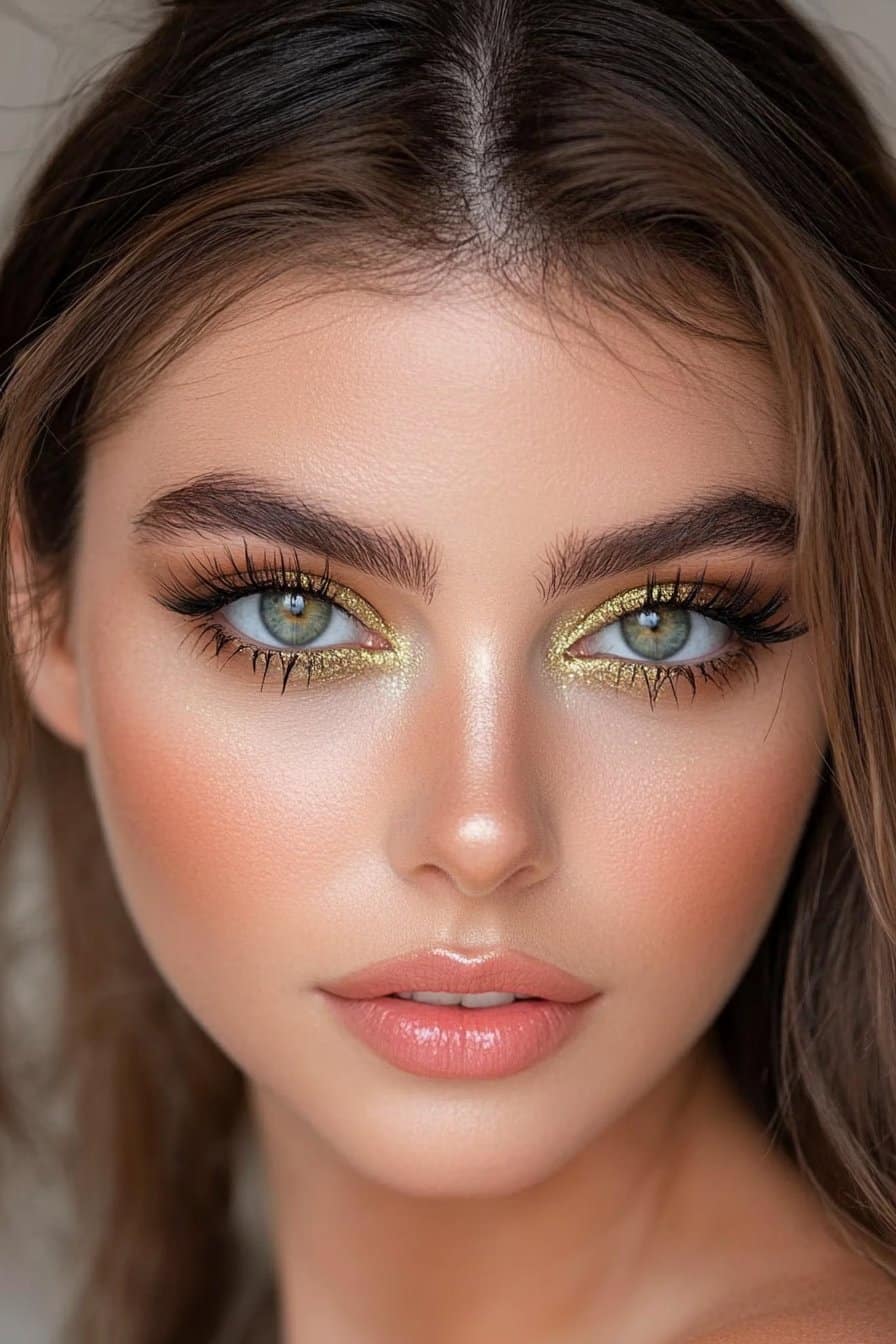
Rose Gold Glam Style
Rose gold makeup has become the life-blood of my signature baddie looks, especially when you have to consider its universal appeal during my recent masterclass series. This stunning shade combines the warmth of gold with subtle pink undertones and creates a sophisticated yet approachable esthetic.
Color Placement
The perfect rose gold baddie look needs strategic placement. We applied shimmery rose gold eyeshadow across the entire lid as a base. Deeper rose tones go in the crease, while lighter champagne-rose shades light up the inner corners. This technique creates depth without overwhelming the eye area.
Product Selection
My Fashion Week experience helped me curate these must-have products for the perfect rose gold baddie look:
- Cream eyeshadow for long-lasting base
- Pearl-infused liquid highlighter for dimensional glow
- Hydrating rose gold lip products with jojoba seed oil
Blending Methods
The key to becoming skilled at rose gold makeup lies in proper blending techniques. The process starts with a blurring primer to ensure longevity. The signature baddie effect comes from using circular motions with a flat synthetic brush. Build intensity from the inner corner outward gradually. Looking straight ahead while applying prevents transfer, which works great for clients with hooded eyes.
Setting cream products with a matching powder shade maintains the rose gold glow during events. This technique ended up creating that coveted baddie esthetic and ensures the look photographs beautifully under any lighting.
Overlined Lip Look
My experience with celebrity photoshoots taught me to become skilled at overlining lips – a technique that creates the signature baddie esthetic. Clients ask me about this look because it improves lip fullness without any invasive procedures.
Lip Mapping
Perfect overlining starts with understanding your natural lip shape. We assessed each client’s lip structure and focused on areas needing more fullness. Creating symmetry requires mapping three key points: the cupid’s bow center and both corners of the mouth. The overlining works best in the center of both upper and lower lips, and it should taper toward the corners for a realistic effect.
Product Selection
These specific product combinations create that flawless overlined look:
- Lip liner 2-4 shades darker than natural lip color
- Matching lipstick in matte finish
- Clear lip gloss for dimension
- Concealer for clean-up
Neutral shades work best while practicing this technique. Matte formulas give better results since glossy finishes tend to highlight the overlined areas.
Natural Finish Tips
The finishing touches make overlined lips look natural. A Q-tip or lip brush helps blend the liner’s edges smoothly and creates a seamless transition. The lip line needs concealer around it, applied with a small brush to lift and define the shape. A touch of highlighter on the cupid’s bow ended up creating that coveted baddie pout that photographs beautifully in any lighting.
Sunset Eye Drama

My signature sunset eye drama look has become a favorite among my celebrity clients. The look draws inspiration from twilight skies’ vibrant hues. I’ve perfected this technique through numerous red carpet events to create a stunning gradient effect that turns heads.
Color Selection
The perfect sunset effect needs warm, earthy tones that blend naturally. Here’s my favorite combination:
- Bright metallic purple for the base
- Red-orange matte for transition
- Bright light orange for dimension
- Warm brown midtones for depth
Blending Techniques
The real magic happens in proper color layering. We start with a light transition shade across the crease and blend upward toward the brow bone. The intensity builds with deeper shades along the crease and outer corner. This creates a natural gradient that reminds you of dusk.
Finishing Touches
My runway experience has helped me develop specific techniques to nail this baddie esthetic. A gel liner along the lash line creates a subtle winged effect. Sometimes I add shimmer to the center lid that mimics the sun’s last rays. A sticky base beneath the shadows will make your look last longer.
Balance between colors makes this look work. My time at Fashion Week taught me to avoid overwhelming contrasts. This approach gives a cohesive finish that looks beautiful in any lighting.
Feline Flick Style
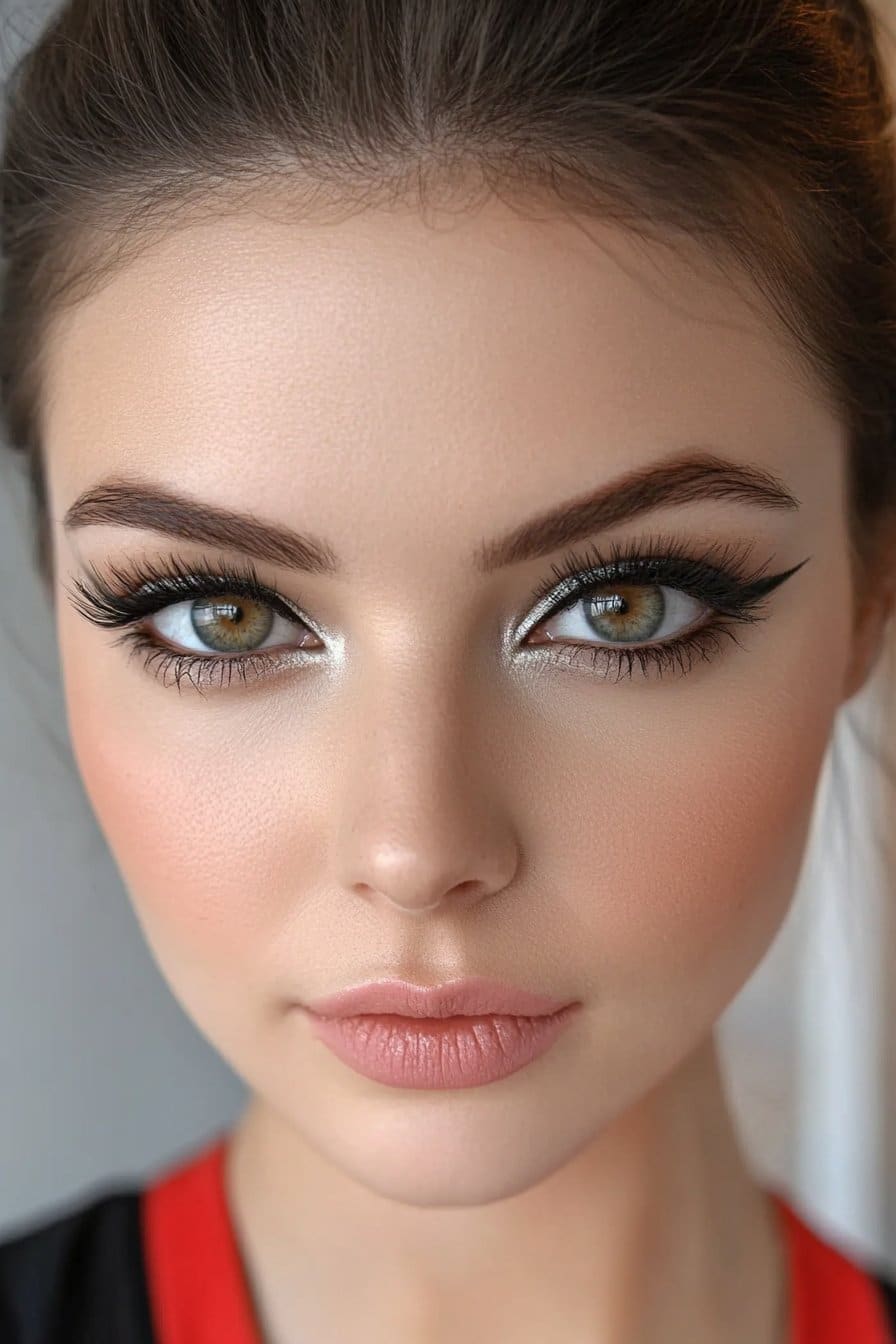
My years at Laboratory of Fun have taught me a lot about the feline flick. It’s become my signature move in baddie makeup. I’ve worked with many celebrity clients and learned to create sharp, striking lines that will boost any eye shape.
Eye Mapping
The bottom lash line works as a natural guide to create that perfect feline flick. I like to picture a line going up from the bottom lash line – this shows me the right wing angle. The technique will give balanced proportions on both eyes. Your eyes should stay relaxed. Don’t raise your eyebrows or stretch the skin because this can mess up your liner alignment.
Product Selection
Over time, I’ve found these products that really changed my feline flick game:
- Dark brown eyeshadow when you want to practice or create softer looks
- Waterproof matte formula that stays put
- Angled eyeliner brush to get those precise lines
Eyeshadow might work better for beginners than liquid liner because you can easily fix mistakes. If you have hooded eyes, keep your liner thin and precise to avoid any transfer.
Application Tips
You’ll become skilled at the feline flick with the right approach. I create three key points – one at the outer corner, one at the highest point of the flick, and one where the line meets your lashes. It works best to finish one eye before starting the next.
A cotton swab with some moisturizer takes care of any mistakes. This technique ended up creating that perfect baddie look while keeping both eyes symmetrical.
Bronzed Goddess Look
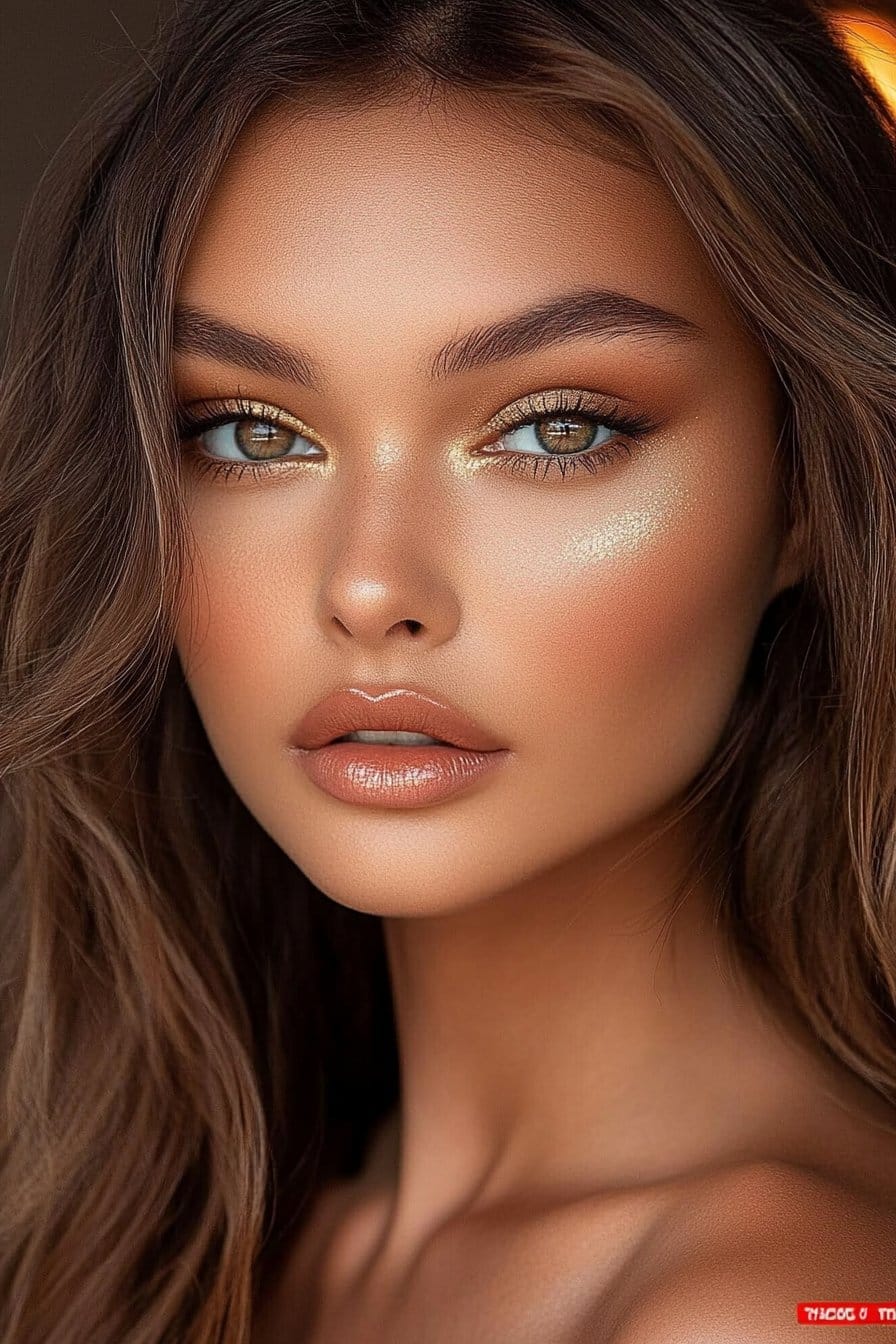
My work with A-list celebrities at red carpet events has taught me that becoming skilled at bronzer application will give a perfect sun-kissed baddie look. Years of photoshoots have helped me perfect techniques that add dimension without looking muddy or orange.
Bronzer Placement
The perfect bronzed goddess look comes from applying product where sunlight hits the face naturally. We focused on the cheeks, forehead, and chin. The same shade around the eye area creates extra dimension. This approach helps blend the look naturally.
Product Selection
Working with clients who have different skin types has shown me how important choosing the right bronzer formula is. Powder-based bronzers work best for oily or balanced skin and provide better control. Cream or gel formulations benefit people with dry or mature skin. The right shade should be no more than two shades darker than your natural skin tone.
Blending Methods
Perfect bronzer application depends on proper technique. A large fluffy brush works best when you start at the top of the ear and pull downward with circular motions on the cheek. The signature baddie glow comes from:
- Warming up the forehead and blending into temples
- Wrapping around the cheek’s contour
- Taking the product down to neck and décolletage
Cream products need setting with a matching powder shade, especially in areas that move a lot. This method keeps that beautiful bronzed goddess effect lasting throughout any event.
Soap Brow Effect
My years of working with runway models helped me find that soap brows create that perfect baddie esthetic while looking natural. Many of my celebrity clients love this technique because they can get salon-like results at home.
Brow Prep
We clean the brow area to remove oils and makeup residue. The best results come from using a gentle cleanser and light exfoliation to remove dead skin cells. Brushing the brows in their natural direction gives you a clean canvas to work with.
Product Application
Perfect soap brows depend on choosing and applying the right products. Here’s what I always keep handy:
- Cosmetic-grade brow soap or clear glycerin soap
- Clean spoolie brush
- Setting spray or water
- Small handy mirror
The application starts with a light spray on the brow soap – too much creates unwanted suds. I work up a thin layer of product with gentle circular motions until it feels waxy. The trick is to coat all brow hairs from root to tip. I brush downward first, then upward for full coverage.
Setting Techniques
My runway experience taught me specific ways to make the look last. Once you get the shape you want, wait about 30 seconds until the product feels slightly tacky. Stubborn brows might need extra help – I use the wooden side of the spoolie to press hairs against the skin. This creates that sought-after laminated effect that looks amazing in any lighting.
Inner Corner Pop
My work at Fashion Week has shown that inner corner highlighting has become a game-changing element that creates stunning baddie makeup looks. This technique brightens eyes and adds glamor that photographs well.
Color Selection
Shimmery shades that complement your eye makeup work best. Warm-toned looks pair well with champagne or rose gold highlights, while cooler looks match perfectly with pearl or silver tones. The shade should contrast or complement your eyeshadow based on your desired effect.
Application Tips
Perfect inner corner highlighting depends on precise application. A small, pointed brush helps control placement. The highlight pops more when you start with a white or light base. Product layering improves longevity – apply a pencil base first and then add powder highlight.
Product Recommendations
My runway show experience has helped me curate these must-have products:
- Caviar Eye Color stick in Moonlight or RoseGold for cream base
- Urban Decay 24/7 Shadow in Free Bird for vibrant pop
- Small detail brush or pinky finger for precise application
A sticky base under shimmer shadows ensures maximum staying power. This technique ended up creating that coveted baddie esthetic and makes eyes appear larger and more awake.
90s Supermodel Look
My latest masterclass on 90s supermodel makeup has created a buzz around this timeless baddie look. I’ve taken these classic techniques and updated them for today’s style, thanks to my runway background.
Color Palette
The 90s supermodel look centers on matte textures and neutral tones. Cool-toned browns and lighter neutral shades work best to improve your natural eye shape. The complexion should stay fresh with subtle bronze sculpting that creates the signature supermodel radiance.
Application Steps
A lightweight, matte skin forms the base of this look. The foundation goes mainly on the t-zone and blends outward with a damp sponge. The sculpted effect comes from cream contour followed by powder contour, which defines features without looking heavy.
These essential products create depth for the eyes:
- Matte brown eyeshadow for subtle definition
- Black pencil liner for tight-lining
- Volumizing mascara for natural lashes
Finishing Methods
The authentic 90s supermodel finish depends on strategic powder application. Two different powder shades make the magic happen – lighter powder under the eyes and darker for the rest of the face. A soft, rosy blush goes where the contour was placed to improve definition. The look ended up complete with a deep nude-pink lip liner, slightly overdrawn to create that classic 90s pout.
Vampy Dark Lip Style
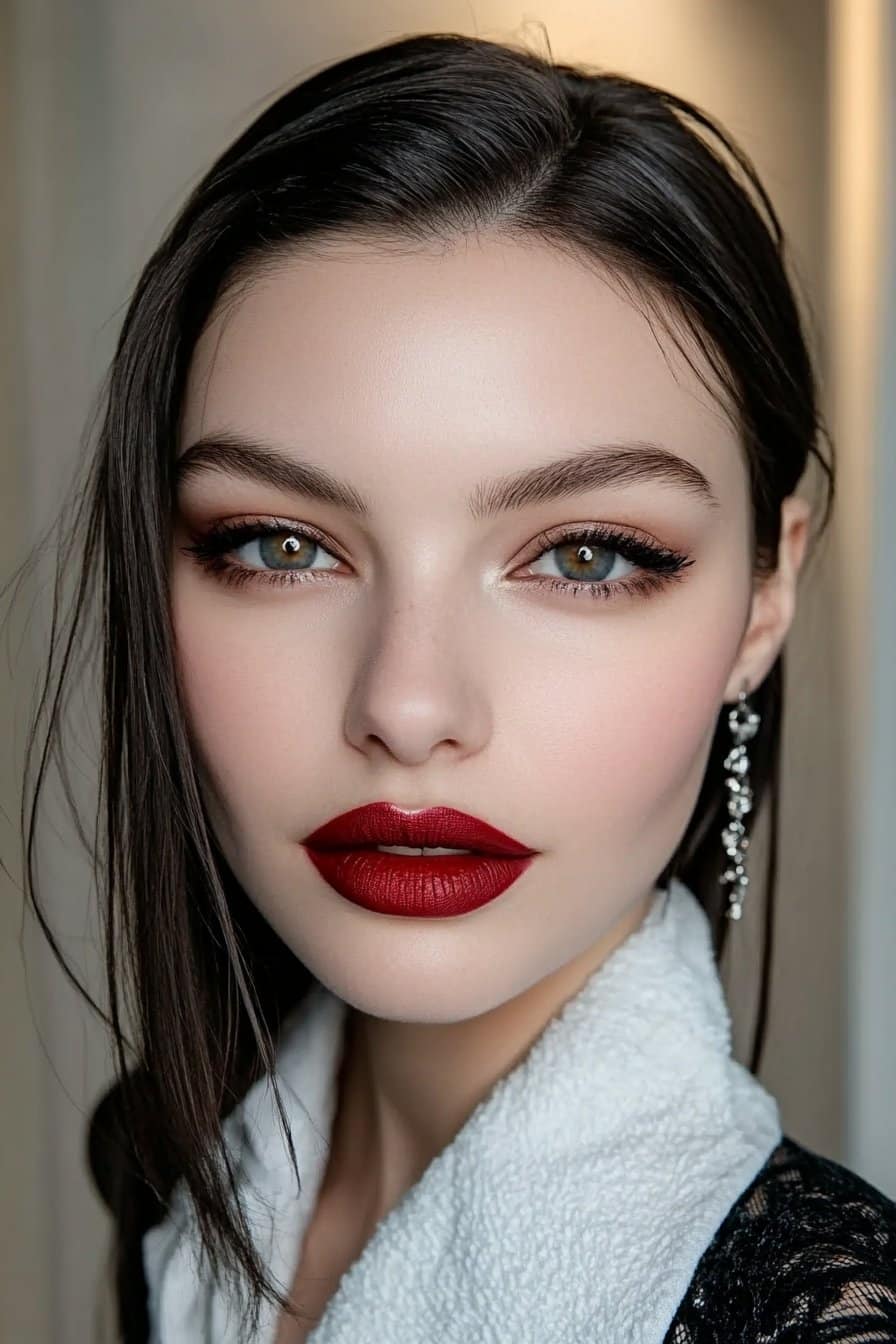
My recent Laboratory of Fun showcase revealed dark vampy lips as a trending look in baddie makeup. Years of working with runway models and celebrities helped me become skilled at making dark lipstick work for any occasion.
Lip Prep
A perfect canvas starts with good exfoliation. A gentle lip scrub helps remove dead skin cells and ensures smooth application. The best results come when you apply lip balm to keep people fed at the start of your makeup routine, which hydrates while you complete other steps. Just remember to remove excess product before adding color to prevent slipping.
Color Selection
Dark vampy lips look best when you choose shades that complement your undertones. Deep burgundy or plum tones work well for fair skin, while darker skin tones look amazing with rich terracotta or chocolate hues. People new to dark lips should start with wine or berry shades since these colors work well across seasons.
Application Techniques
The best way to apply starts with precise lip lining using a shade that matches your lipstick. You can boost definition by mapping the cupid’s bow first and creating an ‘x’ shape for perfect symmetry. A lip brush gives you more control during application, and keeping most pigment in the center makes lips appear fuller.
The perfect baddie esthetic needs crisp edges, so use a small brush to apply concealer around your lips. A light dusting of translucent powder through a tissue will set the look and ended up giving you long-lasting wear without losing that rich color payoff.
Conclusion
My experience creating signature looks for A-list celebrities and teaching masterclasses has shown that these 25 baddie makeup styles work well for everyone. Each technique, from classic winged liner to trendy glass skin, lets you express yourself in countless ways.
Working at Fashion Week and Laboratory of Fun taught me that becoming skilled at these looks takes time and dedication. You should start with simple techniques like proper skin prep and foundation application. Once you master those, move on to complex styles like cut creases or graphic liners.
Product selection is a vital part of nailing these baddie looks. My professional kit has both luxury and drugstore favorites, which shows you can create stunning results with any budget. These techniques should complement your unique features – makeup should boost, not mask, your natural beauty.
These baddie makeup looks ended up being about confidence and self-expression. You can adapt them from subtle day wear to dramatic evening glam, which makes them perfect for any occasion. Whether you’re just starting with makeup or you’re a seasoned enthusiast, these techniques will help you create head-turning looks that truly slay.