If there is one thing I have learned after years of working behind the chair and on set, it is that Black hair is pure magic. I have run my fingers through coils, curls, and kinks of every texture imaginable, and every single time, I am reminded of just how versatile, resilient, and breathtakingly beautiful natural Black hair truly is. Twist updos hold a very special place in my heart because they are the perfect marriage of protection and elegance. They honor the natural texture of the hair while creating looks that can take you from a lazy Sunday morning to a glamorous evening event without missing a beat. Whether you are brand new to twist styling or you have been rocking natural styles for years, this guide is your go-to resource for exploring fourteen of the most stunning black hair twist updo hairstyles I have ever worked with. I am going to walk you through each style the way I would explain it to a client sitting right in my chair, with warmth, honesty, and all the tips I have gathered from real experience.
Classic Two-Strand Twist Updo

What it is and how it works
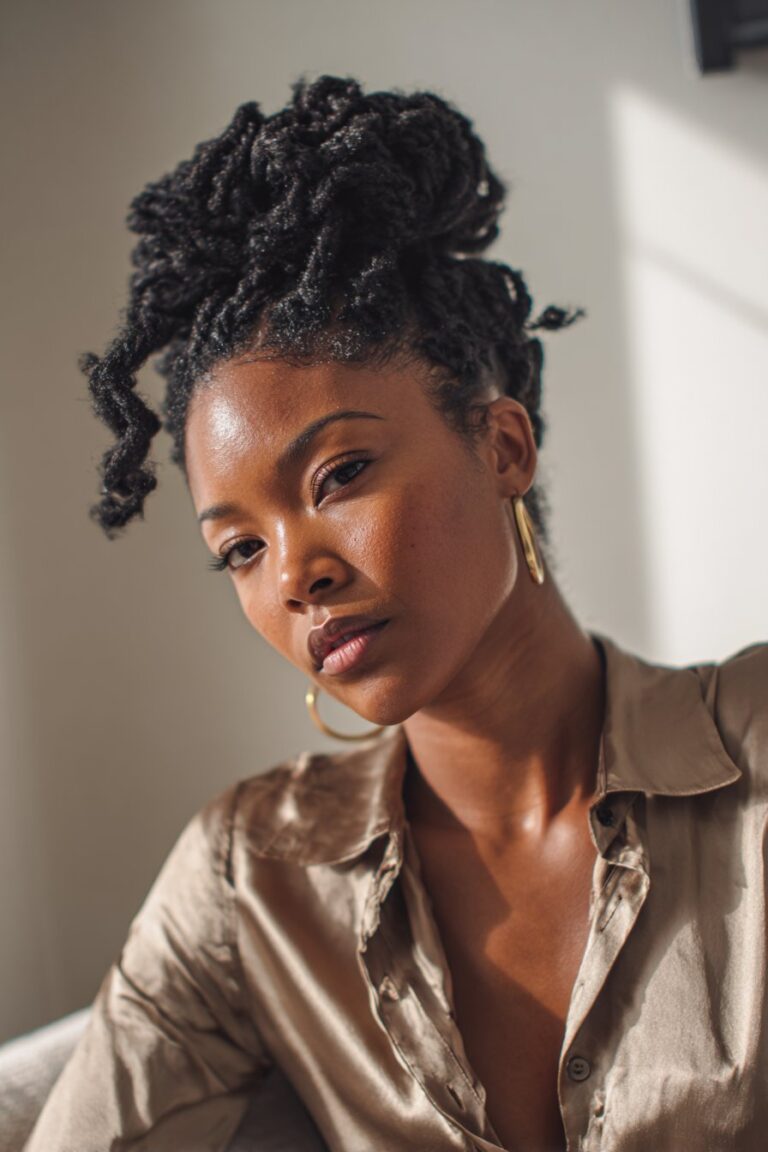
The classic two-strand twist updo is where most people begin their twist journey, and honestly, I think it is one of the most timeless styles a person with natural Black hair can wear. The technique involves dividing a section of hair into two parts and wrapping them around each other from root to tip, creating a rope-like strand. When you gather all of those twisted strands and pin them up into an updo, the result is a full, textured, romantic style that looks incredibly intentional. I love how this style celebrates the natural coil of the hair while giving it structure and polish. The two-strand twist has roots in African hair tradition, and wearing it as an updo feels both culturally meaningful and fashionable. The beauty of this style is that it does not fight the hair. It works with the natural curl pattern, which means less manipulation and more harmony between your styling efforts and your hair’s actual texture.
Best for women with type 3C to 4C hair
This style truly shines on hair that has a strong natural curl or coil pattern because the twists hold better when the hair has texture to grip onto. If you have type 3C, 4A, 4B, or 4C hair, your natural coils will help the two-strand twists stay defined and springy without needing heavy product. The classic two-strand twist updo is also a wonderful choice if you are in a transition phase between relaxed and natural hair, since the twisting technique works on both textures and helps blend the two together seamlessly. It is also perfect for someone who wants a protective style that does not require extensions, meaning you get all the beauty with zero added weight on your scalp.
How to create it with lasting results
Start with freshly washed and deep-conditioned hair because moisture is your best friend when it comes to twist styles. Apply a light butter or twisting cream throughout your hair while it is still damp, working section by section to ensure even product distribution. Divide your hair into small to medium sections depending on how chunky or fine you want your twists to be. Take each section, split it into two, and begin twisting from the root, keeping the tension consistent but never too tight. Once all your twists are complete, allow them to dry completely before pinning them up. This is my biggest tip because pinning wet twists will cause frizz and unraveling. Once dry, gather the twists upward, tuck the ends, and pin them into place with bobby pins that match your hair color for a seamless finish.
Senegalese Twist Elegant Bun

What it is and how it works
The Senegalese twist is a style that carries cultural pride and undeniable beauty in every strand. Also known as rope twists, these are created by twisting two sections of hair or extension hair tightly in the same direction to create a smooth, silky, rope-like appearance. When styled into a bun or updo, Senegalese twists create a look that is simultaneously sleek and textured, structured and free. I always describe this style to my clients as the little black dress of the twist world. It is universally flattering, appropriate for any occasion, and always looks put together. The smoothness of Senegalese twists gives them a more polished appearance than other twist styles, which is why they translate so beautifully into formal and professional updo settings.
Best for those seeking a protective and polished look
Senegalese twist buns are ideal for anyone who wants a long-wearing protective style that also looks refined. If you have a big event coming up, a job interview, or simply want a style that requires minimal daily maintenance, this updo is for you. It works on most natural hair textures and is particularly loved by those with thinner or more fragile hair because the kanekalon or braiding hair used in Senegalese twists acts as a protective barrier against breakage. I always recommend this style to clients who are in a growth phase and want to tuck their ends away while still looking fabulous every single day.
How to style it into a stunning updo
The key to a beautiful Senegalese twist bun starts with the installation. Make sure each twist is created with consistent tension and uniform sections for a clean, even look throughout. Once your twists are installed and your scalp is settled, you can begin building your updo. Gather all the twists toward the crown or the nape of your neck depending on the shape of bun you prefer. Wrap the twists around the base and secure with pins and a hair tie as needed. For extra hold, use a light edge control around your hairline to smooth any flyaways. I love adding a few face-framing twists at the front for a softer, more romantic finish. If you want height, tease the bun slightly and fluff the top twists upward before pinning.
Flat Twist Crown Updo

What it is and how it works
The flat twist crown updo is one of my absolute favorite styles to create because it looks incredibly intricate and artistic, yet the technique behind it is more accessible than most people think. Flat twists are created by twisting two sections of hair flat against the scalp, similar to how you would do a cornrow but using the two-strand twisting motion instead of the braiding motion. When you create flat twists that curve and swirl around the head and pin the ends up at the crown, you get a beautiful halo-like effect that frames the face and draws attention upward. I always feel like I am creating a piece of wearable art when I do this style. It has an old-world elegance to it that feels both regal and effortlessly chic.
Best for natural hair with medium to thick density
The flat twist crown looks most dramatic and full on hair that has medium to thick density because there is more volume to work with, which means more visual impact in the final look. Women with thicker hair will find that their flat twists naturally puff up at the edges, adding beautiful texture to the crown. That said, I have done this style on finer natural hair too, and with the right technique and products, it translates just as beautifully. It is also a wonderful style for people with shorter natural hair who want an updo that looks full and elaborate without requiring a lot of length.
How to achieve a flawless crown
Start by parting the hair from ear to ear and working on one side at a time. Apply a moisturizing cream or gel to each section before you begin twisting to keep the hair pliable and reduce frizz. Create flat twists that curve in a semicircular pattern around the head, always directing the twists toward the crown. When you reach the end of each twist, pin it up at the crown and fan out the ends to create a full, textured topknot effect. Overlap the pinned ends slightly to build volume and dimension. I like to go back in with a small amount of oil sheen on the flat portions of the twists to give them a beautiful shine that makes the style look even more polished and intentional.
Marley Twist High Bun

What it is and how it works
Marley twists are thick, voluminous twists created using Marley hair, which is a textured, matte extension hair that mimics the look and feel of natural Afro-textured hair beautifully. When you install Marley twists and style them into a high bun, the result is a statement-making look that is bold, full, and absolutely gorgeous. I love working with Marley hair because it blends so naturally with most Black hair textures, making the style look incredibly seamless and authentic. The high bun style takes the drama of Marley twists to a whole new level by drawing all that beautiful volume upward, creating a silhouette that is both commanding and feminine. This is the kind of updo that turns heads in the best possible way.
Best for adding volume and dramatic flair
If you have fine or thin natural hair and you have always dreamed of a voluminous updo, the Marley twist high bun is your dream come true. The Marley extension hair adds fullness that your natural hair alone might not be able to achieve, giving you the kind of big, beautiful bun that makes a statement from across the room. This style is also wonderful for those who have recently experienced hair thinning or shedding and want a protective style that restores visual density while giving their own hair a break from manipulation.
How to build your perfect high bun
Begin by installing Marley twists throughout the hair, making sure to use consistent sections and tension throughout. The size of your twists will determine the texture and fullness of the final bun, so decide in advance whether you want chunky, medium, or finer twists. Once your twists are installed, gather them all to the very top of your head and secure them with a thick, snag-free hair tie. Begin wrapping the twists around the base in a circular motion, tucking and pinning as you go to create a full, round bun shape. Use jumbo bobby pins for extra hold. I always recommend wrapping the bun with a silk scarf at night to preserve the shape and prevent frizz, which will keep this style looking fresh for weeks.
Goddess Twist Updo

What it is and how it works
Goddess twists are a relatively newer style that has taken the natural hair community by absolutely beautiful storm, and I am here for every single bit of it. These twists are created using a special wavy or curly extension hair that gives the twists a beautiful, flowing, bohemian texture. The ends of the twists are often left loose and curly rather than twisted all the way down, which creates a stunning contrast between the structured twist and the free-flowing curl. When styled into an updo, goddess twists create a look that feels both ethereal and romantic, like something out of a nature-inspired fantasy. I first started offering this style in my studio and the response from clients was overwhelming. People feel like royalty wearing this style, and that energy is exactly what I always aim for.
Best for romantic and bohemian occasions
The goddess twist updo is the perfect choice for weddings, bridal showers, anniversary dinners, photoshoots, or any occasion where you want to look effortlessly romantic and feminine. It is also a wonderful everyday style if you are someone who loves a more free-spirited, bohemian aesthetic. The flowing curly ends soften the structure of the updo and give the whole look a dreamy, whimsical quality that more traditional twist updos do not always have. I often recommend this style to brides who want a natural hair wedding look that feels both formal and beautifully organic.
How to create this dreamy style
Source a high-quality wavy or curly extension hair specifically designed for goddess twists. Install the twists using the same foundational technique as two-strand twists, but leave the bottom two to three inches of each twist untwisted so the curly texture of the extension hair cascades freely. Once all your twists are installed, gently gather them upward and begin arranging them into your desired updo shape. I love creating a loose, asymmetrical bun with goddess twists because it feels more organic and less structured. Allow some of the curly ends to fall freely around the face and neck as tendrils. Pin the body of the updo securely while letting those loose ends flow, and the result is absolutely stunning. Finish with a light-hold spray to keep everything in place without weighing down those gorgeous curly ends.
Chunky Twist Pinned Updo

What it is and how it works
There is something wonderfully bold and confident about chunky twists, and when you pin them up into an updo, that boldness reaches a whole new level of fabulousness. Chunky twists are exactly what they sound like, larger, thicker twists that make a strong visual statement. The individual twists are prominent and defined, which means the updo reads as textured and artistic rather than delicate. I think of chunky twist updos as the power outfit of hairstyles. They communicate confidence, individuality, and a deep appreciation for natural texture without apology. I have created this style on clients before major presentations, special occasions, and milestone celebrations, and every single time, I watch their posture change the moment they see themselves in the mirror.
Best for those who love bold, statement-making styles
If you are someone who gravitates toward standout looks and loves a hairstyle that does most of the talking for you, chunky twist pinned updos are your perfect match. They are especially wonderful on women with thick, dense hair because the thickness of each twist reflects the natural volume of the hair. They are also great for women who find that smaller twists unravel quickly, since the chunkier sections tend to hold their shape longer and with less product.
How to pin it for maximum impact
Section the hair into larger portions, roughly the size of a silver dollar, to achieve that signature chunky look. Apply a moisturizing twisting cream to each section and twist firmly from root to tip. Once all twists are done and fully dry, begin gathering them into your updo. I love creating a stacked, asymmetrical pinned updo with chunky twists, where some twists are pinned flat while others are looped upward to create dimension. Use large bobby pins and hair pins to secure everything, and do not be afraid to let a few chunky twists hang down at the nape of the neck as intentional detail pieces. The goal is structured boldness with just enough visual interest to make the style feel dynamic.
Mini Twist Elegant Updo

What it is and how it works
On the opposite end of the spectrum from chunky twists, we have mini twists, and they are absolutely breathtaking in their own right. Mini twists are tiny, precisely created two-strand twists that, when gathered into an updo, create a look that is incredibly full, detailed, and refined. The sheer number of individual twists creates a visual texture that almost resembles a tapestry, with every tiny twist adding to the overall richness of the style. I genuinely love doing mini twist updos because they require patience and precision, and the result is a style that looks like true artistry. There is a delicacy to mini twists that feels very different from larger styles, and wearing them as an updo elevates that delicacy into something truly elegant.
Best for fine to medium natural hair
Mini twists are particularly wonderful for women with finer natural hair because the smaller sections create the illusion of greater density and fullness. When gathered into an updo, all those tiny twists combine to create a look that appears incredibly lush and full, even on hair that might feel sparse when worn down. This style is also ideal for women who want a long-term protective style that they can wear and restyle multiple times, since mini twists are versatile enough to be worn down, in a puff, or in various updo configurations.
How to achieve perfect mini twists for an updo
Set aside adequate time for this style because mini twists on a full head of hair can take anywhere from three to six hours depending on your hair length and density. The investment is absolutely worth it. Work in very small, neat sections, keeping them as uniform as possible for the cleanest result. Use a light moisturizing cream, avoiding heavy butters that can weigh down fine twists. Twist each section all the way to the tip and seal the end with a small amount of product. Once complete and dry, gather the twists gently to avoid disturbing the roots. Pin them up in layers to create a full, dimensional updo. I love adding a delicate hair accessory like a thin gold band or small pearl pins to mini twist updos because the small scale of the twists lets those accessories shine.
Half-Up Twist Updo

What it is and how it works
Not every updo has to involve gathering every single strand of hair, and the half-up twist updo is the perfect proof of that. This style takes the top section of twisted hair and pins it up while leaving the bottom section of twists hanging freely. The result is a look that combines the polish of an updo with the freedom and movement of a down style. I love recommending this look to clients who are not quite ready to commit to a full updo or who want a style that transitions easily from day to evening. The half-up twist updo is endlessly versatile because you can adjust the size and position of the pinned-up section to create entirely different looks.
Best for those who love versatility and movement
If you are someone who loves having the best of both worlds in your hairstyle, this is absolutely your look. It is ideal for casual outings, dates, work environments, and social events alike because it reads as put-together without feeling overly formal. Women with longer twists particularly love this style because the loose bottom section showcases the length beautifully while the pinned top section keeps things looking neat and intentional.
How to style the perfect half-up look
Decide where you want your part to be, whether that is a center part, a side part, or no part at all. Gather the top half of your twists, taking roughly from the temples upward, and secure them gently at the crown. You can create a simple topknot, a loose bun, or a folded-over loop with the gathered twists depending on the vibe you are going for. Secure with pins and allow the remaining twists to fall naturally. For a more polished finish, smooth the hairline with a small amount of edge control. For a more relaxed, bohemian look, leave the edges natural and slightly textured. I always say that the beauty of this style is that it is meant to feel effortless, so do not over-engineer it.
Box Braid Twist Updo

What it is and how it works
Box braid twist updos occupy a beautiful intersection between braiding and twisting techniques, and the result is a style that is bold, defined, and incredibly versatile. In this context, the style refers to taking traditional box braids or combining braid and twist techniques to create an updo that has the structure of braids with the softer visual texture of twists. I have always believed that knowing multiple techniques opens up a world of creative possibilities, and box braid twist updos are one of the most exciting examples of that creative freedom. The geometric, clean parts that come with box braiding combined with the organic feel of twists create a look that is both structured and artistic.
Best for those who want long-lasting protective styles
Box braid twist updos are an excellent choice for anyone who wants a style that will hold up beautifully for weeks at a time with minimal daily maintenance. They are particularly popular with women who travel frequently, athletes, or anyone with a busy lifestyle who does not have time to restyle their hair every day. The sturdy structure of the braided foundation ensures that the updo stays in place even through physical activity, making it both beautiful and highly functional.
How to create this fusion style
Begin with clean, moisturized hair and install your box braids or twist braids using your preferred size and extension hair. Once all the braids or twists are installed, allow your scalp to rest for at least a day before styling the updo so that the tension settles. When you are ready to style, begin gathering the braids into your desired updo shape, whether that is a sleek high bun, a stacked crown, or a looser gathered arrangement. Secure with hair ties and pins. I love wrapping one or two braids around the base of the bun as a decorative detail that also helps conceal the hair tie for a more polished, seamless finish.
Havana Twist Updo

What it is and how it works
Havana twists are one of those styles that I feel an enormous personal connection to because of how beautifully they celebrate the fullness and texture of natural Black hair. Created using thick, chunky Havana extension hair, these twists are voluminous, matte, and wonderfully textured in a way that looks incredibly natural and organic. The hair used for Havana twists has a springy, coily texture that closely resembles the natural coil pattern of many Black hair types. When you style Havana twists into an updo, you get a look that is absolutely dramatic and full of personality. I always joke with my clients that Havana twist updos have their own gravitational pull because people are magnetically drawn to them.
Best for women who love voluminous, natural-looking texture
Havana twists are the ultimate style for women who want a protective twist style that looks as close to their natural texture as possible. The extension hair blends seamlessly with most natural Black hair textures, creating a style that looks like it grew that way. This is also a wonderful choice for women who want maximum volume and fullness in their updo without the weight and density that can come with some heavier extension hairs.
How to style Havana twists into an updo
Install your Havana twists using the standard two-strand twist method, making sure to marry the extension hair to your natural hair smoothly at the root for a clean, seamless install. Once your twists are installed and your scalp has settled, begin gathering them for your updo. I particularly love creating a high, voluminous bun with Havana twists by gathering them at the crown and then gently stretching and fluffing the bun outward to maximize its fullness. Use large pins to secure the shape and add a silk scarf or decorative headband at the base of the bun for a finishing touch. The result is a look that is simultaneously powerful and incredibly beautiful.
Feed-In Flat Twist Updo

What it is and how it works
Feed-in flat twists are a technique that I find endlessly satisfying to execute because of how clean and seamless the results are. Unlike regular flat twists, feed-in flat twists involve gradually adding small amounts of extension or additional hair into the twist as you work down the section, creating a gradual buildup of thickness from root to end. This technique eliminates the bulky, obvious look that can sometimes happen at the root when adding extension hair all at once, giving the finished style a much more natural and intentional appearance. When you use feed-in flat twists to create an updo, the result is a style with incredibly smooth, graphic lines along the scalp and a beautiful full finish at the crown. It is architectural and artistic in equal measure.
Best for sleek and graphic styling preferences
If you love clean lines, smooth scalp work, and styles that look like they belong on a high fashion runway, feed-in flat twist updos are absolutely your style. They are also wonderful for women who prefer a more tailored, precise look over a softer, more organic style. I recommend this style to clients who are attending formal events or who work in environments where a polished, structured appearance is important, because feed-in flat twist updos strike that perfect balance between creative expression and refined elegance.
How to master the feed-in technique
The feed-in technique requires a bit of practice, so do not be discouraged if your first attempt is not perfect. Begin with clean, stretched hair and pre-cut your extension hair into small, graduated pieces. Start your flat twist at the hairline and after the first two or three twists, begin feeding in a small piece of extension hair, adding slightly more with each subsequent addition as you work toward the nape or crown. This gradual buildup creates that beautiful seamless look. Keep your tension consistent and your parts clean. Once all your flat twists are complete, gather them at the crown and pin them into your desired updo configuration. Finish with a light hold gel along the edges for a sleek, polished hairline.
Jumbo Twist Chignon

What it is and how it works
The chignon is one of the most classic and enduring updo shapes in the world of hairstyling, and when you create it using jumbo twists, something magical happens. The chignon, traditionally a low, smooth knot at the nape of the neck, takes on a completely different character when made up of large, textured twists. The result is a style that feels simultaneously classic and modern, familiar and completely fresh. Jumbo twists are large, thick twists that make a strong visual impression, and the low placement of the chignon adds a sophisticated, understated elegance to the look. I often describe the jumbo twist chignon as the style you reach for when you want to look like you are effortlessly put together without appearing overdone.
Best for formal occasions and professional settings
The jumbo twist chignon is one of my go-to recommendations for clients attending formal events, galas, corporate functions, or any occasion where they want to look polished and professional while still celebrating their natural texture. The low placement of the chignon is universally flattering and tends to elongate the neck beautifully, which is always a lovely visual effect. It is also a practical choice because the low positioning keeps the style secure and minimizes movement, which is ideal for long events where you want your hair to stay in place all day and evening.
How to create a flawless chignon
Begin by installing jumbo twists throughout the hair or working with your existing twists if you already have them in. Ensure all twists are moisturized and smooth before styling. Gather all the twists toward the nape of the neck and begin arranging them into a low bun or chignon shape. You can create a classic round chignon or opt for a more elongated, oval shape depending on your preference. Fold and tuck the ends of the twists inward and secure firmly with large bobby pins. The goal is a clean, structured shape with no stray ends. Smooth the edges with a light hold edge control product and finish with a small amount of shine spray across the body of the chignon for a beautiful, polished finish. A simple hair accessory like a sleek hair comb or a few strategic pins can elevate this look even further.
Twisted Bantu Knot Updo

What it is and how it works
Bantu knots are deeply rooted in African hair culture, and combining them with the twist updo concept creates something that is both historically meaningful and visually stunning. In a twisted Bantu knot updo, the hair is divided into sections that are first twisted and then coiled into small, tight knots on the scalp, creating a beautiful pattern of circular shapes all over the head. When all the knots are arranged together, they form a full updo that looks like a work of art. I have so much love for this style because it honors tradition while being completely contemporary in its wearability. Every time I create this style for a client, I feel like I am connecting them to something bigger than a hairstyle. I am connecting them to heritage and pride.
Best for celebrating natural hair culture and heritage
The twisted Bantu knot updo is a wonderful style for anyone who wants to honor and celebrate the cultural roots of natural Black hairstyling. It is also practical in that it works as both a finished style on its own and as a setting method for gorgeous twist-out or Bantu knot-out curls later. If you wear the knots for a day or two and then gently unravel them, you will reveal a stunning pattern of defined, springy curls that create a completely different but equally beautiful look.
How to create and arrange your Bantu knots
Start with clean, moisturized hair and divide it into neat, even sections using the tip of a rat tail comb for clean parts. Apply a twisting cream to each section and create a two-strand twist from root to tip. Then, coil the twist around itself at the base, continuing to wrap until you have formed a compact knot. Tuck the end of the twist under the knot and secure with a pin if needed. Repeat this across the entire head, working in rows or a pattern of your choosing. The size of your sections will determine the size of your Bantu knots and the density of the final updo. I love creating a mix of larger knots at the back and smaller ones at the temples and hairline for a beautiful, tapered effect.
Spring Twist Floral Updo

What it is and how it works
Spring twists are perhaps the most joyful and whimsical of all the twist styles I work with, and creating a floral updo with them is one of my all-time favorite styling experiences. Spring twists are lightweight, springy, coily twists created using a combination of technique and a special pre-twisted or springy extension hair that gives the twists a beautiful, bouncy texture. The resulting twists look almost like little springs or coils, full of movement and life. When you gather spring twists into a floral updo, pinning them into circular, petal-like arrangements that resemble flowers in bloom, the style becomes genuinely breathtaking. I created a spring twist floral updo for a client’s outdoor celebration once and I still think about how stunning it looked under the natural light.
Best for spring and summer celebrations and creative occasions
As the name suggests, spring twist floral updos feel perfectly at home during the warmer seasons, particularly at outdoor events, garden parties, picnics, and warm-weather celebrations. The lightweight nature of spring twists means the style feels comfortable even in the heat, and the floral arrangement adds a nature-inspired beauty that complements outdoor settings beautifully. This is also a wonderful style for creative professionals, artists, and anyone who loves a hairstyle that doubles as an artistic expression.
How to arrange your spring twists into a floral design
The key to a beautiful floral arrangement in a spring twist updo is patience and an artistic eye. Begin by identifying where you want your focal flower or flowers to be, typically at the crown, the side, or the nape. Take a group of spring twists and begin coiling them into a circular, layered arrangement, pinning each twist as you go to build the shape of the flower petal by petal. Build outward from the center, allowing the natural spring and curl of the twists to create dimension within the floral shape. You can create one large focal flower or several smaller floral arrangements scattered across the updo for a garden-inspired effect. Finish by pinning any remaining twists smoothly around and behind the floral arrangements. A few small florals or decorative pins tucked into the design can bring the whole look to life in the most gorgeous way.
Conclusion
If there is one thing I hope you take away from this guide, it is that your natural hair is not something to be tamed or worked around. It is something to be celebrated, explored, and adorned with styles that tell your story and honor your beauty. These fourteen black hair twist updo hairstyles represent just a fraction of what is possible when you embrace the creativity and versatility of natural Black hair. From the delicate artistry of mini twists to the bold drama of Havana twist updos, every single style on this list offers something unique and beautiful.
I have spent my career standing behind the chair, watching the transformation that happens when a person sees themselves in a style that truly fits them. And I can tell you with complete certainty that the most powerful looks are never about hiding or conforming. They are about amplifying what is already there, bringing out the confidence and beauty that was always within the person sitting in that chair.
Twist updos, in all their many forms, do exactly that. They work with the natural structure of Black hair, honoring its texture and strength while creating styles that are artful, practical, and deeply personal. Whether you are trying one of these styles for the very first time or adding a new technique to your already rich styling repertoire, I encourage you to approach it with curiosity and patience. Hair is a journey, not a destination, and every twist, pin, and curl is a step in a story worth telling.
As I always say, beauty is not about perfection. It is about confidence, creativity, and feeling empowered to express yourself however you choose. Take these styles, make them your own, add your personal flair, and wear every single one of them with the joy and pride that your beautiful Black hair deserves.