You know what I’ve learned in my years working behind the scenes at fashion shows and red carpets? Some of the most breathtaking hair moments don’t happen on celebrities—they happen when I see a child walk into a room, curls bouncing with confidence, wearing their natural texture like the crown it truly is.
But here’s what I want you to know: curly hair isn’t something to tame or fix. It’s something to celebrate, nurture, and style in ways that honor its natural beauty while keeping it healthy and manageable. Whether your little one has tight coils, loose waves, or those gorgeous spiral curls somewhere in between, there’s a world of stunning hairstyles waiting to be explored.
So let’s dive into these gorgeous styles together. Whether you’re a parent trying to master morning hair routines or simply looking for fresh inspiration to keep those curls looking fabulous, I promise you’ll find something special here.
The Cloudberry Puff
What It Is
The Cloudberry Puff is one of my absolute favorite go-to styles for busy school mornings, and I call it this because of how soft and voluminous it looks—just like a fluffy cloud made of berries. This is essentially a high or mid-level puff that gathers all the hair at the crown while allowing the natural curl pattern to shine through in all its glory. It’s simple, elegant, and takes less than five minutes once you get the hang of it.
The beauty of this style lies in how it keeps curls beautifully defined throughout the day while keeping hair off the face and neck. You can create a high puff for a playful, energetic look, or a lower puff for something more subdued. Add a colorful headband or some decorative clips, and suddenly you’ve elevated the entire look for special occasions.
How to Make It
Start with damp, well-moisturized hair—this is crucial for achieving that soft, defined puff. I always recommend applying a leave-in conditioner first, think of it as giving those curls a drink of water before they start their day. Work it through the hair with your fingers, making sure every section is coated.
Next, smooth the edges gently with your fingers or a soft-bristle brush. Never use a hard brush on curly hair—it disrupts the curl pattern and causes frizz. Gather all the hair at your desired height (crown for high puff, mid-head for medium) and secure it with a silk or satin scrunchie. This is non-negotiable—never use regular elastic bands as they’re the enemy of curly hair and cause breakage.
Belle Hathaway Tips for The Cloudberry Puff
My number one tip for this style is to never skip the moisture step. Dry hair will create a frizzy, undefined puff that loses its shape quickly. I always tell parents to think of leave-in conditioner as their best friend for this style.
For kids with tighter curl patterns, this style is particularly protective because it keeps the ends tucked away from the elements and reduces daily manipulation. The less you touch and manipulate curly hair, the healthier it stays. Before bedtime, simply take down the puff and let those curls breathe—this prevents stress on any one area of the scalp.
Spiral Crown Braids

What It Is
If there’s one style that never fails to make me smile, it’s Spiral Crown Braids. This is an elegant style where braids wrap around the head in a beautiful spiral pattern, creating a regal appearance that’s both practical and stunning. I created this look for a young client before a family portrait session, and when she saw herself in the mirror, her face absolutely lit up with joy.
What distinguishes this from a simple crown braid is the spiral technique—instead of braiding straight across in one continuous line, you create a gentle spiral pattern that winds around the head, adding dimension and visual interest. The braids sit like a crown, with the natural texture of curly hair adding gorgeous depth to each section.
How to Make It
The foundation of beautiful spiral crown braids is properly prepared hair. Start with clean, conditioned curls that have been thoroughly detangled with care and patience. Working in sections with your fingers or a wide-tooth comb, start from the ends and work up to the roots. Add a bit of curl cream for slip, and the detangling process becomes much easier and less stressful for your child.
Create a part that circles the head, typically starting at one ear and moving around to the other. This is your guideline for where the spiral will sit. Begin braiding at one side, incorporating new hair into each section as you move around the head, similar to a French braid technique. The key is maintaining that spiral pattern—you’re moving in a gentle curve rather than a straight line.
Belle Hathaway Tips for Spiral Crown Braids
Patience during detangling makes all the difference in the world for this style. I can’t stress this enough—rushing through detangling leads to breakage and a frustrated child. Set aside proper time, put on your child’s favorite show or music, and work through those tangles with care and gentleness.
For added flair that kids absolutely love, weave small ribbons through the braids or add tiny decorative clips at intervals along the spiral. I’ve seen parents get wonderfully creative with this, using their child’s favorite colors or even coordinating with special outfits for events. The spiral pattern creates perfect little spots for embellishments without overwhelming the overall look.
Waterfall Ringlets

What It Is
The Waterfall Ringlets style is pure poetry in motion, and I was inspired to create this look by watching how water cascades down in gentle, rhythmic patterns. This is a partially protective style that secures the front and crown area while allowing the curls in the back to flow freely, creating that stunning cascading waterfall effect that moves beautifully with every step.
I particularly love this style for children who are transitioning from always having their hair pulled back to occasionally wearing it down. It gives them the experience of feeling their curls flow while still keeping hair away from their face during active play or school activities. It’s the perfect middle ground between fully protective and completely loose.
How to Make It
Begin by working through the hair in sections with a curl-defining cream or gel while the hair is damp. I use the praying hands method—smoothing the product down the length of the hair with both palms pressed together—followed by gentle scrunching to encourage beautiful curl formation. This creates those distinct, separated ringlets rather than one big mass of undefined curls.
For the secured portions at the crown and hairline, use a rat-tail comb to create precise, clean parts. Take small to medium sections along the front and crown area, and either twist or lightly braid them, depending on your preference and your child’s curl type. Secure these sections by pinning them back or connecting them at the crown, creating that structured framework.
Belle Hathaway Tips for Waterfall Ringlets
The key to making this style really shine is in the curl definition process. Don’t skip the step of defining each section properly with product—this is what creates those gorgeous, individual ringlets that catch light beautifully. Take your time with this part, working in manageable sections so you don’t feel overwhelmed.
Waterfall Ringlets typically last one to two days, making them perfect for weekends or short school weeks. For refreshing the loose curls, simply mist them with water mixed with a bit of leave-in conditioner, scrunch gently, and let air dry. The structured parts at the crown will maintain their shape longer than the loose curls, and that’s perfectly fine—it adds to the effortless, cascading aesthetic.
This style photographs beautifully, and I always recommend it when families have special events coming up where photos will be taken. The cascading curls create gorgeous movement and dimension in pictures, catching light from different angles and adding a fairy-tale quality to any photo. You can dress it up with small flowers or decorative pins in the secured sections for formal events, or keep it simple and natural for everyday wear.
Twisted Sunburst Buns

What It Is
The Twisted Sunburst Buns combine fun, functionality, and serious cuteness in one protective style. I created this look during a workshop I was teaching on protective styling for kids, and it quickly became a favorite among the parents in attendance. The name comes from the sunburst pattern the twists create as they radiate outward from the center of each bun, creating a visually striking effect.
This style works particularly well for active children who need their hair completely secure and out of the way. Whether they’re on the playground, in dance class, at a sleepover, or just living their busy kid lives, Twisted Sunburst Buns stay put. I’ve had parents tell me their kids can go an entire week with this style still looking fresh.
How to Make It
Start with freshly washed and conditioned hair, or at minimum, hair that’s been dampened and treated with a generous amount of leave-in conditioner. Divide the hair down the middle into two main sections, one for each bun. Before creating the buns, you’ll create multiple two-strand twists from the scalp that all feed into the center point where each bun will sit.
Working with one side at a time, create small to medium two-strand twists starting from various points around the perimeter, all angling toward your chosen center point. These twists radiating inward create that sunburst effect. Maintain consistent tension as you twist—not too tight, which can cause discomfort and damage, but not too loose, or the twists won’t hold their definition properly.
Belle Hathaway Tips for Twisted Sunburst Buns
Thorough moisturizing before you begin is absolutely crucial for this style. The hair needs to be properly hydrated to create smooth, defined twists that don’t look fuzzy or rough. Don’t skip this step—it’s the foundation of a beautiful, long-lasting style.
For maintenance throughout the week, moisturize the scalp and any exposed hair every two to three days using a light oil or moisturizing spray. At night, protect the style with a silk bonnet or scarf to minimize frizz and help it last longer. When it’s time to take the style down, work slowly and carefully, using your fingers to gently unravel each twist. Follow up with a deep conditioning treatment to replenish moisture and keep those curls healthy.
Natural Texture Layered Freedom

What It Is
Sometimes the most beautiful hairstyle is barely a hairstyle at all—it’s simply allowing natural curls to exist in their glorious, unmanipulated state. The Natural Texture Layered Freedom style is exactly that: a haircut and styling approach that lets curls be curls, with strategic layering that prevents the dreaded triangle shape and encourages beautiful, natural movement.
I’ll be honest with you—this was the style that changed my entire perspective on curly hair care early in my career. I was so focused on creating elaborate, complex styles that I forgot the simple power of healthy, well-maintained natural texture. But after working with a young client whose mother specifically requested we do “nothing fancy, just let her curls be themselves,” I rediscovered this fundamental truth about embracing natural beauty.
The foundation of this style is a proper curly haircut from someone who truly understands curl patterns and cuts hair dry so they can see exactly how each curl springs back. Layering for curly hair is an art—it removes bulk without sacrificing fullness and creates a shape that flatters while allowing curls to move naturally and beautifully.
How to Make It
On wash day, which for most curly kids should be once or twice a week unless they’re getting particularly dirty or sweaty, focus on hydration and curl definition. Start with a sulfate-free shampoo or a co-wash to cleanse gently without stripping natural oils. Follow with a nourishing, moisturizing conditioner, letting it sit for a few minutes to penetrate the hair shaft.
After rinsing out the conditioner, gently squeeze excess water from the hair but don’t dry it completely. While the hair is still soaking wet—and I mean dripping wet—apply your styling products in the right order: leave-in conditioner first for moisture, then curl cream for definition, and finally gel if you want extra hold and definition. The order matters because each product serves a different purpose.
Belle Hathaway Tips for Natural Texture Layered Freedom
Finding a hairstylist who truly knows how to cut curly hair is worth its weight in gold. Not all stylists understand curl patterns, and a bad curly haircut can take months to grow out. Look for someone who cuts hair dry and specializes in curly textures—this makes all the difference in achieving a flattering shape.
Once styled, this natural texture can last several days before needing a refresh, which is wonderful for reducing daily manipulation. For refreshing between wash days, simply mist the hair with water mixed with a bit of leave-in conditioner, scrunch gently, and let air dry. Some curls will need more attention than others, and that’s completely normal and okay.
Boho-Luxe Braided Cascade

What It Is
The Boho-Luxe Braided Cascade is where protective styling meets carefree, artistic beauty in the most wonderful way. This style combines the structure of cornrows or small braids along the perimeter of the head with loose, flowing curls cascading from the crown. The contrast between the neat, controlled braids and the free-flowing curls creates a stunning visual that feels both put-together and relaxed at the same time.
I developed this look inspired by the effortlessly beautiful styles I’ve seen at music festivals and bohemian-themed events, adapted specifically for children’s delicate hair and active lifestyles. What makes this particularly suitable for kids is its longevity and versatility—the braided sections can last several days while protecting the hairline and edges, which are often prone to breakage.
How to Make It
Begin with clean, thoroughly moisturized and detangled hair. Apply a combination of leave-in conditioner and a light oil to ensure smooth, protected braiding that won’t cause friction or breakage. The braiding pattern typically starts from one side of the hairline, moving around the perimeter of the head to the other side, though you can absolutely customize the pattern based on your child’s preference and your skill level.
Create your cornrows or small braids along the perimeter, starting at the hairline and working around. The braids should be neat but never tight—I cannot stress this enough, especially for children. Tight braiding can cause tension alopecia, particularly along that delicate hairline. The braids should feel secure but never pull or cause any discomfort whatsoever.
Belle Hathaway Tips for Boho-Luxe Braided Cascade
One of the beautiful aspects of this style is how customizable it is to your family’s preferences and your child’s personality. Some families prefer more braids with fewer loose curls for a more structured look, while others want just a small braided accent with mostly free-flowing hair for maximum movement. The braiding pattern can be simple and straightforward or more intricate with curved designs—let your comfort level and your child’s patience guide you.
This style typically lasts three to five days before needing attention, which is perfect for busy school weeks. The braided sections will hold their shape well throughout this time, while the loose curls might need daily refreshing. The refresh process is simple: mist the curls with water or a curl refreshing spray, scrunch gently, and let air dry. The contrast between the neat braids and slightly more relaxed curls actually adds to the bohemian aesthetic.
Coiled Crown with Ribbon Weave

What It Is
There’s something undeniably enchanting about a crown-style hairstyle, and the Coiled Crown with Ribbon Weave takes that concept to another level of elegance and whimsy. This style works by creating a series of small two-strand twists or coils that are arranged in a crown pattern around the head, with a delicate ribbon woven throughout adding color, dimension, and that special touch that children absolutely love.
I created this style for a client’s daughter who was a flower girl in a wedding, and it was such a hit that I’ve been refining and teaching it ever since. It’s protective, beautiful, and surprisingly versatile for different occasions—from everyday wear with simple ribbons to formal events with elegant satin ribbons in coordinating colors.
How to Make It
Using a rat-tail comb, create a part that circles the head, roughly following the hairline but set back about one to two inches. This creates your “crown” area where your coils will sit. The remaining hair in the center can be styled in several ways—left loose as a puff, gathered into a bun, or styled in smaller twists or braids depending on the overall look you’re going for.
Take small, even sections along your circular part and create two-strand twists, maintaining even tension and ensuring both strands are roughly equal in size. As you twist, the hair should naturally coil around itself, creating that beautiful, defined texture. Here’s where the ribbon comes in: choose a thin satin ribbon in a color that complements your child’s natural hair or outfit.
As you create each coil, weave the ribbon in and around it, essentially braiding the ribbon with the two strands of hair. This isn’t as difficult as it sounds—the ribbon follows the natural twisting pattern, and with a bit of practice, it becomes second nature. Once all the coils are complete and arranged in their crown pattern, secure them with small bobby pins tucked beneath the coils where they’re invisible.
Belle Hathaway Tips for Coiled Crown with Ribbon Weave
The ribbon serves both an aesthetic and practical purpose that I really love. Visually, it adds that pop of color and creates interesting dimension that catches the eye. Practically, it helps reinforce the coils and can make them last slightly longer, which is always a bonus for busy families.
The Coiled Crown can last five to seven days with proper care, making it excellent for vacation weeks or busy periods when you don’t have time for daily styling. Each night, protect it with a silk bonnet or scarf without question. Every few days, apply a light moisturizing spray to keep the hair and scalp properly hydrated. When removing the style, carefully unwrap the ribbon first, then gently unravel each coil from tip to root to minimize tangling.
Sidewinder Ponytail Twists

What It Is
The Sidewinder Ponytail Twists is my answer to parents who ask for a style that’s both protective and dynamic, something that looks like you spent hours creating it but actually comes together relatively quickly once you understand the technique. This is an asymmetrical style where hair is gathered to one side in a low ponytail, with the journey from scalp to ponytail traced by beautiful twisted sections that create visual interest.
The diagonal twists create a dynamic, flowing effect that suggests movement even when your child is standing still. It’s sophisticated enough for special occasions but practical enough for everyday wear, which is exactly the kind of versatility I love in children’s hairstyles.
How to Make It
Begin by creating a deep side part about two inches from the natural hairline, though you can adjust based on your child’s face shape and preference. From this part, you’ll be creating small to medium two-strand twists that all angle toward the same gathering point on the opposite side of the head—typically just behind and slightly below the ear on the opposite side.
Once all sections are twisted and leading to your gathering point, remove the clips and gather everything into a ponytail using a silk or satin scrunchie. For extra style and security, wrap a small section of hair from the ponytail around the base to hide the scrunchie, then pin it underneath with a bobby pin. This small detail elevates the entire look.
Belle Hathaway Tips for Sidewinder Ponytail Twists
What I love about this approach is that it’s relatively forgiving for parents who are still building their styling confidence. If one twist doesn’t turn out perfectly, it blends into the overall diagonal pattern beautifully. The flowing nature of the design means small imperfections simply aren’t noticeable in the bigger picture, which takes so much pressure off.
The Sidewinder Ponytail typically lasts three to five days, making it perfect for those mid-week styles where you need something that will carry through to the weekend without daily restyling. The twists protect the hair from root to ponytail, while the loose curls in the ponytail itself get to move and flow naturally, giving you the best of both worlds.
Butterfly Wing Cornrows

What It Is
If you want to create genuine excitement and wonder in a child’s eyes when they see their finished hairstyle, let me introduce you to Butterfly Wing Cornrows. This is one of the most creative protective styles I’ve developed, and it never fails to bring absolute joy and confidence. The cornrows are arranged in a pattern that, when viewed from above or behind, resembles delicate butterfly wings—symmetrical, graceful, and absolutely beautiful.
This style typically features four to six cornrows on each side, depending on hair density and the size of each braid. The curved pattern that creates the wing shape is what sets this apart from standard cornrows, and it’s this attention to design that makes children feel truly special when wearing it.
How to Make It
Start by visualizing or even sketching out your butterfly pattern on paper if that helps you plan. The basic design involves creating a center part from forehead to nape, then creating curved cornrows that arc outward from the center line, mimicking the natural shape of butterfly wings. This visualization step is important—it helps you see the finished product before you begin.
Beginning at the center part near the forehead, use a rat-tail comb to create a curved section that arcs outward and then gradually curves back toward the center at the nape, creating that wing shape. Each subsequent cornrow should follow a similar arc, creating layers that build the wing effect. The sectioning is crucial for achieving that distinctive butterfly shape.
Belle Hathaway Tips for Butterfly Wing Cornrows
One detail that really enhances the butterfly effect is graduating the length of each cornrow for dimension. The innermost cornrows—those closest to the center part—should be longest, while the outermost ones can be shorter. This creates beautiful dimension and really emphasizes that wing shape when viewed from the top or back.
At the ends of each cornrow, I prefer leaving some loose curl rather than braiding all the way to the very tip. This softens the look and keeps it age-appropriate for younger children, plus those little curly tails at the end are absolutely adorable. You can secure them with small elastic bands designed for natural hair.
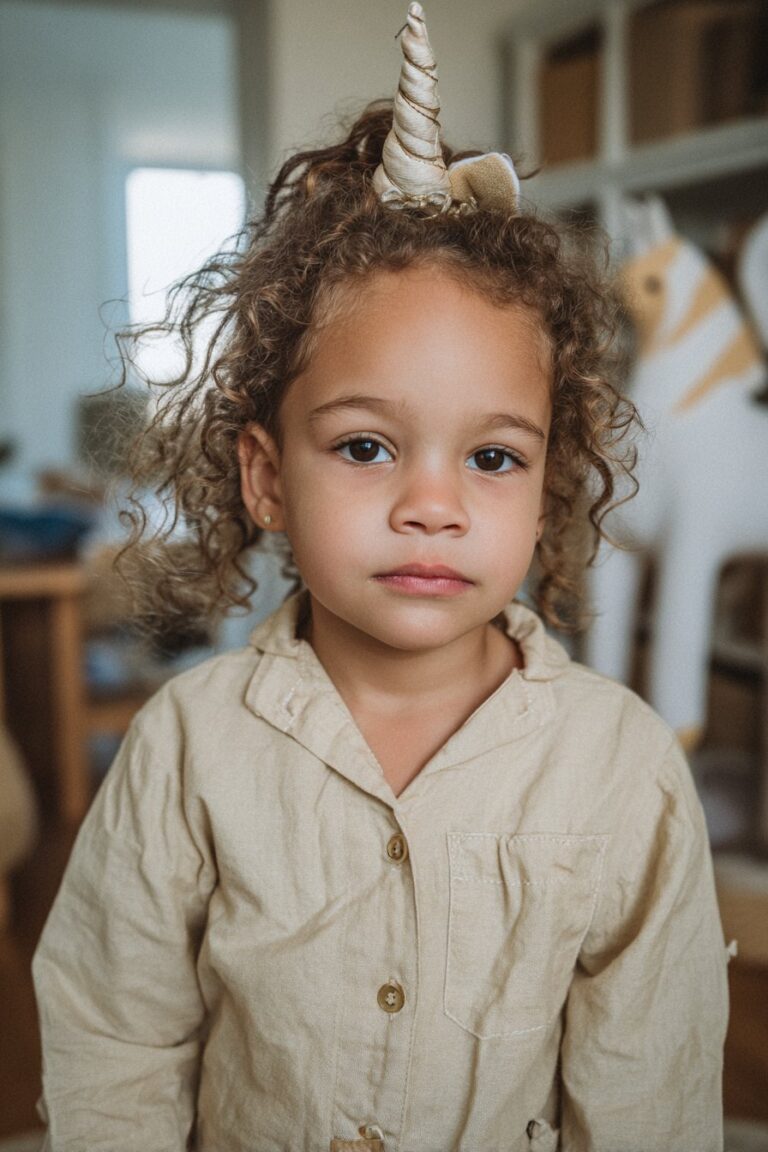
Twisted Updo With Unicorn Horn

What It Is
Every child deserves to feel magical, and the Twisted Unicorn Horn style delivers that feeling in spades. This is a playful, creative style that gathers all the hair into a high, spiraling twist that stands proudly from the crown of the head, resembling a unicorn’s mythical horn. It’s whimsical, fun, and surprisingly practical for active kids who need their hair completely secured.
The unicorn horn stands upright from the crown, creating a statement piece that makes children feel confident, magical, and unique. It’s perfect for themed parties, dress-up days, or just regular days when your child wants to feel extra special and imaginative.
How to Make It
Start by thoroughly moisturizing and detangling the hair, then gather everything to a central point at the crown of the head, positioned slightly forward of the natural crown for the best visual effect. Secure with a strong elastic band to create your base ponytail. This foundation needs to be secure since it’s supporting the entire structure.
Divide the ponytail into two equal sections and begin creating a two-strand twist, but here’s the key difference—you’re twisting tightly and directing the twist upward rather than letting it hang down naturally. As you twist, the hair naturally wants to coil around itself, so encourage this coiling motion, spiraling the twisted hair around and around, building upward to create height.
Belle Hathaway Tips for Twisted Unicorn Horn
The amount of height you can achieve depends on your child’s hair length and density, and both dramatic tall horns and daintier shorter ones are equally adorable in their own ways. Don’t worry if you can’t create a super tall horn—work with what you have and embrace your child’s unique hair characteristics.
Here’s where you can really let creativity shine and have fun with your child: decorating the unicorn horn. Some families love adding colorful ribbons wound around the twist in spiral patterns, others prefer small flowers or decorative clips attached along the coil, and I’ve even seen temporary hair color spray used to create magical rainbow effects that wash out easily
Pearl-Adorned Bantu Knots

What It Is
Bantu knots are a classic protective style with deep cultural roots and historical significance, and when adorned with pearl accessories, they transform into something truly elegant and special. I love Pearl-Adorned Bantu Knots for their incredible versatility—they work beautifully for special occasions but can be dressed down with simpler accessories for everyday wear too.
The beauty of Bantu knots lies in their structural simplicity and striking visual impact. Each knot is essentially a small section of hair twisted tightly and then wrapped around itself to create a small, secure bun sitting close to the scalp. When multiple knots are created across the entire head in organized patterns, the effect is geometric, artistic, and absolutely stunning.
How to Make It
For children, I recommend creating medium-sized knots rather than very small ones for comfort and manageability. Begin by sectioning the hair using a rat-tail comb to divide it into square or diamond-shaped sections across the entire head. The pattern you choose creates different visual effects—straight rows create a more linear, organized look, while a brick-lay pattern creates interesting dimension.
For each section, apply a small amount of styling cream or butter to moisturize and provide hold that will help the knots maintain their shape. Take the section and twist it firmly from root to tip, keeping consistent tension throughout. Once fully twisted, begin wrapping the hair around itself at the base, coiling it into a small knot that sits snugly against the scalp.
Secure the end by tucking it under the knot—it should hold in place from the tension of the twist, but you can use a small bobby pin for extra security if needed. This is where the pearl embellishment comes in: small pearl-tipped pins or pearl hair accessories can be added to each knot or to selected knots in a pattern, creating an elevated, elegant appearance that catches light beautifully.
Belle Hathaway Tips for Pearl-Adorned Bantu Knots
What makes Bantu knots particularly valuable for children is their amazing dual purpose. Worn as knots, they’re a gorgeous protective style that can last up to a week with proper care. But here’s the bonus that kids and parents love—when you carefully unravel the knots, you’re left with beautiful, uniform spiral curls throughout the entire head, a style often called a “Bantu knot out.” It’s literally like getting two completely different styles in one.
For maintenance while wearing the knots, moisturize the scalp every two to three days with a light oil applied carefully with your fingertips or a nozzle-tip applicator. The hair itself is completely protected and tucked away, so it doesn’t need much attention at all. Protect the style every single night with a silk bonnet or scarf to maintain the knots’ crisp appearance.
Mini Mohawk with Defined Curls

What It Is
The Mini Mohawk with Defined Curls is for the bold, confident child who wants to stand out and express their unique personality. This style creates a strip of beautifully defined curls down the center of the head while the sides are slicked back or styled in small braids, creating that classic mohawk silhouette adapted perfectly for curly hair textures.
The contrast between the sleek or braided sides and the voluminous center strip creates a striking visual that celebrates curl texture while maintaining a sense of structure and intention. It’s empowering for children to wear, helping them feel strong, confident, and completely themselves.
How to Make It
Begin by creating a clear center section that runs from the hairline at the forehead straight back to the nape, typically about three to four inches wide depending on your child’s head size and hair density. This is your mohawk strip where the beautiful curls will be showcased and celebrated. Mark this section clearly before you begin styling the sides.
The center strip is all about maximum curl definition. Working section by section with damp hair, apply a curl-defining cream followed by gel for hold. Using the shingling method—smoothing product down each small section of hair individually with your fingers—creates the most distinct, uniform curl definition. This takes more time and patience but the results are absolutely worth every minute.
Belle Hathaway Tips for Mini Mohawk with Defined Curls
For extra drama and dimension that really makes this style pop, you can twist or curl small sections of the mohawk strip upward, securing them with bobby pins to create even more height and visual interest. This is particularly effective for special occasions when you want maximum impact and that “wow factor.”
The Mini Mohawk typically lasts two to three days with proper care and maintenance. The slicked or braided sides stay neat and defined throughout this time, while the center curls might need daily refreshing to maintain their definition. Simply mist with water and curl refresher spray, scrunch gently, and either let air dry or use a diffuser on low heat for quicker results.
Garden Party Twist-Out Blonde

What It Is
The Garden Party Twist-Out Blonde is soft, romantic, and absolutely gorgeous—like wearing a garden of flowing curls on your head. This style creates uniform, fluffy curls throughout the entire head by setting the hair in two-strand twists overnight and then carefully unraveling them in the morning to reveal defined, voluminous curl patterns that move beautifully.
This romantic, voluminous style is perfect for special occasions like birthday parties, family gatherings, or any event where you want your child to look extra beautiful while still showcasing their natural texture. The soft, flowing curls create movement with every step, and children absolutely love how this style makes them feel.
How to Make It
Begin the evening before you want to wear the style—this is crucial for success. Start with freshly washed and deep-conditioned hair, or at minimum, thoroughly dampened and moisturized hair that’s quite wet. Moisture is absolutely crucial to achieving well-defined, beautiful twist-out results.
Section the hair into medium-sized squares or rectangles across the entire head, working systematically so you don’t miss any areas. For each section, apply a leave-in conditioner first for moisture, followed by a curl cream for definition, and finish with a light gel for hold. This layered product combination provides everything the hair needs.
Belle Hathaway Tips for Garden Party Twist-Out
In the morning when the hair is completely dry—and this complete drying is essential—carefully unravel each twist one by one. Untwist each section completely, but don’t separate the hair into smaller pieces yet. Once all twists are unwound into rope-like curl sections, begin the fluffing process that creates that gorgeous garden party volume.
The Garden Party Twist-Out typically lasts three to five days with proper maintenance and care. At night, protect it with the pineapple method—that loose, high ponytail—and a silk bonnet or pillowcase. To dress up this style for special occasions, add fresh flowers tucked throughout, delicate decorative clips, or a beautiful headband. The voluminous, romantic nature provides a perfect canvas for accessories.
Zigzag Part with Side Puffs

What It Is
Sometimes the simplest modifications to classic styles create the most delightful and eye-catching results. The Zigzag Part with Side Puffs takes the familiar two-puff style that many parents already know and love and elevates it with one creative detail: a zigzag part down the center instead of a straight line. This small change creates wonderful visual interest and makes the style feel fresh, playful, and modern.
I started creating zigzag parts almost accidentally when working with a very active young client who kept moving during our styling session, making perfectly straight parts nearly impossible to achieve. When I decided to embrace the irregular line and turned it into an intentional zigzag pattern, both the child and her mother absolutely loved the creative result.
How to Make It
Creating a zigzag part requires a bit more time and precision than a straight part, but it’s not nearly as difficult as it might look. Using a rat-tail comb, start at the forehead hairline and instead of combing straight back in a line, create a short diagonal line angling to the left or right. After about an inch, change direction and create a diagonal line going the opposite way.
Continue this alternating pattern—creating short diagonal sections that change direction regularly—all the way down from the hairline to the nape of the neck. The size of your zigzag sections determines how dramatic the final pattern looks. Smaller sections create a subtle, delicate zigzag, while larger sections create a bold, graphic pattern that really stands out.
Belle Hathaway Tips for Zigzag Part with Side Puffs
For children, I usually aim for medium-sized zigzag sections—noticeable enough to be fun and interesting but not so exaggerated that it looks costume-like or over-the-top. You want the zigzag to enhance the style, not overpower it or make it look unintentional.
The beauty of having two puffs instead of one central puff is that you can create matching puffs for perfect symmetry, or intentionally make them different sizes for an asymmetrical, artistic look that’s very on-trend. Let your child’s personality and preferences guide this decision—some kids love symmetry while others prefer the uniqueness of asymmetry.
Curly Faux Hawk Cascade

What It Is
The Curly Faux Hawk Cascade is pure drama, elegance, and edge all rolled into one absolutely stunning style. Unlike the Mini Mohawk which keeps the sides completely sleek and low-profile, the Faux Hawk Cascade builds height gradually from the sides toward the center, creating a cascading, stepped effect that’s both sophisticated and playful at the same time.
I developed this style specifically for older children and pre-teens who want something that feels more mature and fashion-forward, something that makes them feel ready for anything. It’s the kind of style that makes kids feel confident and special, like they’re ready to walk a runway or attend a red carpet event—while still being entirely practical and protective.
The graduated height creates a dramatic silhouette that’s impossible not to notice, and the cascading ponytails create natural volume and movement that shifts and flows beautifully as your child moves. It’s a statement style that celebrates confidence and individuality while maintaining the health and integrity of curly hair.
How to Make It
Start by creating a center section from hairline to nape, about four inches wide—this will be your highest point. Then create horizontal sections on each side of this center strip, working methodically from front to back. You’ll be building height through a series of small ponytails that gradually increase in elevation as they move from sides toward the center.
Beginning with the front sections closest to the face, gather small amounts of hair from both the side section and the adjacent center strip, creating small ponytails positioned along the border between the side and center. Each subsequent ponytail should be positioned slightly higher than the one before it, creating that beautiful cascading, stepped effect.
As you work toward the back of the head, continue this pattern of increasing height, always ensuring each ponytail is positioned a bit higher than the previous one. The final sections should meet at the crown or slightly behind it, creating maximum height at the center back. The hair from these ponytails cascades down naturally, creating that dramatic faux hawk silhouette.
Belle Hathaway Tips for Curly Faux Hawk Cascade
The sides—the hair not incorporated into the center cascade—can be styled in several different ways depending on the look you want. Slicking them back creates clean, sharp lines that emphasize the dramatic center. Creating small flat twists or cornrows adds a protective element while maintaining the overall aesthetic and adding texture.
The Curly Faux Hawk Cascade typically lasts one to three days depending on how carefully it’s maintained. This is definitely a statement style, absolutely perfect for special occasions when you want your child to feel extraordinary—birthday parties, school performances, family celebrations, or anywhere that calls for a little extra glamour, confidence, and self-expression.
Conclusion
As I sit here reflecting on all these beautiful styles—from the simple elegance of Natural Texture Layered Freedom to the dramatic flair of the Curly Faux Hawk Cascade—I’m reminded why I fell in love with hair artistry in the first place. It’s not just about creating pretty hairstyles, though these are certainly that. It’s about giving children the confidence to embrace their natural beauty, teaching them early that their curls are something to celebrate, not something to fight against or hide.
Throughout my journey in the beauty industry, from my early days in New York to working behind the scenes at major fashion events, I’ve learned that our relationship with our hair is deeply personal and begins forming in childhood. The messages children receive about their hair—from parents, from stylists, from peers, from society—shape how they see themselves for years to come. When we take the time to style their curls with care, creativity, and celebration, we’re telling them something profound: “You are beautiful exactly as you are.”
These fifteen hairstyles represent more than just different ways to arrange hair. They represent versatility, creativity, and possibility. They show that curly hair isn’t limited to one or two acceptable styles but can be transformed in countless ways while remaining healthy, protected, and true to its natural texture. From protective styles like the Twisted Sunburst Buns to romantic looks like the Garden Party Twist-Out, there’s something here for every personality and occasion.
What I hope you’ve gathered from this guide is that working with curly hair isn’t a battle or a burden—it’s a collaboration. When you understand what curly hair truly needs—proper moisture, gentle handling, appropriate techniques, and patience—it rewards you with beauty and versatility beyond what most people imagine possible. Those tangles and tears during detangling sessions that so many parents dread? They diminish dramatically when you approach the hair with the right tools, quality products, and gentle techniques.
I also want to emphasize the importance of making hair time a positive, bonding experience for children. When styling becomes a moment of connection rather than conflict, when it’s an opportunity for creativity and conversation rather than a chore to rush through, children develop healthy, positive associations with their hair care routine. They learn to see the process as an act of self-care and self-love rather than self-correction.