
When I first cut my hair short years ago, I remember the panic that set in when my best friend announced her engagement and asked me to be her bridesmaid. I stood in front of my mirror, running my fingers through my pixie cut, wondering how on earth I was going to create something special for such an important day. That moment of uncertainty taught me something beautiful—short hair doesn’t limit your options; it actually opens up a whole new world of elegant, sophisticated, and absolutely stunning possibilities.
Over the years of working with brides and bridal parties, I’ve discovered that some of the most breathtaking engagement looks I’ve created have been on clients with short hair. There’s something incredibly chic and modern about a beautifully styled short hairstyle that turns heads and photographs like a dream. Today, I’m sharing fifteen of my favorite engagement hairstyles for short hair that will make you feel absolutely radiant on your special day.
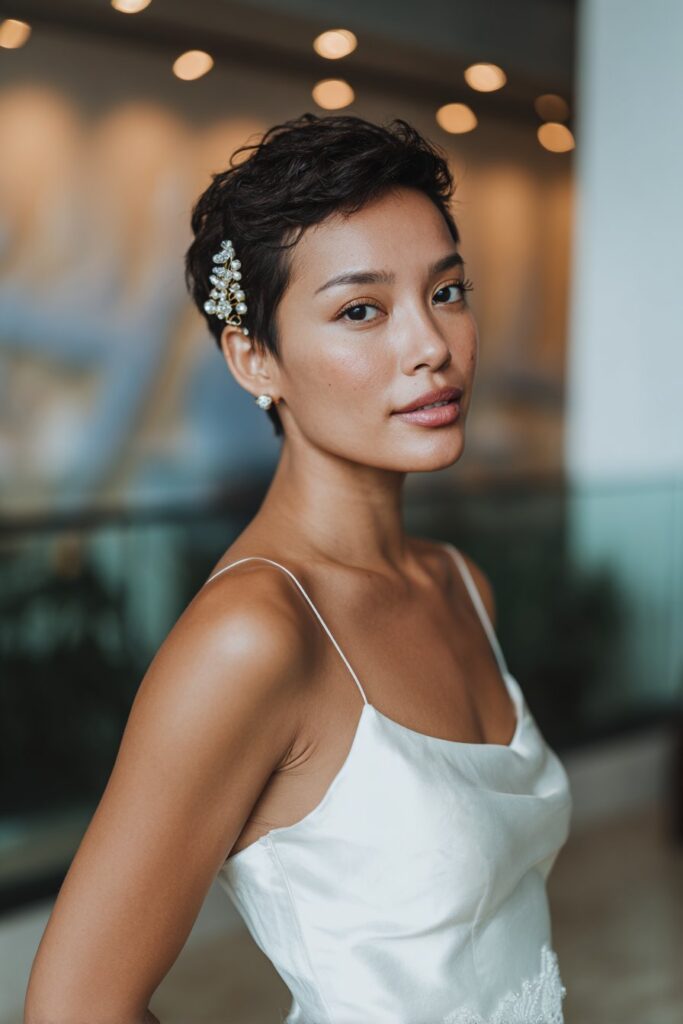
The Textured Pixie with Side-Swept Bangs

There’s something undeniably romantic about a pixie cut that’s been given just the right amount of texture and movement. I’ll never forget working with a bride who came to me absolutely convinced she needed hair extensions for her engagement party. She had this gorgeous pixie cut that honestly took my breath away, but she couldn’t see past the traditional long-hair bridal looks she’d been seeing everywhere.
Understanding the Textured Pixie with Side-Swept Bangs
The textured pixie with side-swept bangs is all about creating dimension and softness in a short cut. It’s not just about running some product through your hair and calling it a day. This style involves strategically adding texture throughout the crown and sides while directing the front pieces to sweep gracefully across your forehead. The result is feminine, elegant, and utterly sophisticated. The beauty of this look lies in how it frames your face while adding movement and life to what could otherwise be a flat, one-dimensional cut.
Who This Style Works Best For
This hairstyle works beautifully for those with naturally straight to slightly wavy hair. If you have fine hair, this style is actually your best friend because it creates the illusion of fuller, more voluminous hair. It’s perfect for oval, heart-shaped, and diamond-shaped faces because the side-swept element softens angular features. I particularly love this look for engagement photoshoots that have a more casual, intimate vibe—think sunset sessions in a field or cozy coffee shop settings. The relaxed nature of the textured pixie complements natural settings while still looking polished and intentional.
Creating Your Perfect Textured Pixie Look
Start with damp hair and apply a volumizing mousse from roots to ends. I always tell my clients to use about a golf ball-sized amount—enough to coat everything but not so much that your hair feels heavy or sticky. Blow-dry your hair using a round brush, lifting at the roots to create volume. Here’s a trick I learned from a hairstylist I assisted early in my career: flip your head upside down while you’re blow-drying the back sections. It sounds silly, but the volume it creates is incredible.
Once your hair is completely dry, take a small amount of texturizing paste and work it through your hair with your fingers. Don’t use a comb at this stage—your fingers create a much more natural, lived-in texture. For the side-swept bangs, use a flat iron to create a gentle curve that directs the hair to one side. Finish with a light-hold hairspray, and here’s my secret weapon: a tiny bit of shine serum on just the front pieces to catch the light in photos.
The Sleek Bob with Deep Side Part

I remember the first time I created this look for an engagement shoot. My client was a lawyer who always wore her bob straight and center-parted for work. When she showed me her inspiration photos, they were all these flowing, bohemian looks with flowers and waves. I knew we needed to honor her personal style while still giving her that special bridal feeling. The sleek bob with a deep side part was the perfect solution.
What Makes the Sleek Bob So Special
This is sophistication personified. A sleek bob cut styled with a dramatic deep side part creates a look that’s both modern and timeless. The asymmetry of the deep part adds visual interest and creates a sense of drama that photographs beautifully. It’s polish and elegance without trying too hard. What I love most about this style is how it commands attention through simplicity—there’s no need for elaborate styling or excessive accessories when your hair is this perfectly sleek and structured.
The Perfect Candidates for This Elegant Style
If you have thick, straight hair, you’re going to love this style. It also works wonderfully for those with round or square face shapes because the deep part and angled lines create a slimming effect. This look is absolutely perfect for formal engagement parties, especially evening events. I’ve styled this for clients wearing everything from sleek cocktail dresses to traditional formal wear, and it never fails to complement the overall look. The clean lines work particularly well in urban settings, modern venues, and anywhere you want to project confidence and sophistication.
Step-by-Step Guide to Achieving Sleek Perfection
The key to this style is all in the preparation and precision. Start by washing your hair with a smoothing shampoo and conditioner—this is not the time for volumizing products. Apply a heat protectant spray and blow-dry your hair using a paddle brush, pulling the hair taut as you dry it to create that sleek finish.
Once dry, create your deep side part. I usually place mine about an inch from the natural part line, but you can adjust based on your face shape and personal preference. Use a fine-tooth comb to make the part absolutely crisp and clean. Then, section your hair and run a flat iron through each piece, using slow, deliberate strokes. The slower you move the flat iron, the sleeker the result.
The Romantic Finger Wave

There’s something incredibly vintage and glamorous about finger waves that makes them perfect for engagements. I first fell in love with this style when I was working on a Great Gatsby-themed photoshoot early in my career. The way the waves caught the light and created this sculptural, artistic effect—I knew I had to master this technique for bridal work.
The Art and Allure of Finger Waves
Finger waves are those beautiful S-shaped waves that were popular in the twenties and thirties. On short hair, they create a sculptural, romantic effect that’s absolutely stunning for formal occasions. Unlike regular waves created with a curling iron, finger waves have a distinctive pattern and definition that makes them truly special. Each wave is deliberately placed and shaped, creating a look that’s more like wearable art than a simple hairstyle. The precision and intentionality of finger waves communicates elegance and attention to detail.
Finding Your Finger Wave Match
This style works on most hair types, though it’s easiest to achieve on hair that has some natural body or wave to it. It’s particularly flattering on those with oval or heart-shaped faces. I love this look for vintage-themed engagements, art deco venues, or anyone who wants to channel old Hollywood glamour. If you’re wearing vintage-inspired jewelry or a dress with classic lines, finger waves tie the whole look together beautifully. This style also photographs incredibly well in black and white photography, making it perfect if you’re planning a classic photo aesthetic.
Mastering the Finger Wave Technique
I’m not going to lie to you—finger waves require practice and patience. Start with damp, not wet, hair. Apply a strong-hold styling gel throughout your hair, making sure every strand is coated. This is crucial because the gel is what holds the wave pattern in place.
Create a deep side part, then take a two-inch section of hair at the front. Using your fingers and a fine-tooth comb, push the hair forward to create the first curve of the wave. Hold it in place with a styling clip. Then, push the next section backward to create the S-shape, securing it with another clip. Continue this pattern around your head.
The hardest part is waiting. You need to let the waves set completely—either air dry or sit under a hooded dryer if you have one. Once everything is dry, carefully remove the clips and use your fingers to gently soften the waves if needed. A light mist of flexible-hold hairspray keeps everything in place without making your hair stiff or crunchy.
The Tousled Crop with Fresh Flowers

One of my favorite engagement looks I’ve ever created involved a gorgeous brunette with a crop cut who wanted something natural and romantic for her garden engagement party. We decided to keep her hair textured and loose, then wove in small white flowers throughout. When I saw the photos later, I actually got a little emotional—she looked like a woodland fairy, absolutely radiant.
Embracing Natural Beauty with Floral Accents
This style embraces the natural texture and movement of short hair while incorporating delicate fresh flowers for a romantic, bohemian touch. It’s effortless beauty at its finest—not too done, not too casual, just perfectly balanced for a celebration of love. The combination of textured hair and fresh botanicals creates a look that feels organic and authentic, like you’ve just stepped out of a secret garden. This approach celebrates imperfection and natural beauty in the most lovely way.
The Ideal Settings and Hair Types for This Look
This look is ideal for those with naturally wavy or curly hair, though it can be adapted for straight hair with the right styling products. It works beautifully for outdoor engagements, garden parties, or any event with a natural, relaxed atmosphere. If you’re planning a daytime celebration or something with a boho aesthetic, this style is absolutely perfect. I especially love this for spring and summer engagements when fresh flowers are abundant and the natural, breezy vibe feels so appropriate for the season.
Bringing the Garden to Your Hair
The beauty of this style is in its simplicity. Start with clean, damp hair and apply a sea salt spray throughout. Scrunch the product into your hair with your hands to encourage natural texture and wave. Let your hair air dry if possible, or use a diffuser attachment on your blow dryer if you need to speed up the process.
Once your hair is dry, use your fingers to gently separate and arrange the pieces. You’re not looking for perfection here—the slightly undone quality is part of the charm. If your hair is very straight and needs help holding texture, you can use a small curling wand to add random bends and curves throughout.
For the flowers, choose blooms that are small and delicate. Baby’s breath, small roses, or lavender work beautifully. Use bobby pins that match your hair color to secure individual flowers or small clusters throughout your hair. I like to place them asymmetrically—maybe a few on one side, one or two on the other—for a natural, organic feel. A light-hold hairspray keeps everything in place without disturbing the flowers or making your hair stiff.
The Polished Pixie with Hair Accessories
I’ll never forget this one bride who came to me with the most adorable pixie cut and a collection of her grandmother’s vintage hair clips. She wanted to incorporate them into her engagement look, and we spent the most wonderful afternoon playing with different placements and combinations. That experience taught me that sometimes the simplest styles become the most meaningful when you add personal touches.
The Power of Accessorizing Short Hair
This style takes a classic pixie cut and elevates it with carefully chosen hair accessories. It could be a jeweled headband, vintage clips, a delicate tiara, or even a subtle veil attachment. The key is choosing accessories that enhance rather than overwhelm your natural style. What makes this approach so special is how it allows you to transform your everyday pixie into something celebration-worthy while maintaining the essence of your personal aesthetic. Accessories add that bridal sparkle and special occasion feeling without requiring you to dramatically alter your hair.
Versatility for Every Pixie and Every Face
This look works for any pixie length and hair texture. It’s particularly wonderful for those who want a more traditional bridal feel but have very short hair. The accessories add that special occasion touch while keeping the overall look modern and chic. This style works for any face shape because you can position accessories to complement your features. Round faces benefit from accessories placed higher on the head for elongation, while those with longer faces can place accessories more to the side for balance.
Styling Your Accessorized Pixie to Perfection
Start by styling your pixie in your preferred way—sleek and smooth, or textured and tousled. The foundation of this look should feel authentic to your personal style. Once your hair is styled, it’s time to add your accessories.
If you’re using a headband or tiara, position it about an inch back from your hairline. I always tell my clients to try it on at home before the big day and make sure it feels secure and comfortable. Nothing ruins photos faster than constantly adjusting your accessories because they’re slipping or uncomfortable.
For clips or pins, think about balance and placement. If you’re using statement pieces, one or two is usually enough. Smaller, more delicate pieces can be scattered throughout for a whimsical effect. I like to place jeweled clips on one side to create asymmetry, or use them to pin back one side of the bangs for a romantic, exposed face.
A trick I learned from a veteran hairstylist: use a tiny bit of texturizing spray or dry shampoo at the roots before adding accessories. It gives them something to grip onto and helps them stay put throughout your event.
The Elegant Low Chignon for Bob Length

When I first started working with short hair for formal events, I thought chignons were impossible on anything above shoulder length. Then I worked with this incredible hairstylist who showed me how to create the illusion of a full, elegant chignon on a chin-length bob. It completely changed my approach to formal styling on short hair.
The Classic Sophistication of a Bob-Length Chignon
This is a sophisticated updo that gathers the hair at the nape of the neck into a small, elegant twist or roll. Even though you’re working with less length, the final result is polished and formal, perfect for the most elegant engagement celebrations. The low chignon has a timeless quality that never goes out of style—it’s been gracing formal occasions for generations. On short hair, it has an especially refined, intentional look that speaks to understated elegance and classic beauty.
Determining If This Style Is Right for You
You need at least chin-length hair for this style to work. It’s ideal for those with thick hair because you need enough density to create the chignon shape. This look is perfect for formal evening engagements, traditional celebrations, or anyone wanting a classic, timeless bridal aesthetic. It works beautifully with statement earrings since your neck is fully exposed. I particularly love this style for black-tie events, upscale restaurants, or any setting where elegance and formality are the order of the day.
Creating Your Elegant Low Chignon
This style requires a bit of patience and quite a few bobby pins. Start with hair that has some texture—second-day hair actually works better than freshly washed hair because it has more grip. Apply a light styling cream through your hair for control.
Gather all your hair at the nape of your neck as if you’re creating a low ponytail. Instead of securing it with an elastic, twist the hair and roll it under, tucking the ends underneath to create a small roll or chignon shape. Secure it with bobby pins, crisscrossing them for maximum hold.
The trick with short hair is that you might need more pins than you’d expect. Don’t be afraid to really anchor everything in place. Once the basic shape is secure, use your fingers to gently pull and adjust the chignon, creating a fuller appearance. Pin any loose pieces around your face for a smooth, polished finish. A medium-hold hairspray sets everything in place, and a shine spray adds a touch of glamour.
The Half-Up Twisted Crown

This is one of my absolute favorite looks for short to medium length hair. I created this style for a client who had a lob and wanted something that felt special but not too formal for her backyard engagement party. The twisted crown gave her that romantic, elevated feeling while still keeping her hair down to show off her beautiful waves.
The Romantic Appeal of the Twisted Crown
The half-up twisted crown takes sections of hair from each side of your head, twists them back, and secures them at the crown, creating a soft, romantic frame for your face. It’s like wearing a crown made from your own hair, which feels especially appropriate for an engagement celebration. This style strikes the perfect balance between casual and dressy, making it incredibly versatile. The twisted sections draw the eye upward and frame your face beautifully while still allowing the length and texture of your hair to be seen and appreciated.
Perfect Faces and Perfect Places for This Style
This style needs hair that’s at least to your chin, preferably a bit longer. It works on all hair textures, though it’s particularly lovely on wavy or curly hair where the texture adds to the romantic feel. This look is perfect for those with round or square faces as it adds height and elongates. I love this for semi-formal to casual engagement events, especially outdoor celebrations. Garden parties, beachside gatherings, vineyard settings—anywhere with a romantic, natural atmosphere is ideal for this style.
Twisting Your Way to Romance
Begin by adding some texture to your hair. If it’s straight, use a curling wand to create loose, soft waves throughout. Take a two-inch section of hair from above your right ear and twist it back toward the crown of your head. Secure it with bobby pins at the crown.
Repeat on the left side, twisting the hair back and securing it so it meets the first section at the crown. The key is to keep the twists loose and soft—you don’t want them to look tight or severe. Once both sides are secured, gently pull on the twists to make them fuller and softer.
For added romance, you can weave small flowers into the twisted sections or add delicate hair pins. I love using pins with pearls or small crystals for engagement looks. They catch the light beautifully in photos and add just the right amount of sparkle.
The Voluminous Curly Pixie

I worked with a client once who had the most gorgeous natural curls and a pixie cut that she usually wore quite close to her head. For her engagement photos, we decided to enhance and celebrate those curls, creating volume and definition that was absolutely stunning. She told me later that she’d never felt more beautiful, and that’s exactly what engagement hair should do.
Celebrating Natural Curls with Volume and Definition
This style is all about embracing and enhancing your natural curl pattern, adding volume at the roots and definition throughout for a full, romantic look. It celebrates texture instead of fighting against it, creating a look that’s uniquely you. There’s something incredibly empowering about wearing your natural texture on such an important day—it’s a statement that you’re celebrating yourself exactly as you are. The added volume and definition takes your everyday curls and transforms them into something special and occasion-worthy.
The Curly Hair Love Affair
Obviously, this is perfect for those with naturally curly hair, especially if you have a pixie or short crop cut. It works on all face shapes and is ideal for anyone who wants to embrace their natural texture for their engagement. This look is wonderful for casual to semi-formal events and photographs beautifully both indoors and outdoors. I find this style particularly stunning on those who have spent years fighting their curls and are finally ready to embrace them—there’s a confidence that comes with that acceptance that makes you absolutely glow.
Enhancing Your Natural Curl Pattern
The foundation of this look is healthy, well-moisturized curls. Start by washing your hair with a sulfate-free, moisturizing shampoo and conditioner. While your hair is still very wet, apply a curl-defining cream, working it through from roots to ends.
Instead of towel-drying, which can cause frizz, gently squeeze excess water from your hair with a microfiber towel or old t-shirt. Apply a volumizing mousse at the roots, then use a diffuser attachment on your blow dryer to dry your curls. The diffuser is key—it dries your hair while preserving the curl pattern and adding volume.
Once your hair is dry, resist the urge to touch it too much. Use your fingers to gently lift at the roots for extra volume, but don’t comb through the curls or you’ll lose definition. For special shine and to combat any frizz, use a lightweight oil on the very ends of your curls. A flexible-hold hairspray keeps everything in place without making your curls crunchy.
The Side-Pinned Bob with Pearl Accents

There’s something so elegant and understated about this look. I created it for a bride who was having an intimate engagement dinner at a fancy restaurant. She wanted to look special but not overdone, and this style hit that perfect sweet spot between casual and formal.
Asymmetrical Elegance with Classic Accents
This style takes a classic bob and pins one side back behind the ear, securing it with decorative pins. The pearl accents add a bridal touch while keeping the overall look sophisticated and modern. It’s asymmetrical, interesting, and photographs beautifully from every angle. What I love about this approach is how it creates visual interest through simplicity—the asymmetry keeps it from being boring, while the pearls add just enough sparkle to feel special without being overwhelming.
The Perfect Bob for Pearl Perfection
You need a bob that’s at least chin-length for this to work well. It’s perfect for straight to slightly wavy hair and looks stunning on those with oval, heart, or diamond-shaped faces. This style works for any formality level—the pearl pins dress it up, but you could easily swap them for simpler pins for a more casual feel. I particularly love this for intimate celebrations, dinner parties, or any setting where you want to look polished and put-together without appearing overly formal or done-up.
Pinning Your Way to Sophisticated Style
Start by creating a deep side part. Style your hair sleek and straight using a flat iron, or add gentle waves with a curling wand depending on your preference. I usually recommend waves for a softer, more romantic feel, but the sleek version is incredibly chic too.
Decide which side you want to pin back—I usually choose the side with less hair from the part, as it creates a more dramatic sweep. Take the front section of hair on that side and smooth it back behind your ear. Use bobby pins that match your hair color to secure it in place, creating a smooth, sleek pin back.
Now for the decorative element—place your pearl pins in a line or cluster where you’ve pinned the hair back. I like to use three to five pins, spacing them evenly for a classic look or clustering them together for something more modern. The pins hide the bobby pins underneath while adding that special bridal touch.
The Textured Top Knot

Who says you need long hair for a top knot? I’ve created this look on clients with hair as short as a long pixie, and it’s always a showstopper. There’s something so fun and youthful about a top knot, perfect for celebrating the joy of engagement.
The Fun and Playful Top Knot
This is a small, textured bun positioned at the crown or slightly back from the crown. Unlike sleek ballerina buns, this version embraces texture and a slightly undone quality that feels modern and fresh. It’s playful yet polished. The top knot has this wonderful way of being both casual and special at the same time—it’s approachable and fun while still clearly being intentional and styled for an occasion. The height it creates is also incredibly flattering and adds a youthful energy to your overall look.
Finding Your Top Knot Moment
You need at least four to five inches of length on top for this to work. It’s ideal for those with thick hair and works beautifully on oval, heart, and diamond-shaped faces because it adds height. This look is perfect for casual to semi-formal engagements, especially daytime events or anything with a fun, youthful vibe. Brunch celebrations, casual garden parties, beach engagements—this style fits perfectly into relaxed, happy settings where you want to look put-together without being too serious.
Creating Your Perfectly Imperfect Top Knot
Start with textured, not freshly washed hair. Apply a texturizing spray throughout and use your fingers to create some deliberate messiness. Gather the top section of your hair—from your temples back to the crown—and secure it in a ponytail. Don’t worry about making it perfectly smooth; a bit of texture and looseness actually adds to the style.
Twist the ponytail and wrap it around the base to create a small bun. Secure it with bobby pins, but again, don’t stress about perfection. Pull a few face-framing pieces loose for a softer look. If you want to add a special touch, wrap a delicate ribbon around the base of the bun or add small flower pins around it.
The beauty of this style is in its imperfection. Those little wisps and pieces that escape are what make it charming and romantic. A light-hold hairspray keeps everything in place without making it stiff.
The Sleek Side Swept Crop

Sometimes the most elegant looks are the simplest. I’ll always remember this gorgeous client with a platinum blonde crop who wanted something sophisticated for her engagement photos. We kept her hair completely sleek and swept everything to one side, adding a single jeweled clip. The photos were absolutely stunning—so classic and timeless.
Minimalist Elegance at Its Finest
This style takes a short crop and sweeps all the hair to one side, creating a dramatic, asymmetrical look. It’s sleek, sophisticated, and incredibly chic. The emphasis is on smooth, shiny hair and a clean, defined side part. This is minimalism done right—there’s nothing excessive or unnecessary about this style, yet it’s undeniably special and elegant. The drama comes from the severe side part and the sleekness of the hair, proving that sometimes less truly is more.
The Bold and the Beautiful
This works on very short to medium-short crops. It’s particularly striking on straight hair and looks incredible on those with strong features and angular face shapes. This is perfect for formal evening engagements, black-tie events, or anyone who loves a minimalist, modern aesthetic. Urban loft settings, contemporary art galleries, upscale restaurants—anywhere with clean lines and modern design is the perfect backdrop for this sleek, sophisticated style.
Achieving Sleek Side-Swept Perfection
Preparation is everything with this look. Wash your hair with smoothing products and apply a heat protectant. Blow-dry your hair completely smooth using a round brush, pulling the hair in the direction you want it to lay.
Create a dramatic side part—I usually place it far to one side, sometimes even along the natural recession of the hairline. Use a fine-tooth comb to make the part razor-sharp and clean. Apply a small amount of smoothing serum to your hair, then use a flat iron to make everything perfectly sleek.
Sweep all your hair to one side and use bobby pins behind your ear to secure it in place. The pins should be completely hidden. Use a strong-hold gel or pomade along the part and on the side you’re pinning back to keep everything smooth and in place. For a special touch, add a single jeweled clip or vintage brooch on the side where you’ve pinned the hair back. Finish with a strong-hold hairspray to lock everything in place.
The Braided Headband on Bob

I absolutely love incorporating braids into short hairstyles. There’s something so romantic and whimsical about a braid, and the headband braid is one of my favorites for engagement looks. It adds interest and detail without being overwhelming.
The Whimsy of a Braided Headband
This style creates a braid that goes across the top of your head like a headband, with the rest of your hair left down. It’s romantic and detailed while still showing off your beautiful bob length. The braid can be simple or more intricate depending on your preference and skill level. What makes this style so charming is how it adds an element of interest and detail to what might otherwise be a simple down style. The braid creates a focal point and frames your face beautifully while maintaining a soft, romantic overall aesthetic.
The Right Length and Setting for Braided Beauty
You need hair that’s at least to your chin for this to work, preferably a bit longer. It works on all hair textures and is particularly flattering on those with oval or heart-shaped faces. This look is wonderful for outdoor engagements, garden parties, or bohemian-themed celebrations. The braided headband has a naturally romantic, slightly bohemian quality that works perfectly in natural settings and casual to semi-formal occasions.
Braiding Your Personal Headband
Start by creating a deep side part. Take a section of hair from the heavier side of the part, right at your hairline. Divide this into three sections and begin braiding, picking up small pieces of hair as you go—this is essentially a French braid or Dutch braid technique.
Continue braiding along your hairline, working toward the opposite ear. The braid should sit about an inch back from your hairline, creating that headband effect. Once you reach the other side, finish the braid without adding more hair and secure it with a small clear elastic.
Tuck the end of the braid behind your ear and secure it with bobby pins that match your hair color. The rest of your hair can be left straight, wavy, or curly depending on your preference. I love adding soft waves to the loose hair for a romantic feel. A few strategically placed hair pins with pearls or small flowers along the braid add the perfect finishing touch.
The Retro Victory Rolls

Victory rolls are having such a moment, and I’m absolutely here for it. These vintage-inspired rolls are dramatic, fun, and perfect for anyone who wants to make a statement. I created this look for a client having a vintage-themed engagement party, and she felt like a movie star.
The Drama of Vintage Victory Rolls
Victory rolls are those iconic rolled sections of hair at the front of the head that were popular during the 1940s. They create height and drama at the hairline and can be adapted to various lengths and styles. On short hair, they’re particularly striking. There’s something incredibly confident and bold about victory rolls—they’re not a shy hairstyle. They make a statement and demand attention in the best possible way. The vintage glamour they evoke is perfect for anyone who loves old Hollywood style or wants to channel that classic movie star energy.
The Perfect Setting for Your Victory Rolls
This style works best on hair that’s at least chin-length, though I’ve adapted it for shorter cuts too. It’s ideal for thick, straight hair that can hold the rolled shape well. This look is perfect for vintage-themed engagements, anyone who loves retro style, or those wanting to make a bold, memorable statement. Speakeasy venues, art deco ballrooms, vintage dress codes—victory rolls fit seamlessly into any setting with a nod to the past.
Rolling Your Way to Vintage Glamour
This style takes practice, so don’t expect perfection on your first try. Start with clean, dry hair that has some grip—a bit of dry shampoo at the roots helps. Take a section of hair at the front, about two inches wide, and backcomb it lightly for volume and texture.
Smooth the top layer of the backcombed section, then roll the hair under and toward your face, creating a tube or roll shape. Secure it with bobby pins, crisscrossing them through the roll to anchor it firmly to your head. Repeat on the other side, making sure both rolls are symmetrical in size and height.
The rest of your hair can be styled in gentle waves, pinned in vintage curls, or left sleek depending on your preference. A strong-hold hairspray is essential for keeping victory rolls in place—they need to maintain their shape throughout your event. For extra vintage glamour, add a small hair flower or jeweled clip between the two rolls.
The Messy Romantic Updo

One of my favorite things about short hair updos is that they can look intentionally undone and romantic in a way that longer hair sometimes can’t. This messy updo embraces texture and a lived-in quality that’s absolutely perfect for modern brides.
The Effortless Romance of Undone Elegance
This is a gathered updo that embraces loose pieces, texture, and an effortlessly romantic quality. It’s not pristine or perfect—it’s soft, touchable, and incredibly romantic. Think European countryside wedding rather than traditional formal ballroom. The beauty of this style is in how it looks both carefully created and naturally effortless at the same time. It’s the kind of hairstyle that makes you look like you just casually pinned your hair up and somehow it came out perfectly, even though we know there’s skill and intention behind every pin placement.
The Natural Settings for Naturally Beautiful Hair
You need at least a long bob or lob length for this style. It works beautifully on wavy or curly hair, though you can add texture to straight hair too. This look is perfect for outdoor engagements, rustic venues, or anyone embracing a more relaxed, natural aesthetic. Barn venues, garden settings, beachside celebrations—anywhere with an organic, natural vibe is ideal for this romantically undone style.
Creating Deliberately Messy Perfection
Start by adding texture to your hair. If it’s naturally wavy or curly, enhance those with a curl-defining product. If it’s straight, use a curling wand to add random waves and bends throughout. The key is to create texture that’s not uniform—you want variety.
Gather your hair at the back of your head, but instead of creating a smooth, sleek gather, embrace the texture and looseness. Twist and pin sections randomly, creating a loose, organic shape. Don’t worry about pieces falling out or the style looking messy—that’s the point.
Pull a few face-framing pieces loose deliberately. Use your fingers to gently pull on the pinned sections, creating even more volume and softness. Secure everything with bobby pins, but remember you’re going for romantic, not rigid. Small flowers, greenery, or delicate pins scattered throughout add the perfect finishing touch. Use just enough hairspray to keep things in place without destroying the soft, touchable texture.
The Glamorous Wet Look

This is definitely a bold choice, but for the right person and the right event, it’s absolutely stunning. I first created this look for a client having her engagement photos taken in a modern art gallery, and the sleek, dramatic effect was perfect against the contemporary backdrop.
High Fashion Meets Engagement Elegance
The wet look is exactly what it sounds like—hair styled to look intentionally wet and slicked back. It’s high-fashion, dramatic, and incredibly modern. This is not your everyday style, but for a special occasion, it makes a serious statement. There’s something incredibly confident about the wet look—it’s bold, unapologetic, and fashion-forward. It channels editorial photoshoot energy and runway glamour in a way that’s absolutely unforgettable.
The Bold Choice for Modern Aesthetics
This works on pixie cuts, crops, and bobs—any short length. It’s particularly striking on those with strong, defined features and works beautifully on all face shapes. This look is perfect for evening events, modern or minimalist aesthetics, and anyone who wants to channel high-fashion editorial vibes. Contemporary art spaces, ultra-modern venues, sleek urban settings—this is where the wet look truly shines.
Creating the Perfect Wet Look
The key to this look is the right products. Start with damp, not soaking wet, hair. Apply a generous amount of strong-hold gel throughout your hair, using your hands and a fine-tooth comb to distribute it evenly and smooth everything back from your face.
Create your desired part—a deep side part is particularly striking with this style. Use the comb to make the part absolutely crisp and clean. Smooth the hair back from your face, using more gel if needed to maintain that wet appearance. If you have a longer top section, you can slick it straight back or to one side depending on your preference.
The hair should look shiny and sleek, as if you’ve just stepped out of a pool. Don’t touch your hair while it dries—let the gel dry naturally to maintain that wet appearance. Once dry, you can apply a small amount of shine serum or hair oil for extra gloss. A strong-hold hairspray on the part and any sections that need extra hold completes the look.
Conclusion
Standing in front of my mirror all those years ago with my pixie cut, panicking about that upcoming wedding, I had no idea that short hair would become one of my specialties. I’ve learned that the most beautiful engagement looks aren’t about conforming to traditional standards or trying to be something you’re not. They’re about enhancing who you already are and celebrating your unique beauty.
As I’ve worked with clients preparing for their engagement celebrations, I’ve noticed something beautiful. The women who embrace their short hair and work with its natural qualities rather than against them—they’re the ones who look most radiant in their photos. They’re the ones who feel most comfortable and confident throughout their events. They’re the ones who look back at their engagement photos years later and still love what they see.
Your engagement is a celebration of your love story, and your hairstyle should reflect who you are as an individual. Whether you choose something sleek and sophisticated, romantic and textured, or bold and dramatic, the most important thing is that it feels authentically you. I’ve seen women transform when they find the right hairstyle—their whole demeanor changes, their confidence soars, and that inner light just shines through.
As you prepare for your engagement celebration, remember that this is your moment. Your hair should make you feel like the most beautiful version of yourself, not like you’re trying to be someone else. Trust your instincts, embrace your personal style, and don’t be afraid to try something new. Some of my favorite engagement looks have come from clients who were willing to step slightly outside their comfort zones while still honoring their authentic selves.
Your engagement is the beginning of a beautiful new chapter, and your hairstyle should celebrate that. Embrace your short hair, celebrate your unique beauty, and step into this exciting time with confidence and joy. You’re going to look absolutely radiant, I promise you that. Because beauty isn’t about conforming to someone else’s standards—it’s about celebrating who you are and letting that inner light shine through. And trust me, there’s nothing more beautiful than a woman who’s genuinely happy, confident, and in love.