
My eye makeup tutorials have reached over 4.2 million views, and I’ve learned that beautiful full color eye makeup can be simple. The beauty industry has made artistic eye looks more available to everyone, which I’ve witnessed firsthand as a professional makeup artist.
Many people think they need countless products or years of practice to create colorful eye looks. That’s simply not true. I’ve found that anyone can create amazing looks by focusing on a few essential techniques and tools. My years of teaching eyeshadow application have led me to develop 15 foolproof colorful makeup looks that suit every skill level and eye shape.
Want to elevate your makeup game? Let’s dive into these beautiful eye looks that I’ve designed to help you showcase your creativity and feel more confident in 2025.
Electric Blue Halo Eye
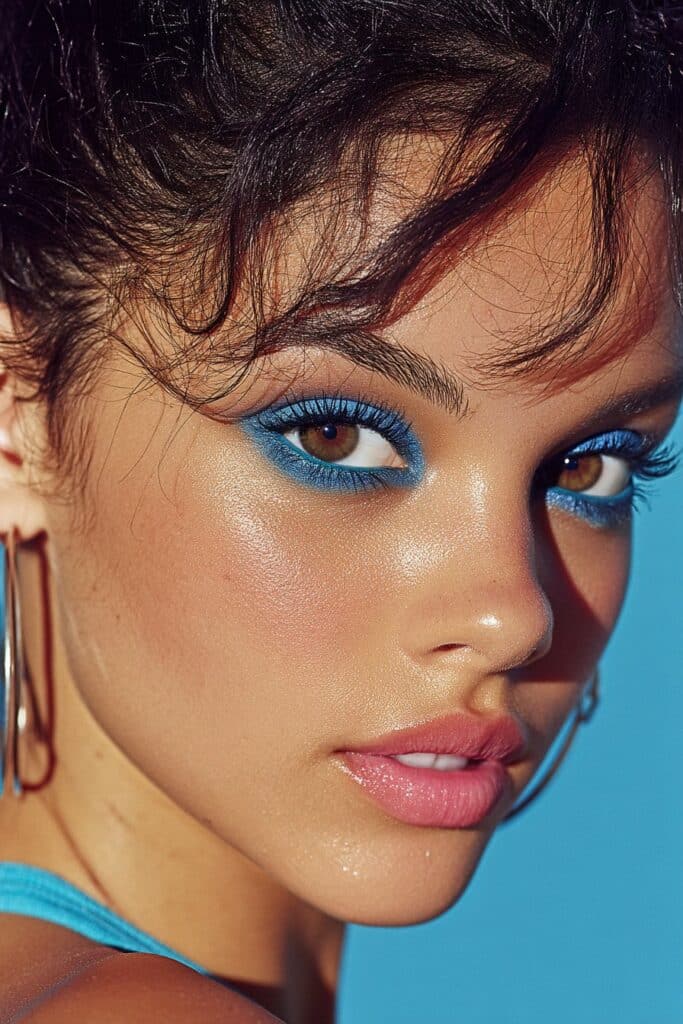
The moment I created an electric blue halo eye for a fashion editorial, everyone on set couldn’t stop talking about it. This eye-catching look has become one of my signature techniques, and with good reason too – it works beautifully on almost anyone.
How I Create the Perfect Electric Blue Halo Eye
Electric blue halo eye makeup creates a stunning spotlight effect that brightens your gaze instantly. The technique places darker blue shades on your eyes’ inner and outer corners with a bright, shimmery shade in the middle. The sort of thing I love about this technique is how it adds dimension and creates the illusion of more lid space. This blue color palette makes brown eyes pop spectacularly – I’ve seen the transformation countless times in my studio.
Essential Products for This Bold Look
You’ll need these items to create this look:
- A good eyeshadow primer or base (vital for grip and blending)
- Flat shader brush to pack color
- Small blending brush to create transitions
- Pencil or smudge brush to work details
- Eyeshadow palette with:
- Royal blue or navy matte shade
- Medium blue matte shade
- Bright shimmery white or silver to highlight center
My preference lies with eyeshadow primer over concealer for colorful looks since it prevents creasing and makes blue pigments appear more vibrant.
Step-by-Step Application Technique
- Prime your lids to create grip for the shadows
- Pat the darkest blue shade onto the inner third and outer third of your eyelid with a flat shader brush, leaving the middle third empty
- Blend the edges with your medium blue shade using a windshield wiper motion through your crease
- Create a true halo effect by repeating steps 2-3 on your lower lash line and connecting the colors at the corners
- Clean the center of your lid with a cotton bud if needed
- Apply a bright shimmery shade to the center of your lid and extend it up to meet the crease
- Define with eyeliner if desired – a thin line works best without overwhelming the colorful shadow
Tips for Different Eye Shapes
People with hooded eyes should place shadows slightly above their natural crease so the colorful center stays visible when eyes are open. On top of that, take the shadows higher than you might think.
Round eyes benefit from creating lift at the outer corners with your darkest blue shade to elongate the shape.
Almond eyes work perfectly with the classic halo technique – you’re in luck!
Monolid eyes look best with a gradient effect using blues, where the darkest shade sits near the lash line and fades upward. Light shades work better than deep ones in the inner corners.
Note that blending makes all the difference – patting motions work better than swiping at the time of applying these intense blue pigments.
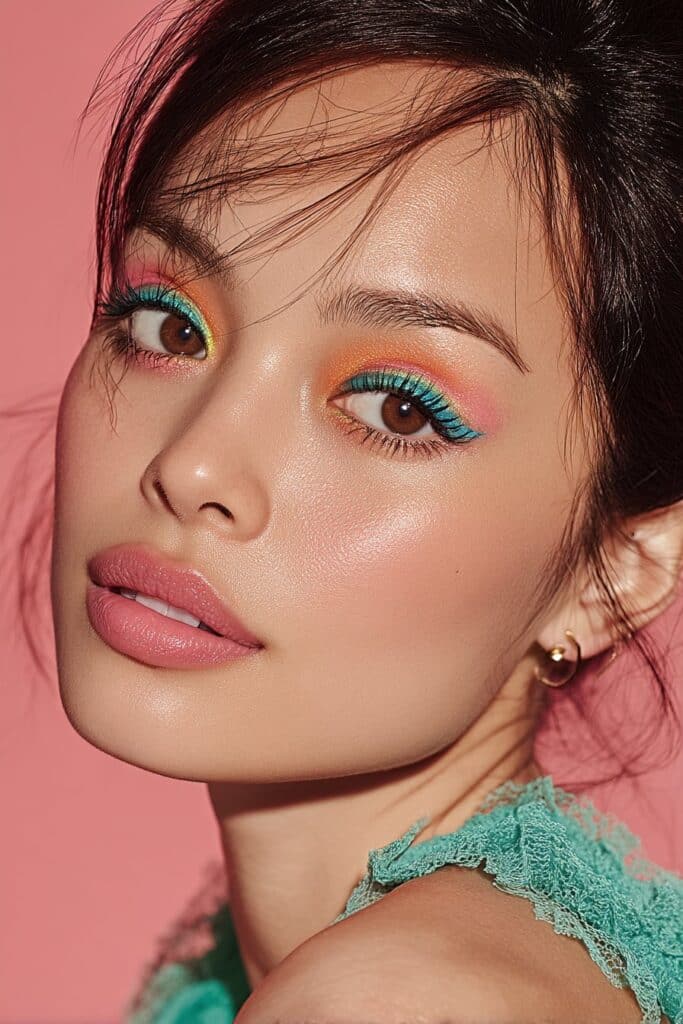
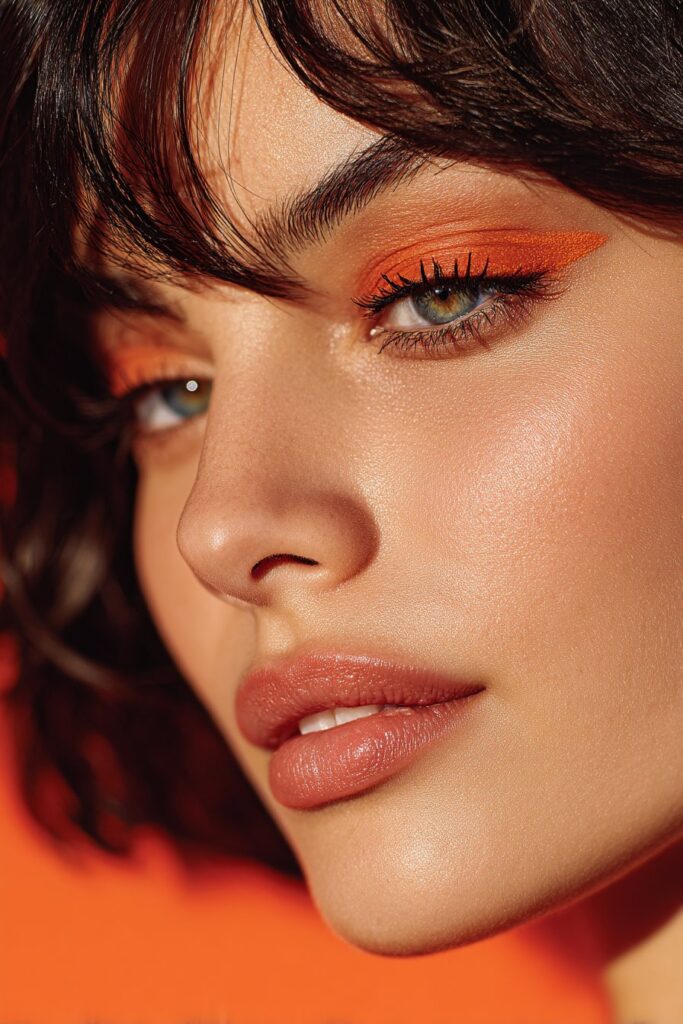
Sunset Ombré Blend
Creating a vibrant sunset ombré blend on my clients’ eyes brings me pure joy. This look captures the magical gradient of sunset colors and turns ordinary makeup into something extraordinary.
My Approach to Sunset Ombré Eyeshadow
I create sunset ombré looks by focusing on smooth transitions between warm tones. This technique works beautifully with all eye colors, especially when you have blue eyes. A high-quality primer is a vital first step to achieve vibrant color payoff. I pat a rice-grain sized amount of primer until it melts into the skin and creates a perfect base.
Color Selection and Placement
To create a true sunset effect, you’ll need:
- Bright yellow (for inner corner brightness)
- Vibrant orange (for the middle lid area)
- Rich pink or red (for outer corner depth)
- Deep brown or purple (for added definition)
The yellow shade goes on the inner corner of the eye, extending to about one-third of the lid. The orange sits in the middle section and slightly overlaps with the yellow. The pink or red creates depth and dimension in the outer third in a V-shape.
Blending Techniques for Seamless Transitions
Blending creates the magic in ombré looks! A clean, fluffy blending brush moves in windshield-wiper motions through the crease after each color. Here’s how to create a truly smooth gradient:
- Start with your transition shade (usually orange) in the crease as a buffer between colors
- Use circular motions for the outer V area
- Switch to a clean brush between colors to prevent muddiness
- Blend from the outside in with gentle pressure
How to Make This Look Last All Day
Proper preparation ensures long-lasting colorful eye makeup. Remove all oil from the lids using an oil-free makeup remover before starting. Apply a thin layer of foundation or concealer, set it with powder, and add primer.
More importantly, a high-quality setting spray melts the different eyeshadow layers together for a cohesive finish. Layering powder shadows over cream bases creates dimension and improves longevity to achieve maximum vibrancy that lasts.
Note that patience creates the most beautiful, long-lasting results with ombré looks. Build up color gradually, and your sunset eyes will stay vibrant from morning meetings to evening events.
Neon Graphic Liner
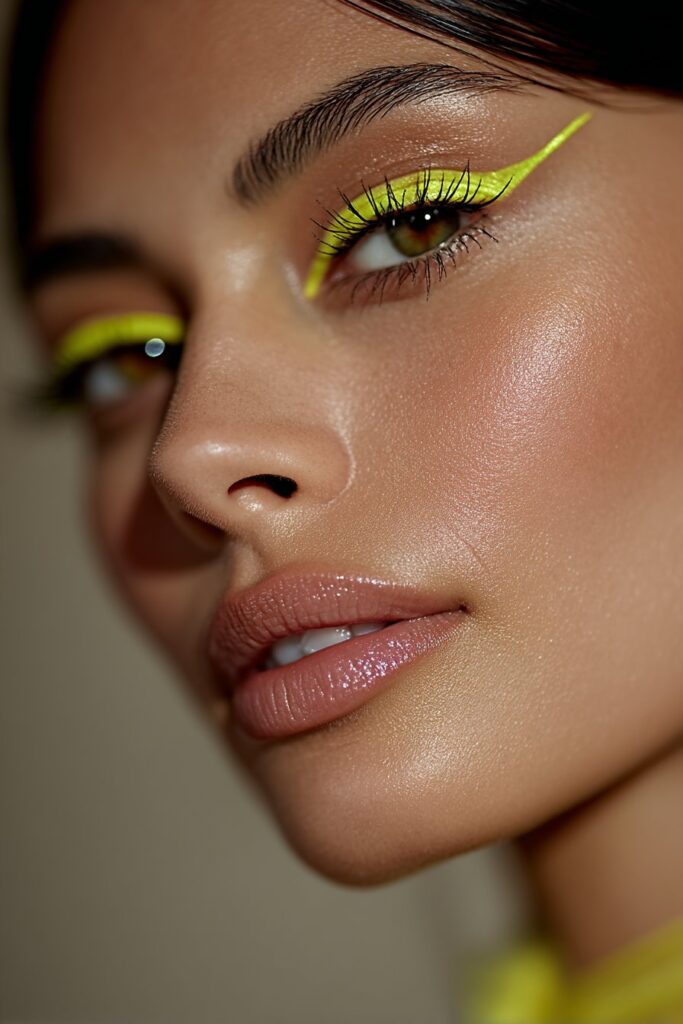
My years as a makeup artist have shown me how trends come and go. Neon graphic liner stands out as 2025’s most exciting technique. Social media proves its popularity – #graphicliner has gathered over 5 billion views online.
Why I Love Neon Graphic Liner for 2025
Statement eyes dominate 2025’s makeup scene. Simple black liner now takes a back seat to creative editorial looks. Neon liners captivate me because they elevate any look with minimal effort. “With very little makeup—and effort—you can create a look that catches instant attention without being overbearing,” a fellow makeup artist perfectly described.
Graphic liner lets artists express themselves through bold shapes and lines. A recent photo shoot showed me this power. My vibrant pink liner design became the focal point with barely any face makeup. This technique creates stunning results using few products.
Choosing the Right Neon Shades
Here are my top neon shade recommendations:
- Electric blue and cobalt to create striking effects that complement most eye colors
- Neon green to make bold statements
- Bright pink or yellow to add playful, unexpected elements
Layering techniques improve color intensity. A white base like MAC Chromaline in Pure White under neon pigments makes colors pop on any skin tone.
Creating Clean, Sharp Lines
Sharp, precise lines need the right tools. My go-to items include:
- Highly pigmented liquid or gel liners that deliver intense color
- A slanted eyeliner brush (like MAC 210) to ensure precision
- A credit card as my secret weapon for perfectly straight lines
Thin layers build opacity gradually. Complex designs work better when you map the shape with lighter shades first.
Making This Look Wearable for Everyday
Neon liner might seem bold for daily use, yet simple techniques make it more approachable:
Your liner should shine against a clean face and subtle eye makeup. A simple colored wing in electric blue or neon pink works better than complex patterns.
Office environments call for subtler approaches. Try colored liner just on the upper lash line or outer corners. Neutral lips and cheeks balance colorful eye makeup, making it suitable for everyday wear.
Note that makeup expresses your personality. Even a small touch of neon brightens your eyes and your entire day!
Pastel Watercolor Wash
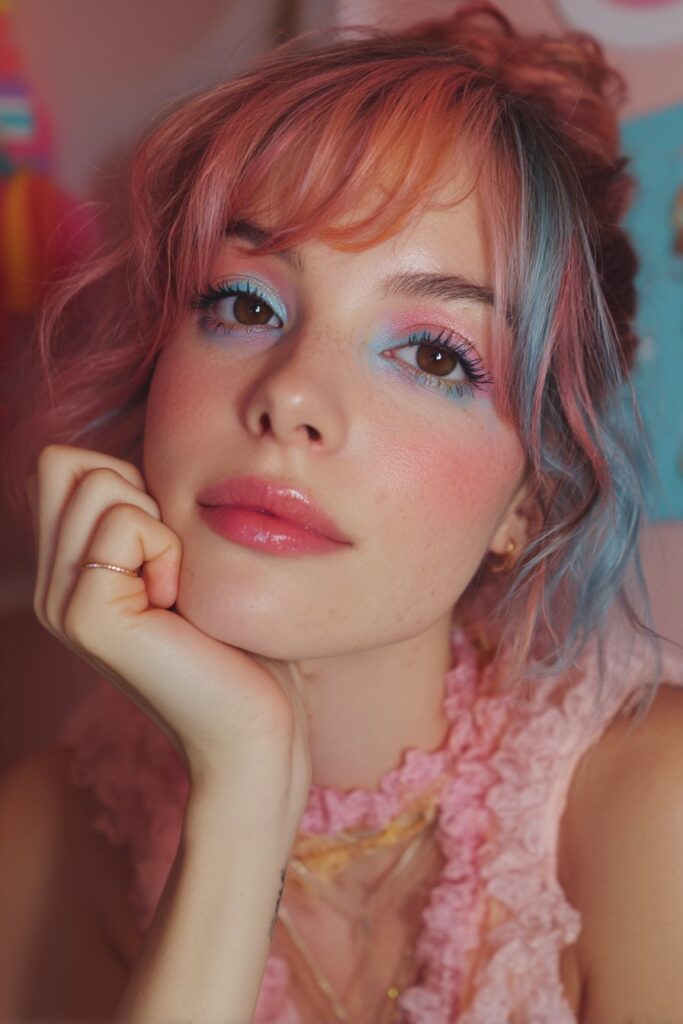
Pastel watercolor washes reshape the scene of delicate eye looks in my studio. These soft washes create an ethereal, dreamy effect that beginners can easily pick up with the right approach.
My Favorite Pastel Eyeshadow Technique
My years of creating editorial looks have taught me that pastel eyeshadow enhances all skin tones with proper application. Warm earthly tones like soft peach or baby blue work best on fair skin. Medium skin tones shine with these same shades, while olive undertones stand out with mint greens and light peaches. Deeper skin tones call for slightly more vibrant versions of pastels – frosty or fluorescent variations add stunning dimension.
My pastel technique’s success lies in proper preparation. A clean eye area comes first, then a gentle moisturizer applied in circular motions. The game-changer comes next – a quality primer that smooths fine lines and creates the perfect canvas.
How to Apply Colorful Eyeshadow for a Watercolor Effect
The dreamy watercolor finish needs these steps:
- A white eyeshadow base makes pastel pigments pop right away
- Your eyeshadow brush should be slightly damp, not wet
- Your chosen pastel shade goes on with gentle patting motions
- A second coat builds more intensity gradually
- A clean fluffy brush blends edges in soft circular motions
The second application brings the magic – pastels need layering to reveal their true beauty.
Product Recommendations for Pastel Pigments
Creating ethereal pastel looks requires:
- Eyeshadow primers that boost color intensity
- White cream shadow base that maximizes pigment payoff
- Pastel palettes with buildable formulas (skip chalky products)
- Slightly damp brushes that turn powder formulas into creamy textures
Complementary Face Makeup
Pastel eye looks need balance elsewhere. Fresh, dewy skin with subtle color on cheeks and lips in complementary tones works best. To cite an instance, lavender eyes pair beautifully with the faintest peachy blush, creating harmony without competition.
Note that pastel looks should feel effortless and delicate – less creates more impact here.
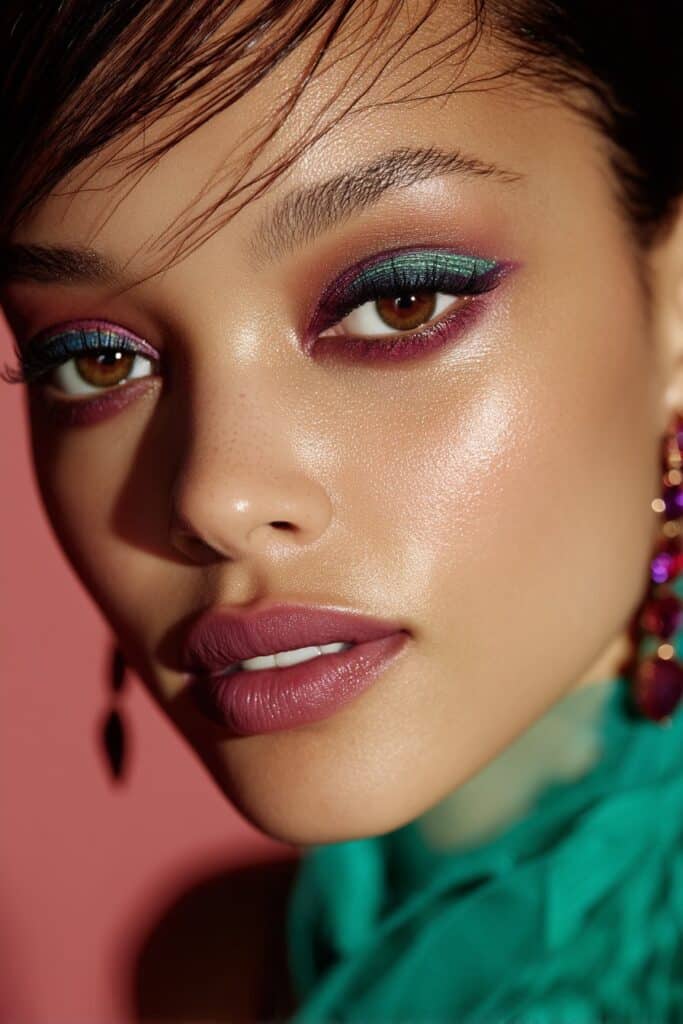
Holographic Duochrome Glam
Duochrome eyeshadows changed how I approach editorial makeup. The photographer couldn’t believe his eyes during a magazine shoot as the model’s eyes changed colors with every turn of her head.
The Magic of Duochrome Eyeshadows
Duochrome eyeshadows show two different colors based on light and viewing angles. Their color-changing properties create a mesmerizing effect that adds depth to any eye look instantly. Special pigments in these unique formulas change when light hits them at different angles. This creates a dimensional effect that regular shadows simply can’t match.
Application Techniques for Best Color-Changing Results
My experience with these magical pigments has taught me several techniques that bring out their special properties:
- Start with a complementary base color. Pat the duochrome shadow on top and focus on the lid’s center. Never swipe!
- Your brush should be damp with setting spray before picking up product. This creates an intense foil-like finish that makes colors pop
- Light pressure works best in areas where you want the color changes to stand out
Building Dimension with Layering
Layering makes duochromes truly shine. A darker shadow works best as your base in the crease and outer corner. The duochrome goes mainly on the center of the lid. This lets both colors show through beautifully. My clients who want extra drama get a light duochrome shade in their inner corners. This brightens their eyes and adds another layer of color-changing magic.
Making This Look Work for Different Skin Tones
These shadows enhance every skin tone when chosen correctly. Gold or bronze undertones create stunning contrast on warmer skin tones. Blue or purple shifts look amazing on cooler undertones. Dark skin makes every duochrome shade pop effortlessly, showing off both colors perfectly.
My signature look uses a purple-blue duochrome all over the lid. A touch of the lighter shade goes right in the center. This creates stunning definition that looks beautiful in photos regardless of lighting.
Rainbow Cut Crease

My clients completely changed their approach to colorful eye makeup after learning the rainbow cut crease technique. This look combines a structured cut crease with vibrant rainbow hues. The result catches everyone’s attention.
Breaking Down the Rainbow Cut Crease
A rainbow cut crease uses multiple colors placed strategically with a clean, sharp line through the crease. The dramatic contrast makes eyes look larger and more defined. The technique works especially when you have hooded eyes since the colorful dimension stays visible with open eyes. Rainbow colors transform a classic cut crease into something extraordinary through deliberate placement.
Color Placement for Maximum Impact
Red or pink goes in the outer corner first, followed by orange, yellow, green, blue, and purple in natural rainbow sequence. Colors blend better when complementary shades sit next to each other – yellow beside green, green beside blue.
Adjacent colors in the rainbow mix naturally without getting muddy. Bright pencils help map out the eyes first. Pressing matching eyeshadows on top creates the most vibrant look.
How to Apply Eyeshadow for a Clean Cut Crease
Here’s how to create a flawless rainbow cut crease:
- Prime your eyelids with a quality primer
- Apply a neutral transition shade across your crease as a base
- Start with red/pink in the crease and blend into inner and outer corners
- Create the “cut” by applying concealer in a semi-circle shape on your lid
- Pack yellow shadow onto the inner corner, green at center, and blue shadow at the outer edge
- Blend where colors meet without over-blending
- Define with eyeliner and mascara for a polished finish
Simplifying This Look for Beginners
Beginners can adapt this technique easily. Start with 3-4 colors until you master placement and blending. White eyeliner pencil makes colors pop right away and simplifies application.
Patient blending leads to success. My students learn to use two brushes for each color: one applies shadow while another blends edges. This keeps colors vibrant and creates that stunning rainbow effect everyone wants.
Metallic Jewel Tones
Jewel tones have become my go-to secret for creating eye-catching makeup looks throughout my career. These colors’ rich depth combined with metallic finishes creates a magnetic effect that draws attention to the eyes right away.
Why Jewel Tones Work for Everyone
Every eye color looks better with jewel tones because they add depth and dimension. Brown eyes appear richer with emerald greens, while sapphire blues create stunning contrast against hazel eyes. Metallic jewel tones’ reflective quality brightens the eye area and gives an immediate lift whatever your age or skin tone. A metallic amethyst shadow transformed my model’s green eyes into the focal point during a recent editorial shoot.
Selecting Complementary Metallic Shades
You can’t go wrong with these metallic jewel tone combinations:
- For blue eyes: Copper, bronze, and gold metallics create beautiful warmth
- For brown eyes: Emerald, sapphire, and deep purple metallics add remarkable depth
- For green eyes: Amethyst and garnet metallics boost natural flecks
- For hazel eyes: Virtually any metallic jewel tone works, especially gold emerald
Metallic shadows stand apart from shimmer eyeshadows. They don’t contain added glitter pieces but have a smooth, foil-like finish that appears more reflective than glittery.
My Favorite Application Method for Metallic Eyeshadows
My fingertips work better than brushes to apply metallic eyeshadows. They pick up the beautiful shiny pigments well and give a more intense color payoff. A gentle press and sweep across the eyelids creates that gorgeous foil-like shine we want. Brushes work too, especially to create a more blended, subtle effect.
Balancing Bold Eyes with the Rest of Your Makeup
My golden rule is simple: bold metallic eyes need subdued facial features. A mild contour, highlight, and blush prevent competition with the dramatic eye look. Nude or neutral lip shades maintain focus on your stunning metallic eyes. Note that this timeless makeup rule stands: bold eye makeup pairs best with minimal lip color.
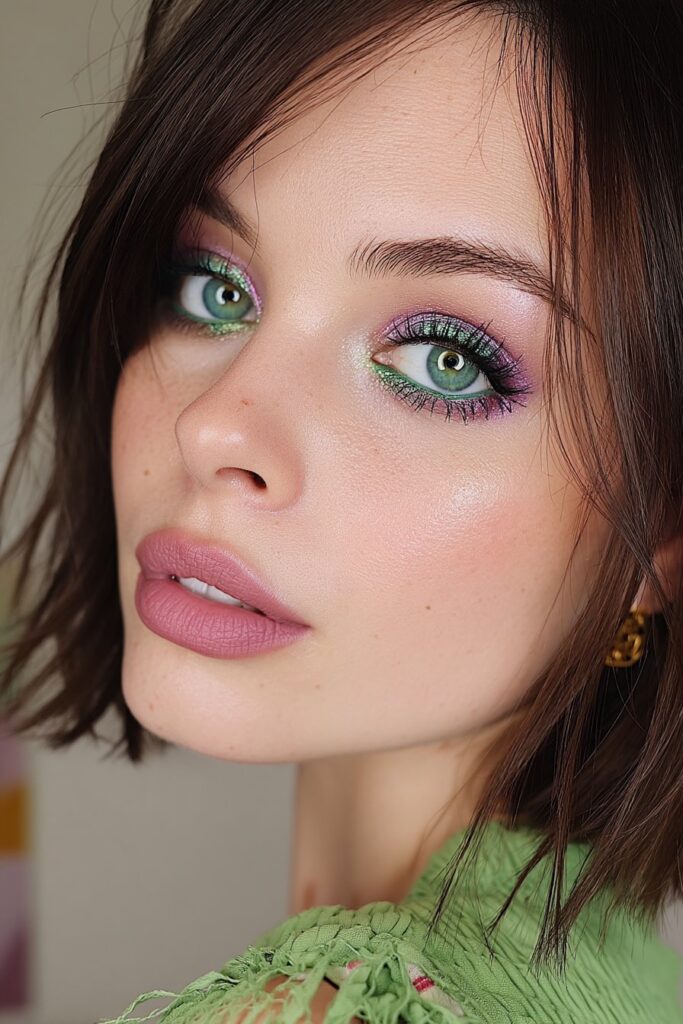
Monochromatic Purple Smoke

Purple eyeshadow has taken center stage over the last several years. Major design houses feature this adaptable shade in their runway shows. As a makeup artist who specializes in color, I’ve become skilled at creating depth and dimension with this stunning shade family.
Creating Depth with a Single Color Family
Monochromatic purple lets me build incredible dimension even with just one color family. Purple’s magic comes from its unique nature – it’s not a primary color. The mix of red and blue gives purple both warm and cool qualities. This makes purple an incredibly flexible choice for many looks.
My monochromatic purple smoke starts with a light lilac base. I build intensity with medium plum shades and define with deep eggplant tones. Layering different purple tones creates a cohesive, sophisticated look that appears more intricate than it is.
Colorful Eyeshadow Placement for Smoky Effects
Here’s my technique for the perfect purple smoky eye:
- Apply a black eye pencil along the lash line, then smudge it with my fingertip or short blending brush
- Sweep bright purple eyeshadow across the lid from inner to outer corner, stopping at the crease
- Blend a dark purple matte shadow into the outer corner using circular motions, work slightly above the crease
- Press a frosted lilac onto the lid’s center for dimension
Brush Selection for Smoky Eyes
The right brushes make a huge difference in smoky eye application. My purple smoky looks rely on:
- A small precision brush for applying dark shadow close to the lash line
- A fluffy eye blender brush for diffusing mid-tones through the crease
- An eyeshadow C brush for concentrated color application
Making Purple Flattering for All Eye Colors
Purple’s versatility makes it beautiful on every eye color with the right shade selection. Rich, warm purples like damson or puce with red undertones enhance brown and green eyes. Blue and gray eyes pop with cooler purple tones like lilacs and violets.
Modern looks need balance. Soft plum lips and a touch of mauve blush create harmony with purple eyes. This creates a pulled-together look where all elements complement each other perfectly.
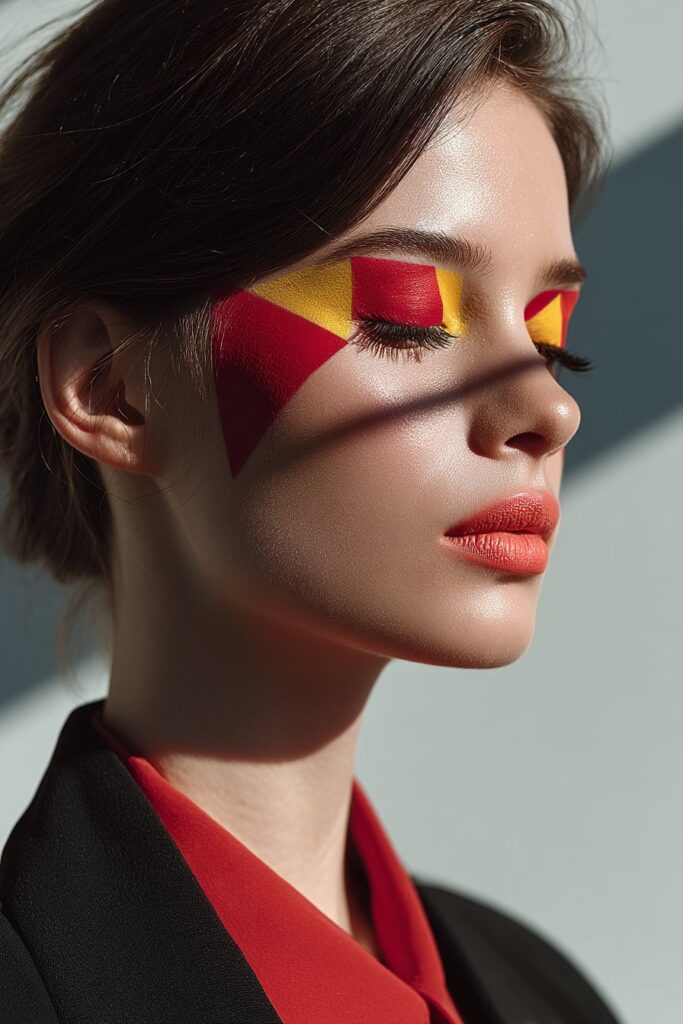
Neon Color Block
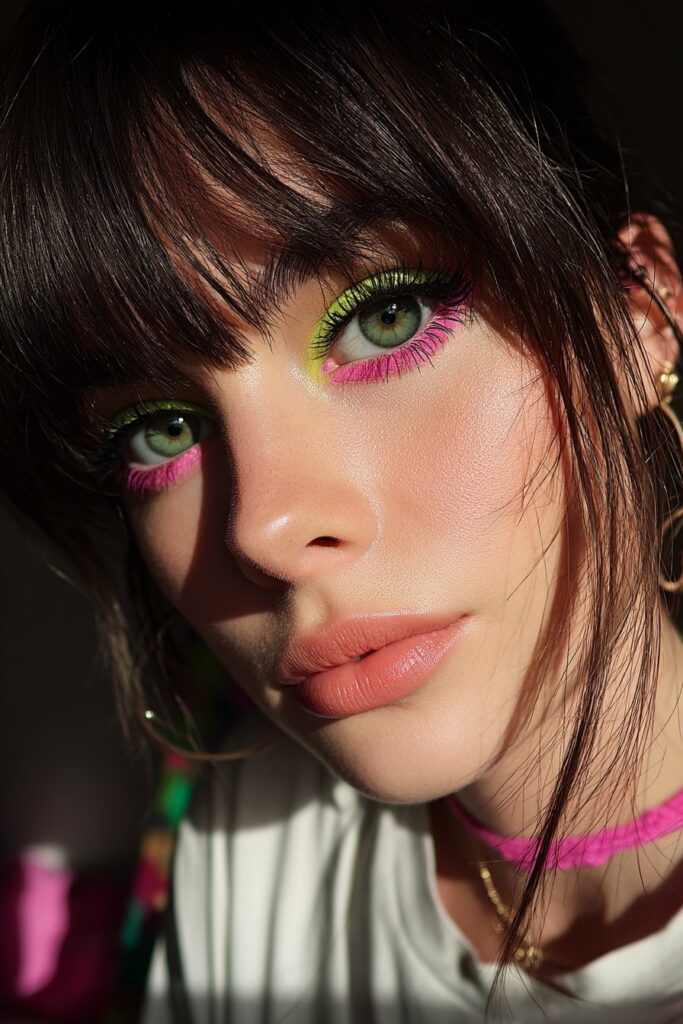
A fashion editor’s challenge to create an unconventional look changed my perspective on eye makeup through color blocking. This technique stands apart from traditional methods that follow natural eye contours. It creates distinct geometric shapes with bold neon colors that catch everyone’s attention.
The Color Block Technique I Use on Clients
My approach to color block eyes breaks free from standard application methods. I apply literal blocks of shadow on the lids instead of following the eye’s natural shape. The process starts with outlining a rectangular shape and filling it with vibrant color. My clients who are just starting out find it easier to apply one eye shadow shade on the upper lids and a different one on the lower lids. This simple approach creates a bold statement quickly.
A flat eyeliner brush loaded with concealer helps create more defined looks. Short strokes from the outer corner of the eye up toward the brow bone and across the lid to the tear duct make geometric shapes easy to define.
Choosing Complementary Neon Shades
Complementary colors create stunning color block looks. Here are my favorite combinations:
- Orange and pink for a sunset-inspired statement
- Blue and green for a cool-toned, oceanic feel
- Copper and royal blue for dramatic contrast
Neon colors excel at this technique because they create bold statements. Electric blues and greens enhance brown eyes’ richness beautifully. Vibrant oranges and pinks make blue eyes pop.
Creating Clean Divisions Between Colors
Clean, crisp divisions between colors make color block makeup special. Translucent powder under the eyes catches any fallout. A firm, flat brush helps apply color with patting motions rather than sweeping—colors stay exactly where you place them.
Gel eyeliner along the borders creates clean edges and defines color separation. Liquid and gel eyeliners work best as they create bold, clean lines that resist smudging.
Adapting This Look for Different Eye Shapes
My experience with various eye shapes has taught me several modifications. Hooded eyes need the color block slightly above the natural crease to stay visible when eyes open. Monolid eyes look best with a gradient effect and darker shades near the lash line.
Darker colors in the outer corners help round eyes appear more almond-shaped. Brighter shades on the outer thirds create width for close-set eyes.
Note that color block makeup looks best with minimal face makeup—let your eyes steal the show.
Glossy Colorful Lids
The glossy eye trend completely engaged me when I first created it for a magazine editorial shoot. That luminous, reflective finish made my client’s colorful eyeshadow look truly magical.
My Approach to the Glossy Eye Trend
Glossy colorful eyes create a high-impact look that’s surprisingly easy to achieve, unlike traditional powder eyeshadows. The multidimensional light effects make even simple colors appear editorial and fresh. My studio experience shows that glossy lids work best with the rest of the face kept soft—this contrast lets the eyes become the undeniable star of the show. I recommend a subtle glossy finish for everyday clients, while photoshoots might call for a more dramatic wet-look effect.
Product Selection for Long-Lasting Glossy Effects
Creating stunning glossy eyes that last requires:
- A quality eye primer (this substantially extends wear time)
- Highly pigmented, metallic eye shadows for maximum vibrancy
- Eye gloss formulas instead of lip gloss (which is too sticky)
- Setting spray between layers to lock everything in place
Many people make the mistake of applying too much product. Note that a pea-sized amount of gloss will give you remarkable results!
Colorful Makeup Base Techniques
Your base application holds the secret to vibrant glossy eyes. I always begin with a white eyeshadow base for intense colors. The colorful eyeshadow goes on next using patting motions rather than sweeping—this maximizes pigment payoff. A subtle effect comes from applying gloss only to the lid’s center. Editorial looks need gloss across the entire lid while avoiding the lash line to prevent migration.
When to Choose Glossy vs. Matte Finishes
Glossy finishes excel at creating youthful, dimensional looks that catch light beautifully. Matte eyeshadows remain crucial for creating depth and contouring. Special events and photography benefit from glossy lids’ unforgettable dimension, while mattes might serve better for everyday wear due to their longevity.
Floating Crease Illusion
My clients’ faces light up when I create their new look using the floating crease illusion technique. This unique approach became my signature style after working with countless eye shapes in my Los Angeles studio.
How I Create the Floating Crease Effect
The floating crease illusion works because of perfect placement. Traditional techniques follow the lash line, but I draw a clean line about half an inch above the upper lash line. I found that there was a better way while helping a client with hooded eyes who couldn’t keep her eyeshadow visible. The magic starts when you close your eyes and locate your natural crease. Then draw an arc just beyond it. This creates a beautiful “floating” effect with a crisp line above the crease that looks bold and graphic.
Color Selection for Maximum Effect
Your color choice makes a huge difference in how the floating crease looks. Brown liner works best for clients who want something subtle – it adds dimension without being too much. In spite of that, my clients who want to make a statement love electric blue or cobalt. These shades completely change the look. White eyeliner creates an amazing graphic effect that makes eyes look brighter and more youthful. Red, yellow, and teal have become my go-to colors for clients who want to show off their wild side.
Precision Application Techniques
These tools help me create clean, sharp lines:
- Freshly sharpened pencils to map out the shape
- Pointy cotton swabs with micellar water to fix mistakes
- A thin liner brush to perfect the details
Keep your eyes closed during application. The look might seem strange at first, but once you open your eyes, you’ll see perfectly drawn liner. Beginners should start with eyeshadow instead of liquid liner because it’s easier to fix mistakes.
Adapting This Look for Hooded Eyes
This floating crease technique works wonders for people with hooded eyes or monolids. With hooded eyes, I outline everything while the eye stays open. This lets me see exactly where the liner should show up and prevents that frustrating moment when you open your eyes and your beautiful work vanishes! The liner should point at a 45-degree angle to lift and elongate the eye shape.
Gradient Winged Liner
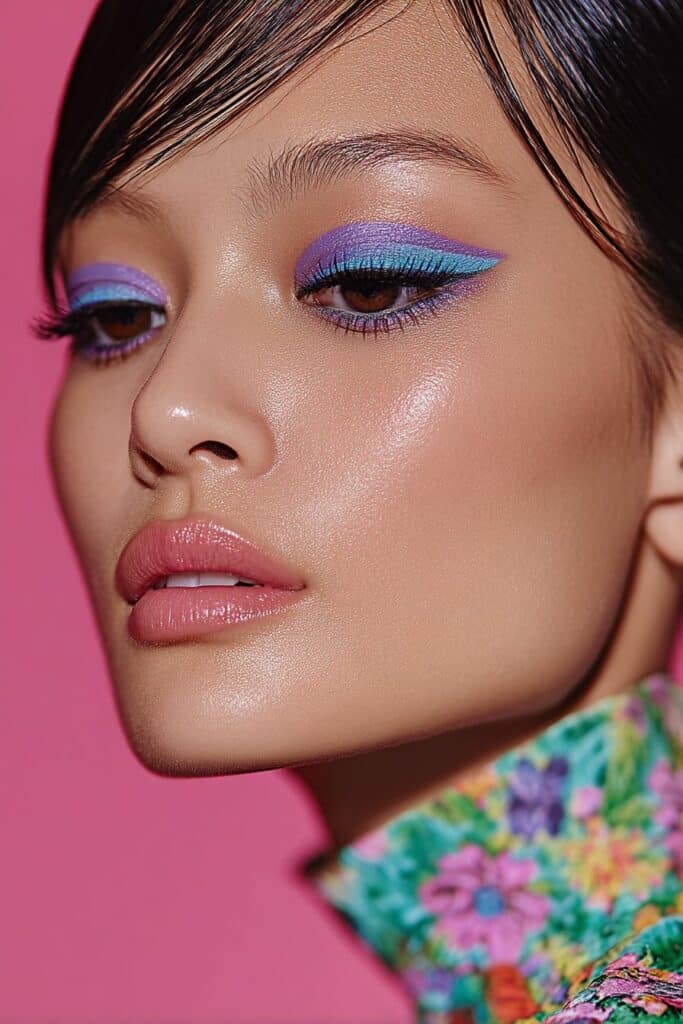
A client’s request for something “classic but unexpected” during a photo shoot made me fall in love with gradient winged liner. This technique adds fresh energy to traditional eyeliner by blending multiple colors that flow smoothly into each other.
Reinventing Classic Winged Liner with Color
Black liner has its place, but gradient effects create depth that black alone can’t match. My career experience shows how gradient liner transforms any look from basic to editorial. This technique’s versatility lets you play with subtle color transitions like black to gray, or bold combinations like electric blue to purple for dramatic results.
My Step-by-Step Gradient Technique
You’ll need patience and precision to create this effect:
- Outline your wing shape with a fine-tip liquid liner in your darkest shade
- Apply your second color from the middle of the liner toward the inner corner
- Use a clean, small brush to blend where the colors meet for a true gradient effect
- Touch up any areas that need more definition
The key lies in minimal color overlap – just enough to create smooth transitions without mixing the shades.
Product Recommendations for Smooth Application
My go-to products for perfect gradient wings include:
- Highly pigmented liquid liners that stay distinct
- Gel liners that create base shapes other colors stick to well
- Eyeshadow mixed with setting spray to create custom colors
Water-activated liners give you vibrant color and precise application for this technique.
Customizing Wing Shapes for Your Eyes
Your eye shape guides the perfect wing style. Almond eyes look stunning with classic upward flicks that complement their natural shape. People with hooded eyes should keep their line thin and straight out instead of upward to stay visible. Round eyes look best with elongated wings that point slightly downward.
Remember that each person’s eye shape needs different wing placement. Listen to your features and adjust your technique to match. Your unique characteristics will guide you to the perfect wing.
Negative Space Geometric
Negative space geometric eye makeup changed my view on color after a client asked for “something artistic but minimalist” for a gallery opening. This technique uses empty spaces between lines to create striking geometric patterns.
The Art of Negative Space in Eye Makeup
Negative space eye makeup leaves parts of the eyelid bare to create bold shapes through contrast instead of filling the entire area. Your skin becomes part of the design with this approach. My experience as a makeup artist in Los Angeles shows this technique works best for editorial looks and special events where standard makeup just won’t do. Negative space reshapes the scene of traditional eye makeup into something architectural and unexpected.
Planning Your Geometric Design
A good design needs planning before the brush touches skin. Here’s what I recommend for beginners:
- Start with a simple winged line along your lash line
- Create a parallel line above it with space between
- Connect the two lines at the outer corner
You should visualize your design with eyes both open and closed. A playing card or credit card helps create perfectly straight lines that are the foundations of geometric designs.
Tools for Precise Application
The right tools make all the difference for clean geometric shapes:
- Gel or liquid liner with a flexible precision tip applicator gives you controlled lines
- Cotton swabs and micellar water help clean-up and create sharp edges
- The Magic Perfectors Eye Makeup Tool or similar products create perfectly straight lines
Making Geometric Looks Wearable
One geometric element often works better than a full design for everyday wear. To name just one example, see how a small negative space triangle at the outer corner or a simple floating line above your crease can work. Minimal makeup works best with this look—geometric eyes should be the focal point. Brown or navy creates a more subtle effect than black while keeping the geometric edge, especially when you want to avoid looking too avant-garde.
Iridescent Fairy Dust
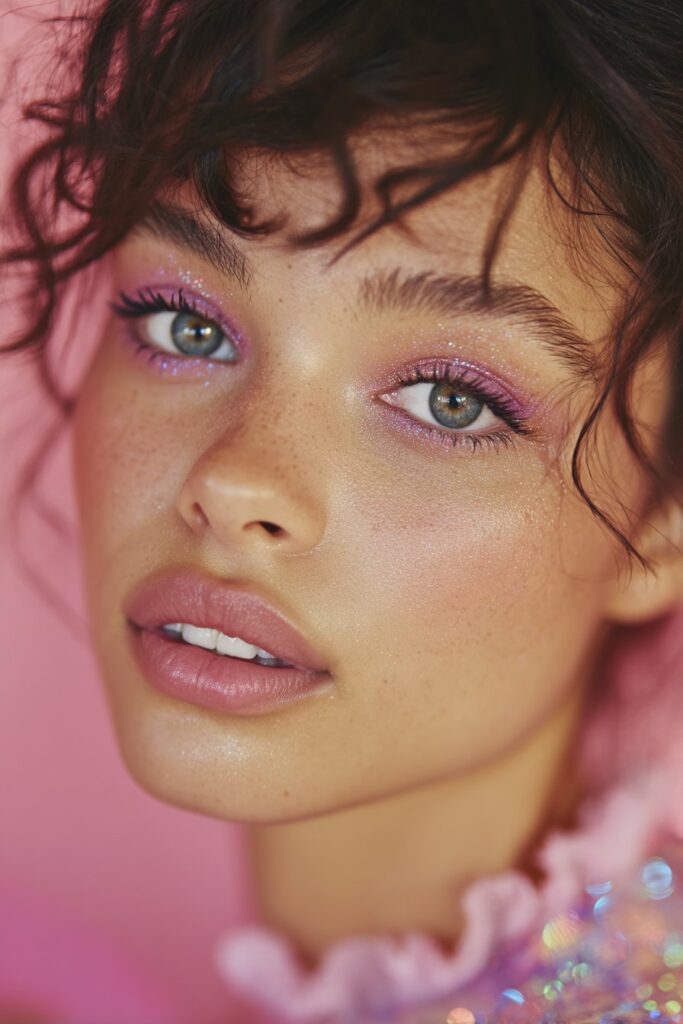
My first experience with iridescent makeup changed how I style special occasion looks. A few years ago, I needed something extraordinary for a client at a high-profile award show. Time was running short, but iridescent pigments created magical dimension effortlessly.
Creating Magical Dimension with Iridescent Pigments
Iridescent eyeshadows stand apart from regular shimmers because of their unique color-shifting properties. These special pigments create a luminous finish that changes as light hits them from different angles. Quality iridescent shadows have a tanned base that prevents white cast on deeper skin tones, making them work beautifully on everyone. My favorite shadows have bright color-shifting reflects that look different under various lighting conditions.
Layering Techniques for Maximum Sparkle
Here’s how to make iridescent pigments look their best:
- Start with matte shadows and blend your crease work completely before adding shimmer
- Use your fingertip to pat (never swipe!) iridescent pigments onto the lid for best color payoff
- Spritz your brush with setting spray before picking up shadow to create a wet-look
- Mix different iridescent tones together for complex, multi-dimensional effects
Base Colors That Make Iridescence Pop
The right base makes iridescent shadows come alive. Diamond Eyes (sheer, pearlescent white-gold) works perfectly on fair skin. Tanned-base multichromes look stunning on medium to deep skin tones without leaving a white cast. A complementary matte shadow base intensifies the iridescent effect – gray creates a holographic finish while colored bases enhance the shifting tones.
Day to Night Transformations
These shadows work wonderfully from day to night. A light wash across the lid with subtle highlighter under the brow bone looks perfect for daytime. The evening look becomes dramatic with black eyeliner, extra iridescent pigment on the center lid, and deeper shadows in the outer corners. One product creates subtle daytime sparkle and dramatic nighttime dimension without a complete makeup change.
Ombré Lower Lash Line

The lower lash line has been my secret canvas that adds unexpected dimension to colorful eye looks. Other makeup artists focused on lid work, but I spent time perfecting techniques to make the lower lash area just as effective.
Why I Love Focusing on the Lower Lash Line
Magic happens with minimal effort on the lower lash line. Bold, colorful lower lash makeup hasn’t gone out of style since 2020, and with good reason too. This small area can revolutionize a look from ordinary to editorial without complex skills. Color under the eyes creates balance and draws attention to the entire eye shape, not just the lid. My clients who struggle with detailed lid work can easily become skilled at lower lash techniques.
Creating Balance with Colorful Lower Lash Makeup
A perfectly balanced lower lash look needs these steps:
- Pick a colored eyeliner that complements your upper lid work
- Apply it from inner tear duct to the outer corner, staying close to the lash line
- Take a small scallop eyeshadow brush with your chosen shadow to diffuse along the liner
- Use clean smudger brush in windshield-wiper motions for smooth edges
My daring clients love trying a reverse cat eye. This technique creates a wing that extends past the inner corner instead of the outer corner for a unique twist.
Precision Tools for Lower Lash Application
The right tools make precise application possible. Small scallop eyeshadow brushes pick up just enough product without overloading. A flat eyeliner brush creates clean lines with gel formulas. My favorite tool is an underlash applicator that has a pointed curve design made specifically to place falsies below the natural lash line.
Preventing Fallout and Smudging
The lower lash area needs priming and setting with translucent powder before color application. Smudging was my nemesis until I started dusting loose powder beneath eyes first – it catches fallout that sweeps away easily with a fan brush. Powder eyeshadows create more fallout than cream formulas, so eye makeup should come before face makeup for easy cleanup.
Conclusion
My career as a makeup artist has shown me how colorful eye makeup doesn’t just change looks – it builds confidence. These 15 techniques show you endless possibilities that anyone can try, no matter their skill level.
Teaching these methods to countless clients taught me something valuable: success comes from simple beginnings that grow more complex over time. Some looks might seem tough at first, but they become achievable with practice and patience. My signature electric blue halo eyes started with simple color placement before evolving into the stunning technique you see today.
Makeup artistry celebrates how each person expresses themselves. You might prefer subtle pastel washes or bold neon blocks – each look becomes uniquely yours. Many clients doubted themselves at first, yet they mastered these techniques through dedicated practice and the right guidance.
The beauty industry keeps changing, but these core approaches to colorful eye makeup stand the test of time. They adapt to new trends while keeping their essential appeal. The right tools and preparation help, but your creativity and openness to try new things matter more.
Let your imagination lead you through these looks. Begin with techniques that excite you, then push your boundaries gradually. Every makeup artist, including me, started as a beginner. Your colorful eye makeup journey is yours alone – take it with confidence and watch your skills grow.