Hey loves! It’s Belle here, and if there’s one thing I’ve learned after years of working with some of the most stylish people in the world, it’s that your nails are the ultimate accessory. This summer, I am completely obsessed with the lemon and blue nail combination, and honestly, I can’t stop talking about it to everyone I meet. There’s something so magical about the way the sunny warmth of lemon yellow meets the cool, dreamy depth of blue. It’s the kind of contrast that just works, like the perfect pairing of a flowy sundress and a beach breeze.
I remember the first time I stumbled upon this color combination. I was prepping for a summer editorial shoot, and we needed something fresh, unexpected, and absolutely eye-catching for the model’s nails. Someone on set dropped a lemon from their fruit bowl right next to a blue ceramic coffee mug, and I literally stopped mid-sentence. That was it. That was the vibe. Since then, lemon and blue nails have become one of my absolute go-to recommendations for anyone wanting to capture the essence of summer on their fingertips.
Whether you’re heading to a rooftop party, lounging by the pool, or just want your everyday look to feel a little more alive, these thirteen styles are going to give you everything you need. Let’s dive in!
Citrus Squeeze Minimalist Nails

Inspiration from citrus market aesthetics
Every summer, I find myself wandering through farmers markets and outdoor citrus stalls, and the visual of bright lemons stacked against cool blue ceramic bowls or lavender tablecloths just never gets old. That’s exactly where this minimalist style draws its soul from. The citrus squeeze minimalist nail design is clean, crisp, and incredibly wearable. It’s the nail look that says “I woke up like this” while also secretly screaming “I have incredible taste.”
This style features a soft, almost powdery blue as the base with delicate lemon slice illustrations placed on just one or two accent nails. The rest remain a clean, glossy blue that feels polished without trying too hard. I personally love this look for brunches, afternoon outings, and any occasion where you want to look put-together without overdoing it.
Tools needed to create the nails design
You’ll need a pale blue gel or regular nail polish as your base, a fine nail art brush or dotting tool, yellow and white nail polish for the lemon details, a top coat, and a UV lamp if you’re working with gel products. A thin striping brush works beautifully for the lemon segment lines.
Step by step guide to create the nails design
- Apply two coats of powdery blue polish and let it dry fully before moving forward.
- On your accent nail, paint a small circle using yellow polish in the center of the nail and allow it to set.
- Using your fine brush dipped in white, add thin lines radiating outward from the center of the yellow circle to create the lemon segment look.
- Seal everything with a glossy top coat for a clean, fresh finish.
Ombre Sunshine and Ocean Nails

Inspiration from summer sunsets over water
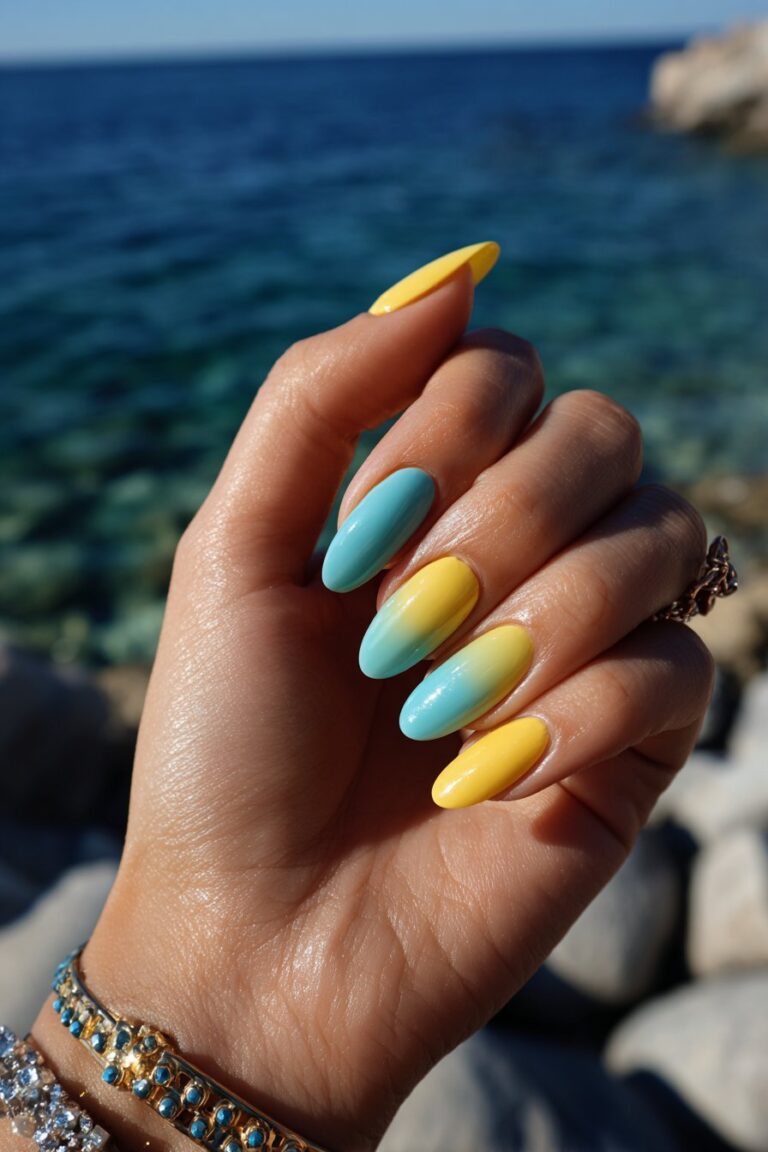
There’s a moment during every summer evening when the sun dips low over the ocean and the sky becomes this breathtaking blend of golden yellow and deep blue. I’ve witnessed it countless times, and every single time it stops me in my tracks. The ombre sunshine and ocean nail design is my tribute to that magical hour. This gradient look blends lemon yellow at the tip into a deep cobalt or navy blue at the base, creating a visual journey from sunshine to the deep sea.
I love recommending this look to clients who want something dramatic but still cohesive. It works beautifully on longer nail shapes like almond or coffin, where the gradient has more space to breathe and transition naturally. It photographs like an absolute dream too, and trust me, your Instagram feed will thank you.
Tools needed to create the nails design
You’ll need lemon yellow nail polish, cobalt or navy blue nail polish, a makeup sponge for blending, a base coat, a glossy top coat, and acetone with a cleanup brush for any edges that need tidying.
Step by step guide to create the nails design
- After applying your base coat, paint your entire nail with lemon yellow and let it dry.
- Apply both colors side by side on a makeup sponge, slightly overlapping where they meet, then dab gently onto the nail in a pressing motion.
- Repeat the sponge application two or three times for a more saturated gradient effect.
- Clean up edges, seal with top coat, and let it dry completely.
Lemon Blossom Floral Nails

Inspiration from lemon tree gardens in bloom
Growing up hearing stories about citrus gardens in the South, there was always something deeply romantic about the image of lemon trees in full bloom, their white flowers filling the air with sweetness. This nail design channels that same romantic, garden-fresh energy. Against a sky blue background, delicate white lemon blossoms with yellow centers are painted in a scattered, organic arrangement that feels effortlessly beautiful.
This is one of those designs that looks incredibly intricate but is actually more achievable than you’d think with a little patience and a fine brush. I always tell my students that floral nail art is about confidence, not perfection. Slightly imperfect petals actually look more natural and charming than anything overly uniform.
Tools needed to create the nails design
You’ll need sky blue nail polish, white nail polish for petals, yellow polish for flower centers, a thin nail art brush, a dotting tool, and a matte or glossy top coat depending on your finish preference.
Step by step guide to create the nails design
- Paint all nails with two coats of sky blue and allow them to dry completely.
- Using the thin brush dipped in white, paint five small rounded petals in a loose flower shape scattered across the nail.
- Add a small yellow dot in the center of each flower using your dotting tool.
- Seal with your preferred top coat finish for a dreamy, garden-inspired result.
Geometric Color Block Nails

Inspiration from modern coastal architecture
Anytime I visit coastal cities with their clean lines, whitewashed buildings, and bold blue shutters framed by afternoon sunshine, I see geometric nail art in my mind. There’s something so satisfying about the way bold shapes interact when placed next to each other intentionally. This design uses sharp, clean diagonal lines or triangles to divide the nail between lemon yellow and bright cobalt blue in a graphic, modern way.
This is the nail look for the woman who loves art, minimalism, and making a statement without saying a word. It pairs beautifully with neutral summer outfits where the nails become the centerpiece of the entire look. I’ve done this style on so many clients heading to gallery events and outdoor art festivals, and the response is always incredible.
Tools needed to create the nails design
You’ll need lemon yellow and cobalt blue nail polish, nail tape or striping tape for clean geometric lines, a base coat, top coat, and a fine brush for any touch-ups needed along the edges.
Step by step guide to create the nails design
- Apply your base coat and paint half the nail in lemon yellow diagonally, allowing full drying time.
- Place nail tape along the dry edge of the yellow section to protect it, then paint the remaining half in cobalt blue.
- Remove the tape carefully before the blue polish dries completely for the cleanest edge possible.
- Touch up any uneven lines with a fine brush and seal with a glossy top coat.
Tropical Fruit Fiesta Nails

Inspiration from poolside tropical spreads
Picture a gorgeous poolside table spread covered in tropical fruits, fresh flowers, and every vibrant color imaginable. That uninhibited, joyful abundance is the entire inspiration behind tropical fruit fiesta nails. This style is playful, colorful, and completely unapologetic about being extra. Lemon slices share nail space with tiny pineapples, watermelon details, and swirls of tropical blue, creating a joyful festival of color across every finger.
I always say that summer is the one season where you’re allowed to go all out with nail art, and this design takes full advantage of that freedom. It’s the kind of manicure that makes strangers stop you and ask about your nails, which in my world, is the highest compliment possible. Kids love it, adults love it, and honestly, so do I every single time.
Tools needed to create the nails design
You’ll need a range of nail polishes including lemon yellow, tropical blue, green, red, and white, a fine detailing brush, a dotting tool, nail art pens for easier detailing, and a top coat.
Step by step guide to create the nails design
- Assign different base colors to different nails, alternating between blue and yellow for variety.
- On blue nails, paint yellow lemon slice details, and on yellow nails, paint simple tropical motifs using other colors.
- Add white highlights to each fruit illustration to give them dimension and a fresh, juicy appearance.
- Seal with a thick top coat to protect all the artwork and give it a polished finish.
French Tip Remix With a Lemon Twist

Inspiration from classic French manicures reimagined for summer
The French manicure is timeless, but I’ve never been one to leave a classic alone when there’s an opportunity to make it even more interesting. This reimagined French tip design keeps the beloved clean base of a traditional French mani but swaps the white tip for alternating lemon yellow and powder blue tips across different fingers. It’s sophisticated, fresh, and deeply summery without abandoning the elegance that makes French manicures so beloved.
I first experimented with this twist during a summer wedding shoot where the client wanted something bridal but not completely traditional. The lemon and blue French tips fit perfectly between classic and contemporary, and every person on set stopped to admire them. It’s now become one of my most-requested warm-weather designs.
Tools needed to create the nails design
You’ll need a sheer or nude base polish, lemon yellow and powder blue nail polish for the tips, a French tip guide sticker or nail tape for clean lines, a fine brush, and a glossy top coat.
Step by step guide to create the nails design
- Apply your sheer nude base to all nails and allow it to dry completely.
- Using tip guides or tape, apply lemon yellow tips to alternate fingers and powder blue tips to the remaining nails.
- Remove guides carefully and use a fine brush to perfect the smile line on each tip.
- Finish with a glossy top coat that unifies the look beautifully.
Abstract Brushstroke Art Nails

Inspiration from expressionist summer paintings
I studied so much art during my time in New York, and one movement that always stayed with me is expressionism, where bold brushstrokes carry emotion rather than precision. Every summer I feel that expressive energy come alive again, and this nail design is my way of channeling it. Against a clean white or cream base, bold brushstrokes of lemon yellow and various shades of blue are swept across the nails in loose, overlapping motions that look like tiny paintings.
This is honestly one of my favorite designs to teach in my beauty workshops because it reminds people that nail art doesn’t have to be perfect to be stunning. In fact, the less you overthink the brushstrokes, the better the result. It’s incredibly liberating and the outcome is always uniquely yours, which is something I truly believe beauty should be.
Tools needed to create the nails design
You’ll need white or cream nail polish for the base, lemon yellow and multiple blue shades ranging from sky to navy, a flat nail art brush for sweeping strokes, and a top coat in either matte or glossy finish.
Step by step guide to create the nails design
- Paint all nails with two coats of white or cream and let them dry thoroughly.
- Dip your flat brush into lemon yellow and sweep it across the nail in a bold, confident diagonal stroke without overthinking it.
- Follow with blue brushstrokes layered loosely over and beside the yellow for depth and contrast.
- Seal with a matte top coat for a more artistic finish or glossy for a polished gallery look.
Daisy Chain Meadow Nails

Inspiration from summer meadows filled with wildflowers
Some of my most grounding memories are of walking through open fields during summer visits back home, surrounded by wildflowers and the smell of warm earth. Daisies always stood out to me the most, so cheerful and unassuming, thriving effortlessly in the heat. This nail design brings that carefree meadow energy directly to your fingertips.
A soft cornflower blue base is adorned with tiny white daisies featuring bright lemon yellow centers, scattered organically across the nails like they’ve been carried there by a warm summer wind. It’s sweet, feminine, and exactly the kind of nail art that makes you feel like twirling in an open field. I especially love this design for outdoor weddings, garden parties, and weekend getaways.
Tools needed to create the nails design
You’ll need cornflower blue nail polish, white nail polish for petals, lemon yellow for centers, a thin detailing brush, a dotting tool for the yellow centers, and a glossy top coat.
Step by step guide to create the nails design
- Apply two coats of cornflower blue to all nails and let them dry fully.
- Using your thin brush in white, paint small daisy petals in groups of five to six petals per flower, placing them randomly across the nail.
- Add a yellow dot in the center of each daisy using the dotting tool.
- Finish with a glossy top coat to make the colors pop beautifully.
Nautical Rope and Lemon Nails

Inspiration from seaside sailing culture
There is something so effortlessly cool about nautical aesthetics, the crisp navy stripes, the weathered ropes, the salty air, and the brightness of citrus fruit packed in a sailor’s bag. This nail design merges those two worlds into something unexpected and totally fresh. A navy blue base features thin rope-textured detailing in cream and is accented with bright lemon yellow elements that bring warmth and energy to the otherwise classic nautical palette.
I designed this look originally for a client heading on a sailing holiday, and it became so popular that I ended up teaching it in one of my beauty workshops the following season. The rope texture might sound complicated, but with the right brush technique it comes together beautifully and looks genuinely impressive.
Tools needed to create the nails design
You’ll need navy blue nail polish, cream or off-white nail polish for the rope detailing, lemon yellow for accents, a thin striping brush, and a matte or satin finish top coat.
Step by step guide to create the nails design
- Apply two coats of navy blue and allow them to cure completely before detailing.
- Using the striping brush in cream, paint two parallel diagonal lines across the nail and then add short crossing strokes between them to create the rope illusion.
- Add a small lemon yellow element such as a dot cluster or tiny lemon shape on the accent nail for contrast.
- Seal with a satin finish top coat for a subtle, sophisticated sheen.
Watercolor Dream Nails

Inspiration from watercolor summer illustration art
Watercolor art has this incredible ability to feel both effortless and deeply intentional at the same time, and that duality is exactly what I love about translating it into nail art. Watercolor dream nails use a sheer, translucent approach to layering lemon yellow and soft blue washes across a bare or white base, creating the illusion of wet paint blooming organically across the nail.
This is a style I introduced during one of my online beauty tutorials and the response was overwhelming. People love how soft and wearable it feels compared to more graphic nail art styles, and it suits virtually every skin tone beautifully. If you’re newer to nail art and looking for something forgiving and gorgeous, this is absolutely where I’d start.
Tools needed to create the nails design
You’ll need white nail polish as a base, sheer or diluted lemon yellow and blue nail polishes, a flat brush for washing color, a detailing brush for soft edges, and a glossy top coat.
Step by step guide to create the nails design
- Apply white polish as a base and let it dry so the watercolor effect has a clean surface to bloom on.
- Using a slightly diluted yellow polish, sweep soft, uneven washes of color across portions of the nail.
- Layer translucent blue washes overlapping the yellow in some areas, letting the colors blend and interact naturally.
- Seal with a glossy top coat to bring the whole soft, dreamy look together.
Checkerboard Retro Summer Nails

Inspiration from retro summer diner culture
I grew up loving the aesthetic of old-school summer diners, checkered floors, neon signs, and everything coated in nostalgia and personality. The checkerboard nail trend took off in a major way recently, and I immediately knew that a lemon and blue version would be perfection. The alternating lemon yellow and cobalt blue squares across the nail create a retro, graphic energy that is incredibly satisfying to look at and even more fun to wear.
This is the design for the bold personality in the room, the one who isn’t afraid to take up space and stand out. I’ve done this on clients ranging from teenagers to women in their fifties, and the confidence it gives every single one of them is absolutely beautiful to witness. Retro never goes out of style, especially when it’s wrapped in summer color.
Tools needed to create the nails design
You’ll need lemon yellow and cobalt blue nail polish, a thin striping brush or nail art pen for grid lines, clear top coat, and optionally a white base coat to make the colors more vibrant.
Step by step guide to create the nails design
- Apply a white base coat to intensify the checkerboard colors and let it dry.
- Paint alternating squares by first creating a grid with your striping brush in a neutral color, then filling in every other square with yellow and blue respectively.
- Use a nail art pen for the most precise checkerboard grid if you find a brush difficult.
- Seal with a thick glossy top coat to protect the detailed work and give it dimension.
Celestial Lemon Moon Nails

Inspiration from midsummer night skies
There’s something deeply poetic about a warm summer night when the sky is ink blue, the air smells of flowers, and the moon hangs low and luminous. That celestial midsummer energy is exactly what this nail design captures. A deep midnight or royal blue base is decorated with crescent moon shapes, tiny stars, and lemon yellow accents that mimic moonlight scattered across a dark summer sky.
This design feels almost like wearing a piece of the night sky on your fingertips, and it has an unmistakable air of mystery and romance. I love this for evening summer events, rooftop gatherings, and anyone who gravitates toward more moody, artistic aesthetics while still wanting to embrace the summer color palette.
Tools needed to create the nails design
You’ll need midnight or royal blue nail polish, lemon yellow nail polish for moons and stars, a fine detailing brush, a star-shaped dotting tool if available, and a glossy or holographic top coat.
Step by step guide to create the nails design
- Apply two coats of midnight blue and allow them to dry completely for a rich, deep base.
- Paint a thin crescent moon shape in lemon yellow on one or two accent nails using the fine brush.
- Add scattered star dots in yellow across the remaining nails using a dotting tool or the tip of your fine brush.
- Seal with a holographic top coat for a shimmering, celestial finish that catches the light magically.
Lemon Drizzle Textured Nails

Inspiration from glazed summer desserts and bakery aesthetics
If you’ve ever walked past a summer bakery and seen a gorgeous lemon drizzle cake sitting in the window, you know exactly the feeling this nail design is going for. Warm, sweet, golden yellow drizzled over something cool and beautiful. This textured nail style uses a powder blue base with a raised, drizzled effect in lemon yellow that mimics the look of icing on a freshly baked treat.
This is one of the more unique techniques in this collection and it absolutely stops people in their tracks. The three-dimensional quality of the drizzle effect adds tactile interest that makes these nails feel genuinely special. I love pairing this look with simple, clean outfits so the nails truly take center stage the way they deserve to.
Tools needed to create the nails design
You’ll need powder blue gel or nail polish, lemon yellow nail art gel or thick polish for the drizzle effect, a fine detailing brush, a UV lamp if using gel products, and a glossy top coat.
Step by step guide to create the nails design
- Apply and cure your powder blue gel base for a smooth, even foundation.
- Load your fine brush with thick lemon yellow gel and drag it in sweeping, organic drizzle lines across the nail surface without pressing the brush flat.
- Cure the yellow drizzle layer separately so it maintains its raised, three-dimensional appearance.
- Finish with a glossy top coat over everything for a polished, confection-inspired result.
Conclusion
Sweet friends, I hope this collection has given you an overflowing basket of inspiration to take into this summer season. As someone who has spent years studying the relationship between color, confidence, and self-expression, I can tell you with absolute certainty that the lemon and blue combination is one of the most joyful, versatile, and genuinely beautiful pairings in the nail world right now. It captures summer in a way that feels both current and timeless, fresh and deeply personal.
What I love most about nail art is that it’s one of the most accessible forms of self-expression we have. You don’t need a full glam team or an expensive wardrobe to feel beautiful and creative. You just need a few polishes, a steady hand, and the willingness to try something that makes you smile. That’s the philosophy I’ve carried with me from my early days as a young artist in New York all the way through every fashion week, every editorial shoot, and every beauty workshop I’ve taught.
These thirteen lemon and blue nail styles represent something different for everyone. For some of you, it’s the bold checkerboard or the celestial moons that speak to your personality. For others, it’s the quiet elegance of the watercolor washes or the classic French tip remix. And that’s exactly how it should be. Beauty is not about following a single rulebook. It’s about finding the styles that make you feel most like yourself and then rocking them with everything you’ve got.
My personal favorite from this entire collection? I find myself coming back to the abstract brushstroke design again and again because it reminds me that imperfection is where the personality lives. Some of my most beloved creations were born out of happy accidents, a wobbled line, an unexpected color blend, a smudge that somehow became a shadow. That’s the magic of creativity, and your nails are the perfect tiny canvas to explore it.
So go ahead, pick your favorite style from these thirteen designs, gather your tools, put on a great playlist, and treat yourself to the kind of nail experience that reminds you how fun it is to be alive in summer. You deserve nails that make you look down at your hands and feel genuinely delighted by what you see.
As I always say, beauty is not about perfection. It’s about confidence, creativity, and feeling empowered to express yourself however you choose. These lemon and blue nails are your invitation to do exactly that, loudly, colorfully, and unapologetically this summer. Now go create something beautiful!