If there is one thing I have learned in all my years behind the makeup chair and beauty chair, it is that the details matter more than anything else. And nothing captures the essence of a fresh, confident, sun-kissed woman quite like a gorgeous set of lemon nail designs. I remember the first time I experimented with citrus-inspired nails during a summer editorial shoot — the models absolutely glowed, and the photographer could not stop zooming in on those tiny, perfectly crafted lemon accents. From that moment, I was completely hooked. Whether you are heading to a rooftop brunch, a casual beach day, or just want to feel like sunshine in human form, lemon nails are your answer. They are cheerful, stylish, and incredibly versatile. Today, I am going to walk you through fourteen of my absolute favorite lemon nail designs, complete with inspiration, tools, and step-by-step guides to help you bring each look to life. Let’s dive into the world of zesty, beautiful nails together!
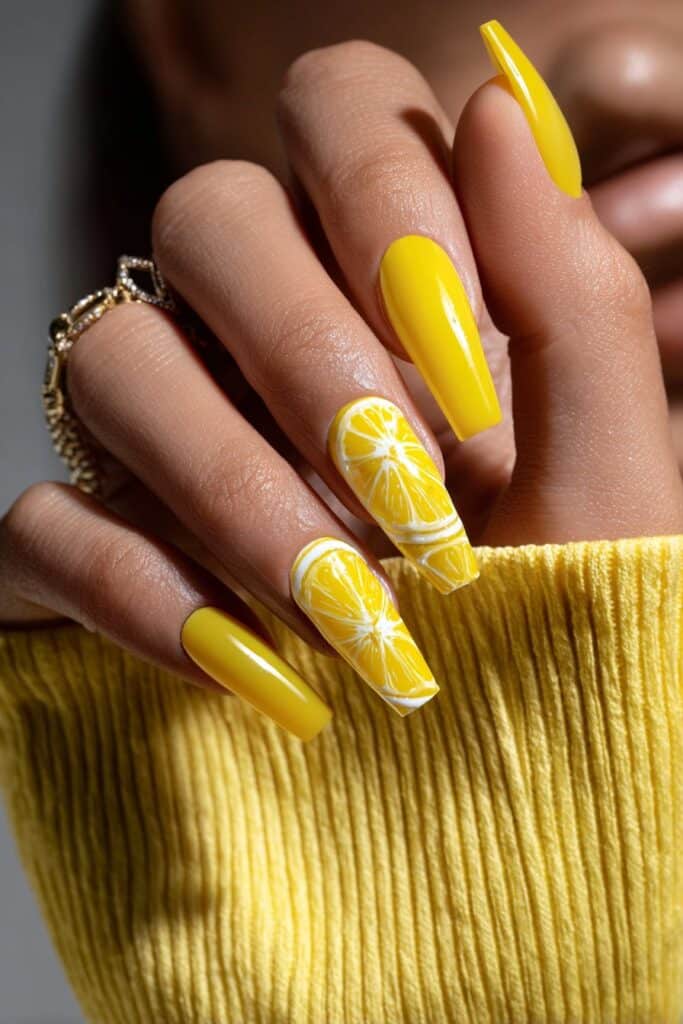
Classic Lemon Slice Nails

Inspiration from classic lemon slice nails
When I think about the most iconic lemon nail design of all time, this is the one that comes to my mind first. The classic lemon slice nail is inspired by the simple, clean cross-section of a real lemon — those beautiful yellow wedges with white pith detailing and tiny seed-like dots arranged in a perfect pattern. I first saw this design done in a tiny nail studio tucked into a side street during one of my fashion trips, and I immediately fell in love with how playful yet polished it looked. This design works on every nail length and shape, which is something I always appreciate. Whether you have long almond-shaped nails or short, practical square ones, the lemon slice translates beautifully. It gives off a summery, retro-inspired vibe that makes people smile the moment they see it. The brightness of the yellow against a white or nude base is simply stunning, and the detailed pith lines give it an artistic quality that elevates it beyond just a simple manicure.
Tools needed to create the nail design
To bring this classic design to life, you will want to gather a few essential tools before you begin. Start with a bright, sunshiny yellow nail polish and a crisp white polish for the base and pith detailing. You will also need a fine nail art brush or a thin striping brush for drawing the precise lines. A dotting tool is helpful for placing those tiny seed dots accurately. A clear top coat is non-negotiable for me — it seals everything in and gives it that glossy, fresh finish. Nail tape or a thin piece of scotch tape can also help you create clean, even dividing lines between sections if you are new to freehand work.
Step by step guide to create nail design
- Apply a white or pale yellow base coat and let it dry completely before moving to the next step.
- Using your fine brush dipped in white polish, paint a small circle in the center of the nail and then draw thin lines radiating outward like a sun, mimicking the lemon slice sections.
- Add tiny dots between the sections using your dotting tool to represent the lemon seeds.
- Seal everything with a generous layer of clear top coat to protect the design and give it a beautiful shine.
Lemon Ombre Sunset Nails

Inspiration from lemon ombre sunset nails
This design holds a very special place in my heart because it came to life during one of those lazy, golden late-afternoon moments when I was sitting on my porch watching the sun dip below the hills. The sky turned from the palest creamy white into a warm buttery yellow, then deepened into a rich, glowing orange at the horizon. I thought — why not recreate that on nails? The lemon ombre sunset design blends white at the base of the nail into a vibrant lemon yellow at the tip, with the option of adding a whisper of coral or peach for extra dimension. It is dreamy, romantic, and catches the light in the most flattering way. I have done this look on clients headed to outdoor weddings and garden parties, and every single time, someone stops them to ask about their nails. It is the kind of design that looks incredibly complex but is actually very approachable once you know the technique.
Tools needed to create the nail design
You will need a white base polish, a lemon yellow shade, and optionally a soft peach or coral for the deeper ombre transition. A makeup sponge or a small nail sponge is your best friend for blending the colors seamlessly. Have your fine brush on hand for any cleanup around the edges, and of course, a high-shine top coat to smooth everything out and make the gradient look polished and professional.
Step by step guide to create nail design
- Apply your white base color to all nails and allow it to dry fully before beginning the gradient process.
- Paint stripes of white and lemon yellow side by side directly onto the sponge, then gently dab it onto the nail in a rolling motion to build the gradient from base to tip.
- Repeat dabbing layers until the ombre is rich and fully saturated, adding a hint of peach at the very tip if desired for a sunset effect.
- Clean up the skin around the nail with a small brush dipped in acetone, then apply two layers of glossy top coat to blend and seal the design.
Lemon French Tip Nails

Inspiration from lemon french tip nails
I have always believed that the French manicure is one of the most elegant nail looks ever created. But over the years, I started craving a way to make it feel fresher and more personal. That is when the lemon French tip was born in my studio. Instead of the traditional white smile line, I replaced it with a bright lemon yellow tip, and the transformation was breathtaking. It keeps all the sophistication of the classic French style while injecting a burst of citrus energy that feels modern and exciting. I wore this design myself throughout an entire summer season, and it paired beautifully with everything from linen blazers to flowy sundresses. It is a design that transcends age and style — elegant enough for a formal setting, fun enough for a casual afternoon out. I love recommending this to clients who want something polished with a twist.
Tools needed to create the nail design
Gather a sheer or nude base polish, a lemon yellow polish for the tips, and either French tip guides or a small piece of nail tape to create that clean, even smile line. A fine brush will help you refine the edge if needed. Your top coat is essential here, as it blurs any harsh lines and gives the finished look a smooth, seamless finish.
Step by step guide to create nail design
- Apply your nude or sheer base coat and let it dry completely to give the tips a clean canvas to sit against.
- Place your French tip guide just below where you want the yellow tip to begin, then carefully paint the lemon yellow polish over the free edge of the nail.
- Remove the guide while the polish is still slightly tacky to reveal a crisp, clean line, then refine with a brush if needed.
- Finish with a smoothing top coat that softens the edge of the tip and pulls the whole look together beautifully.
Watercolor Lemon Nails

Inspiration from watercolor lemon nails
Watercolor nail art is one of those techniques that never gets old for me. There is something so artistic and free-spirited about the soft, blurred edges and translucent layering that watercolor creates. When I started incorporating lemon shapes into a watercolor style, the result was like having tiny impressionist paintings on your fingertips. I was inspired during a visit to an art gallery where I stopped in front of a delicate watercolor print of citrus fruits, and I thought, this needs to be on nails. The design uses diluted yellow and green tones to create hazy, ethereal lemon shapes against a white background, giving the nail an almost painted canvas quality. It is delicate, artistic, and unlike anything else out there. This is one of those looks I love creating for people who appreciate art and want their beauty choices to reflect that.
Tools needed to create the nail design
You will need a bright white base, yellow and soft green nail polishes, and a nail art brush or a thin watercolor brush. The key to achieving the watercolor effect is diluting the polish slightly with a drop of nail polish thinner or acetone to create a sheer, translucent consistency. A clean, flat brush works beautifully for blending. A matte or glossy top coat can completely change the feel of the finished design — I personally love a matte top coat for watercolor looks because it enhances the painted quality.
Step by step guide to create nail design
- Begin with a clean white base coat and allow it to cure fully so the background stays crisp and bright underneath your design.
- Load your brush with a diluted, sheer yellow polish and loosely paint oval or teardrop shapes across the nail to suggest lemon silhouettes.
- Add a thin wash of green at the edges of the lemon shapes to suggest leaves or shadows, keeping the strokes loose and organic.
- Seal with a matte top coat for an artistic, gallery-worthy finish that makes the watercolor effect truly pop.
Lemon Blossom Floral Nails

Inspiration from lemon blossom floral nails
Some of my most beloved nail designs have come from nature, and this one is no exception. Lemon trees in bloom are one of the most beautiful sights I have ever had the pleasure of witnessing — those delicate white blossoms with their sweet fragrance surrounded by glossy green leaves and bright yellow fruit. I wanted to bottle that beauty and put it right on your fingertips. The lemon blossom floral design pairs tiny hand-painted white flowers with lemon yellow accents and green leaf detailing against a soft, creamy background. It is romantic, feminine, and incredibly detailed in the most satisfying way. I created a version of this design for a client who was attending an outdoor spring celebration, and she cried when she saw how beautiful it looked. Moments like that remind me why I love this work so much.
Tools needed to create the nail design
You will need a creamy white or pale yellow base polish, a white polish for the blossoms, a lemon yellow for the fruit accents, a green for the leaves, and a tiny dotting tool for the flower centers. A fine detail brush is critical for painting the delicate petals. A gel top coat gives the most durable finish for intricate floral work and keeps everything looking pristine for longer.
Step by step guide to create nail design
- Apply your soft cream or pale yellow base and let it dry so the flowers have a gentle, warm background to sit against.
- Using your fine detail brush and white polish, paint five small petals in a circular arrangement to form each blossom, and repeat across the nail in a scattered, organic pattern.
- Add tiny yellow dots at the center of each flower using your dotting tool, and paint small almond-shaped green leaves between the blossoms.
- Finish with a gel-formula top coat for a glossy, chip-resistant seal that protects every delicate detail.
3D Textured Lemon Nails
Inspiration from 3D textured lemon nails
I will be honest — the first time I saw truly stunning 3D nail art, my jaw dropped. The idea that nails could become a miniature sculptural medium blew my mind, and I knew I had to master it. 3D lemon nails take the citrus trend to an entirely new dimension — literally. Tiny raised lemon shapes, textured rinds, and dimensional leaf details sit on top of the nail like little pieces of fruit-inspired jewelry. I was inspired by the work of incredibly talented nail sculptors and the concept of turning everyday objects into wearable art. These nails are a showstopper at any event and are guaranteed to start conversations. They require a bit more patience and practice, but the payoff is absolutely worth every second spent at the nail desk.
Tools needed to create the nail design
For 3D nail work, you will need acrylic powder and liquid monomer or UV/LED nail gel for building the raised elements. A small acrylic brush is essential for shaping the lemon forms before they cure. Yellow and green nail pigments or polishes for coloring the 3D elements, along with a LED or UV lamp if you are using gel products, are necessary. A strong base coat and top coat help anchor and protect the finished sculpture.
Step by step guide to create nail design
- Prepare the nail with a base coat and your background color, then allow everything to cure under your lamp or dry fully before adding dimension.
- Using a small acrylic brush, form tiny oval lemon shapes with your acrylic mix or sculpting gel and place them strategically on the nail surface.
- Once cured or hardened, paint the raised lemon forms with yellow polish and add green leaf shapes beside them for a complete fruit motif.
- Seal with a thick, flexible top coat that protects the raised elements without cracking and gives the sculpture a beautiful, glossy finish.
Neon Lemon Pop Nails

Inspiration from neon lemon pop nails
Not every nail design needs to be soft and subtle — sometimes you want to be seen from across the room, and that is exactly what neon lemon nails deliver. I drew inspiration for this look from the electric energy of festival culture, bold pop art, and those neon signs that light up city streets at night. The design takes the familiar lemon motif and cranks everything up to full volume — neon yellow backgrounds, hot pink or electric green accents, and graphic lemon shapes that feel like they belong on a vintage poster. I created this look for a music festival-themed campaign, and the images went absolutely viral. People could not get enough of the boldness and joy radiating from those nails. If you have ever wanted your hands to be a statement piece, this is the design for you.
Tools needed to create the nail design
Neon polishes are a must here, so hunt for the most pigmented, electric yellow and accompanying accent colors you can find. A white base coat underneath neon shades is non-negotiable because it makes the colors pop with full intensity rather than looking washed out. Fine brushes for graphic detailing, black polish or a black nail art pen for outlining, and a UV-reactive top coat for extra glow are all part of this bold toolkit.
Step by step guide to create nail design
- Apply a white base coat first and let it dry, then layer your neon yellow polish on top to achieve full, vibrant color saturation.
- Using a black nail art pen or fine brush, outline simplified lemon shapes and add bold graphic lines or dots around them for a pop art feel.
- Accent alternating nails with a neon pink or green shade to create visual contrast and keep the look dynamic and exciting.
- Finish with a UV-reactive or high-gloss top coat that amplifies the neon intensity and makes the design absolutely electric under light.
Lemon Marble Nails

Inspiration from lemon marble nails
Marble nails have been one of my all-time favorite techniques since the moment I first learned how to create them, and fusing that with a lemon color palette was a moment of pure creative joy for me. Imagine the cool sophistication of marble veining but bathed in warm yellow, cream, and golden tones — it is luxurious, unexpected, and wildly beautiful. I was inspired by photographs of rare yellow marble stone quarried from exotic locations, with its rich, golden veining and creamy undertones. This design communicates elegance and artistry at the same time. It is the kind of look that makes people assume you spent hours at a high-end salon, when in reality you can absolutely recreate it at home with the right technique and a little patience.
Tools needed to create the nail design
You will need a creamy white or ivory base, a lemon yellow shade, a soft gold or champagne polish for the veining, and a very fine nail art brush or even a clean, dry brush with sparse bristles for dragging the veins. A cup of water and some nail polish for the water marble technique can also be used as an alternative approach. Top coat is essential for smoothing and sealing.
Step by step guide to create nail design
- Apply your ivory or cream base coat and allow it to dry completely before beginning the marble effect.
- Add uneven patches of lemon yellow across the nail using a sponge or brush, leaving gaps to suggest the natural variation in marble stone.
- Using your fine brush and a slightly sheer gold tone, draw thin, wandering vein lines across the nail surface, keeping the movement organic and irregular.
- Apply a glossy top coat to smooth all the layers together and give the finished nail a polished, stone-like surface quality.
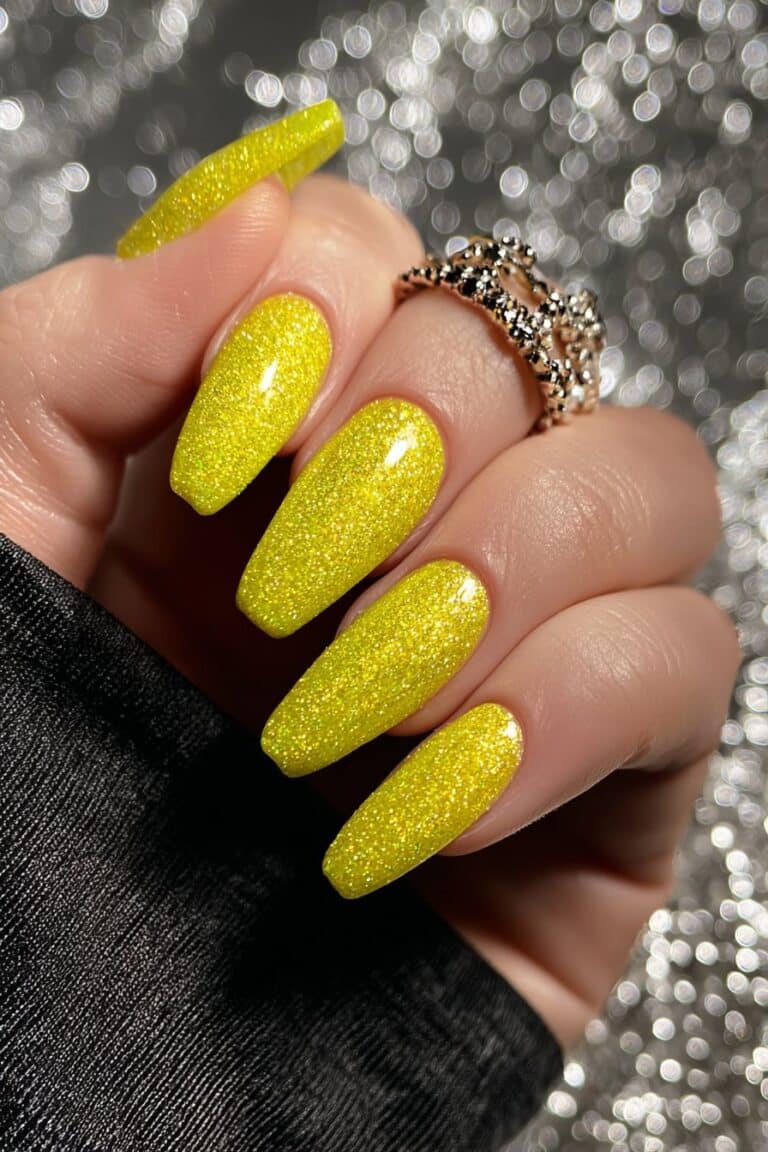
Lemon Glitter Nails

Inspiration from lemon glitter nails
Glitter nails are one of those things that make every age, every skin tone, and every personality absolutely radiant — I have never met a person who did not light up when glitter caught the light on their fingertips. When I combined that sparkle with the cheerful energy of lemon yellow, something magical happened. This design is inspired by sunshine itself — that dazzling, sparkling quality that light has when it bounces off water on a bright summer day. I love creating this look for festive occasions, holiday gatherings, or for anyone who just wants to add a little extra joy to an ordinary Tuesday. The glitter lemon nail is glamorous and fun simultaneously, striking that perfect balance between playful and special.
Tools needed to create the nail design
Gather a lemon yellow base polish, a chunky yellow or gold glitter polish, fine loose glitter in a complementary shade for accent, a glitter brush or eyeshadow brush for patting loose glitter onto the nail, and a thick top coat specifically formulated for glitter nails to ensure a smooth finish rather than a rough, textured one.
Step by step guide to create nail design
- Apply your lemon yellow base coat evenly and allow it to fully dry before adding any glitter layers on top of it.
- Brush a layer of glitter polish over the entire nail or concentrate it at the tips for a glitter ombre effect that fades from sparkle to solid.
- Pat loose fine glitter at the base or accent areas of the nail with a small brush while the top layer is still tacky to build extra dimension.
- Seal with multiple layers of thick, glitter-specific top coat to smooth the texture and lock every sparkle firmly in place.
Minimalist Lemon Line Nails

Inspiration from minimalist lemon line nails
In a world full of maximalism, I have always had a deep appreciation for the power of restraint. Minimalist nail design is an art form in itself — knowing what to leave out is just as important as knowing what to put in. The minimalist lemon line nail takes the concept of a lemon and distills it down to its most essential graphic elements: a simple yellow circle, a few clean lines, and perhaps a single leaf. I was inspired by Scandinavian design principles and modern graphic illustration when I created this look. It feels sophisticated, intentional, and quietly confident. This is the design I recommend to clients who work in professional environments but still want a subtle nod to personality and style. It is polished enough for a boardroom and charming enough for a weekend coffee date.
Tools needed to create the nail design
A nude or white base, lemon yellow polish, a fine striping brush or a nail art liner pen, green polish for a minimal leaf accent, and a sheer, glossy top coat are all you need. The quality of your tools really matters here — a brush that is not precise enough will ruin the clean lines that make this design work.
Step by step guide to create nail design
- Apply a clean, smooth nude or white base coat and cure or dry it fully before adding any line work.
- Using your striping brush and yellow polish, paint a small simple circle or oval shape off-center on the nail to suggest a lemon silhouette.
- Add one or two thin, curved lines beside or through the shape to suggest a leaf stem and a highlight, keeping the composition airy and uncluttered.
- Finish with a sheer glossy top coat that preserves the clean, graphic quality of the design without adding visual noise.
Lemon Geometric Nails

Inspiration from lemon geometric nails
Geometry and beauty have always gone hand in hand for me. There is something deeply satisfying about the way a perfectly executed geometric design can balance creativity with precision. The lemon geometric nail design takes citrus inspiration and reinterprets it through bold shapes, clean angles, and graphic color blocking. Triangles, diamonds, and negative space work together with lemon yellow, white, and green to create a nail that feels architectural and artistic. I drew inspiration from the world of graphic design, modern art movements, and the visual language of fashion editorials. This design makes an especially strong statement on longer square or coffin-shaped nails where there is more canvas to work with.
Tools needed to create the nail design
Nail tape or striping tape is absolutely essential for achieving the clean, hard edges that geometric designs demand. You will need lemon yellow, white, and green polishes, along with a flat brush for filling in color blocks. A fine nail art brush for any detailed line work and a glossy or matte top coat depending on the finish you prefer will complete your toolkit beautifully.
Step by step guide to create nail design
- Apply your base color — either white or a pale cream — and allow it to dry before placing strips of nail tape in angular patterns across the nail surface.
- Paint lemon yellow into the sections you want to highlight, pressing firmly along the tape edges to prevent bleeding, then remove the tape carefully before the polish dries.
- Reapply tape to create additional sections and fill in green accents where the design calls for contrasting color blocks.
- Seal everything with your chosen top coat, running the brush slowly over any tape edges to smooth and unify the geometric shapes.
Vintage Lemon Nails

Inspiration from vintage lemon nails
I have a passionate love affair with vintage aesthetics — the warmth, the character, and the storytelling quality of vintage design speaks to something deep in my soul. The vintage lemon nail design is inspired by the charming kitchenware illustrations of mid-century America, old Italian ceramic tiles, and retro botanical prints. Think hand-painted yellows with a slightly muted, aged quality, tiny leaf details with irregular imperfections that feel human and handmade, and a color palette that leans toward warm mustard and olive rather than bright, saturated citrus. This is a design for the romantic, the nostalgic, the person who treasures beauty that tells a story. I created a version of this look that was featured in a vintage-themed editorial, and the response was overwhelming.
Tools needed to create the nail design
Choose polish shades in warm mustard yellow, muted olive green, and creamy off-white rather than bright, modern tones. A fine detail brush, a small liner brush, and an optional stippling sponge for adding aged texture are your key tools. A matte top coat is essential to achieve that vintage, non-glossy finish that gives the design its antique quality.
Step by step guide to create nail design
- Apply your off-white or cream base coat and let it dry, then lightly sponge a warm mustard yellow irregularly across the nail to mimic aged, uneven coloring.
- Paint small, imperfect lemon shapes using your detail brush, intentionally keeping the edges slightly rough to enhance the handmade, vintage quality.
- Add tiny olive green leaves and stems using your liner brush, allowing some of the lines to be slightly wobbly for authenticity.
- Seal with a matte top coat to remove all shine and give the design that beautiful, antiqued finish that makes it feel genuinely timeless.
Lemon Chrome Mirror Nails

Inspiration from lemon chrome mirror nails
Chrome nail art is one of those techniques that makes people gasp when they see it in person — that liquid-metal, mirror-like finish is genuinely jaw-dropping. When I discovered that chrome powder could be applied over yellow polish to create a shimmering, reflective lemon tone, I was absolutely obsessed. This design was inspired by the intersection of futurism and nature — the idea that something as organic and cheerful as a lemon could be reimagined in a sleek, metallic dimension. I created chrome lemon nails for a high-fashion beauty campaign, and the way they photographed was breathtaking. The light bounced off them like tiny golden mirrors, making the models’ hands look like they belonged in a science fiction film set in a sunlit paradise.
Tools needed to create the nail design
Chrome powder in gold or yellow tones, a gel base coat, a gel color coat in lemon yellow, a UV or LED lamp for curing, a silicone finger or eyeshadow applicator for buffing the chrome powder, and a no-wipe gel top coat for sealing are the key components. Chrome work requires gel polish specifically — regular polish will not hold the chrome powder properly.
Step by step guide to create nail design
- Apply your gel base coat, cure under the lamp, then add two coats of lemon yellow gel polish, curing between each layer as directed.
- Apply your top coat but do not cure it yet — leave it slightly tacky, then dip your silicone applicator in chrome powder and buff it firmly across the nail surface in small circular motions.
- Continue buffing until the chrome mirror effect is fully developed and the nail reflects light like a tiny golden mirror.
- Seal with a no-wipe gel top coat and cure fully under the lamp to lock the chrome permanently without dulling its reflective intensity.
Lemon Tie-Dye Nails

Inspiration from lemon tie-dye nails
If there is one design that captures the free-spirited energy of a sun-soaked summer festival, it is the lemon tie-dye nail. I have always been captivated by the swirling, psychedelic beauty of tie-dye — its unpredictability and vibrancy feel like pure joy expressed through color. When translated onto nails using lemon yellow as the dominant shade swirled with white, green, and hints of coral, the result is electric. I was inspired by tie-dye fashion trends, retro festival culture, and the way color can move and breathe when it is allowed to flow freely. This is the design for the bold, the free, the woman who dances without worrying about who is watching. It is joyful, loud, and completely unapologetic in the best possible way.
Tools needed to create the nail design
You will need lemon yellow, white, soft green, and optional coral polishes. A nail art brush and a clean, flat brush for swirling colors together, along with a small dropper of nail thinner to keep the polish workable, are your key tools. Working quickly is essential with this technique so the colors can blend before they dry. A glossy top coat seals the swirling, vibrant pattern beautifully.
Step by step guide to create nail design
- Apply a white base coat and while it is still slightly wet, drop small pools of lemon yellow and green polish directly onto the wet base using a thin brush.
- Using a clean needle tool or thin brush, drag through the pooled colors in swirling, spiral motions to create the classic tie-dye pattern.
- Work quickly across the nail before the polish can dry, adding extra drops of color wherever the design feels sparse or unbalanced.
- Seal the finished swirl with a glossy top coat and marvel at the completely unique, one-of-a-kind pattern you have created on each individual nail.
Conclusion
I have spent years in this industry pouring my heart into beauty — from the biggest red carpet moments to the quietest one-on-one sessions with someone discovering themselves through a fresh set of nails for the very first time. And every single time, I am reminded that beauty is so much more than the final product. It is the process, the creativity, the joy of experimenting, and the confidence that blooms when you look down at your hands and see something that feels entirely, authentically you.
Lemon nails, in all their sunny, vibrant glory, embody everything I believe beauty should be. They are cheerful without being childish, bold without being aggressive, and creative without being inaccessible. Whether you gravitate toward the clean sophistication of a minimalist lemon line nail or the electric drama of a neon lemon pop design, there is a lemon nail in this collection that was made for you.
What I love most about working through this list is how it proves that a single source of inspiration — a small, cheerful piece of fruit — can blossom into fourteen completely different expressions of art and personality. That is the magic of nail design, and honestly, that is the magic of beauty itself. It meets you exactly where you are and helps you say something without words.
My advice, from one beauty lover to another, is to start with the design that makes your heart leap a little when you look at it. Do not worry about whether you can execute it perfectly on the first try. Gather your tools, follow the steps, and give yourself permission to play. Some of my favorite nail moments have come from happy accidents and unexpected experiments. Beauty rewards the brave and the curious, and if you are sitting here reading about lemon nails, I already know you are both.
As I always say, beauty is not about perfection. It is about confidence, creativity, and feeling empowered to express yourself however you choose. So go ahead — embrace the lemon, embrace the sunshine, and let your nails tell your story this season.