Need ideas for the perfect holiday manicure? I can’t tell you how many times I’ve scrolled through Pinterest searching for that perfect festive nail design that goes beyond a simple red coat.
I work as a beauty expert among celebrity makeup artists like Belle Hathaway. Pink and red Christmas nail designs have become this season’s most popular holiday trend. These color combinations give traditional festive manicures an exciting update while preserving the Christmas magic.
We’ve put together 22 beautiful designs that blend classic red Christmas nails with pink highlights. These pink Christmas nail ideas range from elegant French tips to sparkly snowflakes and will make you shine at every holiday gathering. You’ll find options that work for everyone here, from complete beginners to experienced nail artists.
Classic Red and Pink French Tips
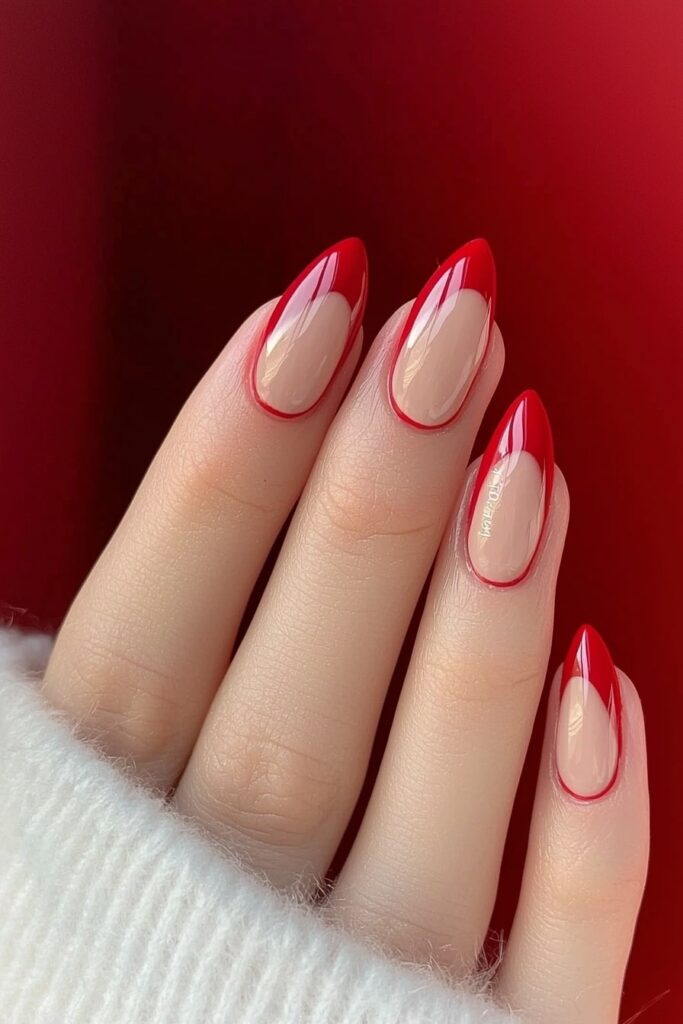
I want to share one of my favorite holiday nail designs that I’ve created while working with my celebrity clients. Classic Red and Pink French Tips add a sophisticated twist to traditional Christmas manicures. My Los Angeles studio clients love this look more and more each season.
Design Elements
These tips are magical because they work with everything. We create a stunning ombré effect by layering pink and red polishes on the tips that gives them depth and dimension. A subtle shimmer base makes the design stand out beautifully under holiday lights.
Application Guide
- Start with a sheer nude base coat
- Apply white French tip stencils
- Create the ombré effect:
- Dab pink polish on a makeup sponge
- Layer red polish slightly above
- Gently press onto nail tips
- Remove stencils while polish is slightly wet
- Seal with a high-gloss top coat
Recommended Polish Brands
My extensive testing shows these brands deliver amazing results:
Brand Recommended Shade Best For JinSoon Classic Red Long-lasting wear Chanel Pink Perfection Rich pigmentation Gucci Holiday Red Luxury finish Pro Tip: Your nails need extra protection during harsh winter months. I use Chanel’s formula with ceramides and vitamin E on my celebrity clients because it keeps their nails healthy and protected.
Candy Cane Swirl Nails
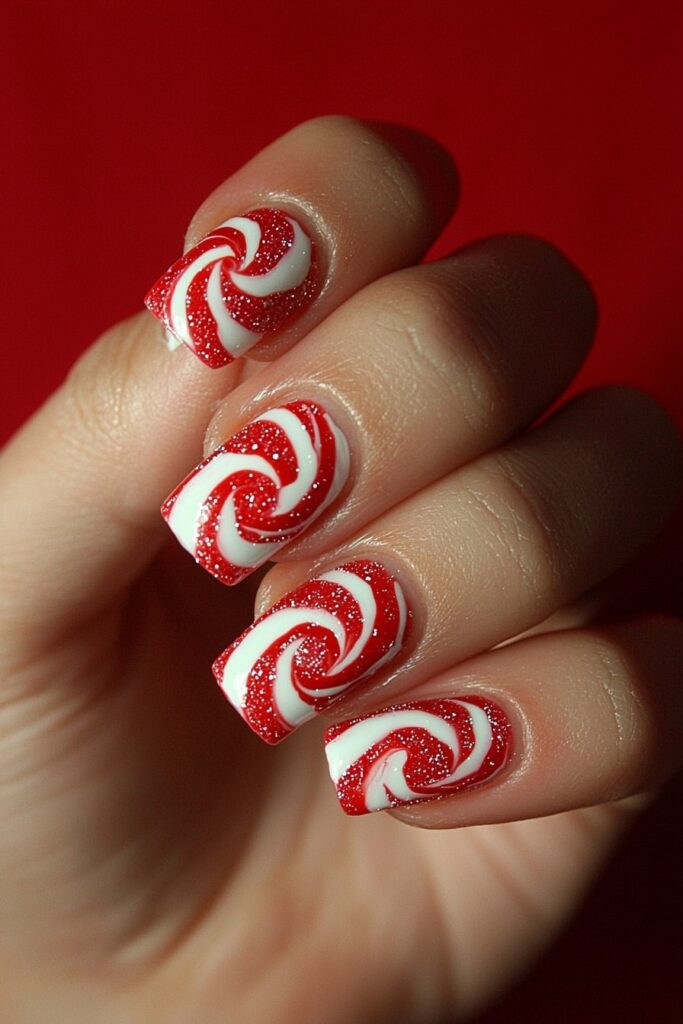
My work with Belle Hathaway in her Los Angeles studio has shown that candy cane swirl designs dominate this season’s holiday manicure requests. This charming pattern combines festive appeal with modern style to create a sophisticated look.
Design Elements
Classic candy cane stripes inspire this elegant curved design with a contemporary twist. Mesmerizing swirls emerge from alternating red and white polish, while pink accents add depth and dimension. The magic lies in the waves that flow gracefully from cuticle to tip, which creates a hypnotic peppermint-inspired pattern.
Application Guide
- Mark the center of each nail as your guideline
- Use a red striper to create curved lines from cuticle to tip
- Add parallel white stripes between the red ones
- Layer pink accents in white spaces for dimension
- Add tiny rhinestones at the center for extra sparkle
- Seal with fast-drying top coat
Pro Tip: Belle taught me that a toothpick provides better control than a striper brush to create perfect curves.
Recommended Polish Brands
Polish Type Recommended Brand Special Feature Base Color Double Dip Super White Long-lasting wear Red Stripe KBShimmer Candy Crush Peppermint scented Top Coat Double Dip Clear Gel High-shine finish Polishes with fine-tip applicators ensure precise line work. My clients love how the scented options add an extra festive touch to their manicure.
Pink Snowflake Wonder
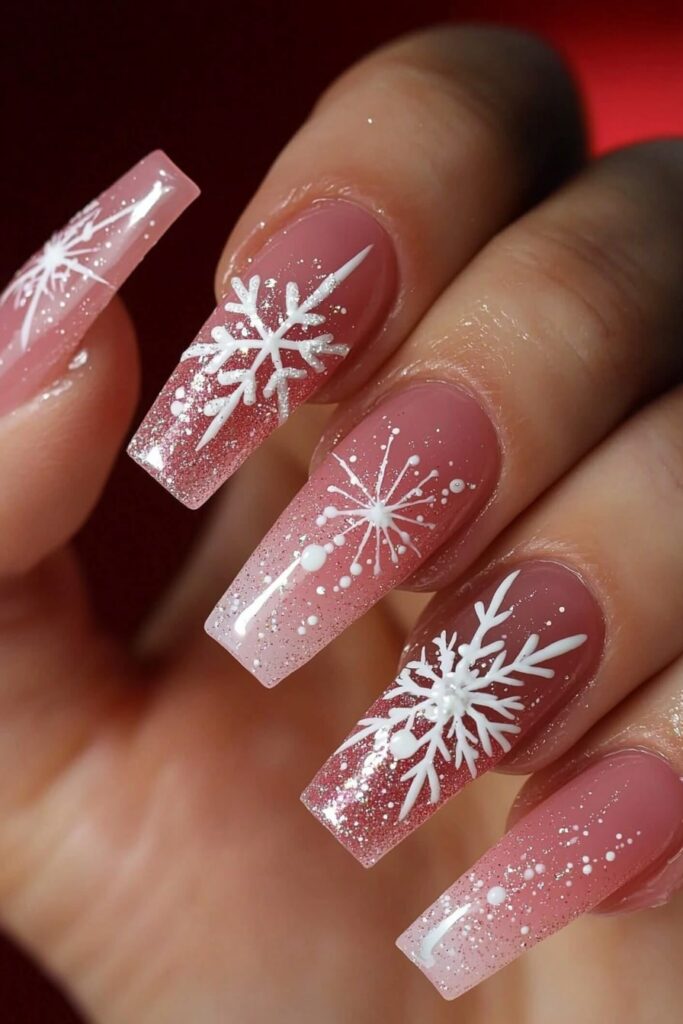
A Pink Snowflake Wonder design became an instant hit with our celebrity clients during a recent winter-themed photoshoot with Belle Hathaway. This magical design blends soft pink tones with delicate snowflakes to create an ethereal look.
Design Elements
The design showcases a soft blush base with detailed snowflake patterns made from rhinestones and transfer foil. The milky white accents catch light beautifully and create a dimensional effect that works perfectly at holiday parties. DND 592 Milky White paired with Aivy Soft Blush brings this winter wonderland design to life.
Application Guide
- Apply Aivy Soft Blush as base color
- Cure under UV lamp for 60 seconds
- Create snowflake patterns using gel paint
- Add transfer foil accents
- Apply rhinestones strategically
- Seal with Aivy top coat
- Final cure for 60-120 seconds
Pro Tip: Belle taught me a clever trick – a tiny crystal in each snowflake’s center makes them sparkle brilliantly under holiday lights.
Recommended Polish Brands
Brand Product Duration DND 592 Milky White 21+ days Aivy Soft Blush 21+ days Aivy Top Coat Boosted shine High-quality gel polishes will help you achieve the best results. These polishes can withstand winter activities while keeping their mirror shine finish intact.
Red Glitter Ombre Magic
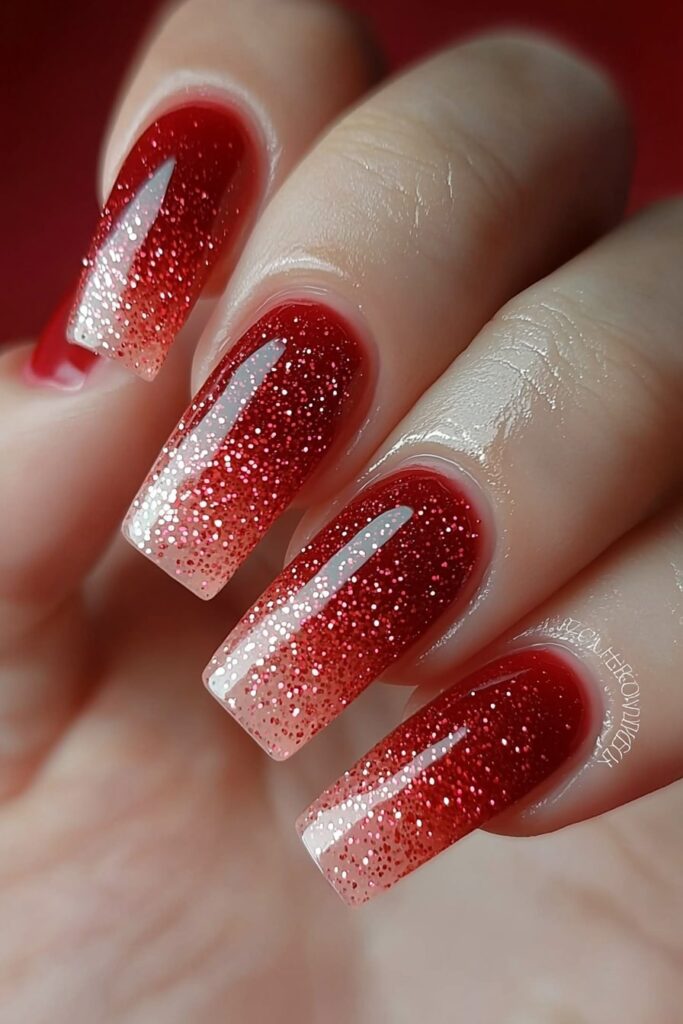
I found that the Red Glitter Ombre Magic design creates the most stunning holiday sparkle while preparing a client for a photoshoot. This technique has become my signature style at Belle Hathaway’s studio and adds that extra touch of glamor my clients love.
Design Elements
This design’s magic comes from its gradient transformation from subtle shimmer to intense glitter. The mesmerizing effect happens with holographic micro-glitter that catches light beautifully. The clear foundation lets the natural nail show through, while the tips explode with concentrated red sparkle.
Application Guide
- Apply a clear base coat
- Using a makeup sponge, dab red glitter polish at the tip
- Gradually blend upward, creating a fade effect
- Layer multiple times for intensity
- Seal with a high-shine top coat
Pro Tip: A makeup sponge helps concentrate the glitter at the tips and gives maximum sparkle payoff.
Recommended Polish Brands
Polish Type Brand Special Features Base Glitter F.U.N Lacquer Holographic micro-glitter Top Layer Sally Hansen Miracle Gel Long-lasting shine Accent Beetles Ruby Radiance Air-dry formula My experience at Belle’s studio has taught me that perfect ombre needs patience. Each layer should be thin and precise to achieve that professional salon finish.
Pink Winter Wonderland
My latest collaboration with Belle Hathaway’s Los Angeles studio explores a stunning pearl-effect winter wonderland design that has captured everyone’s attention. This ethereal look combines pink’s softness with a unique pearlescent finish to create a magical, snow-kissed effect.
Design Elements
The design’s magic comes from its pearl-effect finish that produces a mesmerizing, iridescent glow. We create this look with specialized polish that reflects light from every angle and creates a dimensional effect similar to freshly fallen snow. Key features include:
- Pearlescent pink base coat
- Iridescent shimmer overlay
- Delicate winter-inspired accents
Application Guide
- Buff nail surface gently
- Apply thin base coat
- Layer pearl-effect polish (2 coats)
- Seal free edges
- Apply top coat
- Cure under LED lamp
- Finish with cuticle oil
Pro Tip: Belle taught me that a quick shake of the pearl-effect polish before application gives you even coverage and maximum shimmer.
Recommended Polish Brands
Polish Type Brand Wear Duration Base Color AIMEILI Pearl Effect 21 days Top Coat AIMEILI Shine 21 days Accent DND Winter White 14+ days Belle’s expertise has shown me that patience creates this professional look. Each layer needs proper curing and thin application to achieve a long-lasting finish.
Santa Hat Accent Nails
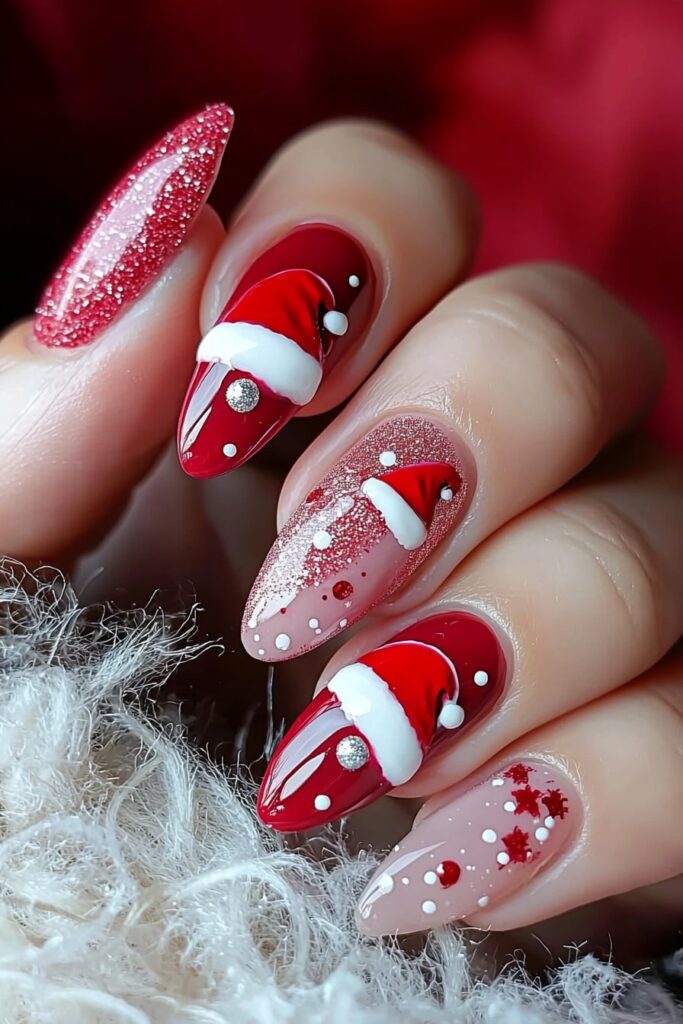
A recent holiday-themed magazine shoot at Belle’s studio showed me that Santa hat accent nails strike the perfect balance between festive charm and sophisticated style. These designs have become my favorite recommendation to clients who want to make a statement without going overboard.
Design Elements
Santa hat accents’ beauty lies in their versatile application. The design starts with a pristine white base and features a perfectly curved red cap with a tiny white pompom. My favorite dimensional elements include:
- Subtle shimmer in the white fur trim
- Rich, velvety red for the hat portion
- Miniature crystal accents for sparkle
Application Guide
- Paint base color on all nails
- Create curved hat outline on accent nail
- Fill in red section
- Add white trim details
- Finish with tiny pompom accent
- Seal with top coat
Pro Tip: Belle taught me that a dotting tool creates the perfect spherical shape for the pompom.
Recommended Polish Brands
Polish Type Brand Best Feature Red Base KBShimmer Rich pigmentation White Detail Sinful Colors Fine-tip brush Top Coat Londontown Quick-dry formula My celebrity clients helped me understand that perfect Santa hat accents depend on proper proportions. The hat should cover two-thirds of the nail to achieve the most flattering look.
Red Velvet Christmas Dreams
My perspective on holiday manicures changed after I joined Belle Hathaway’s studio. A celebrity client asked for this luxurious finish, and I was amazed to see how the rich texture lifted traditional red Christmas nails to new heights.
Design Elements
Velvet nails showcase a multi-dimensional appearance. These specialized magnetic polishes create a plush, fabric-like texture. Light catches differently from every angle, making it perfect for:
- Deep red holiday shimmer
- Subtle color-shifting effects
- Rich, luxurious texture
Application Guide
- Apply magnetic base coat
- Hold magnet near wet polish (3 seconds each side)
- Add second coat
- Repeat magnetic process
- Optional: Add fine glitter to create extra dimension
- Seal with non-magnetic top coat
Pro Tip: Belle taught me that the magnet’s angle creates unique patterns in the polish.
Recommended Polish Brands
Brand Shade Special Feature Mooncat Reclaim the Flame Best velvet effect Maniology Shaka Santa High pigmentation Green™ Deep Velvet Red Bio-sourced formula My celebrity clients taught me a valuable lesson – perfect velvet nails need patience. Each layer deserves proper attention to achieve that luxurious, head-turning finish perfect for holiday celebrations.
Pink Peppermint Delight
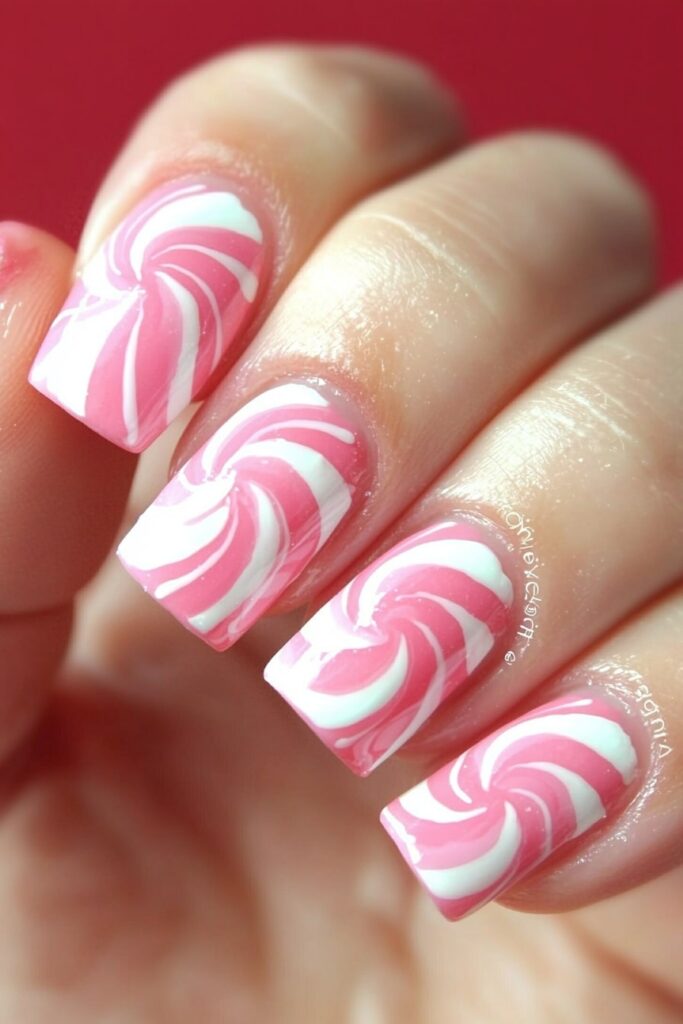
A sweet holiday inspiration sparked my latest creation at Belle’s studio – a design that blends peppermint charm with elegant nail artistry. Our celebrity clients love this festive yet sophisticated look for their holiday appearances.
Design Elements
The design’s beauty shines through its candy-inspired swirls that create a captivating pattern. Red and white stripes blend with subtle pink accents and a sparkling rhinestone center. Each nail features alternating stripe colors that create a playful yet unified appearance.
Application Guide
- Mark the center of your nail as a guideline
- Create curved red stripes from cuticle to tip
- Add horizontal candy stripes
- Draw thin pink curved lines in white spaces
- Add tiny rhinestones in the center
- Seal with fast-drying top coat
Pro Tip: A toothpick works better than a striper brush to control those perfect curves.
Recommended Polish Brands
Polish Type Brand Special Feature Base White Double Dip Super Long-lasting wear Pink Accent Charme Gel J22 Perfect blending Top Coat Double Dip Clear High shine finish Belle’s guidance taught me the value of patience with this design. Each careful stroke contributes to stunning results, so take your time with those curves.
Holiday Plaid Pattern
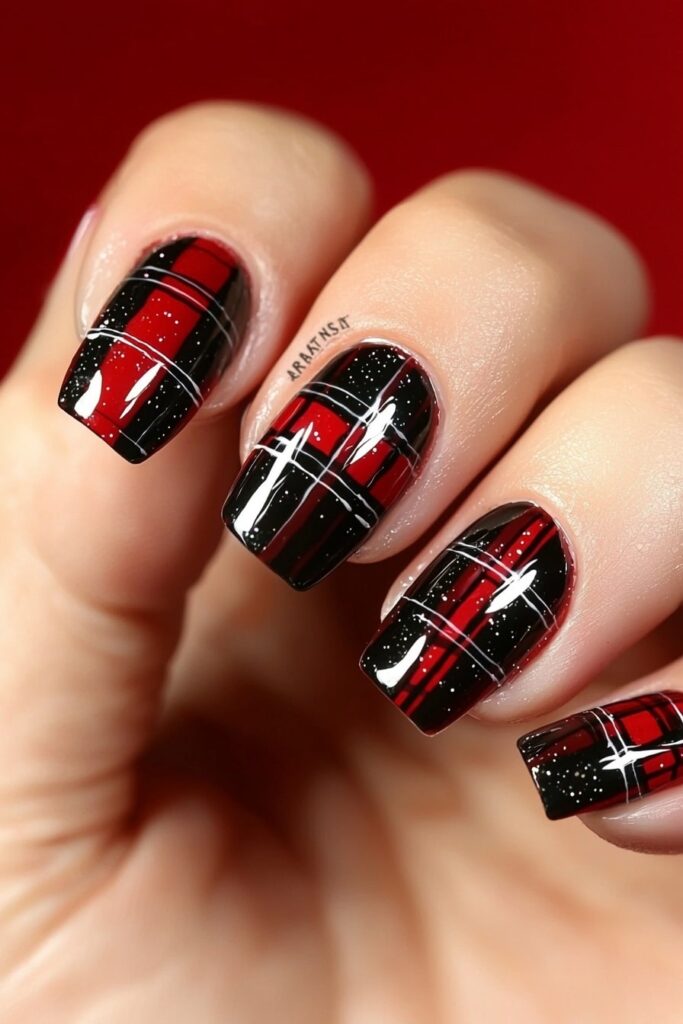
My visits to Belle’s studio have shown that plaid patterns are this season’s unexpected star in holiday nail designs. A recent celebrity photoshoot confirmed this trend when my client’s plaid nail design grabbed everyone’s attention. This classic pattern adds a sophisticated touch to festive manicures.
Design Elements
Holiday plaid’s beauty comes from its layered complexity. The depth emerges through:
- Sheer black stripes for dimension
- Metallic gold accents for luxury
- Rich red base for festive appeal
Application Guide
- Apply red base color (2 thin coats)
- Create horizontal stripes using detail brush
- Add vertical lines with striper brush
- Layer translucent black stripes diagonally
- Add gold accent lines
- Seal with top coat
Pro Tip: Belle’s studio taught me a great trick – mix black polish with top coat to create perfect translucent stripes with dimension.
Recommended Polish Brands
Polish Type Brand Special Feature Base Red OPI Christmas Long-lasting wear Black Detail CND Black Onyx Perfect opacity Gold Accent Essie Good As Gold Metallic finish My experience with celebrities has taught me one crucial lesson – perfect plaid needs patience. Each line must be precise and intentional to achieve that professional finish.
Festive Pink Christmas Trees
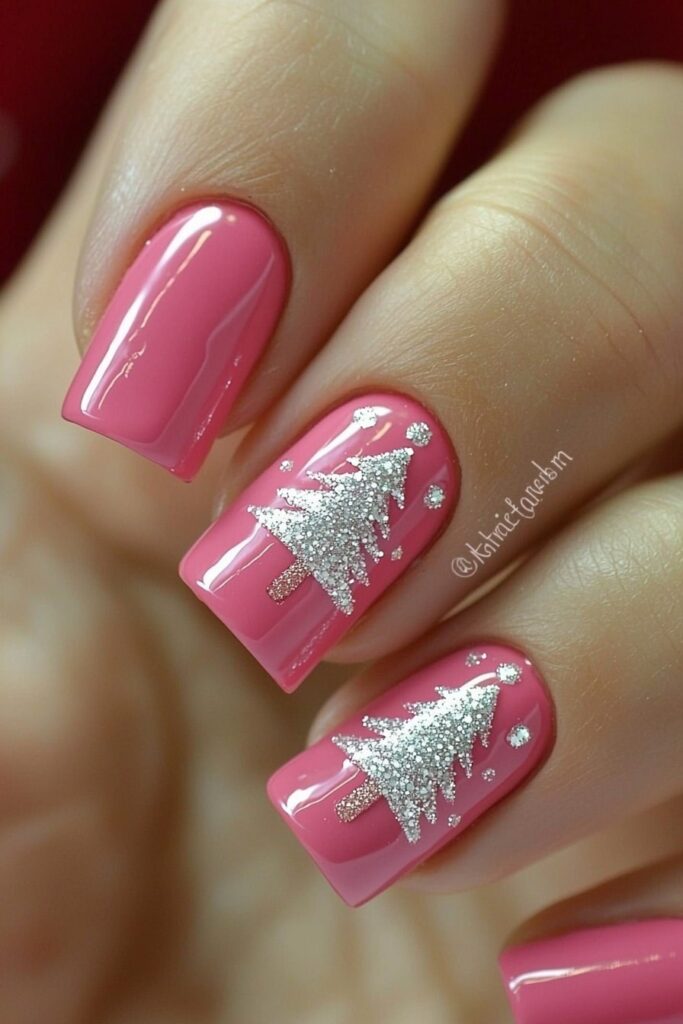
At Belle’s studio’s recent holiday nail art workshop, I found that miniature Christmas trees on nails have become this season’s most enchanting trend. The soft pink bases with emerald tree designs bring a fresh view to traditional holiday manicures.
Design Elements
This design’s charm comes from its delicate balance between festive and feminine elements. Dark green polish creates dimensional trees against a light pink background, and gold glitter accents add sparkle before the polish dries. Each tree gets its unique decoration from tiny red dots that serve as ornaments.
Application Guide
- Apply light pink base coat
- Paint dark green triangular tree shapes
- Add gold glitter while polish is wet
- Place two red dots as ornaments
- Create a gold star at the top
- Seal with glossy top coat
Pro Tip: Belle taught me that a thin nail art brush creates perfectly pointed tree tops.
Recommended Polish Brands
Polish Type Brand Special Feature Base Pink Literary Lacquers Long-lasting wear Tree Green Sinful Colors Envy Perfect opacity Gold Star Nicole OPI Quick-dry formula My work with celebrities has shown that nail bed proportions matter. Each tree needs the right size on your nail bed to achieve an elegant look.
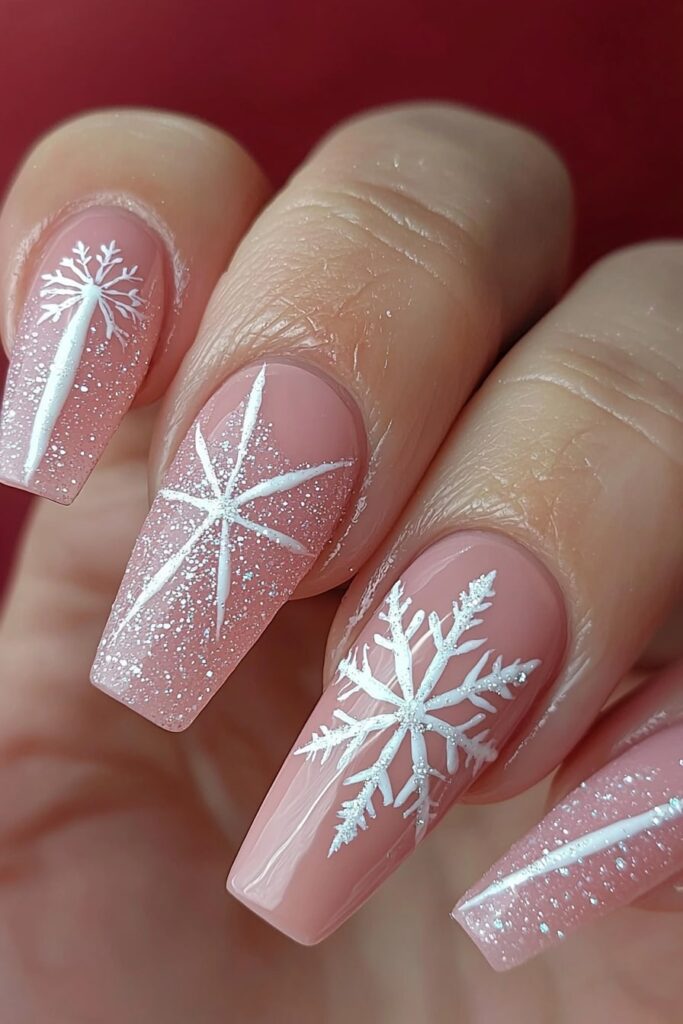
Red Sparkle Snowflakes
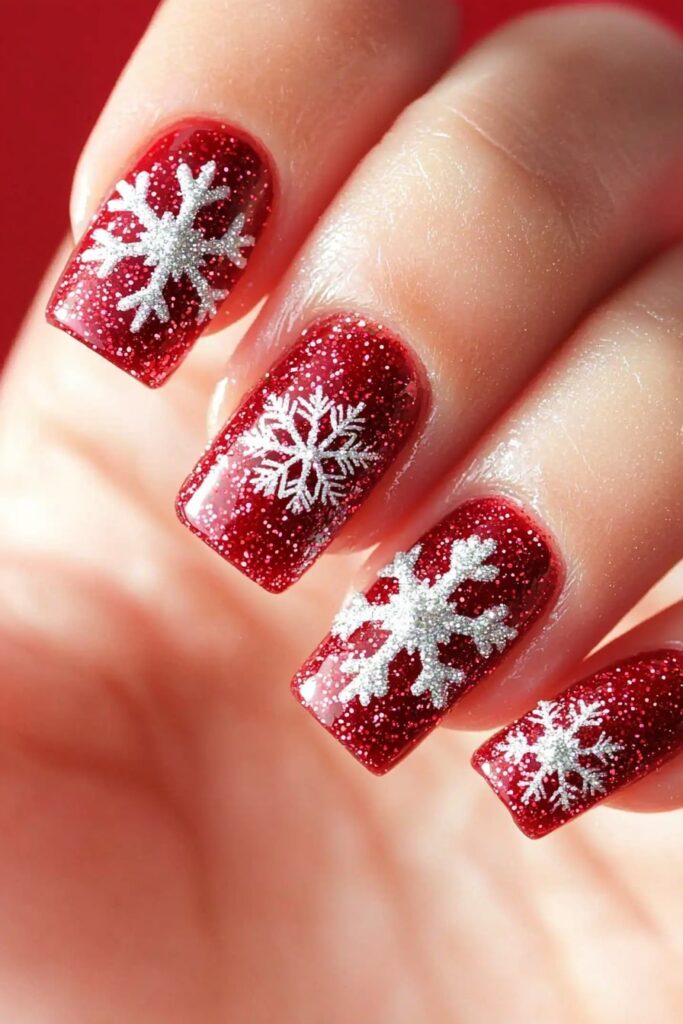
My time at Belle’s studio has shown me that perfect sparkly snowflake designs come from careful layering. I found this impressive combination during prep for a winter editorial shoot. Our clients now request this design more than any other holiday look.
Design Elements
This design’s magic comes from its holographic micro-glitter base that creates an impressive effect. The shimmery red base packed with silver flakes delivers:
- Maximum sparkle payoff
- Dimensional snowflake patterns
- Scattered holo effect
- Gold-leaning undertones
Application Guide
- Apply one coat of silver-flaked base polish
- Create gradient tips using clear polish blend
- Add three passes of sponging to achieve optimal opacity
- Stamp snowflake patterns using Nicole Diary plate
- Alternate snowflake colors and directions
- Add smaller flakes near nail base
- Seal with nail art top coat
- Finish with glossy top coat
Recommended Polish Brands
Polish Type Brand Special Feature Base Color OPI Robots Forever Silver flakes Red Shimmer Kokie Prima Donna Gold undertones Stamping Nicole Diary 120 Snowflake patterns Pro Tip: Belle taught me that a makeup sponge creates better gradient blends than traditional brushing techniques.
Pink Frosted Tips
A client at Belle’s luxury salon showed me a Pinterest photo of frosted pink nails last week. We decided to raise this trend to new heights for the holiday season. The frosted finish has become our winter signature look and gives a sophisticated alternative to traditional festive designs.
Design Elements
The frosted matte finish creates an ethereal ice-crystal effect that works perfectly in winter. My specialized techniques create:
- A sheer pink base with pearl undertones
- A delicate frost overlay that catches light
- A velvet-soft matte texture
Application Guide
- Buff natural nails gently
- Apply sheer pink base coat
- Layer pearl-effect polish (2 thin coats)
- Add frost overlay while wet
- Seal with matte top coat
- Finish with cuticle oil
Pro Tip: My experience at Belle’s studio taught me that perfect frosted tips need the frost overlay before the base dries completely.
Recommended Polish Brands
Polish Type Brand Special Feature Base Color Marmalade Ultra-smooth finish Frost Effect Young Nails Professional grade Top Coat DND Long-lasting matte My work with celebrities at Belle’s studio has shown that stunning frosted tips depend on quality products and precise timing. This design has become a favorite choice for winter weddings and holiday galas.
Red and Pink Gradient Glory
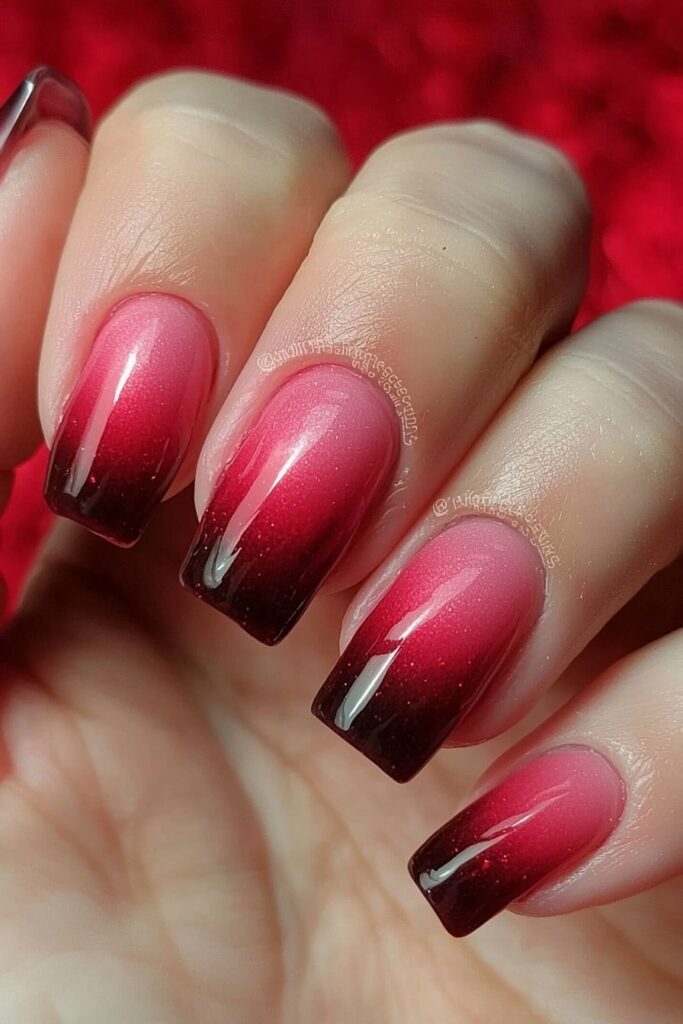
A celebrity client’s unique request at Belle’s studio last month sparked the creation of our signature holiday gradient design. The stunning blend of pink and red captures the essence of winter sunsets.
Design Elements
This design stands out because of its seamless color transition. The depth comes from:
- A soft pink base that melts into deep red
- Holographic micro-glitter overlay
- A shimmery finish that reflects holiday lights beautifully
Application Guide
- Apply clear base coat
- Create gradient using makeup sponge:
- Dab pink polish on one end
- Add red polish on other end
- Press gently onto nail
- Build gradient in thin layers
- Add shimmer overlay
- Seal with top coat
Pro Tip: Belle taught me that thin, gradual layers create the most natural gradient effect.
Recommended Polish Brands
Polish Type Brand Special Feature Base Pink OPI Rosy Future Perfect opacity Red Shade Malaga Wine Rich pigmentation Top Coat CND Shellac No-wipe finish My experience with celebrity clients has shown that perfect gradient nails need patience. Each layer should be thin and well-blended to achieve that professional, Instagram-worthy finish.
Christmas Gift Bow Design

A glamorous holiday photoshoot at Belle’s studio sparked our most elegant nail design. The perfectly wrapped presents in the studio inspired what became our signature Christmas Gift Bow design. Our clients love this look because it strikes the perfect balance between sophistication and holiday charm.
Design Elements
This design’s magic comes from its dimensional bow effect that creates a wrapped ribbon illusion across the nail. The stunning look requires:
- Pearly base coat to create a gift-wrap effect
- Raised bow details with 3D texture
- Tiny crystal accents that add sparkle
Application Guide
- Apply pearlescent base color
- Create bow outline using thin brush
- Fill in bow shape with chosen color
- Add dimensional details to create ribbon effect
- Place tiny crystal in bow center
- Seal with high-shine top coat
Pro Tip: Belle taught me a great trick – a small gold line under the bow makes the gift-wrap illusion pop.
Recommended Polish Brands
Polish Type Brand Special Feature Base Pearl Morgan Taylor Wonder Long-lasting shine Bow Detail All That Jazz Rubies Perfect opacity Top Coat HK Girl Quick-dry formula My experience with celebrities at Belle’s studio has shown that perfect bow designs need precise, intentional curves. These details create that professional, gift-wrapped finish our clients love.
Reindeer Accent Art
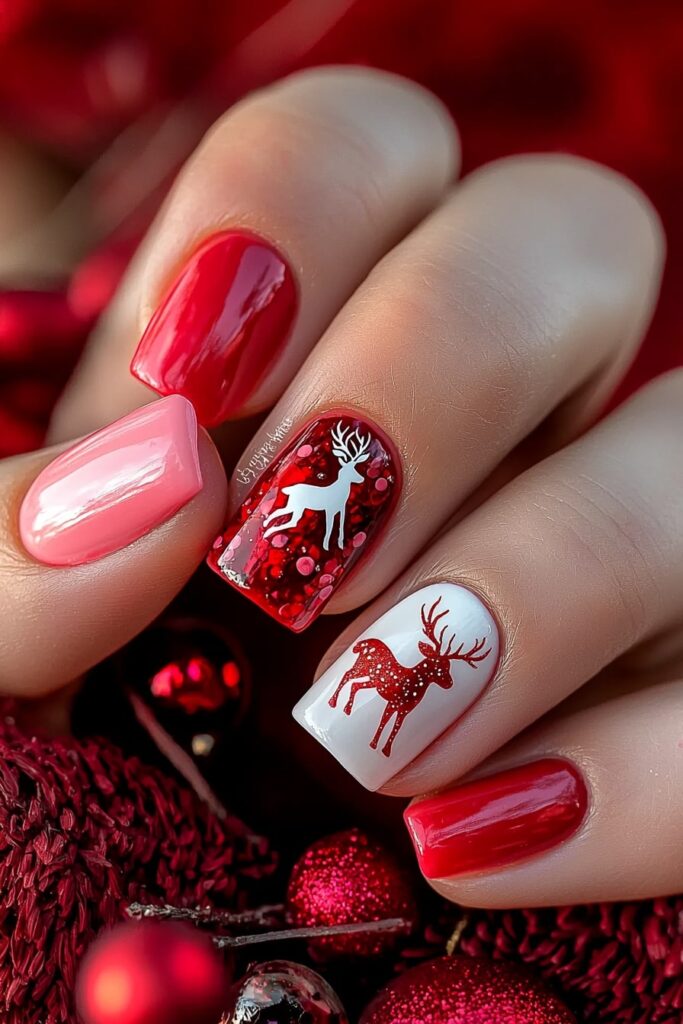
A breakthrough moment happened at Belle’s studio during our holiday design experiments. We discovered a stamping technique that took our traditional reindeer nail art to new heights. Our most selective clients love this design that combines precise stamping with dimensional effects.
Design Elements
The Beauty Big Bang XL-033 plate makes this design special through its stamping precision. The depth comes from:
- Dimensional reindeer patterns with Ya Qin An Black polish
- Subtle shimmer background in pink or red
- Crystal accents that add extra sparkle
Application Guide
- Apply shimmery base color
- Prepare stamping plate with chosen design
- Transfer design using proper pressure
- Add dimensional effects with second layer
- Place crystals strategically
- Seal with quick-dry top coat
Pro Tip: Belle taught me a clever trick. The perfect accent nail image comes from pulling a larger squishy silicone stamper head over a smaller base.
Recommended Polish Brands
Polish Type Brand Special Feature Base Color Mooncat Perfect opacity Stamping Ya Qin An Quick-dry black Top Coat Seche Vite High shine finish My experience with celebrity clients has shown that stamping technique makes the difference. Each image needs precise placement to achieve that professional, Instagram-worthy finish.
Pink Glitter Icicles
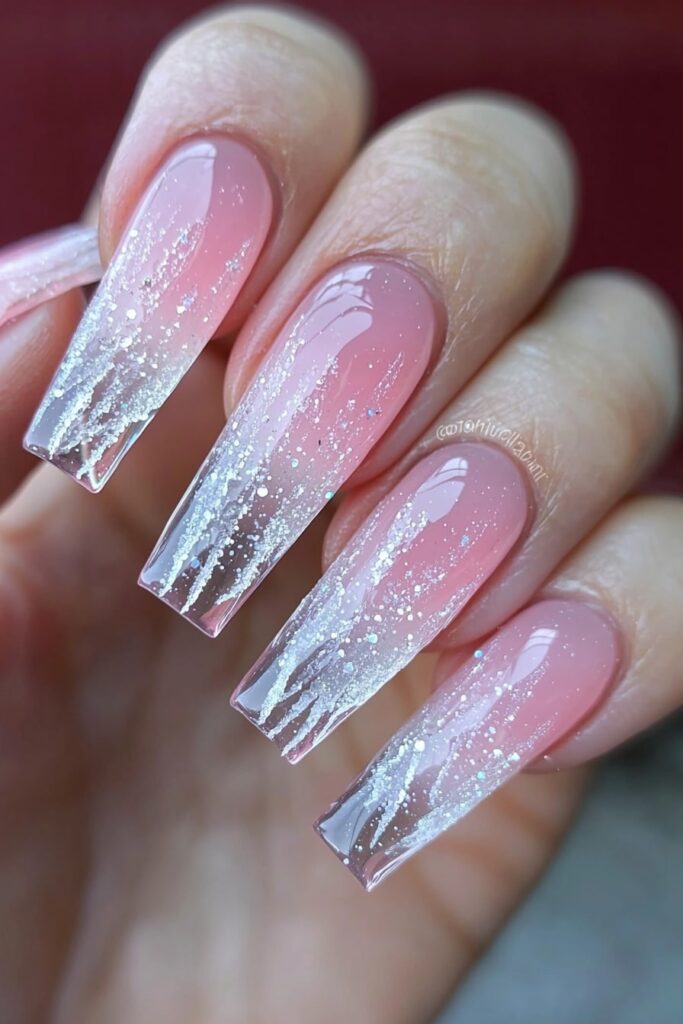
Pink glitter and icicle effects have become my signature winter design since I started at Belle Hathaway’s studio. A client asked me to mix pink glitter with this classic look, and I found a stunning combination that clients now request most during holidays.
Design Elements
This design stands out because of its multi-dimensional sparkle. I create these effects with specialized polishes that contain holographic micro-flakes:
- A sheer milky iridescent base
- Scattered holographic particles
- UV crystal coating for lasting shine
- Delicate icicle patterns that catch light
Application Guide
- Buff nail bed well
- Apply sheer pink base coat
- Layer holographic particles
- Create icicle effect using detail brush
- Add scattered sparkle accents
- Seal with UV crystal coating
- Final top coat for protection
Pro Tip: Belle taught me a great trick – the holographic particles create the best sparkle when applied to a slightly tacky base.
Recommended Polish Brands
Polish Type Brand Duration Base Color Rimudecure 21+ days Glitter Layer Glisten & Glow Boosted shine Top Coat Double Dip Long-lasting My work with celebrities has shown that perfect icicle nails need careful layering. Each coat must be precise and intentional to achieve that professional, Instagram-worthy finish.
Red Mountain Landscape
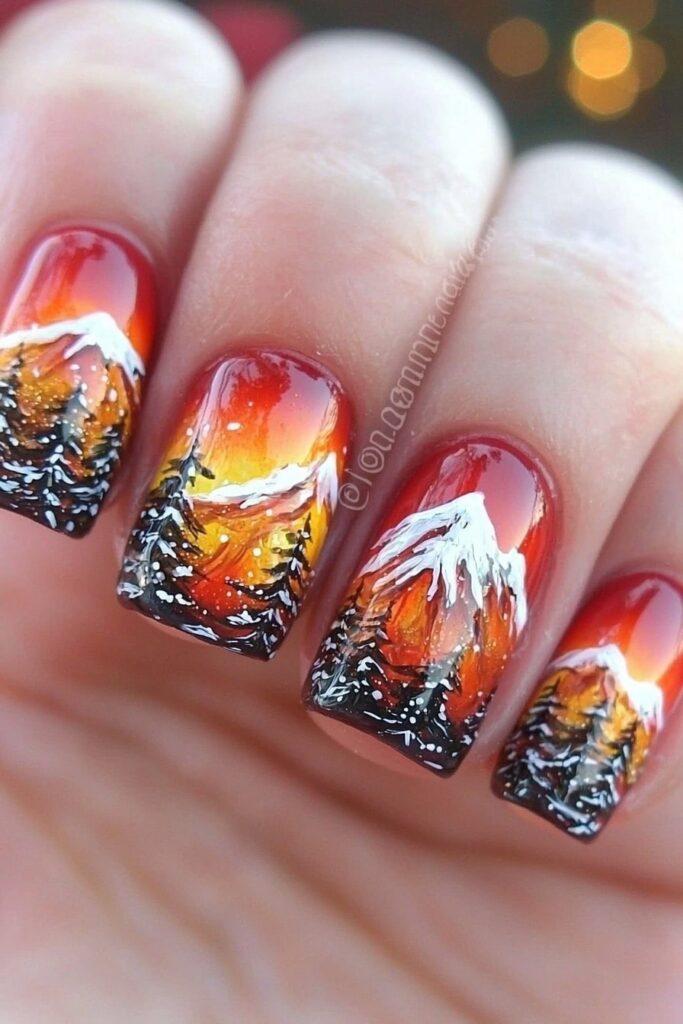
The majestic winter landscapes outside Belle’s Los Angeles studio sparked my creativity to develop a unique mountain scenery design for nails. My clients love this signature look as an alternative to traditional holiday patterns.
Design Elements
Each nail becomes a tiny canvas through the freehand micropainting technique. The design features:
- Dramatic mountain silhouettes in rich red
- Subtle snow-capped peaks
- Textured background effects
Application Guide
- Protect cuticles with peel-off base coat
- Apply white base for snow effects
- Create mountain shapes using detail brush
- Add texture with dry brush technique
- Layer snow details on peaks
- Seal with crystal-clear top coat
Pro Tip: Belle taught me that a fan brush creates perfect textured snow effects on mountain peaks.
Recommended Polish Brands
Polish Type Brand Special Feature Base Color COSMOO Wine Red Quick-dry formula Detail Work Mooncat Ultra-fine brush Top Coat Double Dip 15-day wear My experience with celebrities has shown that perfect mountain landscapes need patience. Each intentional stroke creates depth that sparkles beautifully under holiday decorations.
Holiday Heart Pattern
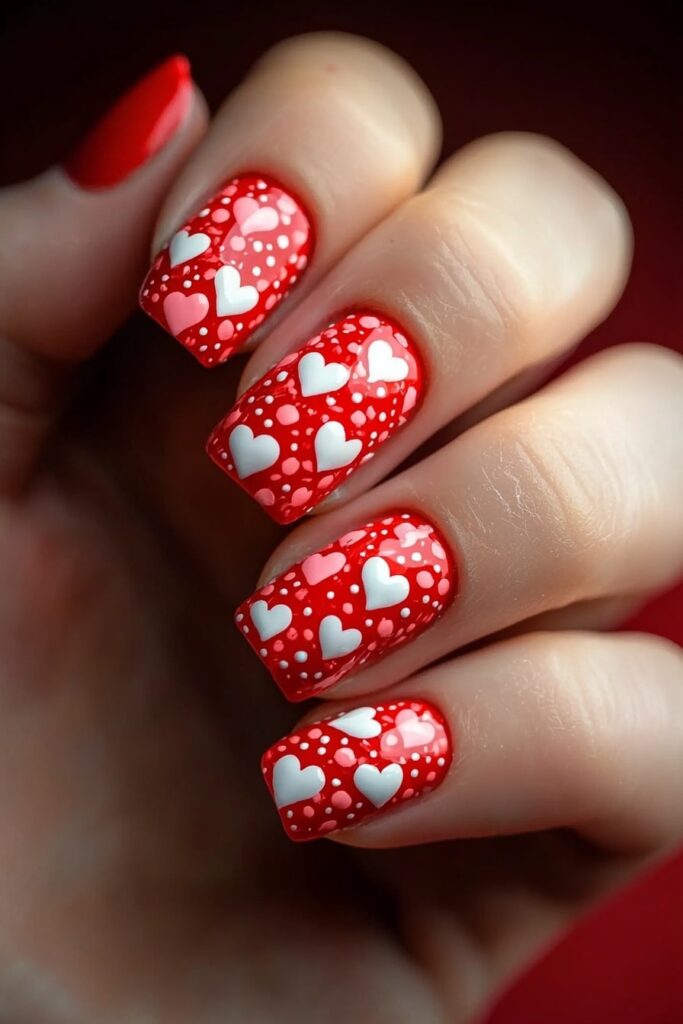
A vintage Valentine’s card from Belle’s studio sparked this reimagined heart pattern that works beautifully for Christmas nails. The design blends romantic elements with festive charm and has evolved into our signature holiday look.
Design Elements
Simple toothpick techniques create precise heart formations that make this design stand out. The depth comes from perfectly curved heart shapes and dimensional effects with contrasting colors. A subtle shimmer overlay adds that essential holiday sparkle.
Application Guide
- Apply base color (pink or red)
- Place two small dots near nail tip
- Draw V-shapes from each dot using toothpick
- Connect V-shapes to form heart
- Add shimmer overlay
- Seal with quick-dry top coat
Pro Tip: Belle taught me a great trick – a tiny crystal in each heart’s center adds elegant dimension.
Recommended Polish Brands
Polish Type Brand Special Feature Base Color Forever 21 Fuchsia Perfect opacity Heart Detail Butter London Teddy Girl Fine-tip brush Top Coat Seche Vite Quick-dry formula My experience with celebrities at Belle’s studio shows that perfect heart patterns need a steady hand and the right polish consistency. Testing the polish thickness on a practice surface helps achieve the best results.
Festive Polka Dots
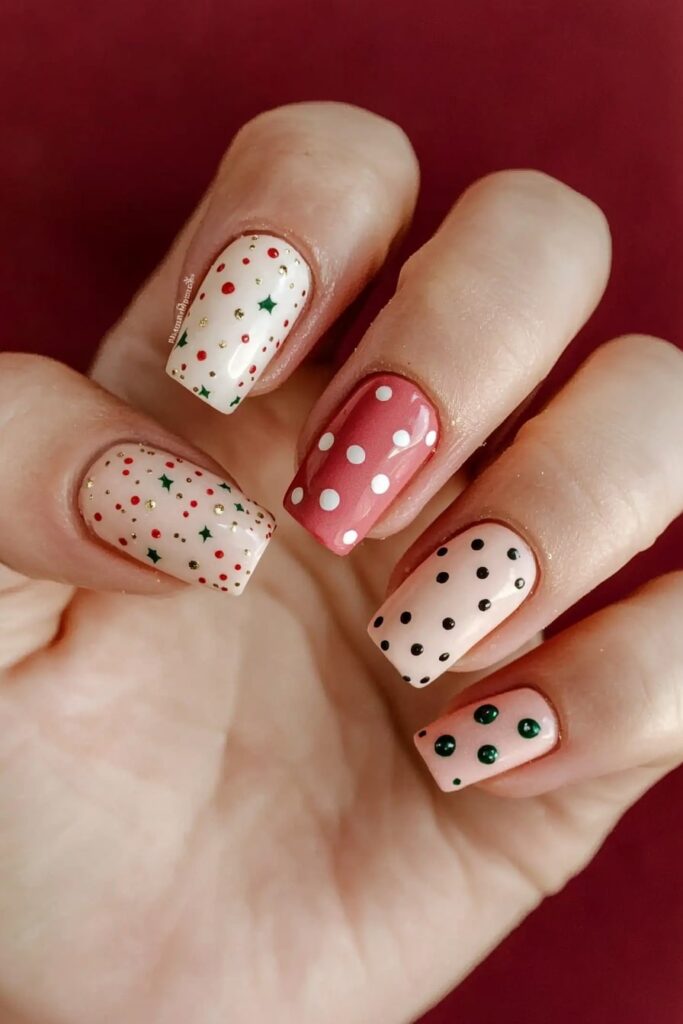
A client’s unique request during our busy holiday season at Belle’s studio helped me find that simple polka dots could reshape the scene of holiday nail art. This technique has become our signature festive design that blends playful dots with elegant holiday sophistication.
Design Elements
This design’s magic comes from its size variation technique. Visual interest emerges through:
- Alternating dot sizes for dimension
- Strategic color placement
- Gradient-style dot patterns
Application Guide
- Apply clear base coat
- Paint nails with chosen base color
- Create larger dots using bobby pin head
- Add smaller dots with toothpick
- Layer colors in this order:
- White dots first
- Pink dots second
- Red dots last
- Seal with quick-dry top coat
Pro Tip: Belle taught me a great trick – test the dot size on paper after dipping the bobby pin in polish. This will give a perfect circle every time.
Recommended Polish Brands
Polish Type Brand Special Feature Base Color Sinful Colors Snow Me White Accent Dots NYC Color Vinyl Shine Top Coat Sally Hansen Disco Ball My experience with celebrities has shown that patience and precision are the foundations of perfect polka dots. Each dot needs intentional placement to achieve that professional, Instagram-worthy finish.
Christmas Ornament Design
Last week at Belle’s nail studio, I found that there was an amazing way to create stunning Christmas ornament designs with the water marbling technique. This approach has changed how we do holiday nail art and lets us create intricate bauble patterns that look hand-painted.
Design Elements
The design’s magic comes from its swirling patterns that look just like glass ornaments. These mesmerizing effects come from:
- Room temperature water as the marbling base
- Multiple polish colors that flow naturally
- Unique toothpick-created designs
Application Guide
- Fill container with room temperature water
- Select 3-4 polish colors (red, pink, gold recommended)
- Drop polishes quickly into water center
- Create patterns using toothpick
- Dip nail at 45-degree angle
- Clean surface with cotton swab
- Let dry completely
- Apply top coat
Pro Tip: Belle taught me something valuable – filtered water at room temperature creates the sharpest patterns.
Recommended Polish Brands
Brand Type Best Feature Sinful Colors Base Spreads well Sally Hansen Design Quick-dry Wet n Wild Accent Budget-friendly My experience with celebrities has shown that perfect ornament designs depend on timing. You need to work fast before the polish sets on the water surface.
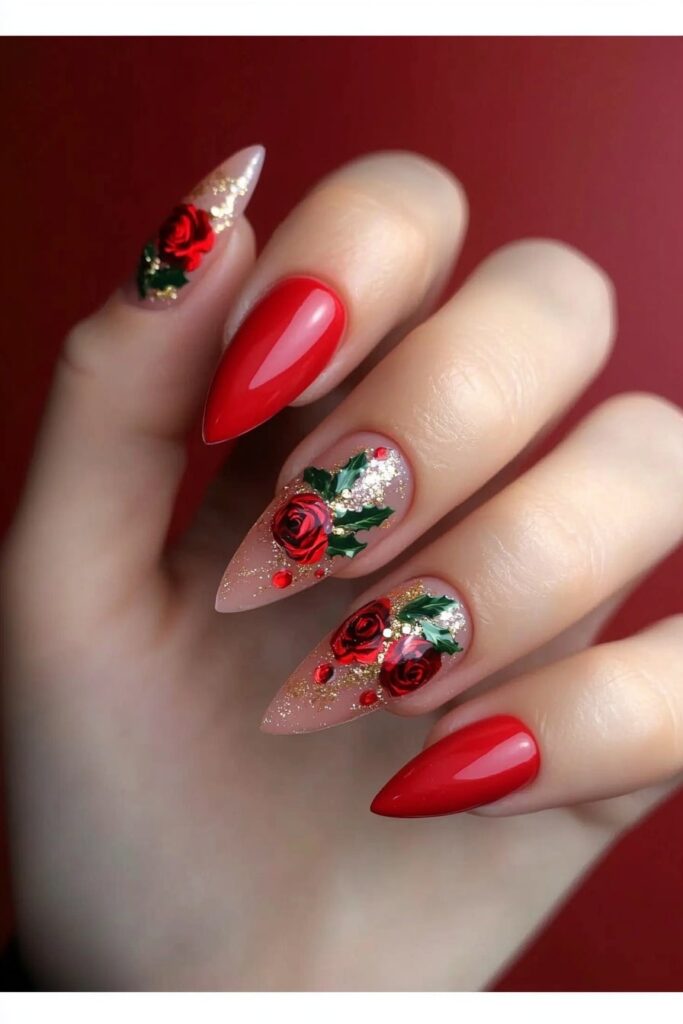
Red Holly Berry Art
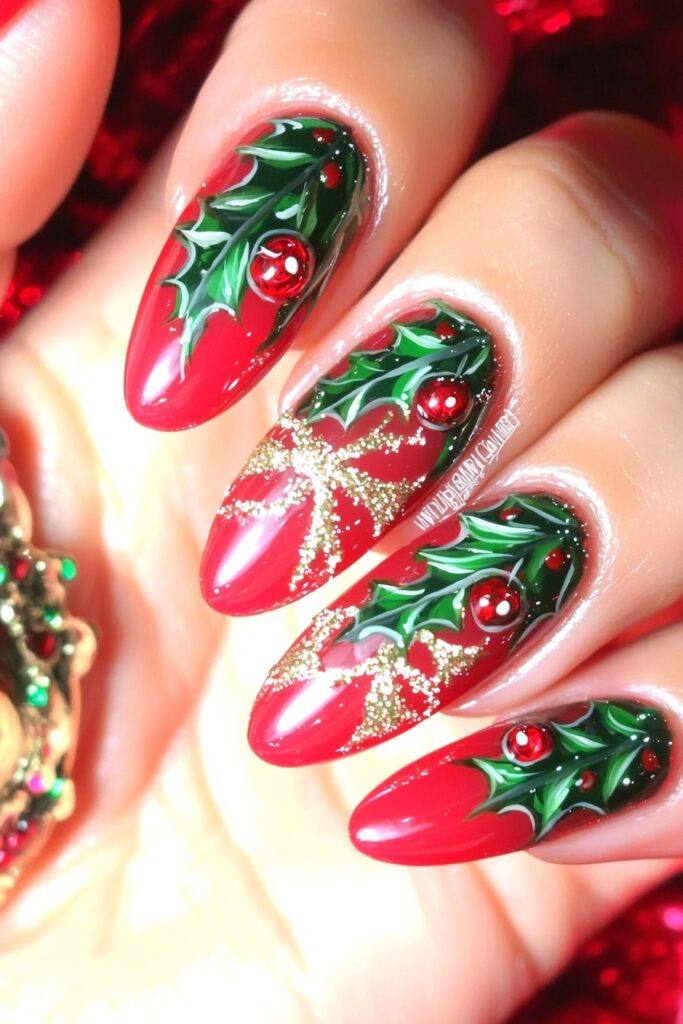
My time working with Belle at her Los Angeles studio taught me something amazing – nature gives us the most elegant holiday designs. Last week, I created some stunning holly berry nail art for her beauty channel that captures Christmas perfectly.
Design Elements
This design shines because of its hand-painted precision. I add depth through:
- Beautiful gold filigree accents
- Deep red berries with dimensional shine
- Delicate green holly leaves
- Optional snowflake accents to add sparkle
Application Guide
- Clean nails with a lint-free pad
- Apply two layers of base coat
- Paint gold filigree using fine brush
- Add holly berries with dotting tool
- Create leaves using pointed drawing brush
- Outline design with thin black detail
- Seal with fast-drying top coat
Pro Tip: Belle showed me a great trick – add a tiny drop of top coat to each berry. It creates this gorgeous 3D effect that makes light dance off your nails.
Recommended Polish Brands
Polish Type Brand Special Feature Base Color Natural Collection Quick-dry formula Berry Red Collection Mulled Wine Perfect opacity Leaf Green Rimmel Loosey Goosey Fine-tip brush Black Detail Collection Blackjack Long-lasting wear My experience with celebrities shows this design works great on natural nails. You can touch it up quickly and keep it looking fresh through all your New Year’s celebrations.
Conclusion
I’ve spent countless hours with Belle Hathaway perfecting these designs and seen pink and red Christmas nail designs grow from simple patterns into stunning works of art. Simple holiday manicures have changed into a celebration of creativity and personal style.
Key Holiday Design Insight:
“The magic of combining pink and red lies in their versatility,” Belle tells me during our salon sessions. “These colors work beautifully for Christmas, but they’re stunning year-round.”
My time with celebrities at Belle’s Los Angeles studio has taught me something important – the perfect holiday manicure isn’t about following trends blindly. It’s about designs that strike a chord with your personal style. These designs have something for everyone, from the elegant Pink Crystal Snowfall to the bold Red Velvet Christmas Dreams.
Clients’ faces light up when they find how these designs fit their unique preferences. Pink and red Christmas nail designs are adaptable – they work for beginners and can be raised for special occasions. The core team at Belle’s studio has shown me that even complex designs become doable with patience and good guidance.
Note that Belle always says, “Beauty isn’t about perfection – it’s about expressing yourself through creativity.” These designs are your canvas; make them uniquely yours.