The sort of thing I love about being a professional makeup artist and beauty expert is helping black women find their perfect prom updos. Your prom hairstyle really sets the mood for this special night, whether you want to make a statement or go for classic elegance.
My years of experience have shown me how the right updo doesn’t just change your appearance – it boosts your confidence too. Black women’s natural beauty shines through chic protective braided buns and stunning twisted crowns. Some styles need time and patience – Lemonade Braids can take eight hours to create, but they’re worth every minute. These looks become even more special with beautiful additions like pearls and crystals.
I’ve handpicked 15 show-stopping prom updos that will make you feel like absolute royalty in 2025. Each style in my collection will help you look incredible on your big night and keep your hair healthy naturally.
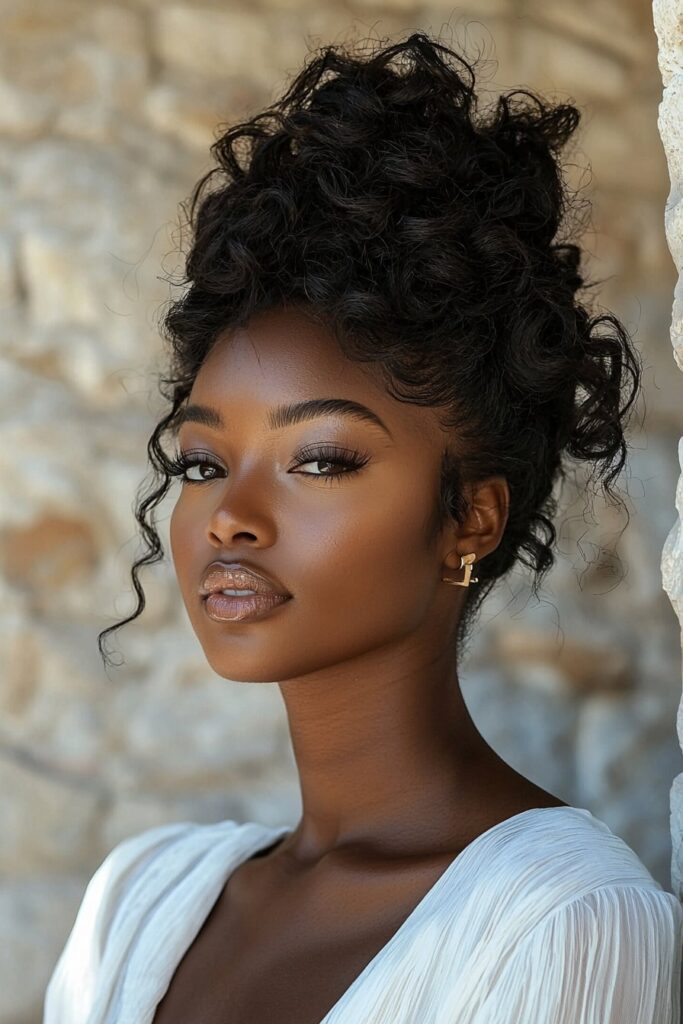
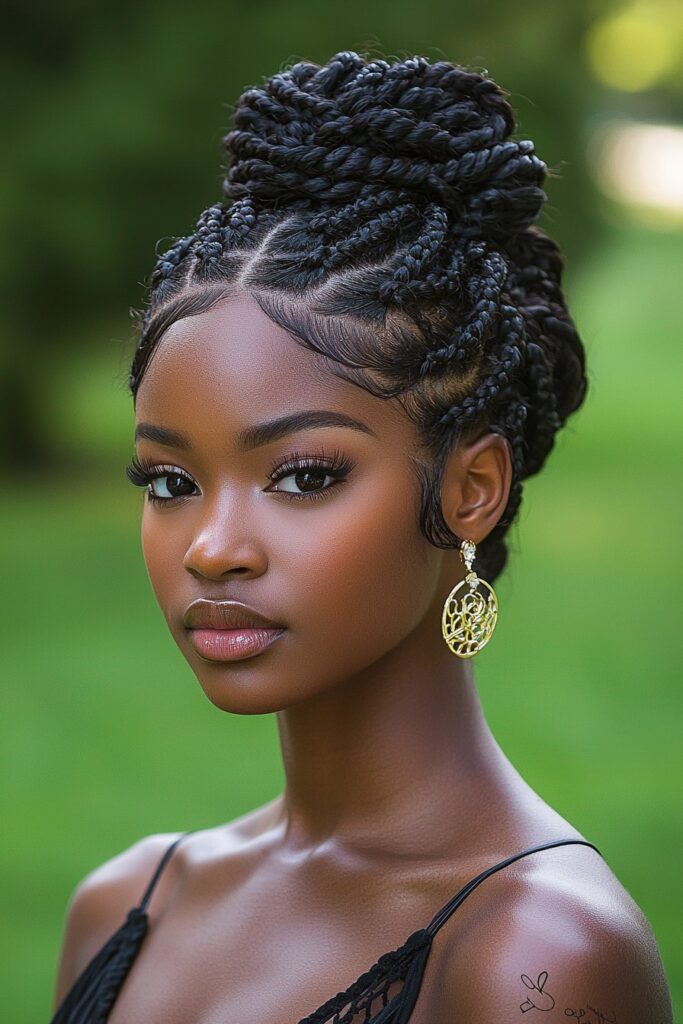
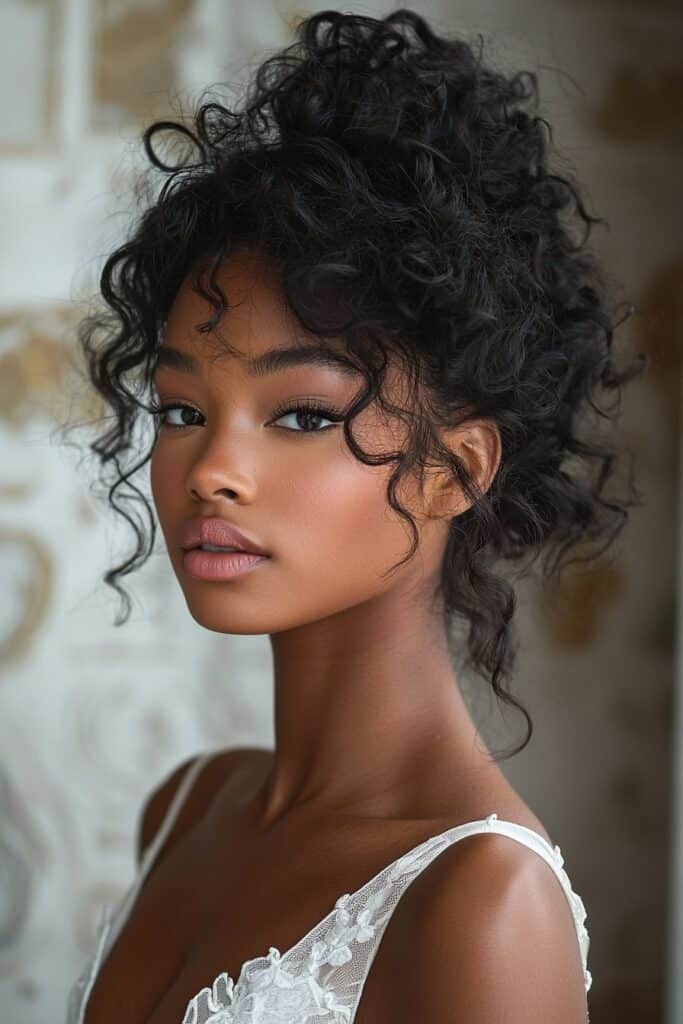
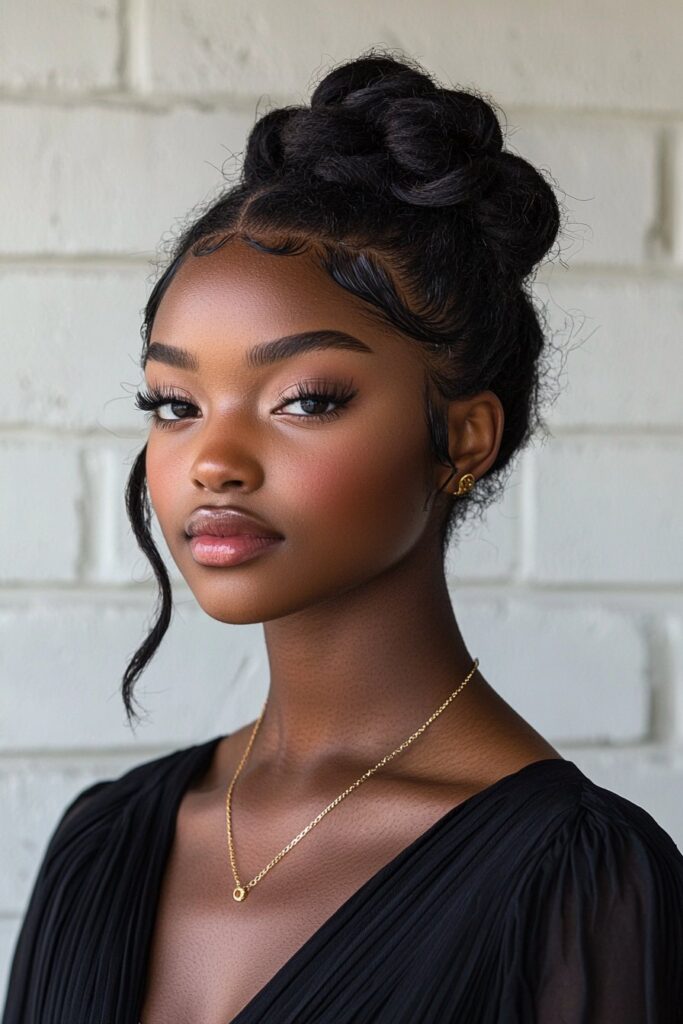
Elegant Twisted Crown Updo

I’ve styled countless prom updos, and the sort of thing I love about the Elegant Twisted Crown Updo is its regal appearance. This style brings together protective elements with sophisticated glamor that makes it perfect for your special night.
Crown Updo Styling Steps
Your perfect crown updo starts with really well-prepped hair. The braid should start behind your right ear with a 2-inch section of hair. This section needs to be split into three parts to create a Dutch braid by crossing sections under rather than over. The braid curves around your head above the occipital bone as you add hair from both the front hairline and back. A small clear elastic will secure the completed braid.
Best Hair Products for Long-Lasting Hold
A lasting crown updo depends on proper preparation. Damp hair needs volumizing mousse first, and dry shampoo at the roots helps create extra grip. Fine hair works best with volume mousse applied specifically at the roots before blow-drying. On top of that, a firm-hold hairspray that fights humidity will keep your style secure all evening.
Face Shapes This Style Flatters
My experience shows how this crown updo enhances different face shapes beautifully. The crown’s height creates a lovely elongating effect for round faces. Oval faces look best without too much height at the top since it can over-elongate features. Square faces get a nice softening effect from this style, especially when you leave some strands loose around the face.
Maintenance Tips
The core team of maintenance strategies will help your updo stay flawless throughout prom night. Extra bobby pins underneath the braid provide added support. The style needs to be checked from multiple angles for evenness. A satin scarf wrapped around your hair overnight prevents frizz and keeps the style’s integrity intact.
You can personalize this versatile updo by gently pulling at the braid’s edges to make it fuller. Pearl pins can add an elegant touch to your style. Note that rushing through the steps won’t help – take your time to perfect each one.
Braided Butterfly Updo

My work as a makeup artist has shown me that the Braided Butterfly Updo ranks among the most magical prom hairstyles. This style beautifully blends soft loops and twists that create a stunning 3D effect just like butterfly wings.
Braiding Pattern Guide
The beauty of this updo starts when you split your hair into four sections. You’ll want to make a ponytail first, then work each section to shape those butterfly wings. The right upper section needs a French braid with careful length control to get that wing shape right. The left side follows the same steps. Your lower sections will take more hair to create those smaller matching wings.
Styling Duration and Prep
After doing countless butterfly updos, I suggest you set aside enough time for this style. Butterfly braids take patience because of their detail work, but they’ll reward you with amazing staying power. These braids hold their shape really well, even when the weather isn’t cooperating. You’ll get the best results if your hair is well-moisturized and you use a strong hold styling product.
Recommended Hair Length
My experience shows butterfly braids look amazing on different hair lengths. Longer hair gives you more options to create dramatic wing effects. If you have shorter hair, hair extensions might help you achieve fuller, more defined butterfly wings. The style works great with all hair types – straight, curly, or wavy.
Small, delicate accessories will boost your updo’s elegance without taking away from the beautiful braid pattern. The style’s adaptability lets you match it perfectly with your dress and overall prom look.
The updo will stay picture-perfect all night if you secure those overlapping sections well. Make sure the lower wing braids go under the upper ones to create the butterfly’s body at the crown. This approach keeps everything stable and gives you that beautiful butterfly silhouette that makes this style so special.
Cascading Curls Side Updo
The Cascading Curls Side Updo stands out as one of my salon’s most popular prom styles. It frames the face beautifully and brings out that Hollywood glamor. This romantic style strikes the perfect balance between sophistication and whimsy, making it a great choice for formal events.
Curling Techniques
Second-day hair works best to create those perfect cascading curls as it gives better texture and hold. The process starts with hair sectioning and root-level curling. The top layer needs special attention to create beautiful texture. A diffuser attachment helps dry natural curls evenly and adds maximum shine. My technique involves two barrel sizes – a 1-inch for the base and a 1/2-inch for face-framing pieces.
Pin Placement Tips
A secure side updo depends on smart pin placement. We rely on two main techniques: grip pinning and push pinning. Grip pinning needs smaller hair sections secured with pre-gripped pins. Push pinning requires you to hold the hair in place and secure it with a firm push. The updo should look even from all angles, with pins hidden beneath the curls.
Product Recommendations
Experience shows that the right products make a real difference. Heat protectant spray comes first before any thermal styling. Each section needs flexible-hold hairspray before curling. A light oil or serum helps curb humidity and keeps the style’s definition intact.
Success lies in the details of this updo. Start with a side part so face-framing layers fall naturally forward. Next, create a low ponytail on the opposite side behind your ear. Thick hair might need the ponytail split into two or three sections for the final bun. The finishing touch involves wrapping loose ends around your fingers to create elegant loops and pinning them discreetly.
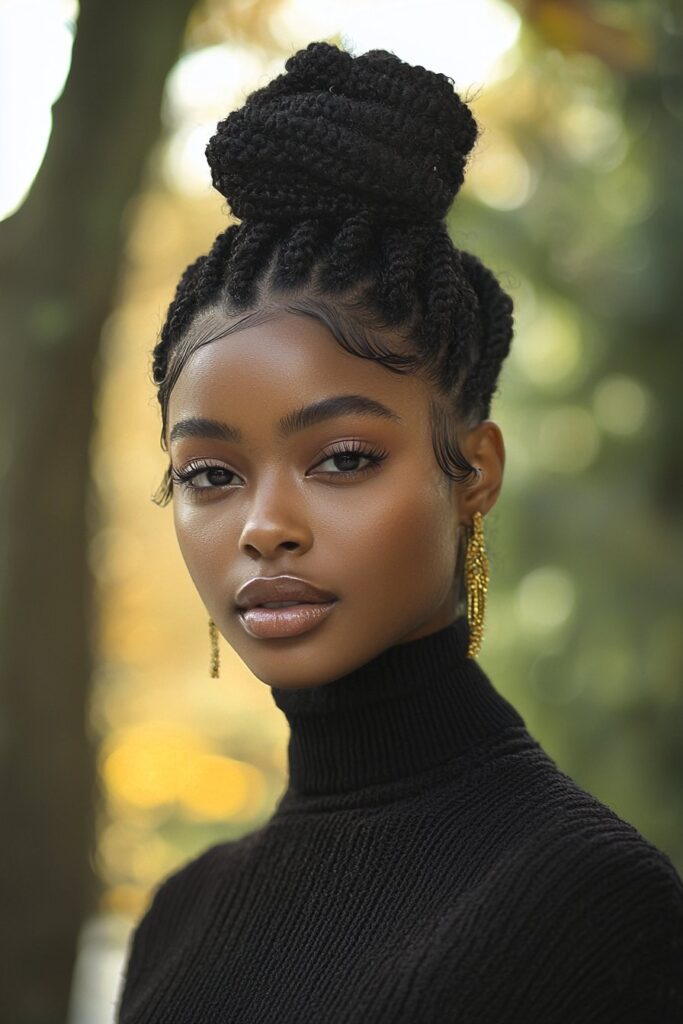
Natural Hair Bantu Knot Updo
My experience with protective hairstyles shows that Bantu knots make an elegant updo perfect for prom night. This traditional African style looks stunning and helps keep your hair healthy throughout the evening.
Knot Positioning Guide
Clean, fully detangled hair works best. The right section size makes all the difference – not too small, not too large. My salon work has taught me that good sectioning keeps knots from getting too tight and helps them dry faster.
Your head needs staggered parts to look balanced. Take each section and twist it firmly from base to tips until it forms a tight roll. The roll then becomes a tiny bun that you can secure with pins or elastic bands.
Moisturizing Products Needed
Beautiful Bantu knots depend on the right products. A sulfate-free shampoo helps control frizz. Each twist needs a light-hold styling pomade. The best moisture comes from:
- A leave-in conditioner as your base layer
- Shea butter or argan oil to lock in moisture
- A light water mist to keep hair flexible
Nighttime Maintenance
Your prom updo stays elegant with proper overnight care. A shower cap over the knots creates humidity that sets the style naturally. My top protection tips include:
- A satin bonnet keeps moisture from escaping
- Loose knots need gentle wrapping to avoid tension
- A silk scarf protects your edges
Bantu knots work great with hair of all textures. Take your time with each knot – rushing never helps. Every section needs good moisture. The style lets you create unique placement patterns that make your prom look special.
Sleek High Bun with Baby Hair
My experience styling countless celebrities has taught me how to become skilled at creating the perfect sleek high bun with baby hair. This timeless style brings together sophistication and modern edge, making it a fantastic choice to wear on prom night.
Edge Control Tips
The secret to flawless edges lies in layering your styling products correctly. Start with eco styler gel as your base, then add edge control for detailed work. You’ll get an extra-strong hold by layering products the right way – a lighter gel first, followed by edge control on top. A light mist of water over the baby hairs prevents white residue.
Securing the Bun
A lasting high bun needs the right technique. Gather your hair into a tight ponytail at the crown. The next step is to twist the ponytail counterclockwise twice toward the top of your head. Bobby pins should go through the twist from bottom to top to secure the base firmly.
Your perfect bun shape comes from gently re-twisting loose ends and wrapping them counterclockwise. The bun should sit high on your crown so it’s visible from the front. Any flyaway strands need strategic pinning around the bun’s circumference.
Face-Framing Techniques
Beautiful baby hairs need strategic styling. A specialized edge tool helps separate the fine hairs along your hairline. The tool should glide in a J-motion to create three distinct curves. Your style gets extra drama when you shape the side baby hairs into elegant S-shaped swirls.
Your prom night style will last longer with these helpful tips:
- Let edge control become slightly tacky before styling for better hold
- Wrap your hair in a silk scarf for at least 30 minutes
- Remove edge control with water before bed for multi-day wear
A common mistake is pulling the bun too tight, which causes discomfort and scalp tension. Focus instead on creating a secure yet comfortable style that stays put through hours of dancing and celebrating.
Cornrow and Curl Combination
My years working with protective styles have taught me that cornrows paired with curls create a stunning prom updo. This combination strikes the right balance between structure and softness, and works amazingly with different hair textures.
Cornrow Pattern Guide
Start with clean, detangled hair to build your perfect foundation. Make a middle part that will guide your cornrow placement. The style flows from feed-in cornrows along the sides into a high bun. Your cornrows should follow straight lines or geometric designs close to the scalp. The key is to avoid pulling too tight near the edges.
Curl Definition Methods
Once your cornrows are secure, let’s focus on those perfect curls. Natural curls need a diffuser attachment to dry evenly and shine brilliantly. You can also define your curls using:
- Flexi rods that give you bouncy, well-defined curls
- Finger coiling to achieve natural-looking definition
- Perm rods when you want smooth, polished curls
A light curl-defining cream or mousse helps maintain your curl pattern. Your curls will have more volume if you separate them with fingers instead of brushes or combs.
Style Duration
This elegant style combination lasts two to four weeks when maintained properly. A silk scarf wrapped around your hair at night helps preserve the look. Your hair needs regular moisture – mix water with nourishing oils like coconut or argan to keep cornrows and curls fresh.
Each morning, refresh your curls with a light water spritz or curl refresher spray. Touch-ups might be needed if you see frizz, especially in the cornrow sections. Note that your scalp’s health matters throughout the style’s duration, so make sure the braids feel comfortable and not too tight.
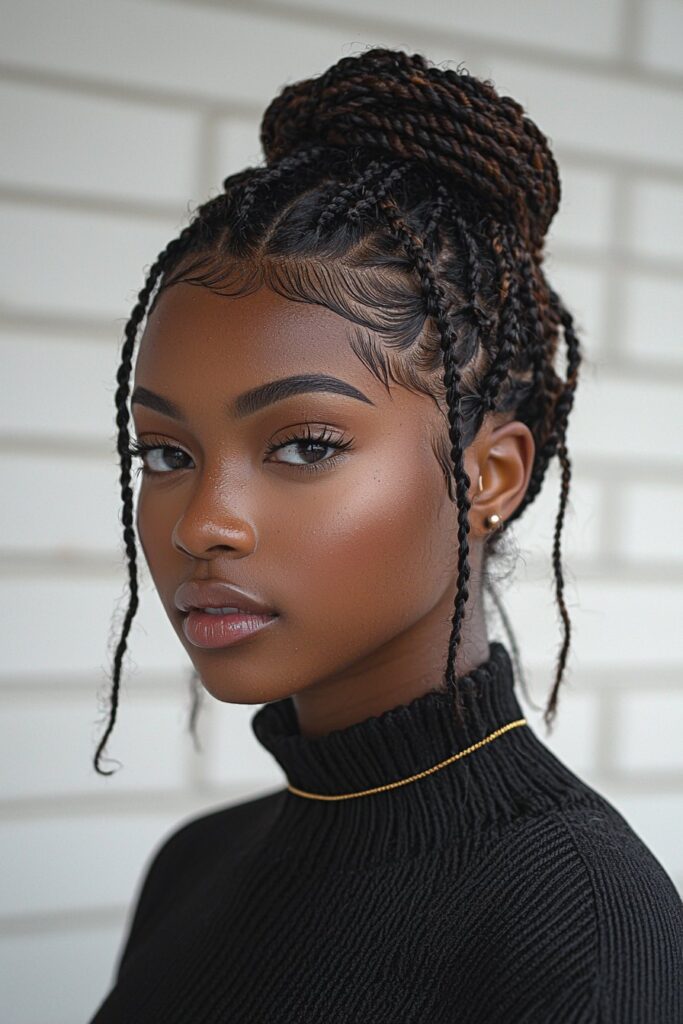
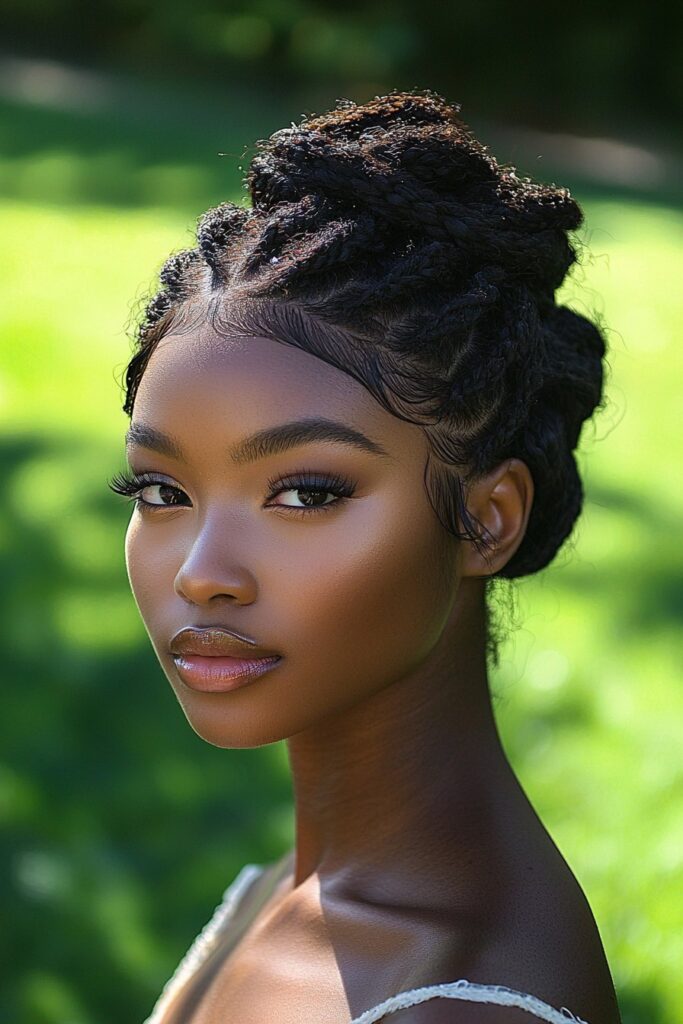
Goddess Braided Updo
My experience with creating stunning prom hairstyles has taught me a lot about the Goddess Braided Updo. This elegant style shows evidence of ancient African artistry. The regal look combines thick cornrows with a lifted design that creates an unmistakable goddess effect.
Braid Size and Pattern
Your updo’s foundation starts with carefully sectioned hair, braided into thick cornrows close to the scalp. The best results come from alternating braid sizes throughout the pattern. This creates unique dimensions that add depth to the overall look. My technique includes straight-back cornrows that combine smoothly into larger goddess braids. These braids gather into an elegant high ponytail.
Decorative Elements
Gold thread woven through the braids will boost your updo’s allure with a subtle sparkle. Metallic cuffs placed at key points along the braid ends work both functionally and esthetically. They prevent unraveling and secure your style effectively. A touch of extra glamor comes from thin golden ribbons coiled into side buns.
Maintenance Guide
The right maintenance will keep your goddess braids looking pristine throughout prom night. Start with a weekly cleansing routine. Use sulfate-free products to protect the braids’ integrity. A lightweight leave-in conditioner mixed with water in a spray bottle helps refresh curls. Your style needs protection at night with a silk bonnet or scarf to reduce friction.
Daily care tips include:
- Light oils moisturize your scalp every three days
- Water-based foaming mousse once or twice weekly prevents product buildup
- Quick attention to any knots keeps them from becoming problems
Goddess braids adapt well to match your priorities. Face-framing techniques work beautifully – leave a few braids loose around your face for a softer finish. The installation takes 30 minutes to three hours, based on your chosen pattern’s complexity.
Textured Pompadour Updo
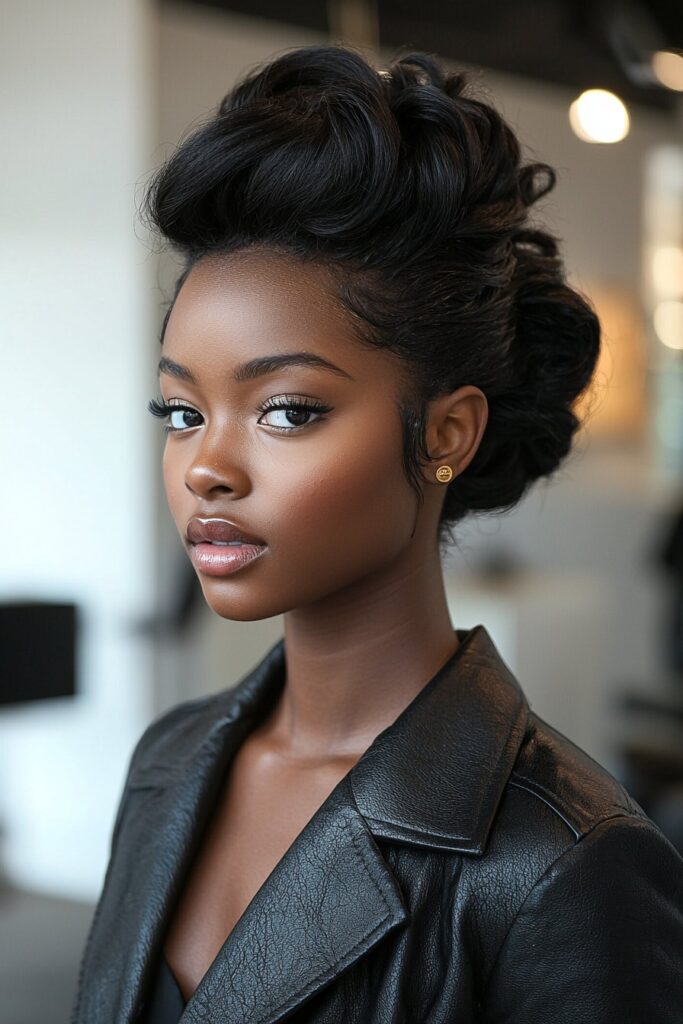
My love for creating unique prom hairstyles helped me become skilled at the Textured Pompadour Updo. This style brings together vintage glamor and modern sophistication. The adaptable look works great with natural hair textures and adds both drama and elegance to your special night.
Volume Creation Tips
I found that getting the perfect pompadour volume starts with the right preparation. You should twist your hair into 9-10 large twists and secure them with Bantu knots overnight to maintain stretch. A texturizing sea salt spray works best on towel-dried hair, especially at the roots. The next step needs you to section your hair in a V-shape from the recession point to just below the crown curve.
Securing Techniques
A lasting hold starts with gel application along the sides and back. The hair needs to be smooth. Bobby pins placed in a crisscross pattern form an “X” shape and create a solid foundation. A fine-tailed comb helps with precise smoothing and tucking when rolling the hair under. The style locks in place with additional pins facing downward at the crown area.
Product Selection
The right products will keep your pompadour shaped perfectly throughout prom night. Equal amounts of firm-hold wax and shine treatment oil help smooth side sections. The perfect finish comes from choosing between:
- A high-hold pomade for classic, shiny results
- Putty for a natural, matte appearance
- Clay to boost texture and volume
Strategic product layering gives maximum staying power. Start with volumizing mousse, add a working hairspray for flexible hold, and finish with a humidity-blocking spray to fight frizz in tough weather. Each product should be warmed between your palms to spread evenly throughout your hair.
Spiral Twist Elegant Updo
A spiral twist elegant updo has become my signature prom look as a professional hairstylist who specializes in protective styles. This enchanting style blends classic elegance with modern flair to create a sophisticated look that makes everyone stop and stare.
Twist Pattern Guide
The perfect spiral twist starts with a French twist that pulls the hair back into a secure ponytail. Split the ponytail into three equal sections to get the right balance. Work with each section one at a time – twist it tightly while keeping even tension throughout. Roll each twisted section up to create a spiral wheel that looks just like a cinnamon roll.
Securing Methods
Strategic pin placement is what makes spiral twists last. Start by putting bobby pins in the center of each spiral after you’ve rolled about a third of the way through. This gives you stronger support in the middle and helps keep the spiral’s shape as you finish each bun. You’ll need extra stability, so put pins both at the base and through the spiral itself.
Style Variations
The traditional updo shows off three distinct spirals, but you can try many more variations based on your priorities. Here are some ideas:
- Double French twistbacks from the front that lead into a high ponytail
- Senegalese twists elegantly piled on top of the head
- Different spiral sizes to create unique dimensional effects
A light mist of water or styling product helps control flyaways and gives the best results. This protective style lets you get creative with different updo positions and decorative elements. The height and placement of each spiral can be adjusted based on your face shape and personal style.
Note that you should avoid pulling the twists too tight to stay comfortable throughout your special night. The right technique and careful securing methods will help this elegant updo keep its shape while protecting your natural hair.
Protective Braided Crown
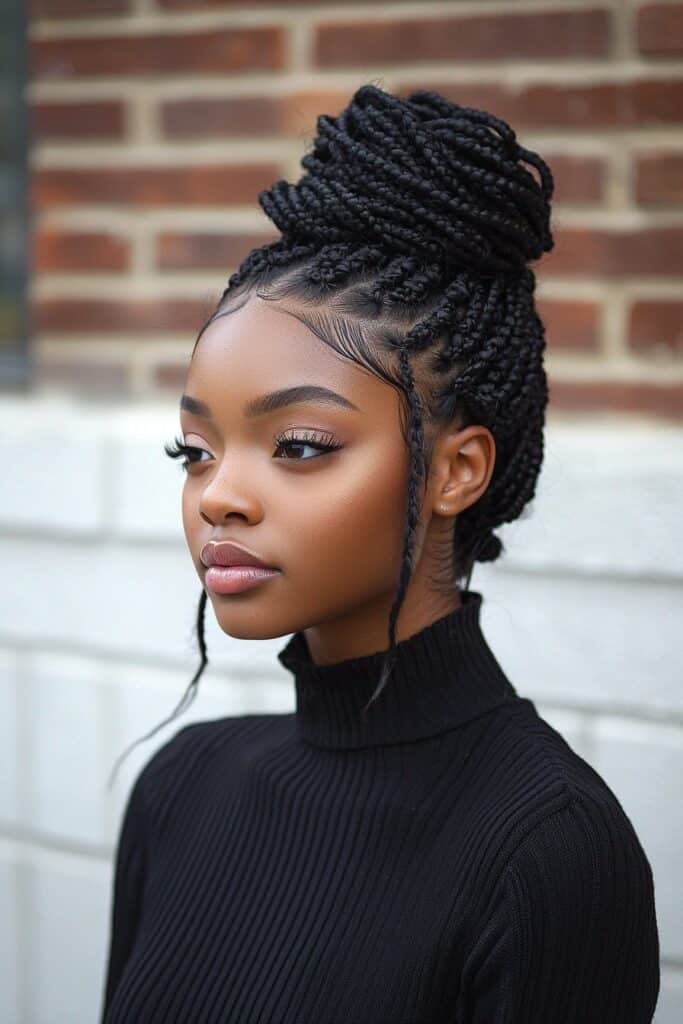
My decade-long experience with protective styles has shown that the Protective Braided Crown stands out as a timeless prom night choice. This regal style protects your natural hair and makes an unforgettable statement.
Braiding Technique
A flawless crown braid starts behind your right ear with a 2-inch section of hair. Split this into three parts and create a Dutch braid by crossing sections underneath instead of over. Add hair from both sides as you go, and keep the tension steady. Your braid should flow around your head naturally, right above the occipital bone.
Hair Prep Steps
Good prep will give a crown braid that lasts all through prom night. Start with clean hair using sulfate-free shampoo. Dry shampoo at the roots will boost grip and texture. New clients should know that fresh-washed hair won’t hold well. Your hair will style better on day two.
Duration and Care
A well-maintained protective crown braid can last 1-2 months. Here’s what you need to know about care:
- Light oils should go on your scalp 2-3 times weekly
- Clean your hair every 1-3 weeks based on how active you are
- Sleep with a satin scarf wrapped around your style
Look at your crown from different angles to make sure it’s even. Add bobby pins underneath to keep it stable. The hairline should feel comfortable without too much pulling.
Straight hair or layers might need curling beforehand to stay in place. This makes the style smoother and helps it last longer. Your face shape and style preferences will determine the crown’s height and placement.
Curly Mohawk Updo
My experience as a celebrity stylist has shown that the Curly Mohawk Updo stands out as one of the most eye-catching prom hairstyles. This style brings together edgy sophistication and classic elegance. You can adapt it to hair textures of all types to create a stunning look on your special night.
Creating Height
The right sectioning will give you impressive height. Start by dividing your hair into a curved rectangle at the top and two side sections from the front hairline to the corner back area. A diffuser attachment will give you even drying and maximum shine if you have natural curls. You can boost volume by gently teasing the front section from the back near your roots. This creates the height and proportion you need.
Securing Side Sections
Make two small French braids on each side to get flawless side sections. Position one braid above the other. Clip these braids without elastics since they’ll combine smoothly with your top section later. Create a French braid along the top with the remaining hair and work those side braids into it when you reach the back of your head.
Styling Products
The right products will keep your mohawk shaped perfectly throughout prom night. Apply volumizing mousse to damp hair first, then add dry shampoo at the roots to get extra grip. Your curls need:
- A curl-friendly hair gel on damp hair
- A lightweight serum to add shine
- A firm-hold hairspray that lasts
A silk or satin bonnet at night will protect your style. You can refresh your curls each morning by running your fingers through them to separate and define the pattern. This protective style looks amazing and helps shield your natural hair from damage.
Flat Twist Updo Design
My salon experience with natural hairstyles shows that flat twist updos are a hit among prom clients. This style brilliantly combines hair protection with elegant design – a perfect choice if you want to look stunning while keeping your hair healthy.
Twist Pattern Options
The best flat twists start with medium-length natural hair and patterns that match your face structure. Start behind your right ear and work with 2-inch sections to keep control. Flat twists offer amazing versatility – you can pick flat rolls for a rounded, rope-like look or go with traditional twists that give more definition.
Securing Methods
A sophisticated bun at the crown works great to secure your flat twists. Start by twisting larger sections of hair and bring them together at the top. You can add security by coiling loose hair into tiny Bantu knots or creating a sideways fishtail with the free ends. A light touch of shine spray will give you that glossy finish without making the style heavy.
Maintenance Tips
A well-done flat twist updo can last two to four weeks. Here’s how to keep it looking fresh:
- Use scalp conditioning spray to fight dryness
- Protect the style with a satin scarf while sleeping
- Add moisture before styling for better hold
Here’s a pro tip – second-day hair gives better grip than freshly washed hair. Try starting with damp hair and add a flexible-hold product to each section before twisting. This approach will make your style last longer and keep frizz away.
My years of experience show that flat twists look amazing on hair of all textures. The secret is getting the right tension without any pulling. You’ll need about four hours to create this beautiful style. Take time to check your work from different angles – this helps create an even and balanced design.
Sculptured Pin Curl Updo
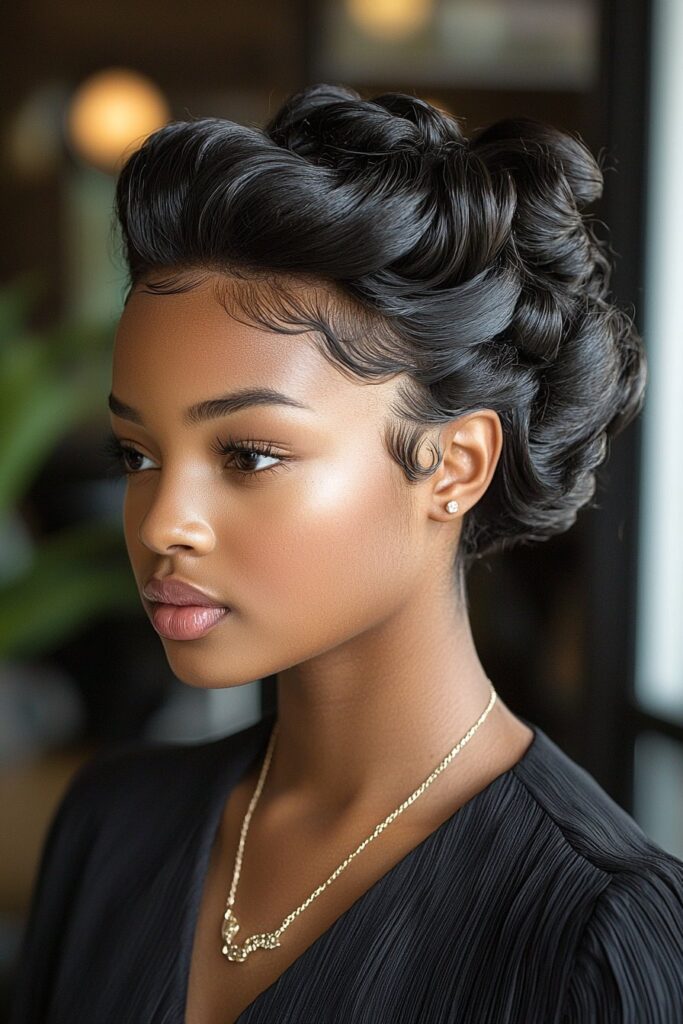
My experience as a beauty expert has shown that the Sculptured Pin Curl Updo creates timeless vintage-inspired glamor. This classic technique from the 1950s gives black women an elegant option that perfectly balances sophistication with lasting hold.
Pin Curl Technique
Perfect sculptured pin curls need slightly damp hair – towel-dried works best for thick textures, while fine hair needs a bit more moisture. Use a rat’s tail comb to section your hair into one-inch squares. Take the ends and wrap them around two fingers for medium curls, or one finger if you want tighter definition. Roll each section toward the scalp with the right tension, making sure loops nest neatly inside each other.
Setting Pattern
Your updo’s success depends on where you place each curl. Near the crown, create stand-up pin curls to add volume. Two rows of curls frame the face beautifully – roll the top row backward and the front row forward. Mix up curl directions throughout your hair to create stunning wave patterns after brushing out.
Product Selection
The right products are vital for results that last. A sulfate-free shampoo helps keep frizz away. Layer these products:
- Setting lotion on each individual strand
- Light-hold styling pomade to define
- Shea butter or argan oil to lock in moisture
Secure your style with double-coated bobby pins in a crisscross pattern. A satin bonnet or silk scarf protects your hair overnight and keeps frizz at bay. A flexible-hold hairspray after brushing out helps combat humidity.
Working with hair of all textures has taught me that day-old hair grips better than freshly washed strands. Take time to dry your hair properly – either naturally or under a hooded dryer set to medium heat. Look at each pin curl’s placement from different angles to ensure balanced distribution that blends smoothly into your prom look.
Romantic Loose Curl Updo
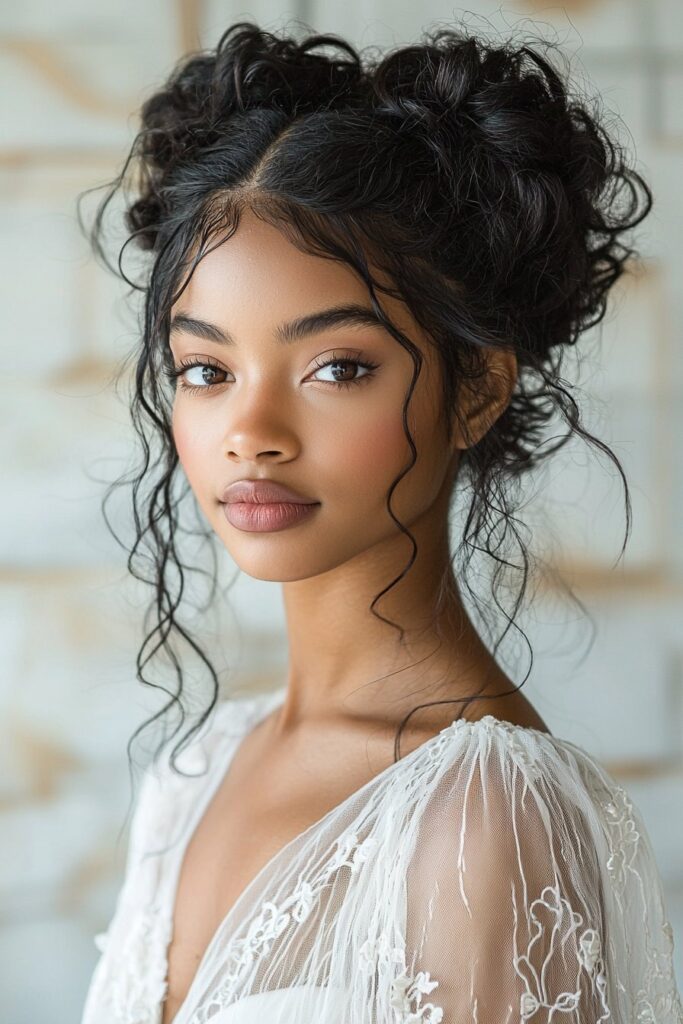
My expertise as a beauty educator who specializes in romantic hairstyles has shown that the Loose Curl Updo makes a stunning choice for prom night. Years of teaching at prestigious beauty institutes have helped me perfect techniques that make this style elegant yet relaxed.
Curl Pattern Guide
Perfect loose curls start with dry hair and a firm-hold hairspray applied from 10 inches away. You should curl the entire head and make sure sections along the hairline and top curve away from your face. Let the curls cool completely, then apply a small amount of emollient finishing gloss and gently comb through with your fingers.
Securing Loose Curls
Success comes from strategic placement. Start by gathering the top and front sections into a ponytail. Split this ponytail into two parts to create a soft knot and secure it with pins. This technique continues down the back as you take sections and tie them into simple knots among twisted curls in varying directions. The texture improves when you alternate between different sized curls by twisting varying amounts of hair.
Touch-Up Tips
The style’s romantic appeal needs proper preparation and care. These techniques are crucial:
- A silk scrunchie gathers hair without causing damage
- A lightweight serum tames flyaways without weighing down curls
- Decorative pins placed strategically improve the overall design
My teaching experience at beauty academies has shown that second-day hair gives optimal grip and texture for this style. A light-hold hairspray allows natural movement while providing lasting hold. Check your updo from multiple angles to ensure balanced distribution of curls and smooth integration of twisted sections.
This versatile style adapts to your face shape and personal preference. Wispy tendrils around your face add softness. Such an approach creates an ethereal effect that’s perfect for your special night, blending sophistication with romantic charm.
Regal Twisted Bun
My ten years as a beauty expert have shown me how the Regal Twisted Bun never fails to wow my clients with its timeless appeal. This sophisticated style blends classic elegance with modern techniques to create a look that protects your hair and stuns at special events.
Twist Placement
The perfect twisted bun starts with a vertical part down to each ear. Clip the front sections away from the back. Start twisting the back section clockwise at the center to create an elegant spiral shape. Take out the right-side clip and direct the twist toward the back as you add more hair. The left-side hair needs a second clockwise twist to match.
Bun Shaping
A flawless bun depends on proper technique and smart securing methods. Your hair’s natural texture guides how you gather it into a low ponytail. Curling the ends beforehand helps prevent slipping if you have layers. Shape your bun with clockwise wraps while keeping even tension. Bobby pins should slide toward the center to secure each section. Medium-thick hair needs about six pins, while thicker hair requires more.
Decorative Elements
You can raise your regal bun’s appeal with the right accessories:
- Pearl-studded pins add classic sophistication
- Metallic hair cuffs bring modern flair
- Delicate floral pieces create romantic appeal
Teaching at prestigious beauty institutes has taught me that day-old hair gives the best grip. A quick spray and comb-through removes tangles before you start. Each section needs hairspray before twisting. Keep the style tight at first – you can always loosen it later.
Look at your work from different angles to ensure symmetry and balance. This classic style works beautifully with all hair textures while protecting and adorning your hair. A silk scarf wrapped around your creation at night keeps it pristine throughout your celebration.
Conclusion
My clients have loved these 15 updos more than any other prom hairstyles I’ve created over the years. Each style shows off natural beauty and keeps hair protected in its own way. These designs have helped my clients feel elegant and confident all night long.
The Bantu Knot Updo and Cornrow Combinations keep hair healthy and look stunning for the big event. Cascading Curls and Spiral Twist create that magical prom look many students want. Bold personalities really stand out with statement pieces like the Curly Mohawk and Sculptured Pin Curls.
Note that your prom updo should match your personality and protect your hair’s health. Good preparation makes a difference – pick the right products and embrace your natural texture. Most styles take 2-3 hours to complete, though complex designs might need extra time.
Nothing makes me happier than seeing young women leave my salon feeling beautiful and confident. A style that boosts your confidence will make you shine brighter than any crown.