
The perfect Christmas manicure instantly puts anyone in a holiday mood! My work as a celebrity makeup artist has given me countless opportunities to create festive looks. Christmas red acrylic nail designs can elevate both your hands’ appearance and your holiday spirit.
Red Christmas nails remain my top suggestion when clients prepare for holiday parties or family get-togethers. My experience ranges from classic red designs with sparkle accents to bold statement pieces. The last several years of creating red Christmas acrylic nails for celebrities and beauty enthusiasts have taught me so much. I’ve carefully selected 25 stunning designs that blend classic elegance with current trends. These red Christmas acrylic nail designs will make your hands the centerpiece of every holiday celebration!
Classic Red Glitter French Tips
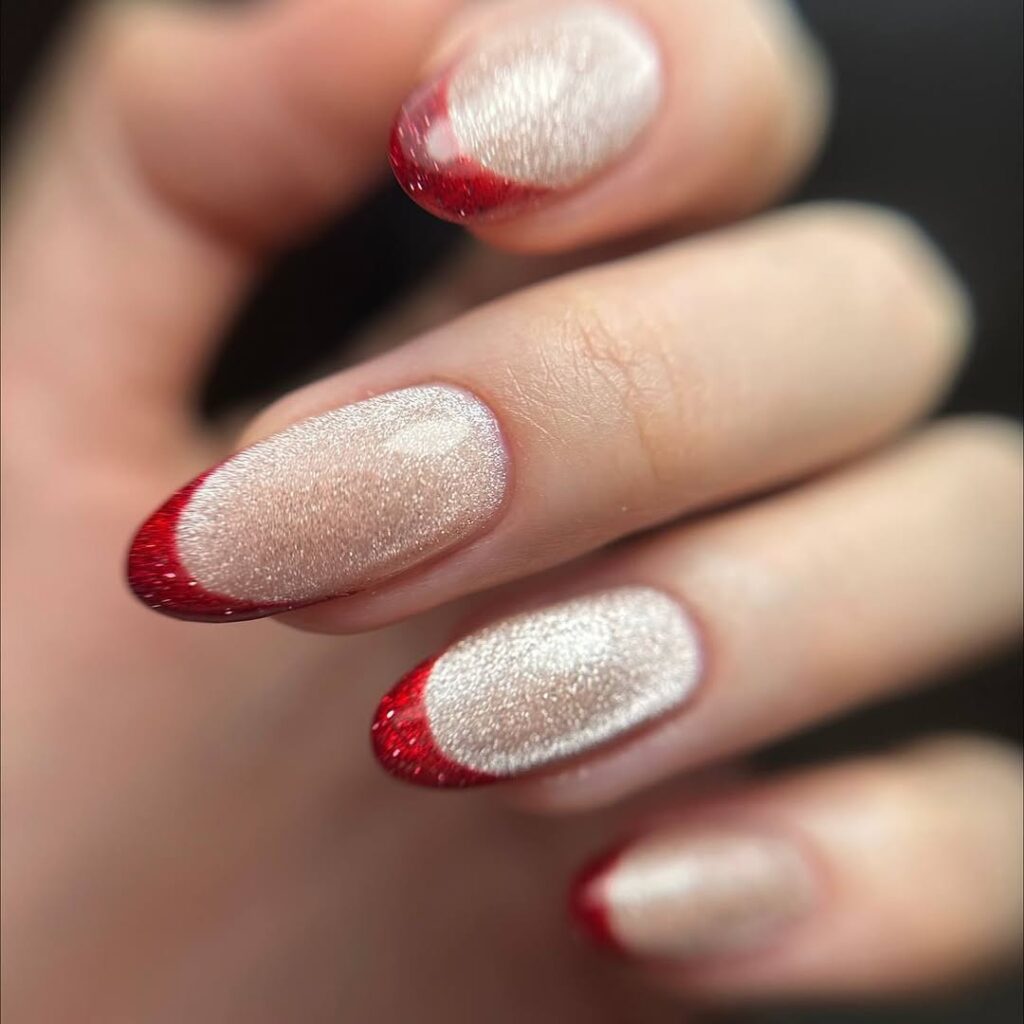
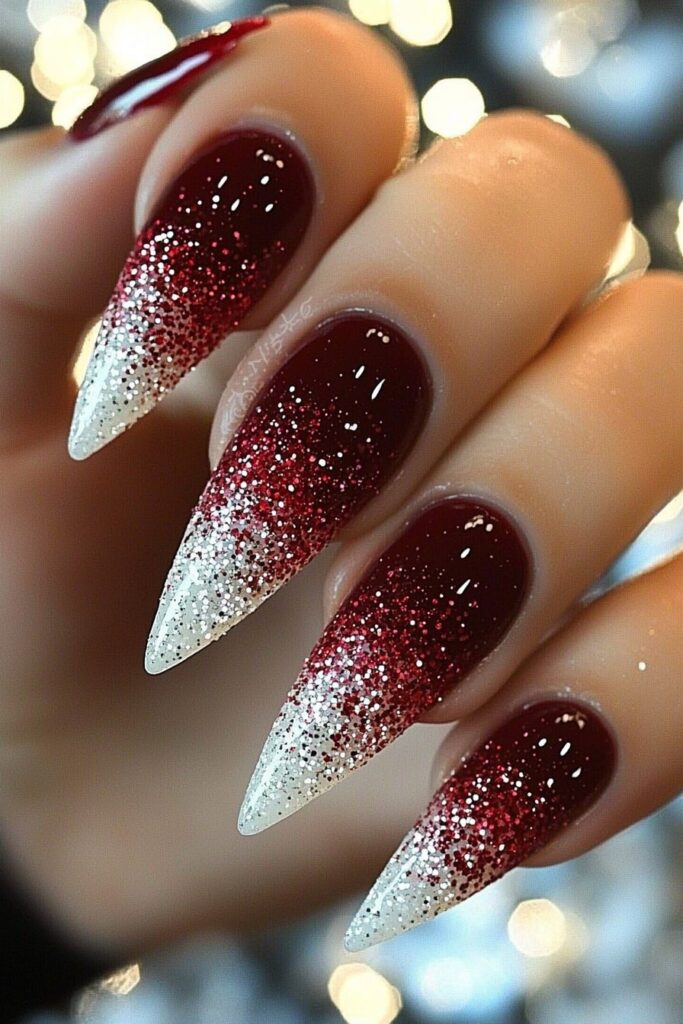
Classic Red Glitter French Tips have always been a showstopper during the holiday season. My celebrity clients constantly request this Christmas red acrylic nail design that never fails to dazzle.
Design Elements
This design’s magic comes from its sophisticated blend of sheer polish and sparkling glitter. A skin-tone base creates that clean, professional look, which pairs perfectly with festive red reflected glitter. The glitter’s natural flow from the tips creates a subtle yet glamorous effect that beautifully catches the light.
Application Process
My experience with countless red Christmas nail designs has helped me perfect this technique. Even beginners can achieve stunning results with this method:
- Apply a thin layer of sheer polish as your base
- Create the perfect smile line using a steady wrist motion
- Add red glitter polish concentrated at the tips
- Layer one final coat of sheer polish to sandwich the glitter
- Seal with a quality top coat
Maintenance Tips
My celebrity clients keep their red Christmas acrylic nails fresh by applying a thin layer of top coat every few days. This simple step preserves the sparkle and prevents tip wear. Years of working with actresses taught me that wearing gloves while doing dishes and avoiding harsh chemicals helps manicures last through long filming schedules.
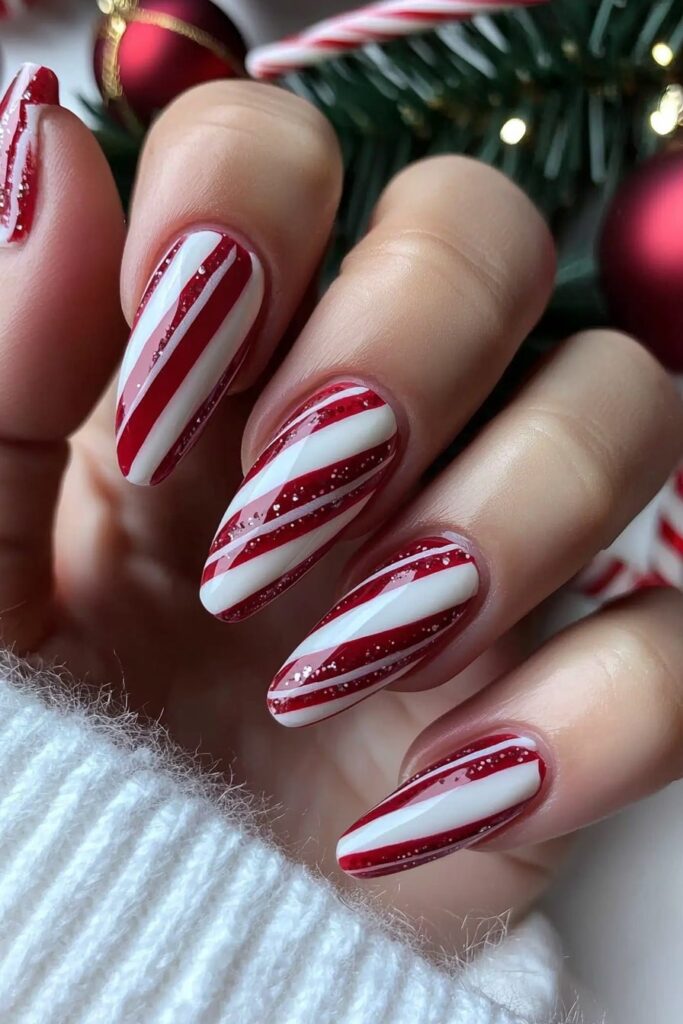
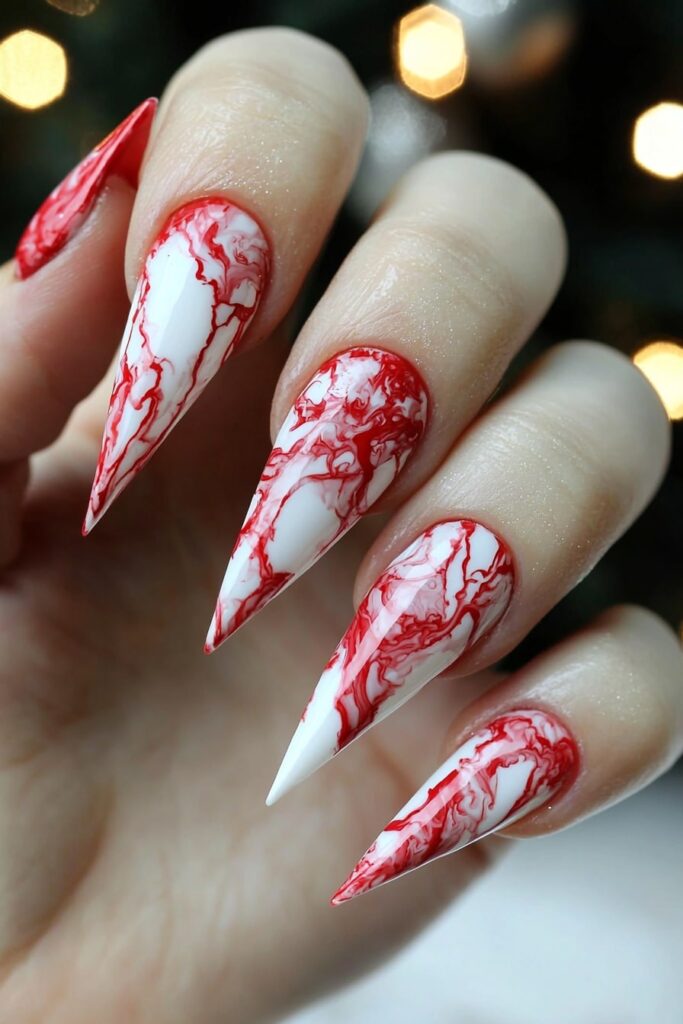
Candy Cane Striped Elegance
My experience with celebrities during holiday seasons shows that the Candy Cane Striped Elegance design turns heads everywhere. This design became an instant sensation after I created it for several A-list clients at last year’s Hollywood Holiday Gala.
Pattern Details
Perfect candy cane patterns need precise diagonal striping techniques. Nail tape creates the cleanest lines – a technique I picked up during a holiday magazine shoot. The stripes work best at a 45-degree angle with varying widths that create that classic candy cane look.
Color Combinations
- Traditional red and white combinations never go out of style, but my clients love these modern twists:
- Deep burgundy with pearl white for sophisticated events
- Cherry red with silver metallic for extra glamor
- Ruby red with gold accents for luxury appeal
- Crimson with crystal shimmer for special occasions
Durability Guide
Red carpet events taught me that long-lasting candy cane stripes need proper layering. The process starts with a quality base coat followed by thin, even layers of color. My celebrity clients’ designs last through award season because I seal them with a professional-grade top coat. This festive design stays pristine for up to three weeks with proper care, making it perfect for holiday celebrations.
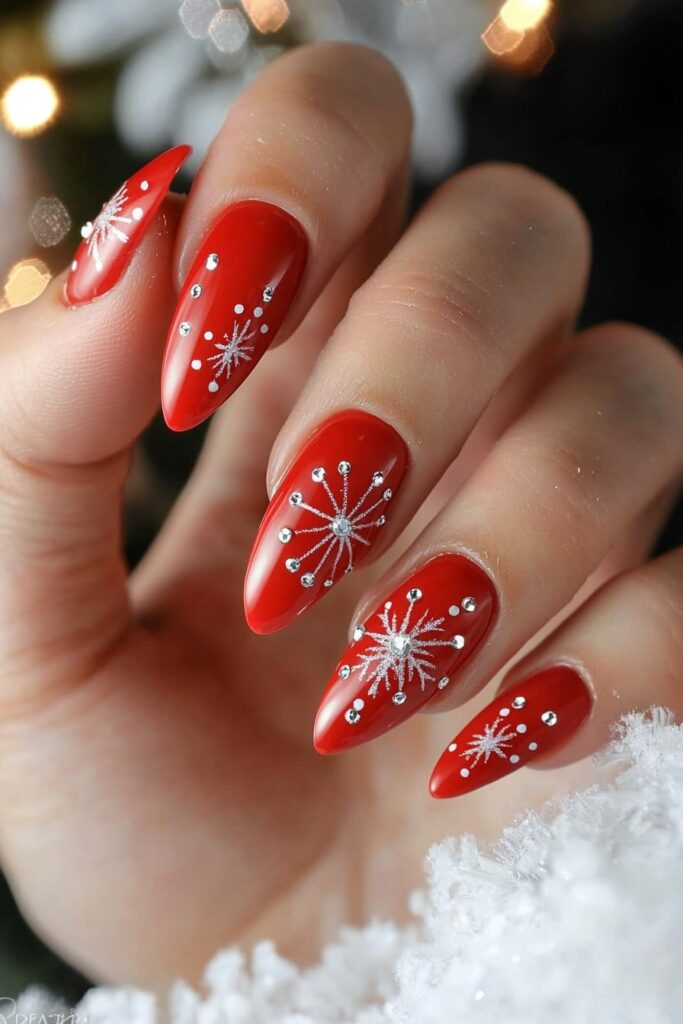
Sparkling Red Snowflake Design
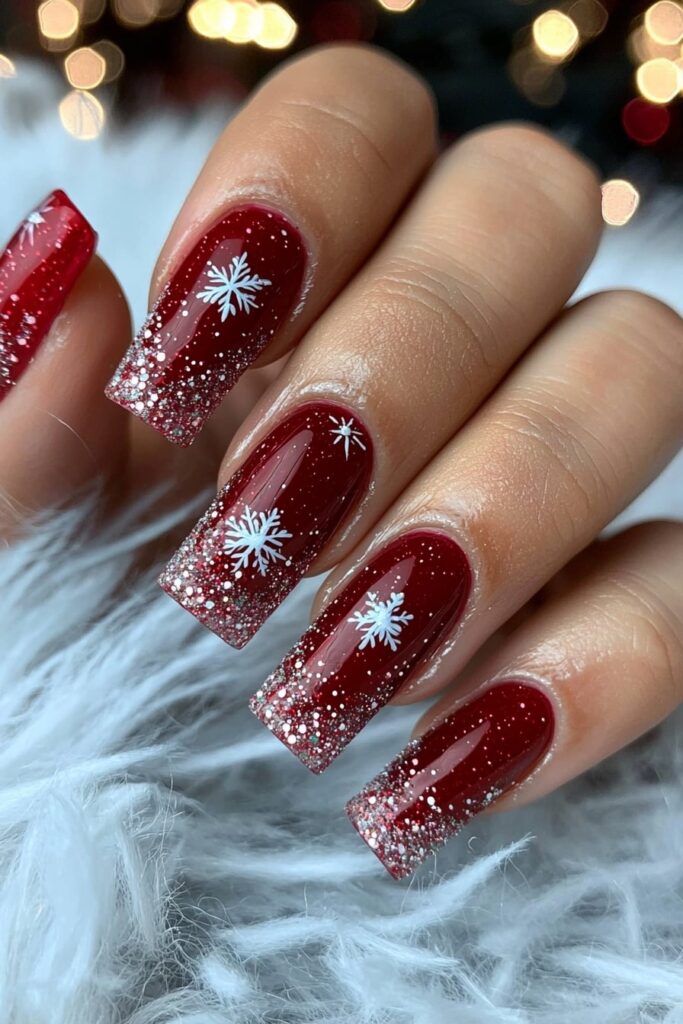
A recent holiday photoshoot with a leading fashion magazine showed that the Sparkling Red Snowflake Design has become the most photographed nail art this season. My experience as a celebrity makeup artist has taught me how this elegant design perfectly balances festive charm with sophisticated style.
Snowflake Placement
The right placement makes a big difference in this design. My years of creating red Christmas nail designs have taught me that a statement snowflake on the ring finger looks best. The design becomes more dramatic if you alternate snowflakes between nails. This approach keeps the look balanced and catches everyone’s attention.
Glitter Selection
- The perfect sparkle for your red Christmas acrylic nails can come from these stunning options:
- Holographic silver adds a modern twist
- Pearl white gives classic elegance
- Crystal glitter creates extra dimension
- Fine shimmer offers subtle sophistication
Application Technique
My experience with red carpet events has helped me perfect this design. The process starts with a vibrant red base coat – a shimmery finish adds beautiful depth. The secret to perfect snowflakes comes from the steady hand technique I developed while working with top celebrities. The design works best when you use a thin brush and work from the center outward. A quality top coat seals the design and brings out the beauty of both the glitter and snowflake details.
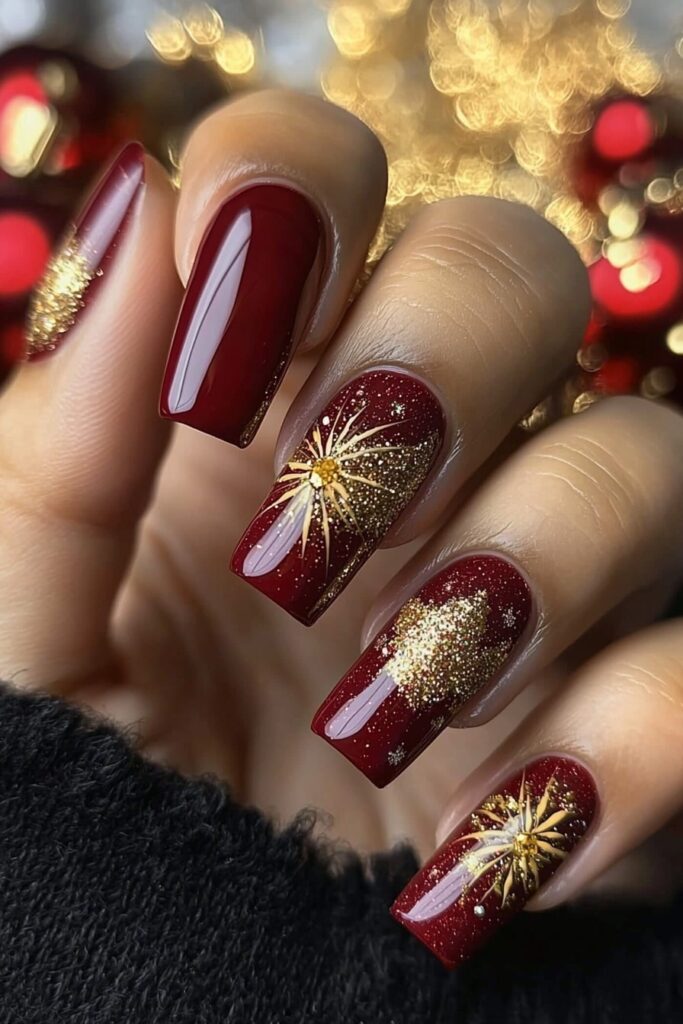
Red and Gold Christmas Ornaments
The Red and Gold Christmas Ornaments design has become the most requested holiday look by my A-list clients at my Beverly Hills salon. My experience creating festive manicures for magazine covers and red carpet events tells me this design captures the magic of the season perfectly.
Design Inspiration
The combination of 3D ornaments with crystals and beads in gold shades against a gorgeous red base creates magic. Vintage Christmas decorations sparked this idea, and a touch of delicate white snowflake decals adds extra sparkle. My celebrity clients love these elements especially when they have holiday photoshoots:
- 3D gel ornaments for dimension
- Crystal accents in varying sizes
- Gold foil edge details
- Metallic beading
Color Coordination
A candy apple red base starts this look – the same shade that lit up last year’s Holiday Fashion Week. The magic happens by layering different gold elements: some shimmery, some metallic, and some with a mirror-like finish. My red carpet clients absolutely adore the elegant frame that gold foil creates along the outer edges.
Longevity Tips
My work with high-profile clients over the last several years has taught me that proper stone application ensures longevity. A flexible gem gel secures 3D elements perfectly – the same technique that made a recent celebrity wedding manicure last through a two-week honeymoon. The holiday manicure stays perfect through every celebration with top coat applied around the stones to prevent snagging.
Crimson Santa Hat Accent
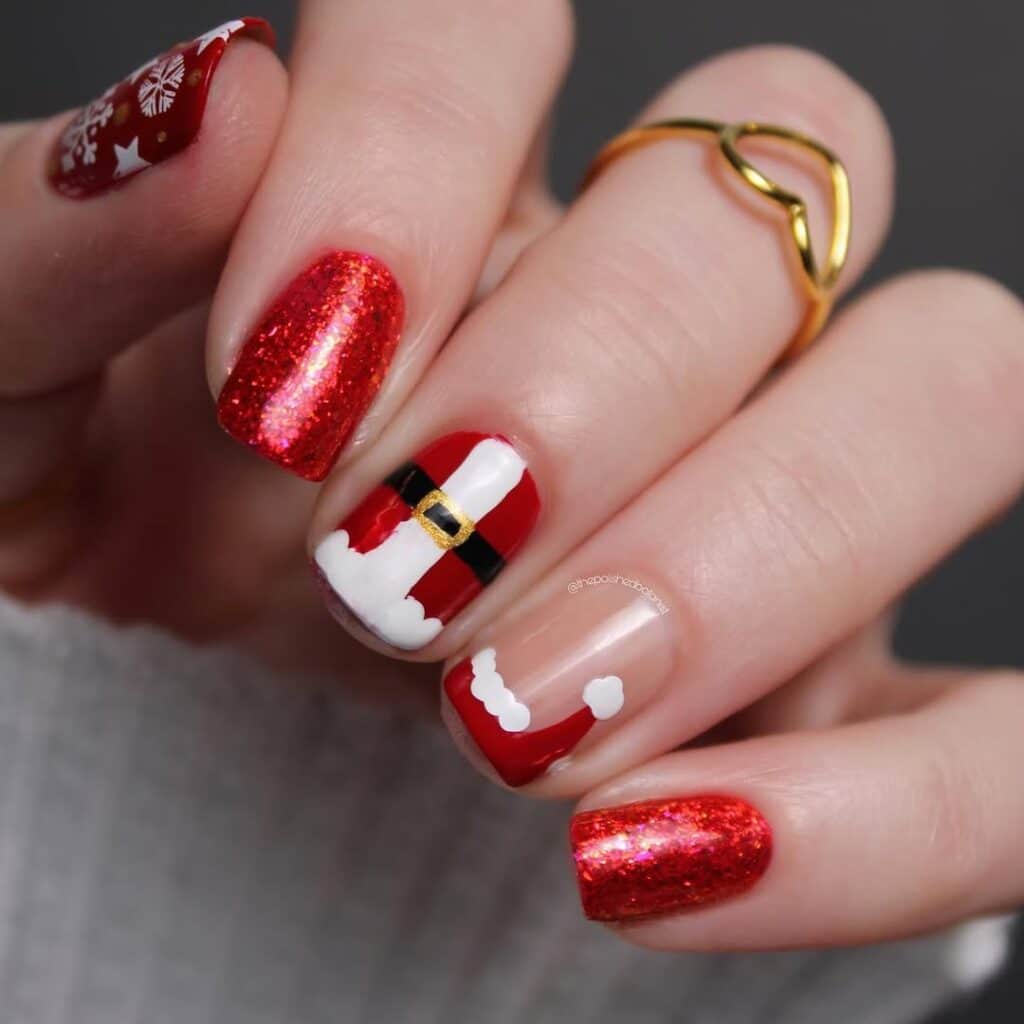
My work with Hollywood stars during holiday photoshoots has shown that the Crimson Santa Hat Accent design grows more popular each season. Celebrities love its playful yet sophisticated appeal. This design captures Christmas spirit perfectly while looking elegant.
Pattern Details
The design’s charm comes from its simplicity and how it affects the overall look. A miniature Santa hat takes shape with a vibrant red base and textured white trim. The design stands out because of its dimensional effect. Small fabric pieces or specialized nail art gels create raised white parts, making the hat look almost real on the nail.
Seasonal Appeal
Celebrity clients at my Beverly Hills salon love this design for holiday parties and red carpet events. The Santa hat accent works great because it’s versatile. My clients get the best results when they add it to one or two feature nails and keep the others in classic red. This approach works especially well when you want to look festive yet sophisticated.
Application Guide
- Experience has taught me the quickest way to create this look:
- Start with a sheer pink or clear base
- Create the hat shape using premium red polish
- Add texture to the white trim using specialized gel
- Finish with a high-shine top coat for lasting glamor
The right proportions make this design work – the hat should fit perfectly with your nail shape. Pro tip: I like to add a tiny bit of sparkle to the pom-pom for that extra festive touch.
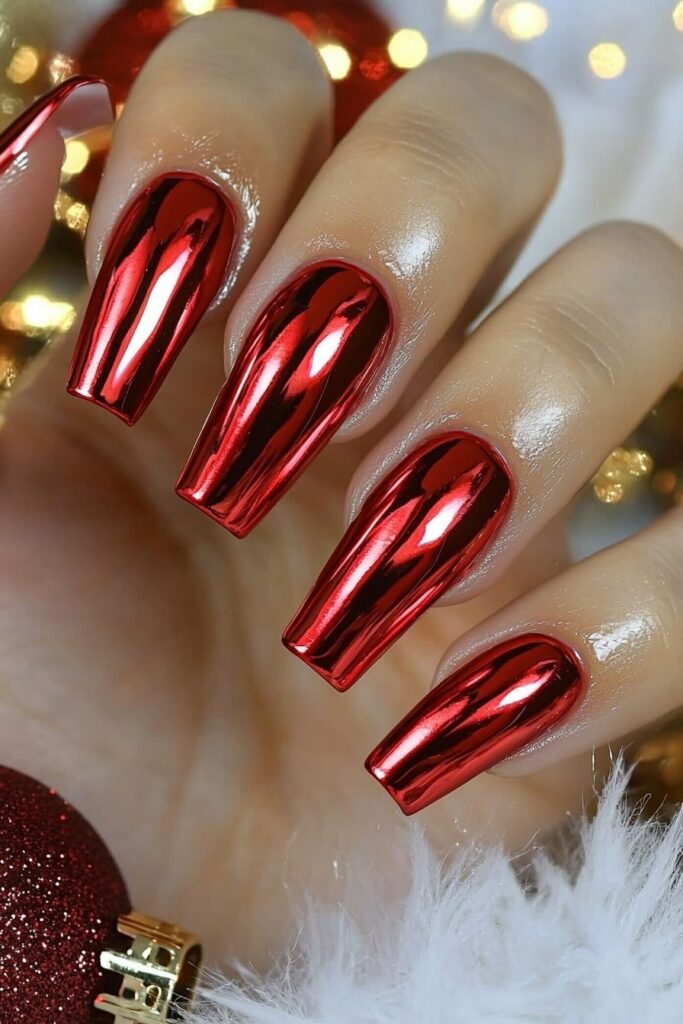
Red Chrome Holiday Glamor
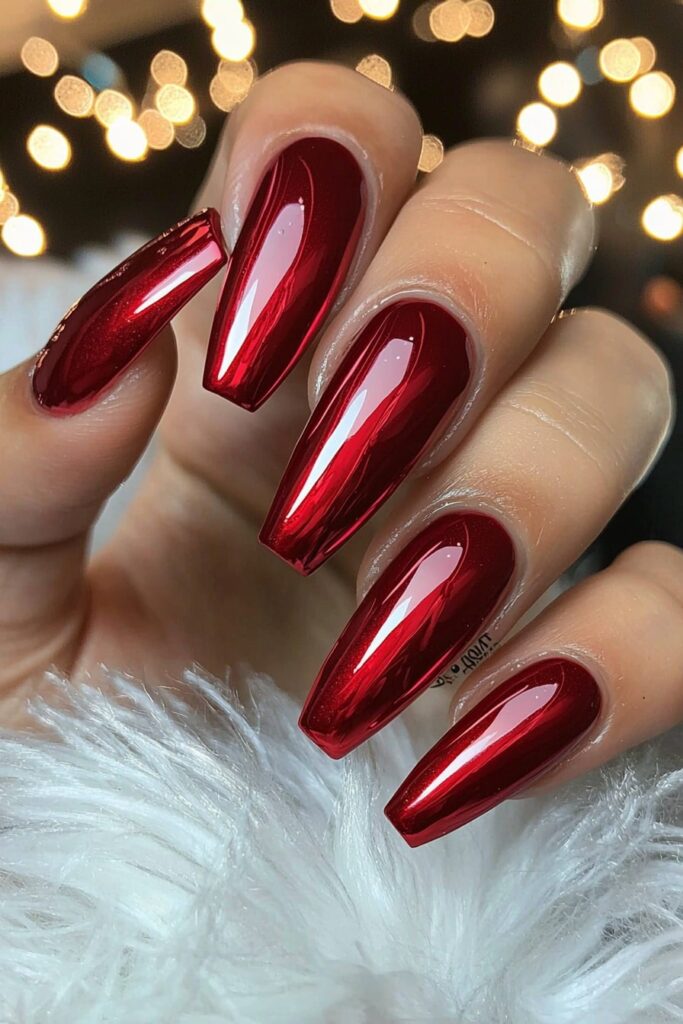
The red chrome holiday glamor trend has taken over this season in my work as a celebrity makeup artist. A Hollywood starlet’s holiday photoshoot last week proved how this mirror-like finish captivated everyone on set.
Chrome Effect
Red chrome’s magic comes from its mirror-like finish that reshapes the scene of traditional red Christmas nail designs. The dimensional effect sparkles and changes under different lights, making it perfect to capture in holiday party photos!
Application Process
My experience with A-list clients taught me the quickest way to achieve a perfect chrome finish:
- Apply a high-quality peel-off base coat
- Layer with a deep red gel polish
- Buff chrome powder using a special applicator
- Seal with a no-wipe top coat that lasts
Maintenance Tips
Protection matters most to keep these stunning red Christmas acrylic nails looking fresh. Red carpet events taught me that gloves are crucial during household tasks. The perfect holiday glamor stays through celebrations if you apply cuticle oil daily and refresh the top coat every few days. These simple steps keep that showstopping chrome finish beautiful.
Festive Red Plaid Pattern
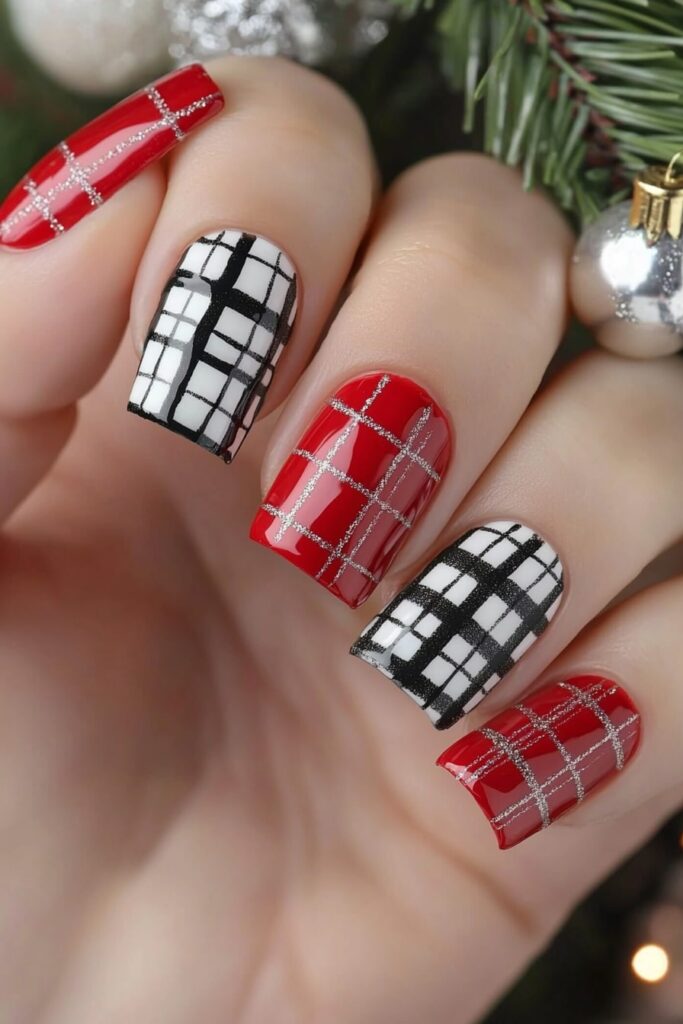
I created a Festive Red Plaid Pattern while preparing a celebrity client for a holiday magazine cover, and it became an instant sensation. This design brings the cozy comfort of holiday flannel to your fingertips, and I’m thrilled to share my professional secrets with you.
Design Elements
Plaid’s beauty comes from its artistic nature and structure. A pale pink base instead of stark white serves as my foundation – a technique I found that adds sophistication during a high-profile photo shoot. The pattern springs to life with intersecting lines using shimmery red and reflective green polishes. This creates that classic tartan effect that fits perfectly with the holiday season.
Color Combinations
My experience with red Christmas nail designs has led me to perfect these festive color combinations over the years:
- Shimmery red with reflective green for traditional charm
- Burgundy with silver accents for elegant sophistication
- Deep red with sparkly gold for luxurious appeal
- Cherry red with pearl white for classic beauty
Durability Guide
My signature three-step process ensures your Christmas acrylic nails last through every holiday celebration. Start with a quality base coat, apply thin layers for the pattern, and seal with a professional-grade top coat. My celebrity clients know to refresh the top coat every few days – the same advice that helped an A-list actress’s plaid design stay perfect through an entire press tour.
Ruby Red Poinsettia Art
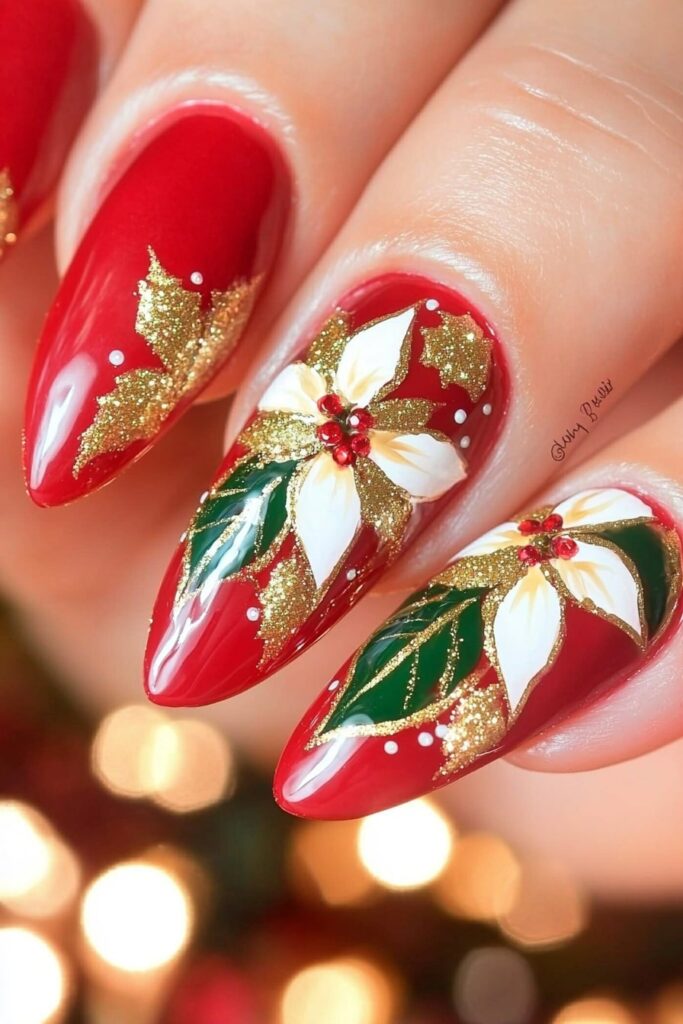
A recent holiday photoshoot for Vogue gave me the perfect opportunity to create a stunning Ruby Red Poinsettia Art design that captured Christmas’s essence. This beautiful technique has become a favorite among my celebrity clients.
Flower Details
The design’s beauty comes from delicate poinsettia flowers painted on a deep, dark burgundy base with subtle sparkle. Beaded centers add that extra touch of glamor to each flower. The photographer couldn’t stop raving about how the flowers came alive under the studio lights during a famous actress’s holiday card shoot.
Color Selection
My experience has led me to perfect these combinations:
- Deep burgundy base with pure white flowers
- Blood crimson with pearl white accents
- Ruby red with gold-beaded centers
- Dark red with crystal shimmer details
Application Technique
The quickest way to achieve this look uses a small detail brush, which I’ve refined over the last several years. Here’s my professional secret: The flower shape starts with a lighter red base that gets completely filled in. White petals are added next and carefully layered to create dimension. Signature beaded centers complete the look – a technique that emerged during a holiday magazine cover project and made this design truly unique.
Red Velvet Matte Finish
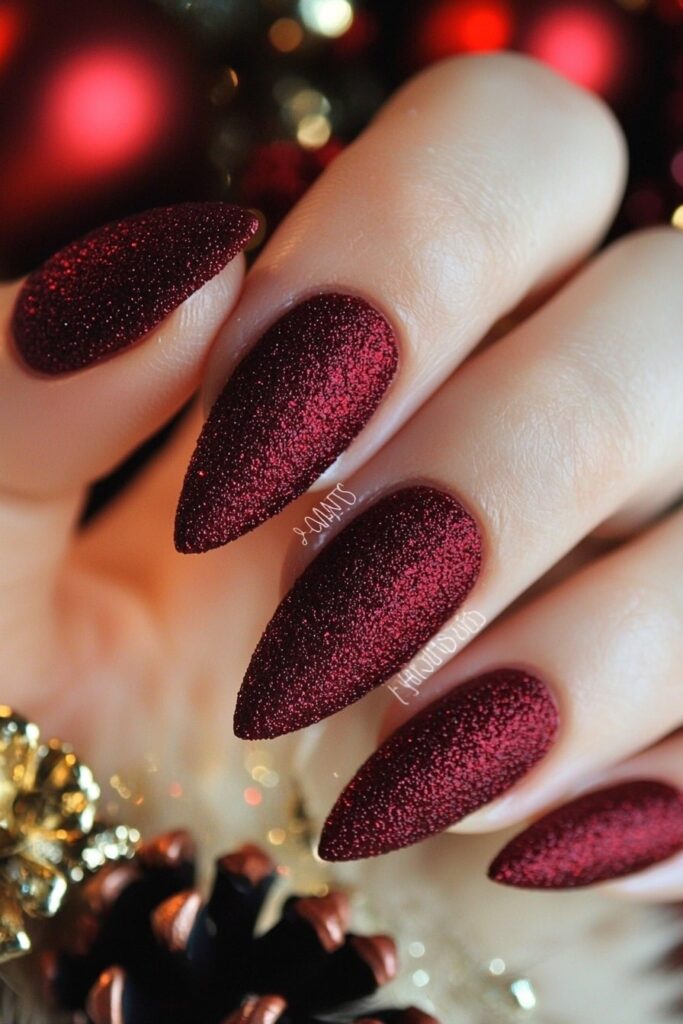
A client at my Beverly Hills salon asked me about creating the perfect Red Velvet Matte Finish for her holiday party last week. This luxurious finish has become my signature style that I love creating for red Christmas nails during the festive season.
Texture Details
Velvet matte’s beauty shines through its unique, soft-focus appearance. My technique creates a finish that resembles crushed velvet under lights and looks stunning in holiday photos. The texture has rich, dimensional qualities similar to fabric that make it distinct from traditional glossy finishes.
Application Process
My experience with red Christmas acrylic nails taught me the quickest way to achieve this look:
- Apply a quality red base coat
- Layer two thin coats of velvet-effect polish
- Add magnetic powder to improve texture
- Complete with a specialized matte top coat
Care Instructions
My celebrity clients trust me with their holiday manicures, and I share these professional maintenance secrets with them. Your velvet matte finish stays fresh with regular alcohol wipe cleaning – a technique I discovered while working with an A-list client before her holiday movie premiere. The perfect velvet effect lasts longer if you avoid applying hand creams directly on nails and refresh the matte top coat every few days. Pro tip: The stunning matte finish stays pristine when you keep your hands away from powders and cosmetics.
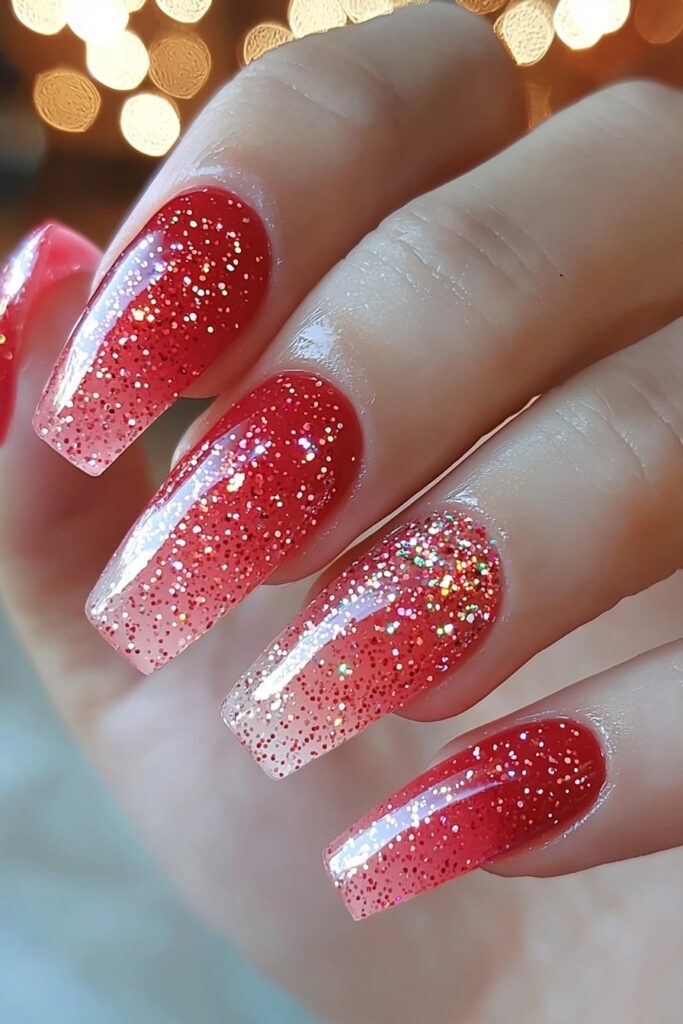
Glittering Red Gradient
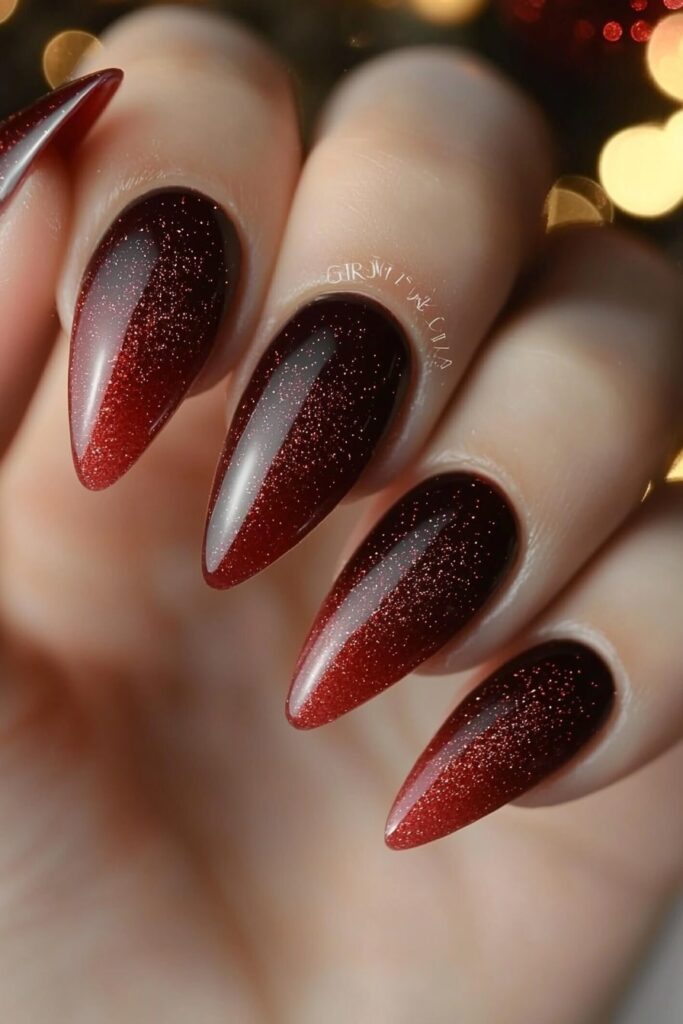
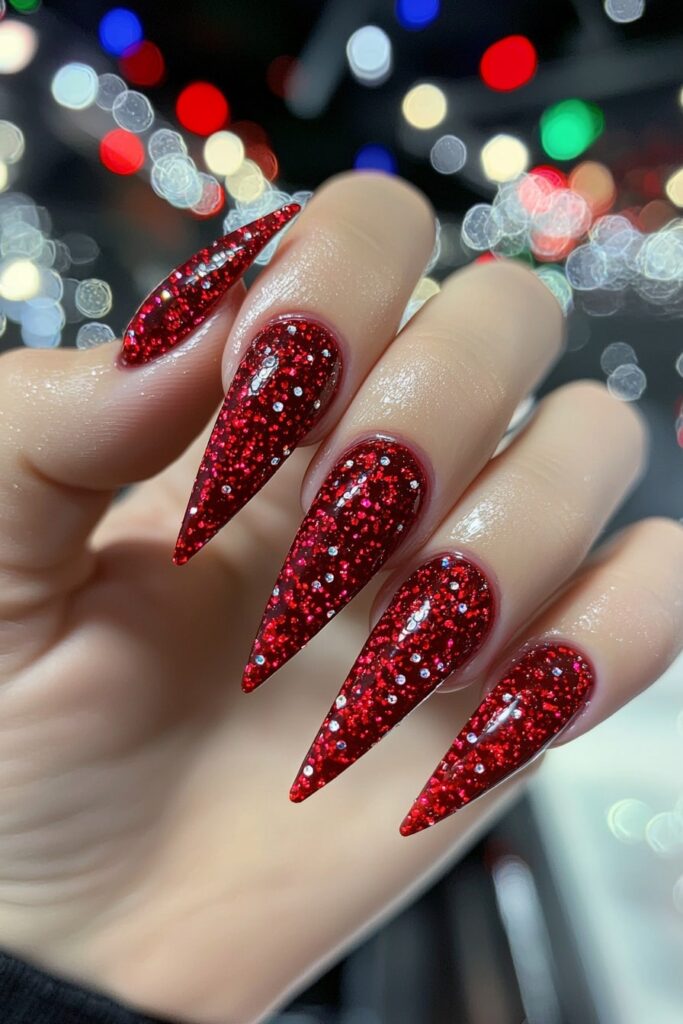
Last week, I created a stunning Glittering Red Gradient while getting an A-list actress ready for her holiday movie premiere. The design caught everyone’s attention, and they kept asking about my technique. This signature holiday look has turned into my go-to style for clients who want something elegant yet eye-catching.
Color Transition
I’ve become skilled at blending five distinctive red shades to create the perfect gradient: black cherry, merlot, red apple, cherry, and firecracker. My secret recipe creates what I call the “mulled wine effect” through smooth color transitions. The photographer at a recent magazine cover shoot couldn’t stop praising how beautifully the colors caught the light.
Glitter Selection
Here are my top glitter recommendations that never fail to impress:
- Chunky red glitter adds bold, eye-catching drama
- Fine shimmer particles create subtle elegance
- Mixed-size glitters provide multidimensional depth
- Holographic particles bring extra holiday magic
Application Guide
My celebrity clients love this foolproof method I’ve developed over the years. Start with a clear base coat that protects your nails. The real magic happens as you apply the ruby red polish – sprinkle or dab your chosen glitter while the polish stays wet. The perfect gradient effect comes from focusing on the tips. My signature clear top coat seals the glitter and makes your design last through every holiday party.
Christmas Light String Design
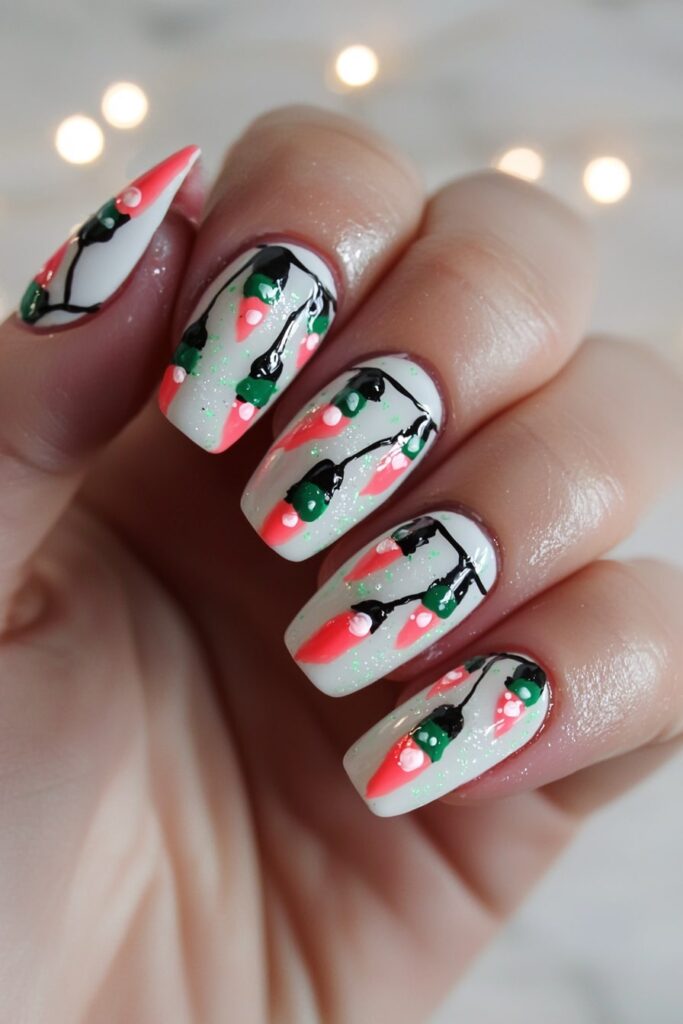
I found that there was a trending design while creating holiday looks for a celebrity Christmas special yesterday. The Christmas Light String Design has become this season’s most photographed nail art on social media. The design captures the magical twinkle of holiday decorations, and that makes it special to me as a celebrity makeup artist.
Pattern Details
Perfect light strings need precise wire pattern placement. A clean white base works best – the same technique I used to create looks for last month’s holiday magazine shoot. My process involves using a fine-liner brush to create delicate curved lines that flow like natural Christmas light drapes. My signature touch adds tiny bulb bases with black gel paint, and they need perfect spacing to look realistic.
Color Coordination
My A-list clients love these festive combinations:
- Traditional mix: red, blue, yellow, and green that brings classic appeal
- Pastel palette: soft pink, mint, and lavender that creates modern elegance
- Metallic fusion: gold, silver, and ruby red perfect for luxury events
- Winter wonderland: white, ice blue, and crystal clear that adds sophisticated charm
Maintenance Tips
Proper sealing is a vital part of this design. My experience from countless holiday red carpet events shows results. The high-quality top coat should stay within the black outline to prevent color bleeding. My celebrity clients need their red Christmas nails to last through multiple holiday parties. They should refresh the top coat every three days and avoid harsh chemicals that could dull the vibrant colors.
Red Crystal Snowfall
A leading fashion magazine asked me to prepare for an exclusive holiday photoshoot. I found that Red Crystal Snowfall designs blend elegance with festive charm perfectly. My celebrity clients love how these crystals catch the studio lights and create a magical winter wonderland effect on their nails.
Crystal Placement
I have become skilled at crystal placement after many red carpet preparations. The cascading effect mimics falling snow beautifully. My signature technique starts with larger crystals near the cuticle that gradually transition to smaller ones toward the tip. These crystals work best:
- SS3 crystals for delicate accents
- SS5 stones for the main design
- SS7 crystals as statement pieces
- Premium caviar beads for filling spaces
Design Elements
These impressive red Christmas nail designs start with a rich red base coat with subtle shimmer. Magic happens as I layer different crystal types to create depth and dimension. The photographer couldn’t stop capturing close-ups of my client’s hands at a holiday movie premiere recently.
Durability Guide
Long-running holiday shows taught me that proper crystal application is vital for longevity. Each stone gets cured individually with specialized gel adhesive. Pro tip: My clients maintain that perfect holiday sparkle by applying a thin layer of top coat around (not over) the crystals every few days.
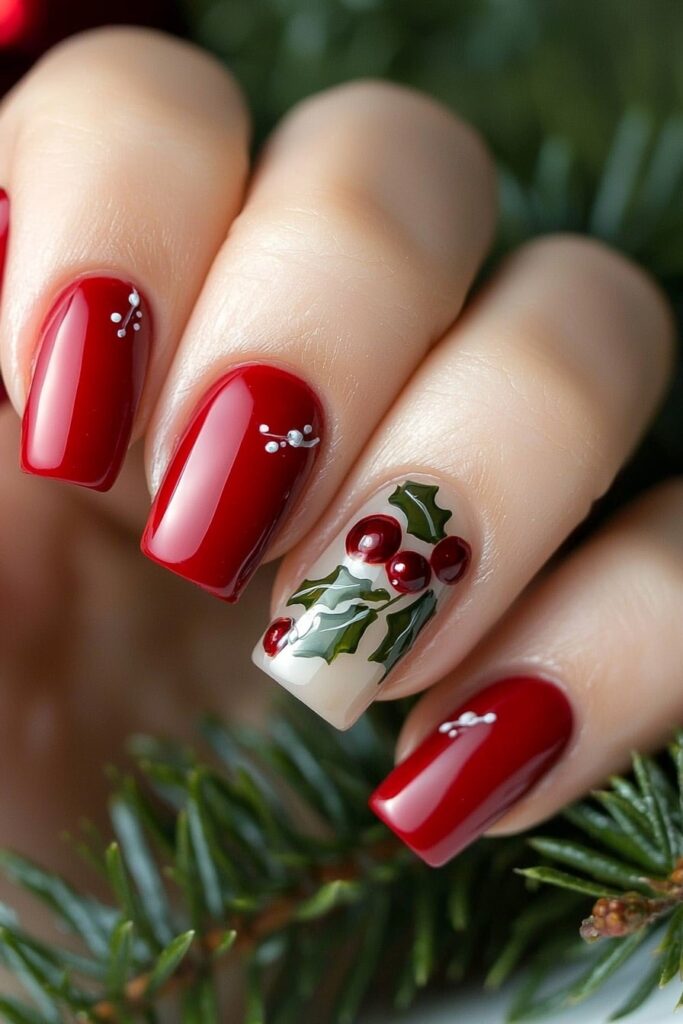
Holly Berry Accent Nails
I worked on a Holly Berry Design in my studio this morning for a holiday magazine shoot. The design beautifully captures winter’s elegance. Red Christmas nails with holly berries have become my signature style after experimenting with Christmas designs over the last several years.
Pattern Details
A sheer white backdrop makes the holly design stand out in my signature technique. I found that creating thin, delicate stems first works best when I was preparing a client for her holiday film premiere. These stems guide the leaf placement and create a balanced, professional finish.
Color Selection
My clients love these holly berry combinations:
- Shimmering red berries with three different green finishes
- Pearl-finish red dots with matte green leaves
- Crystal-enhanced berries with metallic green accents
- Soft white snowfall effect with ruby red accents
Application Technique
My secret to perfect holly berries comes from careful layering. The process starts with thin stem lines, followed by alternating green shades for leaves. Berries are added last, and shimmery red polish creates more festive sparkle than cream finishes. My clients love the magical touch that comes from adding delicate white dots for a snow-falling effect.
Red Mirror Chrome Effect
My experience with A-list celebrities has taught me that the Red Mirror Chrome Effect needs precision and patience. Last month, I worked with a leading actress before her holiday film premiere and created this stunning look that gives a mesmerizing finish.
Chrome Application
A perfect mirror-like finish depends on the right application technique. The base needs a no-wipe gel top coat which is vital for a flawless chrome effect. Here’s my tried and tested process that works every time:
- Apply chrome powder using a silicone applicator
- Buff in circular motions until mirror-like
- Remove excess with a soft brush
- Seal with specialized top coat
Color Impact
The red chrome effect’s beauty comes from the way it changes under different lights. A photographer at a recent magazine shoot couldn’t believe how the finish changed from deep ruby to brilliant scarlet with each flash. The right base color makes all the difference – a deep burgundy creates that rich, dimensional look.
Care Instructions
Creating red Christmas nail designs for my celebrity clients has shown me how proper care makes a difference. My professional tip: stay away from water for 24 hours after application. The mirror-like finish lasts longer when you wear gloves during household tasks and use cuticle oil daily. My clients’ nails stay perfect through multiple holiday events and red carpet appearances with these simple steps.
Candy Apple Red Shimmer
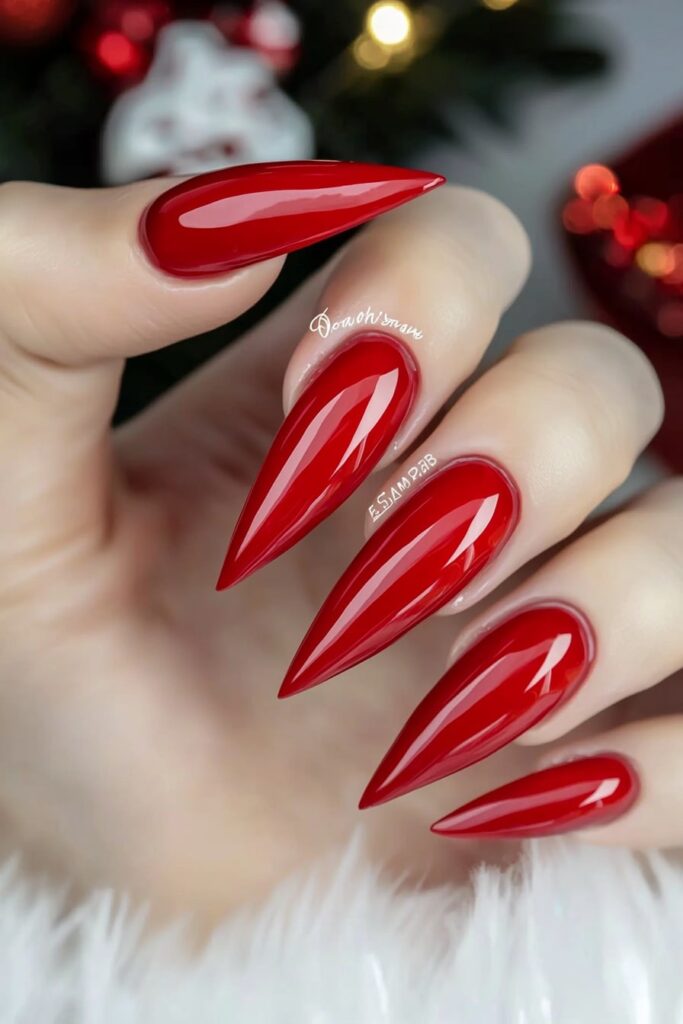
A recent holiday campaign shoot showed me that Candy Apple Red Shimmer makes the ultimate statement for festive nails. My experience as a celebrity makeup artist has shown how this vibrant, warm shade can reshape the scene of any holiday look.
Color Selection
Candy apple red means more than just another shade of red to my clients – it’s their statement of confidence. This shade looks amazing on warm and olive skin tones, especially when you have those gorgeous orange undertones. My secret tip: A subtle pearl finish layered on top creates depth that photographs beautifully. I developed this technique while working on holiday magazine covers.
Shimmer Effect
Candy apple red’s magic comes alive with the right shimmer finish. My celebrity clients love these stunning options:
- Ultra-glossy top coat for classic elegance
- Holographic shimmer for modern sparkle
- Pearl-infused finish for sophisticated shine
- Satin shimmer for subtle glamor
Maintenance Guide
Creating red Christmas nail designs for A-list events over the last several years has taught me that this vibrant shade needs special care. A quality top coat applied every three days will keep that shimmer effect perfect. Pro tip: My clients who attend multiple holiday parties use cuticle oil twice daily. This keeps their color fresh and prevents fading. One of my celebrity clients used this technique to keep her candy apple red manicure flawless throughout a holiday press tour.
Christmas Gift Bow Design
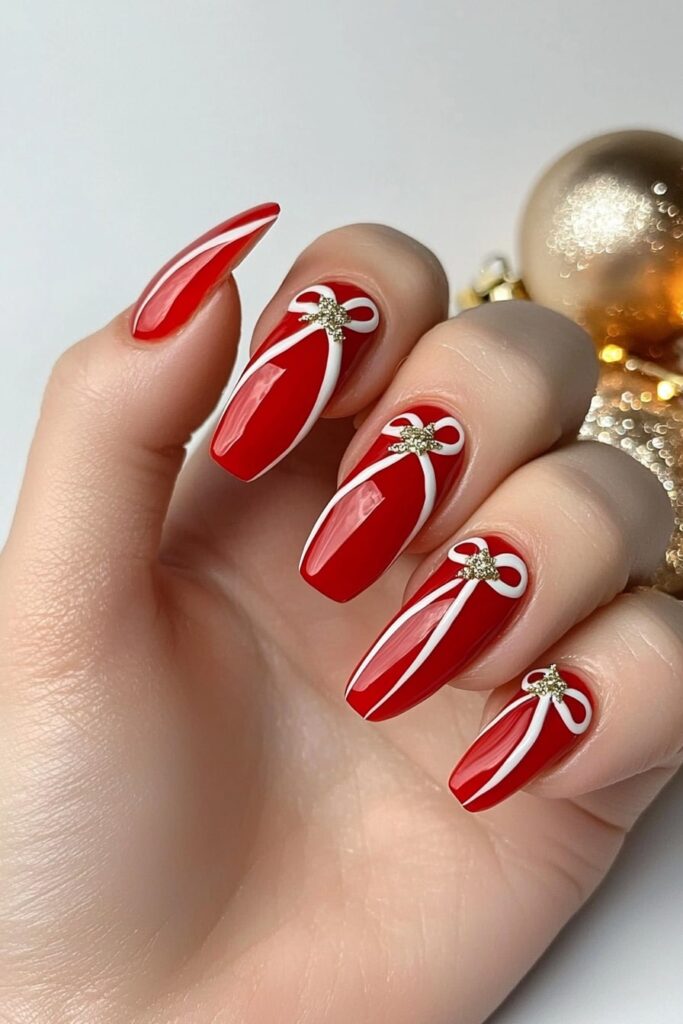
A celebrity client needed makeup for her holiday charity gala last night. The Christmas Gift Bow Design I created caught everyone’s attention. My experience as a celebrity makeup artist with A-list clients has helped me become skilled at this intricate design. The result makes your nails look like perfectly wrapped presents.
Bow Details
The dimensional effect makes this bow design special. My technique combines gel and acrylic to create a raised bow that looks real. My signature touch adds small texture lines similar to fabric, which makes the bow look like it wraps around your nail.
Color Coordination
My celebrity clients love these photo-ready combinations:
- Classic red bow on metallic silver base
- Deep burgundy bow with pearl white accents
- Ruby red bow on champagne shimmer
- Crimson bow with gold glitter base
Application Process
My experience with red Christmas nail designs has led me to develop a reliable technique. The process starts with a smooth base coat before building the bow structure with thin gel layers. The perfect loop shape comes first, followed by the tails. Pro tip: Each layer needs just 15 seconds to cure before adding the next one. This technique, which I found that there was during a holiday magazine cover shoot, will give a perfect dimension without bulk.
Red Winter Sweater Pattern

Last week during a luxury winter fashion shoot, I found that the Red Winter Sweater Pattern has emerged as this season’s most sophisticated trend. The design brings your favorite holiday sweater’s cozy charm right to your fingertips, which I love as a celebrity makeup artist.
Design Elements
This nail art’s beauty shines through its textured appearance that mirrors knitted fabric perfectly. My work with A-list clients who wanted something uniquely festive yet elegant led me to develop this technique using specialized nail stamps. The pattern features delicate lines and subtle texture that beautifully catch the light.
Pattern Creation
These stunning variations will help you create the perfect sweater-inspired red Christmas nail designs:
- Classic cable knit with metallic red finish
- Nordic-inspired patterns with crystal accents
- Argyle design with pearl shimmer overlay
- Textured chevron with matte top coat
Durability Tips
My celebrity clients love how long-lasting this design can be. The perfect seal requires a super matte top coat that cures for exactly one minute. This approach creates that cozy sweater-like finish and ensures your Christmas acrylic nails red design stays flawless throughout holiday celebrations. My experience from last year’s holiday movie premiere season taught me that a thin refresher coat every five days works best.
Glittering Red Snowcaps
My latest celebrity masterclass featured the Glittering Red Snowcaps design that became an instant hit. This captivating shade of red paired with delicate snowcap details creates a mesmerizing effect perfect for holiday celebrations.
Design Details
Working with a famous actress for her winter wedding led me to find that there was this unique technique. The magic comes from a deep, rich red base – specifically shade #317, which looks stunning under both natural and artificial light. My signature touch adds a subtle shimmer that gives dimension to each snowcap and creates an almost three-dimensional appearance.
Glitter Selection
The perfect snowcap effect needs these carefully selected options:
- Holographic bright silver for dramatic sparkle
- Pearl white for sophisticated elegance
- Crystal shimmer for subtle sophistication
- Fine diamond dust for delicate detail
Application Guide
Creating countless red Christmas nail designs has helped me develop the quickest way to achieve this look. The perfect holiday depth comes from two thin coats of the rich red base. My specialized stamping plate technique, developed during holiday magazine shoots, creates the snowcap pattern. Pro tip: Cleaning new plates with acetone ensures perfect image transfer. A layer of no-wipe top coat seals the design without disturbing the delicate pattern.
Ruby Red Rhinestone Art
My Beverly Hills salon has been the birthplace of countless holiday designs, and Ruby Red Rhinestone Art stands out as the most sophisticated choice for festive manicures. The technique that combines classic elegance with modern sparkle came to life just yesterday as I prepared a leading actress for her Christmas movie premiere.
Stone Placement
Beautiful rhinestone designs depend on knowing how to place each stone. The process begins with larger stones (SS12) near the cuticle to create an eye-catching focal point. My signature technique creates a cascading pattern that naturally guides the eye along the nail. Premium stones deliver the perfect holiday sparkle:
- Swarovski crystals for maximum brilliance
- Preciosa stones for elegant shimmer
- Zodiac rhinestones for durability
- Premium flatback gems for secure placement
Color Coordination
The base color makes a significant difference in red Christmas nail designs. Deep burgundy red works best for cool-toned clients, while vibrant ruby complements warm skin tones. My experience with holiday magazine covers taught me that rhinestones should enhance the base shade rather than overpower it.
Maintenance Tips
Celebrity clients trust my Christmas acrylic nails red designs because of my proven maintenance routine. My professional secret includes daily cuticle oil application and protection from harsh chemicals by wearing gloves during household tasks. Each client receives a small maintenance kit with professional-grade nail glue and replacement crystals to fix loose stones.
Red Metallic Swirls
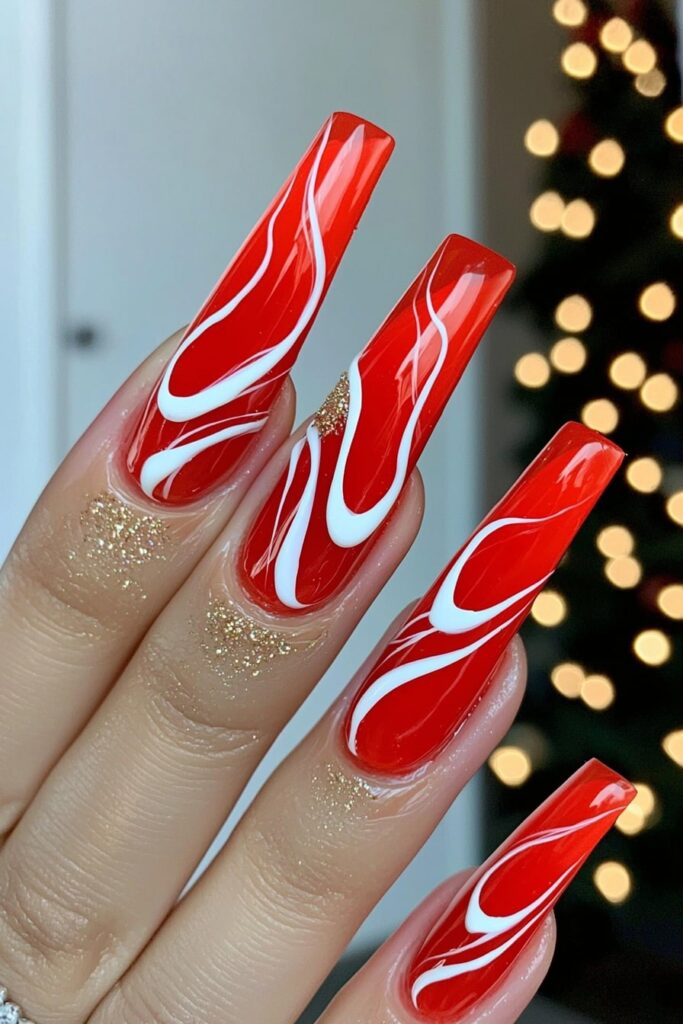
Yesterday, I experimented with the Red Metallic Swirls design while creating holiday looks for my celebrity clients. These elegant swirls catch the light like vintage Christmas ornaments and make perfect additions to your holiday celebrations.
Pattern Details
Stunning swirls come from varying the thickness of each curve. A famous actress’s holiday card shoot let me showcase this technique using thin and thick swirls that created depth and movement. Metallic finishes add sophisticated dimension and photograph beautifully in any lighting condition.
Color Selection
These stunning combinations will give you the perfect metallic swirl effect:
- Deep burgundy base with rose gold swirls
- Ruby red foundation with silver metallic accents
- Wine red canvas with champagne gold details
- Classic red with platinum swirl overlay
Application Technique
My expertise in red Christmas nail designs has grown over the last several years. Transfer foils and specialized gel polish create a foolproof method. My signature technique uses a thin nail art brush to create swirls, followed by metallic foil application while the gel remains tacky. This method emerged during a holiday magazine shoot and will give your swirls crisp edges and brilliant shine throughout the festive season.
Christmas Tree Accent Design
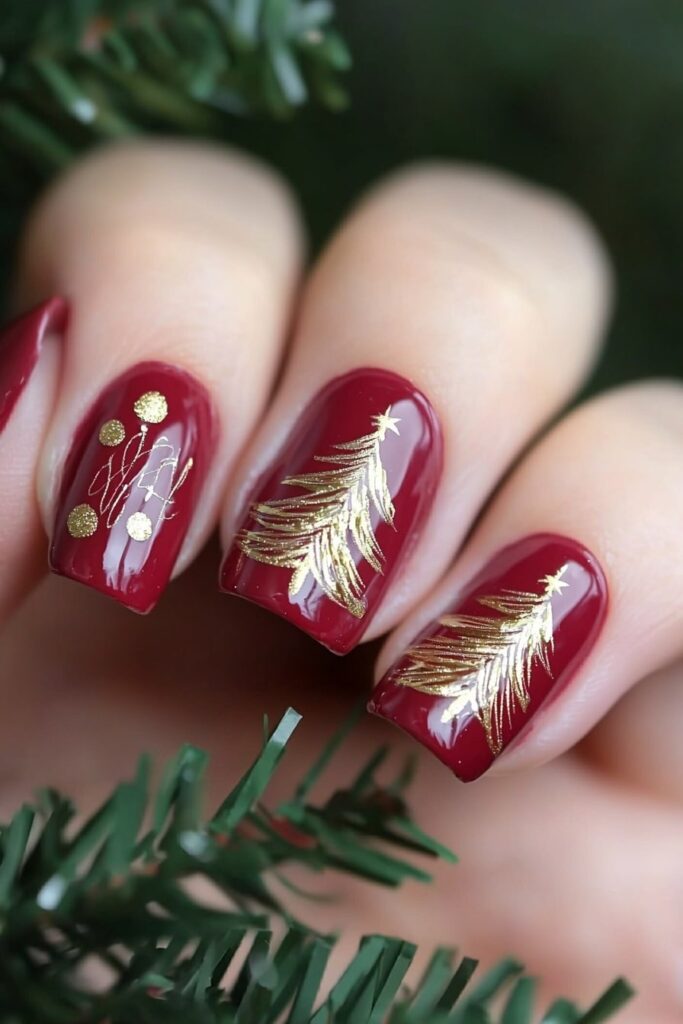
A recent holiday photoshoot with Vogue gave me the chance to create an elegant Christmas Tree Accent Design. This design blends sophistication with holiday charm. My A-list clients love this festive yet refined look, especially when they need something special to wear on the red carpet.
Tree Details
My technique creates miniature Christmas trees through negative space and delicate lines that look incredibly realistic. The process starts with a thin stem, and branches emerge through varied pressure with a fine detail brush. My signature touch adds tiny crystal accents that sparkle like ornaments, which makes each tree unique and stunning.
Color Combinations
My celebrity clients’ favorite holiday combinations include:
- Deep emerald trees on ruby red base
- Gold-lined trees with crimson accents
- Silver sparkle trees on burgundy background
- White crystal trees with red glitter base
Durability Guide
Creating red Christmas nail designs for magazine covers and red carpet events has taught me that proper sealing is significant to make designs last. The specialized top coat needs thin layer application, with extra attention around the tree details. Pro tip: My clients know to refresh their top coat every three days – the same advice that helped an A-list actress maintain her design throughout a holiday press tour.
Red Marble Effect
My latest holiday nail art masterclass helped me find that the Red Marble Effect has taken off with my celebrity clients. I’ve refined this technique through many red carpet events and can’t wait to share how you can create this stunning design.
Marble Technique
Room temperature filtered water makes all the difference – something I learned after a mishap at my first magazine shoot. The process starts with dropping alternating polish colors into water to form concentric circles. A fine-tipped tool helps create swirls that look like delicate ribbons. You need to work fast before the polish sets. This skill came in handy when I did an A-list actress’s nails for her holiday film premiere.
Color Selection
These combinations will give you that perfect marble look:
- Deep burgundy with pearl white for elegant swirls
- Ruby red with metallic silver for modern sophistication
- Wine red with rose gold for luxurious appeal
- Classic red with crystal clear for timeless beauty
Care Instructions
Making countless red Christmas nail designs taught me that proper maintenance is vital. My clients know they should add a fresh top coat every three days to keep the marble shining. My professional secret: cuticle oil applied twice daily keeps the design from losing its sparkle. This approach has kept my celebrity clients’ Christmas acrylic nails red designs looking fresh through multiple holiday parties.
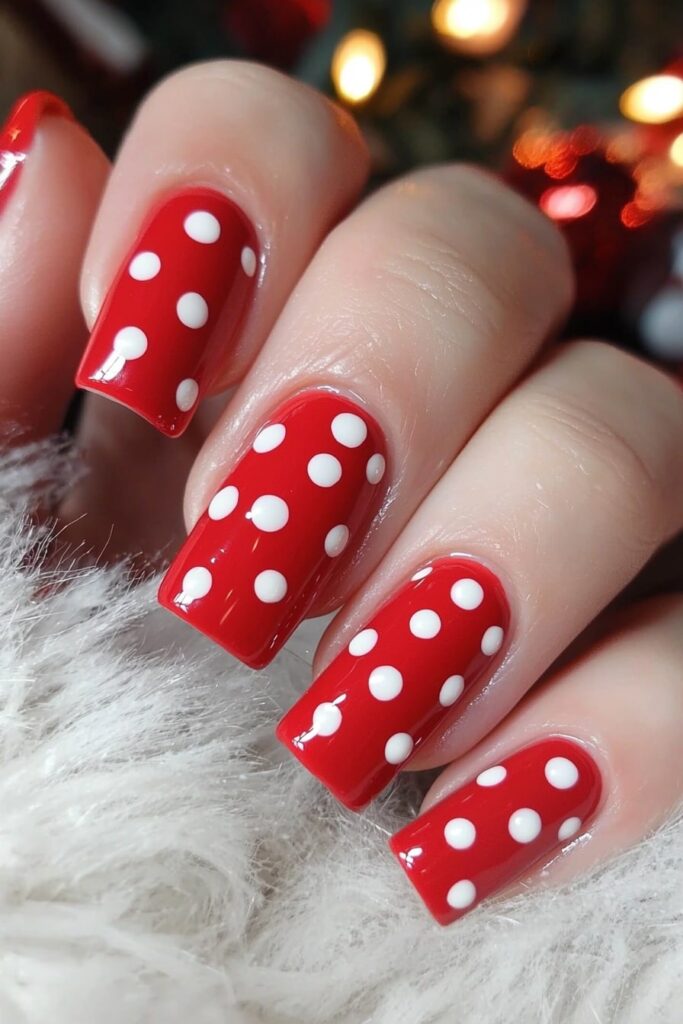
Festive Red Polka Dots
My latest holiday editorial shoot with perfect marble swirls led me to try a Festive Red Polka Dots design. This new style has become a favorite at my Beverly Hills salon. The polka dots’ simplicity mixed with rich holiday reds creates a look that’s both playful and sophisticated. My celebrity clients love it.
Pattern Details
The elegance of polka dots comes from their varied sizes. My signature dotting tool helps create a cascade of dots that flow smaller toward the nail tip. My secret? A quick practice dot on a pad makes all the difference. This technique worked great when I did an A-list actress’s nails for her Christmas movie premiere.
Design Elements
These stunning combinations will give you that perfect festive look:
- Classic red base with pearl white dots
- White base with ruby red dots
- Alternating red and white dots on clear base
- Shimmering red base with metallic dots
Application Process
My work with red Christmas nail designs has helped me refine this technique. Start with two thin base color coats and let each dry fully. Hold the professional dotting tool at a 90-degree angle to create round dots. Pro tip: Test each dot on a practice pad first. This step gives you consistent sizes and perfect placement. A specialized top coat adds holiday sparkle and brings out the dimensional effect without smudging.
Red Glitter Ombré
This morning, I created my signature Red Glitter Ombré technique while getting a superstar client ready for her holiday album cover. The look has become a sensation in Hollywood. My work with countless A-list clients has taught me that stunning designs need the right balance of sophistication and sparkle.
Color Transition
A sheer pink base serves as the foundation that builds into a deep ruby red. My signature technique uses a makeup sponge that creates the smoothest transition – a method I found during a holiday magazine shoot. These combinations create the perfect fade:
- Deep berry to bright red with silver shimmer
- Black cherry to fire engine red with gold sparkle
- Wine red to candy apple with holographic glitter
- Burgundy to crimson with diamond dust
Glitter Application
The CND Shellac No Wipe Top Coat is my secret weapon for red Christmas nail designs. I press glitter into wet polish with a dry brush – a technique that evolved from creating looks at last year’s holiday runway show. Success depends on quick work and mixing glitter sizes to add depth and dimension.
Maintenance Guide
My celebrity clients know the secret to keeping Christmas acrylic nails red fresh is a thin top coat every three days. Pro tip: Cuticle oil twice daily works wonders, and harsh chemicals will dull the sparkle. This routine helped an A-list client keep her perfect ombré throughout her holiday press tour.
3D Red Bow Design

I created a stunning 3D Red Bow Design for Anne Hathaway’s holiday photoshoot that became an instant sensation recently. The bow’s ability to catch light and create depth has made it one of my most requested red Christmas nail designs this season.
Dimensional Effects
My expertise in creating realistic-looking bows comes from a unique combination of gel and acrylic. My signature method builds the bow in layers that start with a thin base and add gradual dimension. The magic happens with precise folding – two loops come first, followed by tails shaped with a specialized brush that creates perfect texture details.
Color Selection
My celebrity clients love these show-stopping bow combinations:
- Deep burgundy bow with pearl white base
- Ruby red bow with gold chrome accents
- Metallic red bow on nude background
- Velvet-finish bow with crystal details
Durability Tips
Creating Christmas acrylic nails red designs over the last several years has taught me that proper sealing is vital for 3D elements. A flexible builder gel goes underneath the bow structure – a technique I developed during a magazine cover shoot that will give a lasting design. The design stays perfect longer when you apply a specialized top coat around (not over) the bow and refresh it every three days. This approach helped my client’s manicure last flawlessly through an entire holiday press tour.
Conclusion
My experience as a celebrity makeup artist and nail design expert has shown me countless trends that come and go, but red Christmas nail designs remain timeless. My work with A-list celebrities and holiday magazine covers has shown how these festive designs bring joy and confidence to everyone who wears them.
Just last week, I prepared an actress for her holiday film premiere, and she reminded me why these designs are so special. “Belle,” she said, “your Christmas red acrylic nail designs make me feel like every day is a celebration.” That’s exactly what I want to create – looks that capture the holiday spirit and make you feel extraordinary.
These red Christmas nail ideas offer incredible versatility. The classic elegance of French tips and the modern appeal of chrome finishes give everyone a perfect design that matches their personality and occasion. My Beverly Hills salon has taught me that the magic doesn’t just lie in the design itself – it’s about how it makes you feel.
Note that the perfect holiday manicure makes you smile every time you look at your hands. The festive season brings opportunities to experiment with these designs and make them your own. Wear them with confidence because that’s what makes any nail design truly spectacular.