
Short neutral winter nails dominate the beauty scene this season! My work as a celebrity makeup artist in Los Angeles has given me a front-row seat to this trending style.
Creating stunning looks for A-list clients taught me that winter nails pack a powerful punch without excessive length or complex designs. Simple Christmas nails often outshine intricate patterns in sophistication. My experience with celebrities and fashion shows proves this time and again.
These 23 chic short square winter nail designs blend style with functionality perfectly. The collection helps you achieve that perfect winter look, whether you plan to attend holiday parties or just want to add seasonal sparkle to your daily routine. Each design comes with my personal stamp of approval and testing.
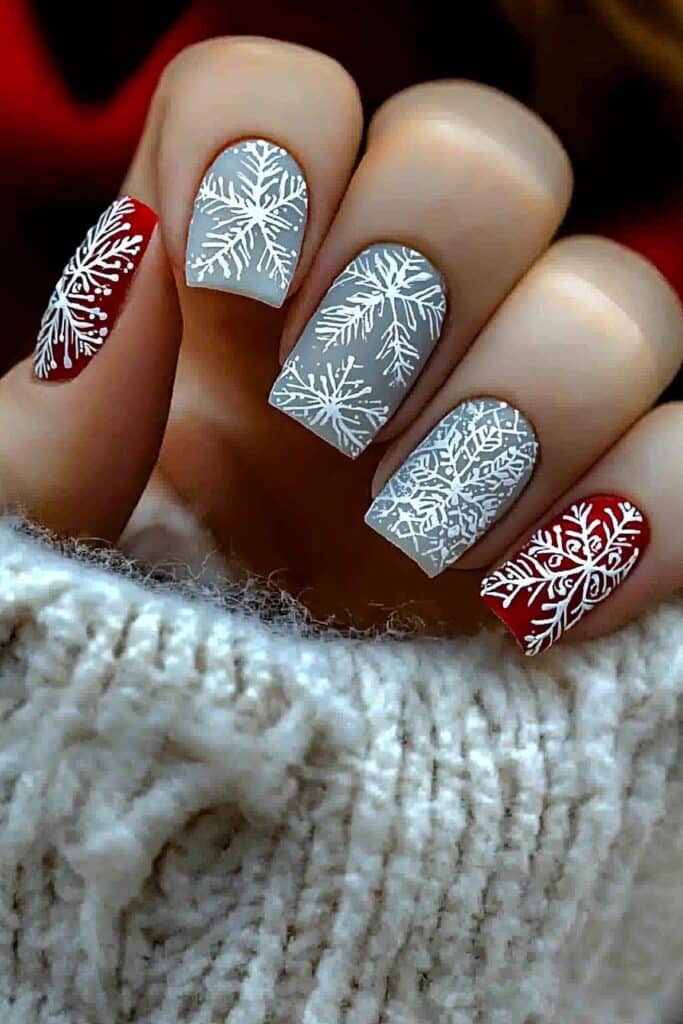
Snowflake Sparkle Square Nail
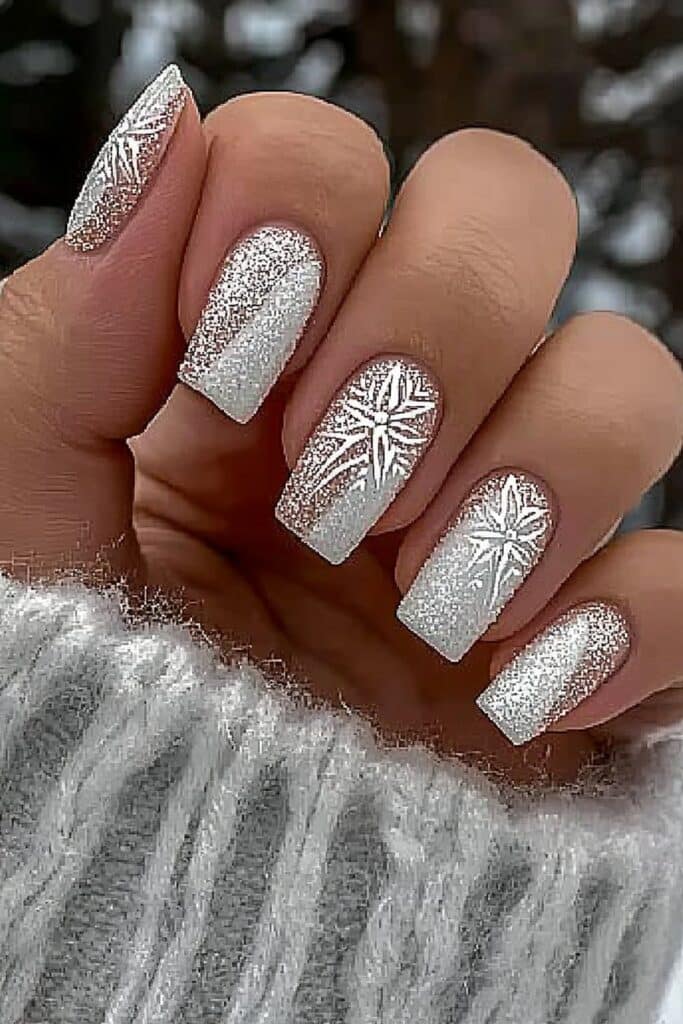
My experience creating red carpet looks has taught me that snowflake nail designs add winter glamor perfectly to short square nails. Last week, I created a stunning snowflake sparkle design for an A-list client at a holiday premiere. Everyone wanted to know the details.
Snowflake Sparkle Design Elements
This design’s versatility makes it magical. The core elements that work best include icy blue, midnight navy, or snow white base colors. Silver glitter and holographic powder serve as stunning accent materials. Delicate snowflakes and crystal patterns round out the design options.
Snowflake Sparkle Application Tips
A contrasting base color starts the perfect snowflake design. My professional technique requires two coats of the base shade. Stamping plates or a fine-tipped brush help create the snowflakes. Pro tip: Tiny dots at the snowflake tips add extra sparkle.
Snowflake Sparkle Maintenance
A high-quality top coat every three days keeps your winter nails fresh. Daily cuticle oil prevents the design from chipping – something my celebrity clients swear by.
Important: Your snowflake art needs protection with gloves during household chores.
Balance makes this design stand out. My signature style for winter red carpet events features detailed snowflakes on two accent nails. The other nails stay simple with a subtle shimmer. This approach combines elegance and practicality for short square nails.
Icy French Tips
My experience with A-list celebrities has taught me something interesting – the most striking winter nail designs can be incredibly simple. The Icy French tip became my signature look this season. My clients love it because it works perfectly for elegant events.
Icy French Tips Design Elements
Everything in the classic French manicure gets a winter makeover with these features:
- Milky white base mixed with gentle shimmer
- Crystalline blue or silver tips
- Optional rhinestone accents to add glamor
- Thin, precise lines that create a modern look
Icy French Tips Application Process
The perfect milky base comes from mixing cookie cream and gentle white. Pro tip: The tip color should go from the center outward. Small dashes connect into a perfect arc. The icy effect emerges by layering different shades of blue or silver. This creates depth that makes light dance beautifully.
Icy French Tips Longevity Tips
Quality base coat makes Icy French tips last through winter events – this is non-negotiable in my salon. My celebrity clients know they need to reapply top coat every three days. Cuticle oil before bed helps too. Important: Your nails deserve the same care as fine jewelry to keep that perfect tip line intact.
This design stands out because it never loses its appeal. Just like a blazer for your nails, it stays stylish and matches everything in your winter wardrobe perfectly.
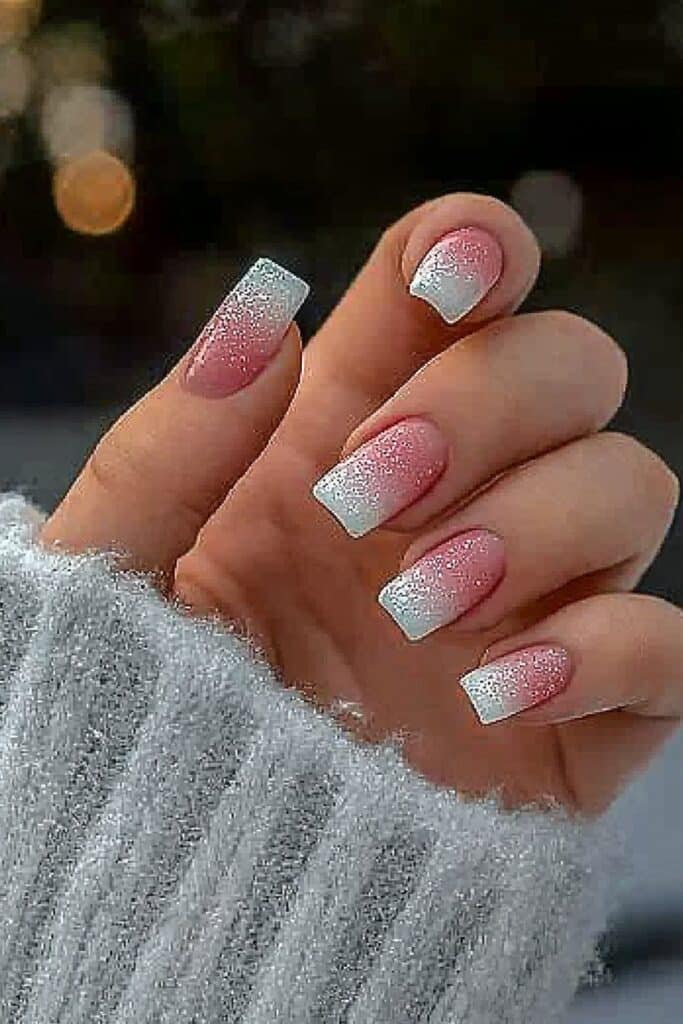
Frosted Glitter Ombre
I created a frosted glitter ombre while preparing a Hollywood starlet for her winter movie premiere that became an instant hit on social media. This design brings together gradient effects’ sophistication with winter sparkle’s magic.
Frosted Glitter Ombre Color Selection
These stunning combinations will give you the perfect winter ombre:
- Silver to ice blue for a frosty effect
- Clear to champagne for elegant events
- White to holographic that creates drama
Frosted Glitter Ombre Technique
A clear base coat sets the foundation for the gradient effect. I apply the glitter polish with a small sponge from the tip and work my way down. Pro tip: Tap the sponge instead of dragging it to create a natural fade. Building up layers slowly makes the difference – three thin coats will give you that perfect transition.
Frosted Glitter Ombre Care
My celebrity clients know they need a fresh top coat every three days to keep their gradient perfect. The secret to long-lasting glitter ombre lies in protecting the tips from wear and tear. Cuticle oil application each day keeps the skin healthy and prevents glitter from lifting at the edges. Important: Lukewarm water works better than hot water to maintain the sparkle’s intensity when washing hands.
Midnight Blue Shimmer
The midnight blue shimmer nails stole the spotlight from traditional festive reds at last month’s winter fashion showcase. This sophisticated shade has become my top recommendation to clients who seek elegance with a twist.
Midnight Blue Shimmer Polish Options
The perfect midnight blue should have these qualities:
- Rich cobalt base with intense blue shimmer
- Opaque coverage in 2-3 coats
- Iridescent finish for extra dimension
- LED-compatible formulas for longevity
Midnight Blue Shimmer Application
My foolproof technique ensures perfect application results. First tip: A quality base coat is vital for dark colors. The shimmer polish needs thin layers from base to tip. My celebrity clients love the starry night effect created by the final layer of fine shimmer topcoat.
Midnight Blue Shimmer Styling
Evening events showcase this shade beautifully, and it looks equally stunning during daytime wear. Pro styling secret: My red carpet clients achieve a regal look with gold accessories. Corporate events call for subtle shimmer with just two coats, while holiday parties shine with an extra layer of holographic top coat.
White Marble Winter
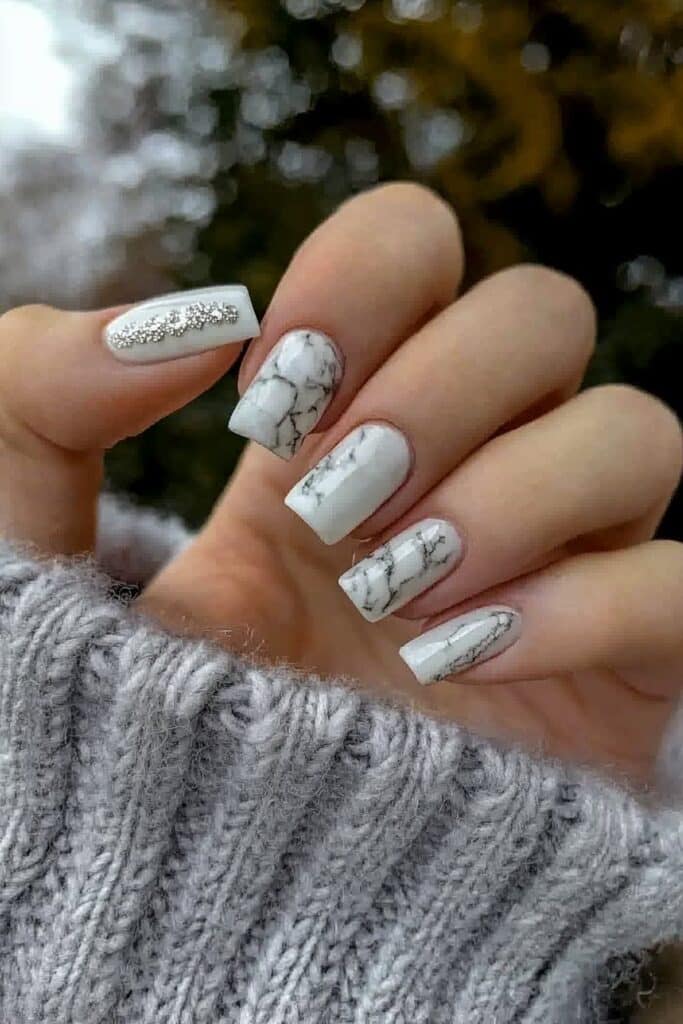
Last week, I was getting a leading actress ready for her winter photoshoot and found that marble nail designs have become the new must-have for sophisticated winter looks. Marble nails know how to capture luxury’s essence while you retain control of that perfect short square shape.
White Marble Design Elements
These elements create the perfect marble effect:
- Classic white base with gray swirls
- Subtle gold or silver accents
- Light neutral undertones
- Delicate veining patterns
White Marble Application Steps
A pure white base coat creates the perfect canvas. My signature marbling technique involves dropping polish into room-temperature water and creating swirls with a fine-tipped tool. Pro tip: The most natural marble effect comes from gentle movements, so avoid over-swirling the colors.
White Marble Maintenance
Your marble nails need a high-quality top coat every three days to stay fresh. Here’s a secret I tell my A-list clients: cuticle oil applied twice daily prevents the
design from losing its shine. Important: Your marble masterpiece needs protection, so wear gloves during dishes or cleaning.
This versatile design works beautifully at holiday parties and casual outings. These nails look stunning in photos, which explains their popularity among my celebrity clients at red carpet events.
Evergreen Minimalist
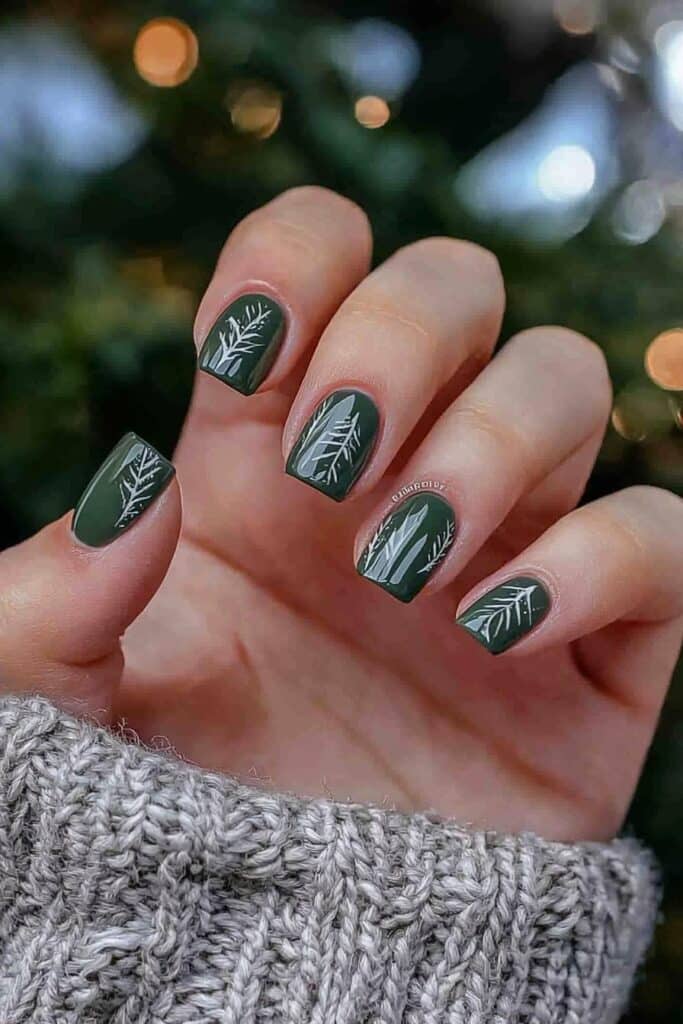
My A-list clients have shown growing interest in evergreen minimalist nails. This trend caught my attention during a recent session. A memorable moment came just yesterday when I created this sophisticated look for an Oscar-nominated actress at a winter gala.
Evergreen Color Selection
The perfect evergreen shade needs these key qualities:
- Deep forest green for sophistication
- Sage green for subtle elegance
- Khaki undertones for versatility
- Army green for modern edge
Evergreen Design Process
A sheer milky white base evens out imperfections – this is my signature technique. Pro tip: Simple color-blocked swoops alternate between nail sides to create visual interest. A line of small dots in negative space can boost the design’s appeal naturally.
Evergreen Style Pairings
Evergreen minimalist nails are the foundations of versatile styling. Gold accessories complement these nails at red carpet events to create a luxe look. My celebrity clients love how these nails work with casual winter outfits and formal evening wear. A matte top coat adds that final touch of sophistication – it’s become my signature finish for this design.
Cranberry Red Gloss
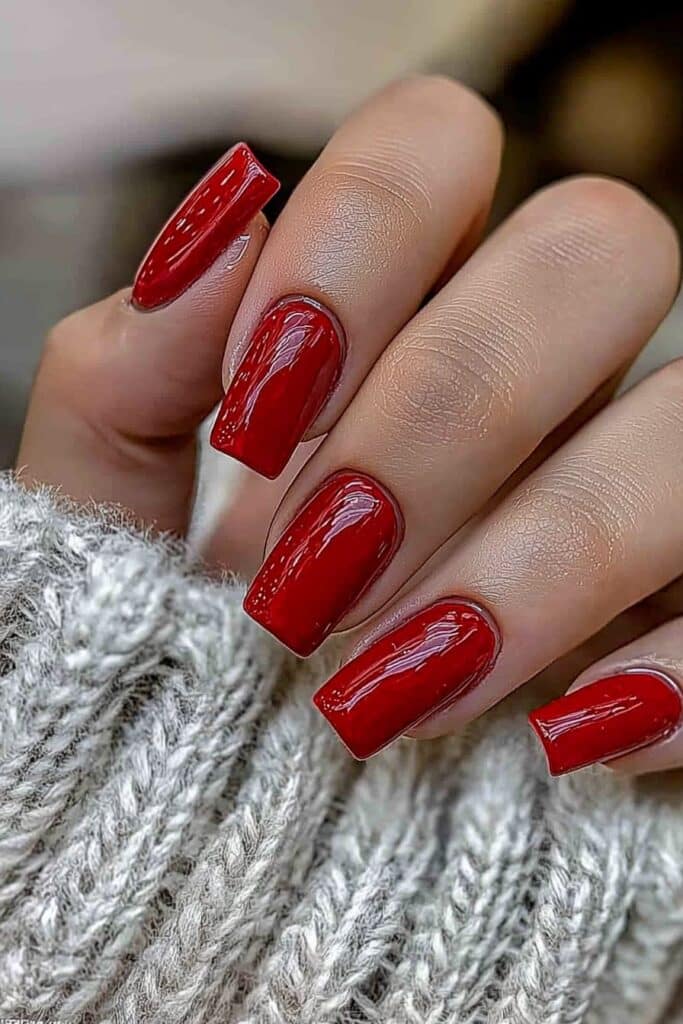
Yesterday, I worked with an A-list actress to prep her nails for a holiday film premiere. My go-to winter shade – a perfect cranberry red – was the obvious choice.
This rich, cool-toned red has become my signature holiday color that lets clients make a bold statement while they retain control of their sophisticated look.
Cranberry Red Polish Options
These tried-and-tested options deliver that perfect cranberry shade:
- Deep burgundy-red with blue undertones
- Rich cranberry with subtle shimmer
- Classic opaque cranberry with super gloss finish
Cranberry Red Application Tips
My red carpet experience has taught me the best way to apply cranberry polish. First step: The results depend on meticulous cuticle preparation – this distinguishes professional work from amateur attempts. A quality base coat goes on first, then two thin layers of the cranberry shade. My celebrity client secret: The most even coverage comes from applying each coat from the center and working outward.
Cranberry Red Care Guide
My clients get a foolproof care routine to keep their cranberry gloss looking perfect. Regular moisturizing makes all the difference – daily cuticle oil is a must. Pro tip: A fresh top coat every three days keeps that stunning glossy finish. Red carpet clients should wear gloves during household tasks to protect the rich color from dulling.
Winter Wonderland Holographic

One of my red carpet clients couldn’t stop raving about the holographic winter nails I designed for her upcoming holiday movie premiere. Creating that perfect winter wonderland holographic effect needs the right technique, and I’m thrilled to share what I’ve learned with you.
Holographic Effect Creation
Beautiful holographic nails depend on choosing the right materials. These are my go-to products for celebrity sessions:
- High-quality no-wipe top coat
- Holographic powder or foil
- Soft eyeshadow applicator
- Non-wipeable gel top coat
Holographic Application Steps
The quickest way to perfect results comes from years of practice. Start with your base coat and apply a no-wipe top coat. My signature touch involves a stiff eyeshadow applicator to buff the holographic powder onto the nail gently. The look becomes more dramatic when I create an ombré by adding extra powder at the tips.
Holographic Maintenance
Your mesmerizing holographic effect will last through all winter events with two layers of top coat. Pro tip: My A-list clients know to avoid hot water during the first 24 hours after application. The nails will shine through multiple holiday parties when you add a fresh layer of top coat every three days – this trick works wonders for my celebrity clients.
Matte Gray Snowfall
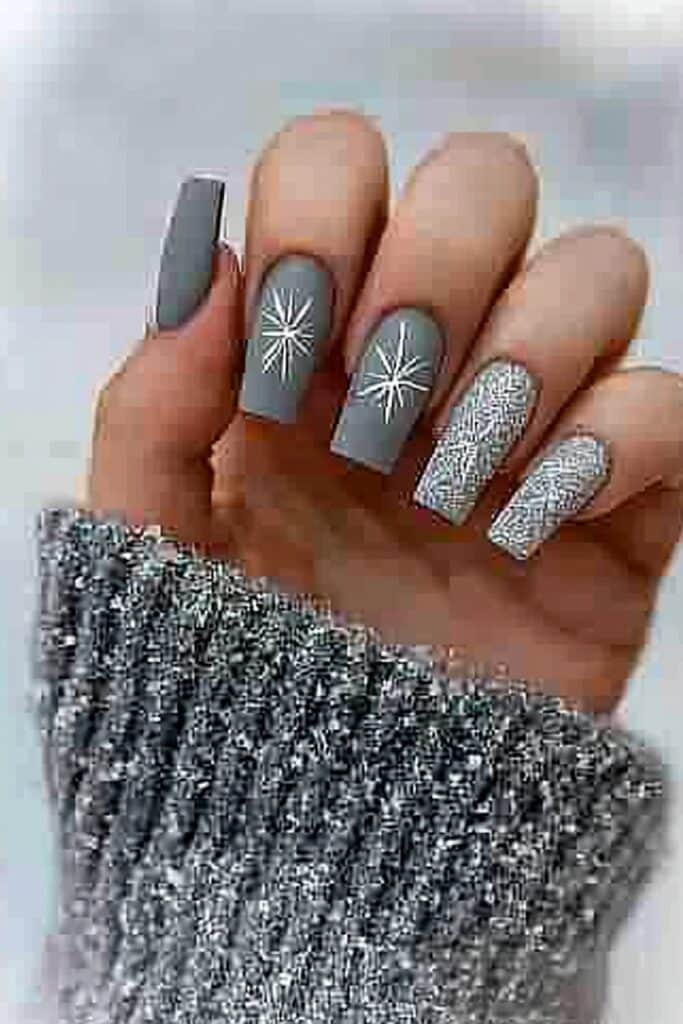
A recent winter fashion editorial shoot taught me that matte gray polish paired with delicate snowfall designs creates perfect balance between edgy and elegant.
This signature style has become highly requested at my Los Angeles studio, particularly for winter weddings and holiday photoshoots.
Matte Gray Polish Selection
The perfect matte gray should have these qualities:
- Deep charcoal to create drama
- Soft dove gray to add subtle elegance
- Pearl-infused gray to build dimensio
- Cool-toned gray to capture winter vibes
Snowfall Design Process
The base needs two thin coats of your chosen gray shade – patience matters here. Pro tip: Each layer must dry completely before the next application. The snowfall effect comes alive with a fine-tipped brush. Small dots in varying sizes start from the cuticle and gradually space out toward the tip. This technique creates an illusion of snow falling against a winter sky.
Matte Finish Care
My experience with A-list clients shows that matte finishes need special care. Gentle soap works best for cleaning, and daily cuticle oil keeps the finish pristine. Important: Regular top coats will ruin the matte effect. My celebrity clients refresh their nails with a specialized matte top coat every three days to maintain that perfect velvet finish.
Cozy Plaid Art
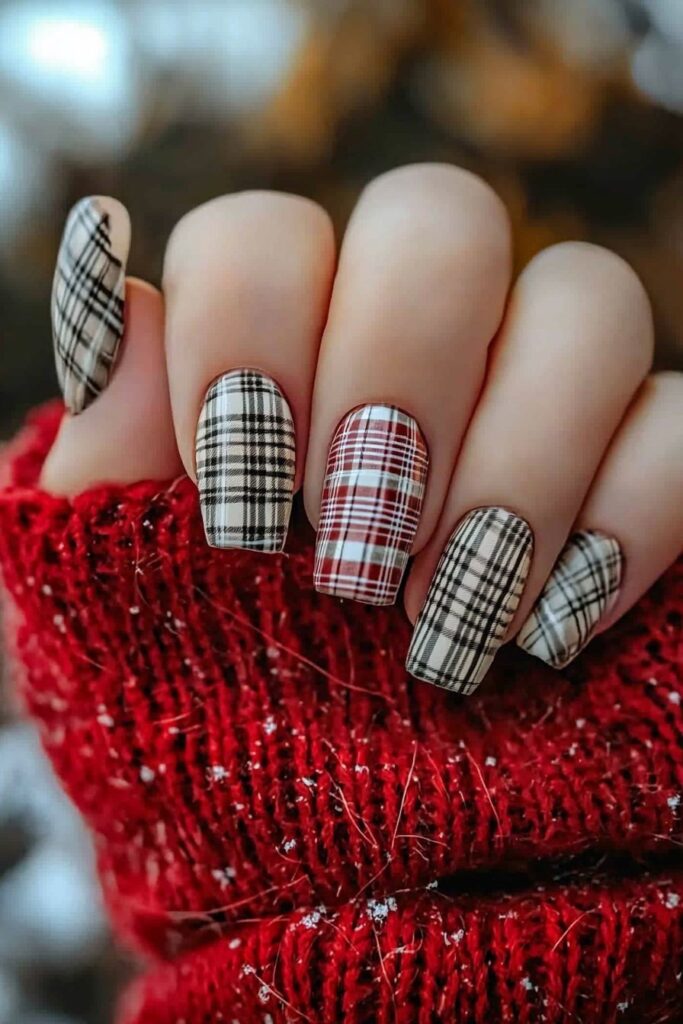
A prominent fashion editor visited my Los Angeles studio yesterday to request something cozy yet sophisticated for her winter photoshoot. The moment gave me a perfect opportunity to showcase my signature plaid nail art – a design that captures the season’s warmth beautifully on short square nails.
Plaid Pattern Elements
Stunning plaid nails depend on choosing the right color combination. The winter season calls for:
- Deep caramel with turquoise blue accents
- Forest green with gold metallic lines
- Burgundy base with black crosshatching
- Cream base with soft purple overlay
Plaid Design Steps
My experience with celebrity clients has helped me develop a reliable technique. First tip: A slightly sheer base coat works best – I love using syrup gels for that
milky finish. Your first set of lines needs confident strokes because hesitation creates wobbles. Pro secret: Flash-curing between crossing lines prevents color bleeding effectively.
Plaid Art Maintenance
Quality top coat applications every three days keep your plaid design fresh throughout holiday events. My red carpet clients swear by this maintenance routine.
Daily cuticle oil applications and avoiding hot water exposure during the first 24 hours will make your design last longer.
Silver Foil Accents
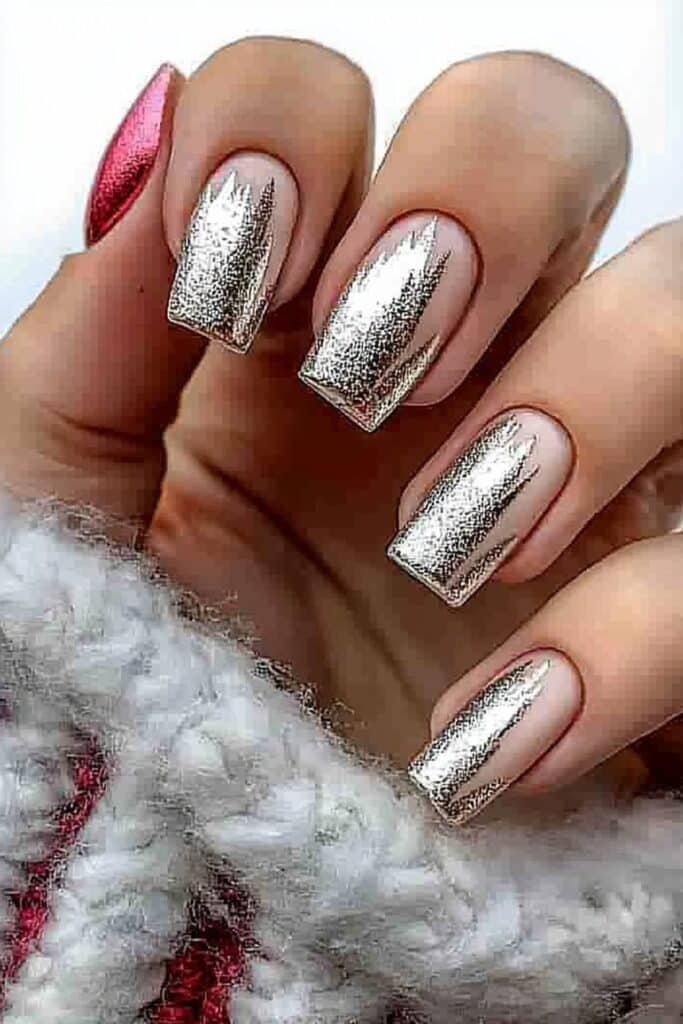
This morning, while creating looks for a luxury winter fashion magazine spread, I found that there was something special about silver foil accents. These metallic elements have become the ultimate statement maker for short square nails. The way they catch the studio lights is pure magic!
Silver Foil Selection
My high-profile clients deserve the best foils based on their finish and quality. My go-to options include:
- Mirror-finish silver for dramatic effect
- Crackled effect foils for texture
- Holographic silver for dimensional shine
- Matte silver for subtle elegance
Foil Application Process
The quickest way to perfect results comes from years of experience with this technique. First step: A quality gel base coat needs to be applied – this is non-
negotiable in my studio. The foil should be pressed with firm, even pressure. Pro tip: My celebrity clients know that less is more, and strategic foil placement creates better effects than full nail coverage.
Foil Maintenance Tips
Your silver foil accents will stay red-carpet ready with a non-wipe top gel coat seal. My signature maintenance secret works best with a fresh top coat every three days. My A-list clients heading to winter galas need to use cuticle oil daily. They should also avoid hot water exposure during the first 24 hours after application.
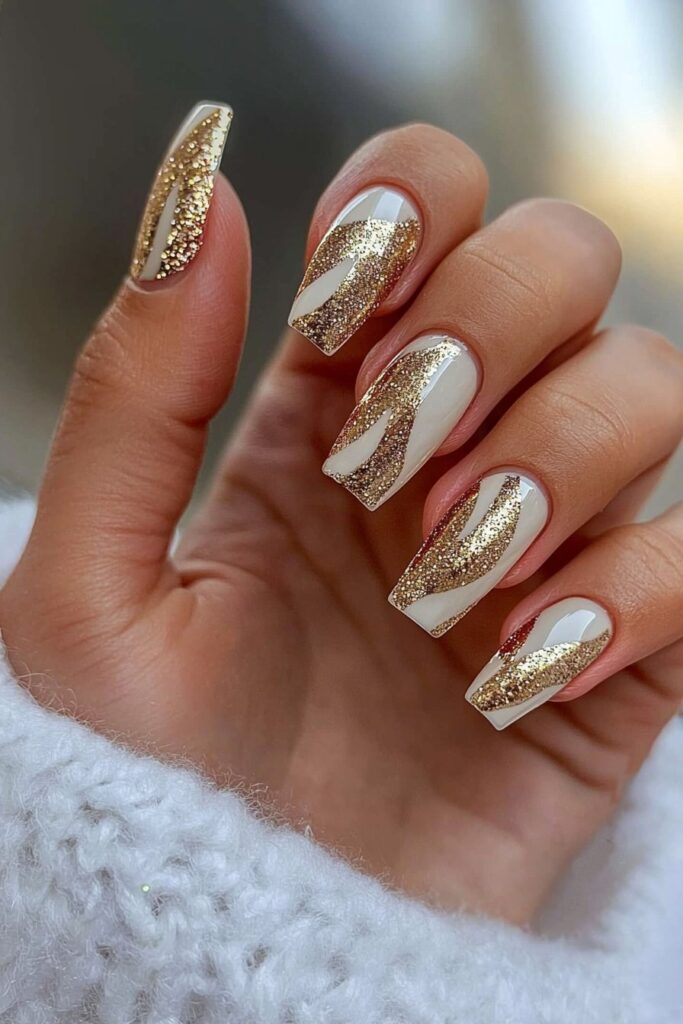
Glitter Gradient Design
My experience creating countless red carpet looks this season has shown that glitter gradient designs are now my celebrity clients’ most requested winter nail trend. The technique I mastered at the time of preparing an A-list actress for her holiday charity gala creates a stunning fade effect.
Gradient Color Selection
These stunning combinations photograph beautifully:
- Crystal clear to silver for elegant events
- Navy to holographic for dramatic effect
- Champagne to rose gold for holiday parties
- White to iridescent for winter weddings
Gradient Application Steps
My signature technique begins with a clear base coat. Pro tip: I always use a makeup sponge to achieve the perfect fade – this is the secret I share with my VIP clients. The glitter polish should be applied to the sponge first and allowed to absorb the clear base for about 5 seconds. This method gives better control over glitter placement and creates that flawless gradient effect.
Gradient Care Guide
My red carpet clients’ perfect fade stays intact with a special care routine. A fresh top coat should be applied every three days, with focus on the tips where glitter concentration is highest. Important: Direct contact between hand sanitizer and nail surface should be avoided. My celebrity clients swear by using cuticle oil twice daily to stop the glitter from lifting at the edges.
Arctic Blue Chrome
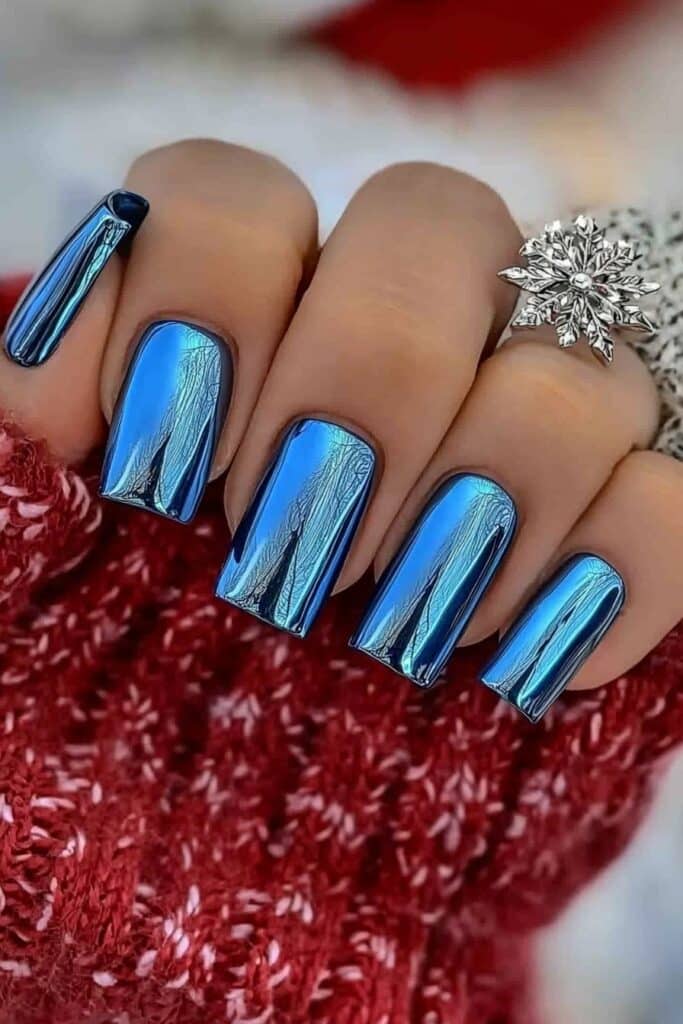
Last night, I found an amazing technique to create the perfect Arctic Blue Chrome finish on short square nails while getting a leading actress ready for her winter awards ceremony. The right products and precise application method make all the difference.
Chrome Polish Options
A perfect mirror-like finish needs these tested options:
- Non-wipe top coat for the base layer
- High-quality chrome powder in arctic blue
- LED-compatible finishing gel
- Specialized burnishing gel
Chrome Application Process
My foolproof method comes from years of experience with this technique. First step: Apply a thin layer of non-wipe top coat and let it cure completely. My signature technique uses a makeup sponge for chrome application that creates a more even, mirror-like finish than traditional applicators. The most striking effect comes from folding the sponge and buffing in circular motions.
Chrome Finish Care
Beautiful chrome finish needs attention to detail. My celebrity clients know to avoid hot water for 24 hours after application. Pro tip: File the free edge gently and clean with alcohol before the final top coat to prevent chipping and extend wear time. Red carpet events need a touch-up top coat every three days to keep that perfect mirror shine.
Nude Snowflake Pattern
A sophisticated winter bridal shoot this morning showed me that there was something special. Nude bases paired with delicate snowflake patterns created the perfect balance of elegance and seasonal charm. The bride loved how the subtle design went together with her winter wonderland theme.
Nude Base Selection
The perfect nude base needs these qualities:
- Dusty pink-nude for warmth
- Ballet flat nude for elegance
- Warm beige for versatility
- Clear pink for natural looks
Snowflake Stamping Process
My technique has evolved over the last several years into a foolproof stamping method. First step: Your chosen nude shade needs two thin coats. My signature touch combines clear polish with the nude base to get better coverage. Specialized stamping plates with winter motifs will give crisp, professional results with snowflake designs.
Pattern Maintenance
Perfect snowflake patterns last longer with proper preparation and care. My celebrity clients know they need a smudge-free top coat right after stamping. Pro tip: The top coat should be applied with gentle, circular motions to prevent smearing. Winter brides should refresh their top coat every three days. Daily cuticle oil helps maintain that perfect nude finish.
Golden Holiday Glam
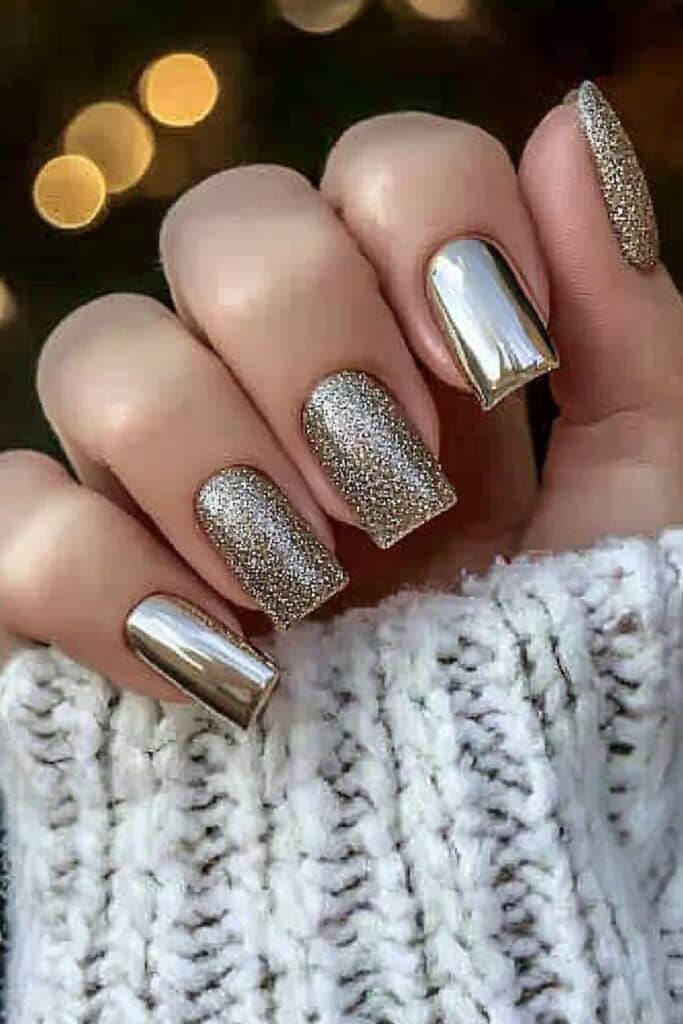
My experience with A-list celebrities during awards season taught me something special – gold isn’t just a color, it’s a statement. This week, I created looks for a major holiday magazine cover shoot and mastered a technique that gives short square nails a luxurious gold finish.
Gold Polish Selection
The perfect holiday glamor needs the right gold polish from these tested options:
- High-shine metallic gold creates dramatic results
- Rose gold adds subtle elegance
- Champagne gold works with everything
- Pearl-infused gold brings dimension
Glam Design Process
Years of practice led me to develop this foolproof technique. First step: A sheer base coat goes on – this creates the perfect canvas for gold. The luxury factor
comes from gold leaf placed over fine glitter. Pro tip: My celebrity clients love how expensive it looks when I press the gold leaf with a soft brush.
Holiday Glam Care
The perfect golden shine stays beautiful with proper care. My red carpet clients know to stay away from hot water during the first 24 hours. My signature maintenance routine needs daily cuticle oil and a fresh top coat every three days. The metallic finish stays pristine when you wear gloves during household tasks at holiday events.
Festive Candy Stripes
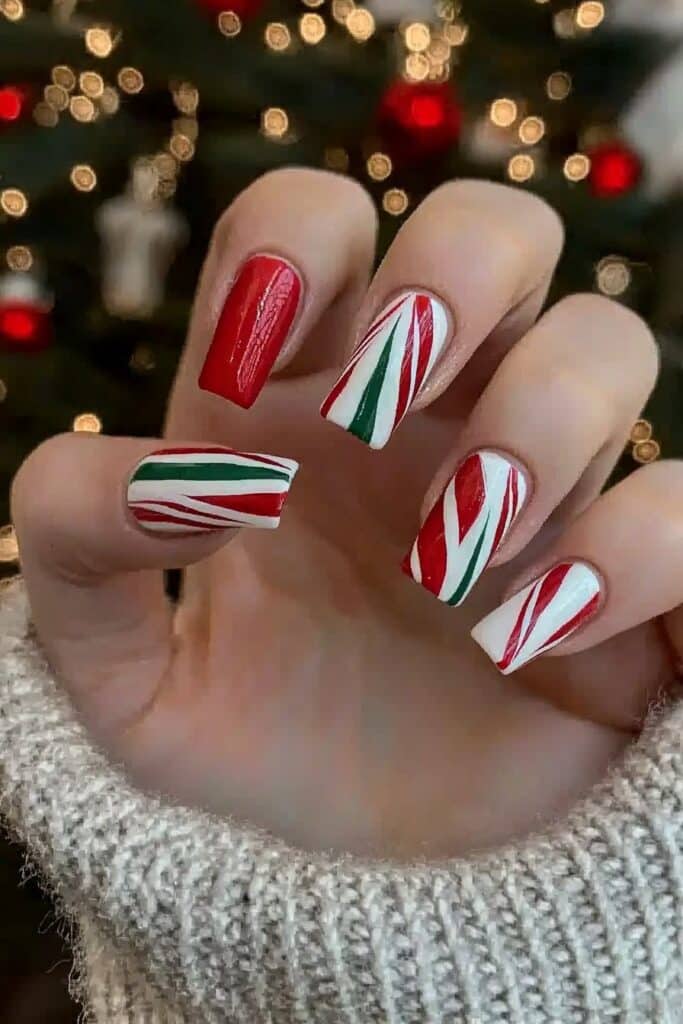
A recent holiday photoshoot for a major fashion magazine showed me that candy stripes are making an unexpected comeback in winter nail art. The secret lies in reimagining these classic lines with sophisticated winter color combinations.
Stripe Color Selection
My celebrity clients attending holiday galas love these stunning combinations:
- Classic candy red with metallic silver
- Deep burgundy with pearl white
- Navy blue with champagne gold
- Forest green with crystal white
Stripe Application Steps
Red carpet events taught me a foolproof way to create perfect stripes. First step: Apply a quality base coat and your chosen background color. My signature technique uses nail vinyls instead of traditional tape – they create crisper lines and protect the nail bed. The base must be dry before applying the vinyl. You should remove it before the stripe color sets to achieve perfect stripes.
Stripe Design Care
Your stripes will stay pristine if you pay attention to details. My A-list clients apply a fresh top coat every three days and seal the edges where stripes meet. Pro tip: A quick-dry top coat right after creating your stripes prevents color bleeding. Winter brides should use cuticle oil daily to stop the design from chipping at the edges.
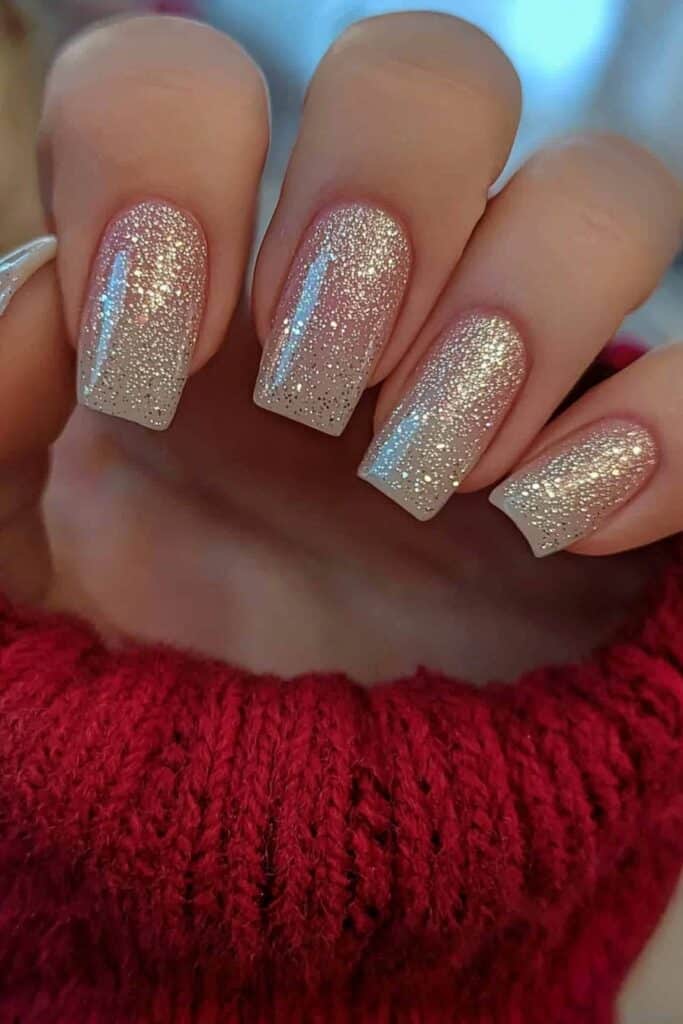
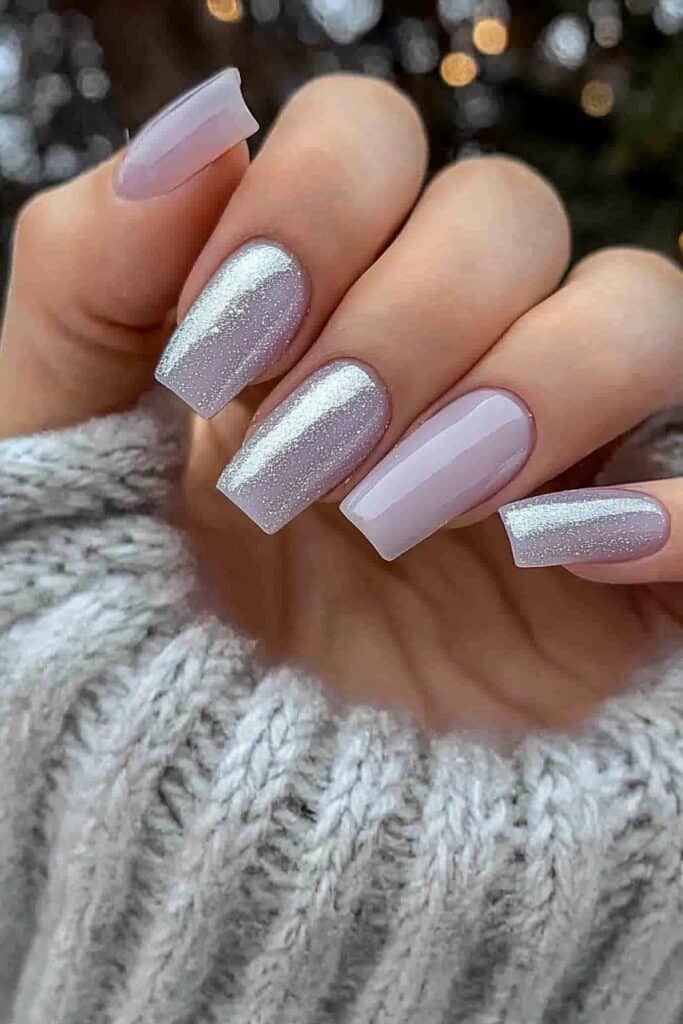
Champagne Glitter Swirls
I created a beautiful champagne glitter swirl design at my Los Angeles studio yesterday. The design, made for a magazine editor, captured winter’s elegance perfectly. The champagne frost sparkles just like fresh snow under morning sunlight.
Champagne Polish Options
My signature collection offers several choices to achieve that perfect champagne shimmer:
- Oyster Velvet gives you subtle sophistication
- Champagne Princess delivers classic elegance
- Frost-infused taupe adds a modern edge
- Holographic champagne creates dramatic results
Swirl Design Process
You need precision and patience to create the perfect swirl. First step: Mix a cream-silver base with a cool-toned nude. My signature technique works best with a medium-short detail brush for swirls. My celebrity clients learn that success depends on the original placement. Start with a small polish ball at the cuticle, then sweep outward with light pressure to create that perfect tapered line.
Glitter Care Tips
The champagne frost’s beauty depends on proper maintenance. Pro tip: A non-wipe top coat made specifically for glitter finishes works best. My red carpet clients refresh their shine with a light top coat layer every three days. The velvet-like finish needs gentle treatment. Daily cuticle oil helps, and you should avoid harsh soaps that can dim the champagne’s natural shine.
Frosty Pink Ombre
I created a breathtaking frosty pink ombre this afternoon while getting a rising starlet ready for her winter rom-com premiere. The soft gradient captures winter sunsets over the Los Angeles skyline perfectly.
Pink Shade Selection
These combinations create the perfect winter pink ombre:
- Soft ballet pink to crystal white to achieve elegant events
- Rose quartz to pearl frost that works with romantic looks
- Blush pink to silver shimmer adds a modern edge
- Baby pink to holographic white creates dramatic effects
Ombre Technique Steps
A makeup sponge helps create this foolproof technique that I’ve refined over the last several years. First step: The base nude-pink color goes along the sponge before adding a single line of the second color. My signature touch shows in the way I blot the sponge onto each nail. The lighter shade focuses on the top third to create that perfect fade effect.
Ombre Maintenance
The gradient stays perfect with proper care. My A-list clients know they need to apply a fresh top coat every three days. The tips need extra attention where the fade stands out most. Pro tip: Lukewarm water works better than hot water when washing hands. This keeps the sparkle intense and prevents the gradient from clouding. My celebrity clients heading to winter events use gentle nail oil each evening. This keeps their ombre looking fresh and vibrant.
Pine Green Gloss
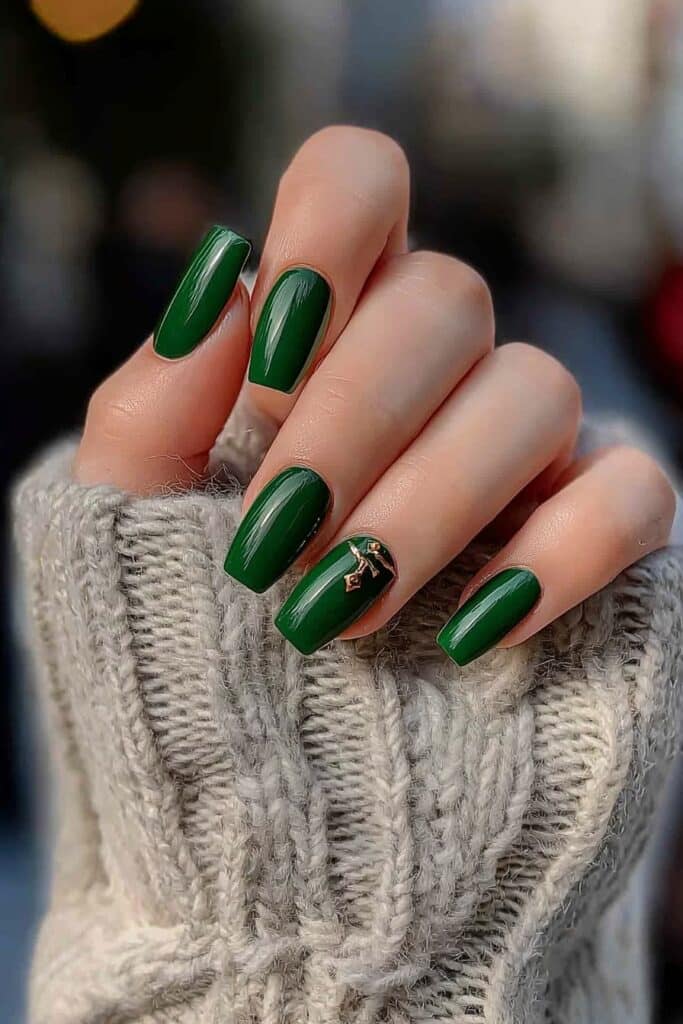
A fascinating chat with a top fashion editor at my Beverly Hills salon last night revealed something unexpected – pine green nails have become incredibly sophisticated. This rich, deep shade has turned into my go-to choice to create elegant winter manicures on short square nails.
Green Polish Options
These carefully selected options will give you that perfect pine green gloss:
- Deep forest green with blue undertones
- Emerald-infused pine for extra depth
- Dark teal-pine hybrid for uniqueness
- Mossy green with golden shimmer
Gloss Application Steps
My technique delivers that glass-like finish every time. First essential step: A quality base coat creates the perfect canvas that lets pine green truly shine. My signature technique uses three ultra-thin coats instead of two thick ones. This approach adds incredible depth and stops bubbling.
Gloss Finish Care
Your mirror-like shine needs proper care to last. My A-list clients know they need a fresh top coat every three days. Pro tip: Lukewarm water works better than hot water for washing hands since high temperatures can dull the glossy finish. My winter brides who choose pine green get the same advice as celebrities heading to award shows – apply cuticle oil twice daily.
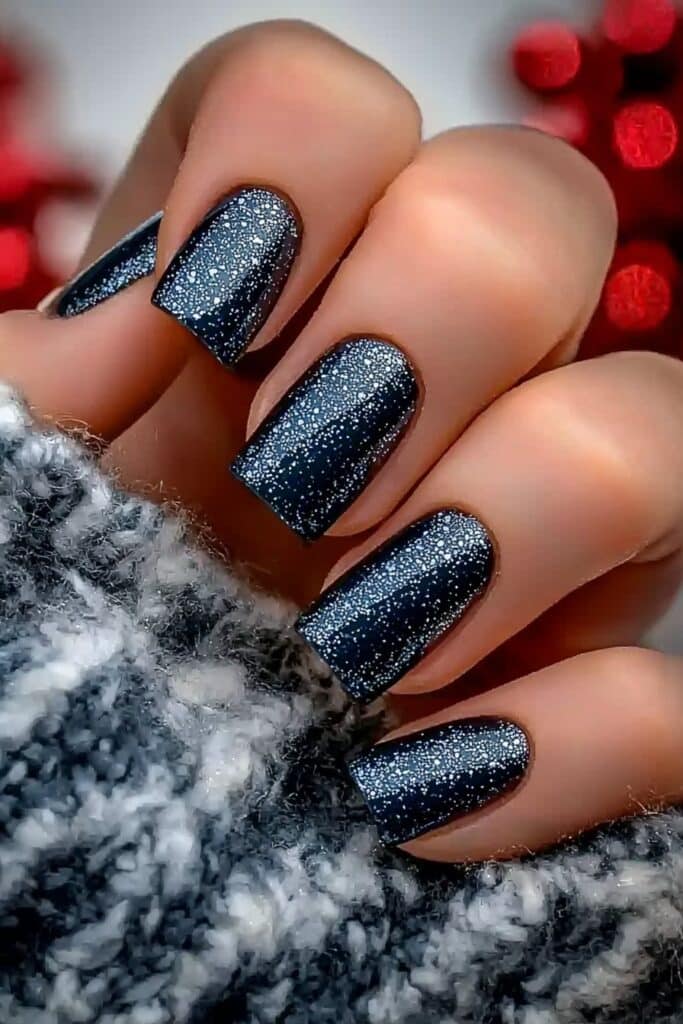
Winter Starry Night

I created a stunning starry night design that had everyone at the after-party asking about an Oscar-winning actress’s nails recently. The celestial-inspired look captures winter nights’ magic on short square nails, and I’m ready to share my red carpet secrets with you.
Star Design Elements
The perfect winter night sky effect comes from combining these key elements:
- Deep blue base with subtle shimmer
- Silver micro-glitter for star clusters
- White dot details for bright stars
- Holographic powder for galaxy effect
Night Sky Creation
The perfect starry night demands both precision and patience. First step: I apply a deep blue base that’s almost black – this creates the perfect canvas for your celestial masterpiece. The twinkling stars come alive through careful layering. A fine silver micro-glitter goes first, followed by larger sparkle particles that create depth. The mesmerizing galaxy effect emerges when I use a special eyeshadow blending brush with holographic powder in subtle swirls.
Starry Design Care
My A-list clients follow a special care routine to keep their magical starry effect pristine. Pro tip: A fresh top coat should go on every three days, with extra attention to the tips where stars shine brightest. My celebrity clients love how a specialized no-wipe top coat seals the design and keeps the galaxy effect from dulling. Daily cuticle oil helps your celestial masterpiece twinkle like the night sky during winter events.
Shimmering Ice Crystal

A breakthrough moment struck me last week at my Beverly Hills salon while I created a shimmering ice crystal design for a leading fashion magazine cover shoot.
These crystals catch the winter light in absolutely mesmerizing ways. I can’t wait to share my red carpet secrets with you.
Crystal Design Elements
My perfect ice crystal effect comes from these premium options:
- MAXIMA Crystals for maximum sparkle
- Preciosa crystal shards for depth
- Holographic micro-crystals for dimension
- AB-coated crystals for rainbow effects
Crystal Application Steps
My foolproof technique evolved through years of practice using GEMGEL Adhesive. First essential step: Gently buff the nail surface – this creates the perfect foundation for crystal adherence. The larger crystals go near the cuticle area and gradually decrease in size toward the tip to create that natural ice formation look. My celebrity clients’ crystals sit slightly into the gel without being completely buried.
Crystal Effect Care
Beautiful crystal shine depends on proper care and protection. My A-list clients know to avoid hot water exposure during the first 24 hours after application. Pro tip: Daily cuticle oil applications work wonders when carefully applied around the crystals. Red carpet events demand protective gloves during household tasks to prevent crystal loosening. My signature maintenance routine keeps that spectacular sparkle alive with gentle cleaning using a soft brush every few days.
Cocoa Brown Matte

This morning’s exclusive winter fashion editorial preparation led me to an interesting find – cocoa brown matte nails have emerged as the unexpected hero of sophisticated winter manicures. My experience as a celebrity makeup artist shows how this rich, velvety shade can change the simplest short square nails into statement pieces.
Brown Polish Selection
The perfect cocoa shade comes from these premium options:
- Deep chocolate brown creates dramatic effects
- Warm hazelnut adds everyday elegance
- Rich mocha shows subtle undertones
- Espresso brown brings maximum sophistication
Matte Application Process
My years of experience have helped me find the quickest way to achieve that perfect velvet finish. First essential step: Apply a quality base coat – this creates the ideal foundation for the matte effect. A-list clients learn from me that a flawless matte finish needs thin, even coats. Red carpet events require two thin layers instead of one thick coat, and each layer must dry completely.
Matte Finish Tips
A perfect matte effect needs proper care and protection. Pro tip: Regular hand creams should stay away from the nail surface because they create unwanted shine spots. Celebrity clients heading to winter galas should use a specialized matte top coat every three days. My signature maintenance routine combines gentle cleaning with antibacterial soap and daily cuticle oil application, but the oil must not touch the nail surface to keep that stunning velvet finish.
Frozen Lavender Sheen
A celebrity client came to my Beverly Hills salon this morning to get ready for her holiday film premiere. I created a beautiful frozen lavender sheen manicure that captured the winter light like dawn breaking over fresh snow.
Lavender Polish Options
These carefully selected options will help you achieve that perfect frozen lavender look:
- Soft lavender with chrome finish
- Pearl-infused orchid shade
- Holographic lavender shimmer
- Green-to-gold shifting lavender
Sheen Application Steps
My technique has evolved over the last several years into a reliable method that delivers perfect results. First essential step: A crystal-clear base coat creates the ideal foundation that makes the lavender truly shine. My A-list clients’ manicures get an extra touch – I add special chrome powder between coats. This creates a stunning frozen effect that looks amazing on the red carpet.
Sheen Maintenance
Your lavender sheen will stay perfect with proper care and protection. My celebrity clients know to stay away from hot water during the first 24 hours. Pro tip: A specialized no-wipe top coat every three days keeps the chrome effect fresh. Winter events need extra care – use cuticle oil morning and night but avoid the nail surface to keep that magical frozen finish intact.
Conclusion
My Beverly Hills salon’s most requested styles are these winter nail designs, crafted from years of creating stunning looks for A-list celebrities and magazine covers. Short square designs have become a favorite among my celebrity clients, especially when you have to balance sophistication with practicality. They work perfectly for both red carpet events and casual winter gatherings.
Short square nails show their versatility across these 23 winter designs, ranging from classic snowflake patterns to modern chrome finishes. Champagne Glitter Swirls stand out as my personal favorite, which captured beautifully in last week’s holiday magazine shoot. The Midnight Blue Shimmer made quite an impression at a recent awards ceremony.
Beautiful winter nails don’t need length to make an impact. My work with Hollywood’s elite has shown that proper preparation, careful application, and consistent maintenance truly create stunning nails. You’ll achieve that perfect winter style with any choice – from the subtle elegance of Nude Snowflake Pattern to the bold drama of Arctic Blue Chrome.
Your nails reflect your personal style – that’s what I tell my celebrity clients. Choose a design that boosts your confidence and makes you feel beautiful. These winter nail designs go beyond trends. They let you express yourself during the year’s most magical season.