Hey beautiful! It’s Belle here, and let me tell you, I am absolutely living for this Y2K renaissance we’re experiencing right now. When I think back to the early 2000s, I remember being absolutely mesmerized by the bold, unapologetic hair moments that defined that era. Those chunky highlights, the butterfly clips, the zigzag parts—everything was about making a statement and having fun with your look.
As someone who’s spent years working behind the scenes in the beauty industry, I’ve had the incredible privilege of recreating some of these iconic styles on modern faces, and let me tell you, they hit differently now. There’s something magical about taking a nostalgic trend and giving it a fresh, contemporary twist that speaks to who we are today. The Y2K aesthetic was all about experimentation, creativity, and not taking yourself too seriously, and honestly, we could all use a little more of that energy in our lives.
What I love most about Y2K hairstyles for black girls is how they celebrated texture, versatility, and individuality. This was an era where we weren’t afraid to play with color, embrace protective styles in bold new ways, and mix high fashion with street style. Whether you’re looking to channel that nostalgic energy or create something entirely new, these fifteen hairstyles will have you feeling like the main character in your own early 2000s music video.
Zigzag Part Box Braids

I still remember the first time I created a zigzag part on a client—the way her whole face lit up when she saw that playful, geometric pattern running through her braids was absolutely priceless. This style is pure Y2K magic, combining the protective benefits of box braids with that signature early 2000s flair.
What It Is and Why It Works
The zigzag part box braids take your traditional box braid style and elevate it with a dramatic, angular parting pattern that runs down the center or side of your head. Instead of the standard straight part, you create a lightning bolt effect that immediately catches the eye. What makes this style so perfect is that it adds visual interest without requiring any additional maintenance beyond your regular box braid routine. The zigzag creates dimension and draws attention to your face in the most flattering way possible. I’ve found that this works beautifully for all face shapes because you can adjust the angle and depth of the zigzag to complement your features.
Best Styling Options and Versatility
One of the things I absolutely love about zigzag part box braids is their incredible versatility. You can wear them down for that classic Y2K vibe, pull them into a high ponytail for a more athletic look, or create space buns on either side of the part for maximum nostalgia. The zigzag becomes even more pronounced when you style your braids up, creating this really cool geometric effect that photographs beautifully. I’ve styled these braids with colored extensions woven through the zigzag section, adding pops of color that really make the pattern pop. You can also play with different braid sizes—jumbo braids give you that bold, statement look, while medium-sized braids offer more styling flexibility.
How to Create This Look Successfully
Creating the perfect zigzag part requires patience and precision, but trust me, it’s worth every minute. Start with freshly washed and conditioned hair, making sure it’s completely detangled. Use a rattail comb to section your hair, starting at your hairline and working backward in a zigzag motion. The key is to keep your angles consistent and deliberate—you want sharp, clean lines rather than wobbly curves. I always recommend having someone help you with the back section because it’s really difficult to maintain that precision when you can’t see what you’re doing. Once your parting is complete, proceed with your regular box braiding technique, making sure to keep the sections on either side of the zigzag neat and even. The braiding process can take anywhere from six to eight hours depending on the size and length you choose, so make sure you’re comfortable and have everything you need within reach.
Butterfly Clip Twist-Outs

If there’s one accessory that screams Y2K more than anything else, it’s butterfly clips. I remember seeing them everywhere during that era, and now they’re back with a vengeance. Pairing these nostalgic clips with a gorgeous twist-out creates a look that’s both textured and playful.
Understanding the Style Foundation
A butterfly clip twist-out combines the natural beauty of defined coils with the whimsical charm of strategically placed butterfly clips. The twist-out provides the foundation—those beautiful, springy curls that showcase your natural texture in all its glory. The butterfly clips then become your styling accent, pinning back sections, creating patterns, or simply adding pops of color and shine. What I love about this combination is that it works whether your hair is short, medium, or long. The clips can be functional, helping to keep your hair off your face, or purely decorative, scattered throughout your twist-out for that authentic Y2K aesthetic.
Maximizing Volume and Definition
The secret to an amazing butterfly clip twist-out lies in your prep work and technique. I always start with damp, not wet, hair because too much moisture can lead to frizz and elongated drying time. Apply your favorite twist cream or gel, making sure to distribute it evenly through each section. The size of your twists will determine your final curl pattern—smaller twists create tighter, more defined curls, while larger twists give you looser, more voluminous results. I typically go for medium-sized twists because they offer the best balance of definition and body. Once your hair is completely dry, carefully unravel each twist, fluffing at the roots for maximum volume. This is where the magic happens, and I never rush this step.
Clip Placement and Styling Techniques
Now comes the fun part—adding those butterfly clips. I love to create asymmetrical looks by pinning back one side completely, using three to five clips in a diagonal line from the temple to behind the ear. You can also create a crown effect by placing clips around the perimeter of your hairline, or go for a more scattered, casual vibe by randomly placing them throughout your hair. The trick is to make sure the clips are actually securing hair, not just sitting on top. Slide them in at an angle, catching enough hair to hold them in place. Mix different sizes and colors for a truly authentic Y2K feel, or keep them all matching for a more cohesive look. The best part about this style is that you can change up your clip placement every day, getting multiple looks from one twist-out.
Chunky Highlights with Cornrows

There was something so bold and fearless about Y2K hair color, and chunky highlights were absolutely everywhere. When you combine those statement-making highlights with sleek cornrows, you get a style that’s edgy, modern, and totally unforgettable.
The Color and Style Combination
Chunky highlights with cornrows create incredible dimension and visual interest. Unlike the subtle balayage techniques that are popular now, Y2K highlights were all about contrast and drama. We’re talking thick, bold streaks of color woven throughout your natural shade. When these highlights are incorporated into cornrow patterns, they create this really cool striped effect that emphasizes the geometric beauty of your braiding. I’ve worked with every color combination imaginable—blonde on dark brown, caramel on black, even vibrant fashion colors like burgundy or auburn. The cornrows keep your hair protected while allowing your color to shine.
Choosing Colors That Complement Your Skin Tone
While the Y2K era was all about experimenting with color, I always encourage my clients to choose shades that enhance their natural beauty. For deeper skin tones, rich golden blondes, warm auburns, and deep burgundies create stunning contrast without looking harsh. Medium skin tones can rock honey highlights, copper tones, and even some cooler ash shades. The key is to have the color placed strategically—I love concentrating highlights around the face and at the crown where they’ll catch the light. If you’re nervous about permanent color, there are amazing temporary options now, including colored braiding hair that you can weave into your cornrows for that highlighted effect without any chemical processing.
Creating the Perfect Highlighted Cornrow Pattern
The installation process requires careful planning to make sure your highlights are showcased properly. I typically start by mapping out the cornrow pattern, considering where the colored sections will fall. Simple straight-back cornrows create clean, bold lines that really show off the color contrast. You can also create curved patterns, zigzags, or geometric designs that become even more striking with the addition of color. If you’re using colored braiding hair, prep it by matching the texture to your natural hair as closely as possible. Braid it in seamlessly, making sure the color transition looks intentional rather than patchy. The entire process can take four to six hours, but the results last for weeks with proper maintenance.
Space Buns with Baby Hairs

Space buns were absolutely iconic in the Y2K era, and when you add perfectly laid baby hairs into the mix, you’ve got yourself a look that’s both nostalgic and incredibly current. This style has been one of my absolute favorites to create because it’s playful, versatile, and works for so many different occasions.
Defining This Playful Style
Space buns are essentially two buns positioned high on the head, one on each side. They can be sleek and polished or messy and textured, depending on your mood. The addition of carefully styled baby hairs takes this cute style and elevates it to something truly special. Those delicate swirls and patterns around your hairline frame your face beautifully and add an extra layer of artistry to the overall look. I’ve created space buns on natural hair, on braids, on locs—the style is incredibly adaptable. What makes it so perfect for celebrating black hair is that it showcases your texture while giving you endless creative possibilities.
Best Techniques for Different Hair Types
Creating space buns on natural hair requires a good amount of smoothing and control. I always start with a strong hold gel or edge control, gathering the hair into two high ponytails positioned toward the front of the head rather than directly on top. The placement is crucial—too far back and they lose that signature space bun vibe. From there, twist each ponytail and wrap it around itself, securing with bobby pins and elastic bands. For braided or loc’d hair, the process is similar, but you have the added benefit of hair that’s already uniform in texture. You can create fuller, more dramatic buns with braids by pulling them apart slightly once they’re secured. Natural hair space buns tend to be a bit smaller and tighter, while braided versions can be absolutely voluminous.
Mastering Baby Hair Styling
Now, baby hairs are an art form all their own, and I could talk about them for hours. The key to perfect baby hairs is using the right tools and products. I’m a big believer in a good edge control that holds without flaking, and a small edge brush or even a clean toothbrush for precision. Start by deciding on your pattern—classic swirls, dramatic waves, or geometric designs all work beautifully with space buns. Apply a small amount of edge control to your baby hairs, then use your brush to guide them into your desired shape. I love creating symmetrical patterns on both sides of the face, but asymmetrical designs can be equally stunning. The baby hairs should enhance your face shape and complement the playfulness of the space buns. Take your time with this step because it truly makes or breaks the entire look.
Beaded Braids and Twists

The sound of beads clicking together as you move is pure nostalgia for anyone who grew up in or around the Y2K era. Beaded braids and twists aren’t just a hairstyle—they’re an experience, a form of self-expression, and a celebration of black hair culture.
The Cultural Significance and Style
Beaded braids have deep roots in African and African American hair culture, but the Y2K era brought them into mainstream fashion in a really big way. This style involves adding colorful beads to individual braids or twists, creating both visual interest and that distinctive sound. The beads can be placed at the ends, scattered throughout the length, or concentrated in specific sections. What I love about this style is how customizable it is—you can go for a rainbow effect with beads in every color imaginable, keep it monochromatic for a sleek look, or even coordinate the beads with specific outfits or occasions. Beyond aesthetics, beaded braids offer protection for your natural hair while allowing for creative expression.
Selecting Beads and Creating Patterns
Choosing your beads is honestly one of the most fun parts of this process. I recommend starting with a variety pack so you can experiment with different colors, sizes, and styles. Wooden beads give a more natural, earthy vibe, while plastic beads come in every color under the sun. You can also find metal beads, crystal beads, and even custom letter beads to spell out words or names. When creating patterns, think about color placement and spacing. You might want all the same color beads on each braid for a uniform look, or you could create patterns that alternate between two or three colors. Some of my clients love the ombre effect, starting with darker beads at the roots and transitioning to lighter ones at the ends.
Installation Tips for Long-Lasting Results
Installing beads requires patience and the right technique to ensure they stay secure. Once your braids or twists are complete and dry, select the beads you want to use. Thread each braid through the bead—for smaller beads, you might need a beading needle or a small piece of wire to help guide the hair through. Secure the beads by either tying a small knot beneath them or using a small clear elastic band. I always make sure the beads can move slightly because if they’re too tight, they can cause tension and discomfort. For the best longevity, sleep with a silk or satin scarf or bonnet to protect your beads and prevent them from catching on your pillowcase. With proper care, beaded braids can last anywhere from four to eight weeks, giving you incredible value for your time and investment.
Slicked Back Ponytail

The slicked back ponytail was a red carpet staple during the Y2K era, and it from classic to extraordinary. This is one of those styles that looks incredibly sophisticated but is actually quite achievable with the right technique and products.
Understanding the Sleek Aesthetic
A slicked back ponytail is all about that glossy, smooth finish that looks almost wet. Your hair is brushed straight back from your hairline, gathered at the crown or nape, and secured tightly. The colored extensions add length, volume, and that signature Y2K drama. What makes this style so appealing is its versatility—it works for the gym, for formal events, for casual outings, really anywhere. The sleekness shows off your facial features beautifully, and the pop of color adds personality and edge. I’ve created these ponytails in every color imaginable, from subtle highlights to bold, statement-making hues.
Choosing Extensions
Selecting the right extensions is crucial for achieving that perfect Y2K ponytail. You want extensions that blend seamlessly with your natural hair texture or provide an intentional contrast if that’s the look you’re going for. Length-wise, I usually recommend starting with at least eighteen to twenty-four inches for that dramatic, swishy effect. For color, you can either match your natural shade for a monochromatic look or go bold with contrasting colors. Burgundy, deep purple, bright red, or even platinum blonde can create stunning effects. If you’re hesitant about committing to one color, try ombre or highlights within the extension itself. Make sure you’re using high-quality synthetic or human hair extensions that can withstand heat styling if needed.
Achieving Maximum Sleekness and Hold
The secret to that perfect slicked look lies in your products and technique. Start with clean, slightly damp hair. Apply a generous amount of smoothing gel or edge control, distributing it evenly from roots to ends. Use a boar bristle brush to brush your hair back in firm, smooth strokes, making sure to eliminate any bumps or flyaways. The brushing technique is crucial—you want to create tension and smoothness without causing breakage. Once your hair is perfectly smooth, secure it with a strong elastic band at your desired height. Attach your extensions using your preferred method, whether that’s a wrap-around ponytail, clip-ins, or braiding them in. Finish with a light mist of holding spray and tie a silk scarf around your edges for about ten to fifteen minutes to really set everything in place.
Micro Braids with Curled Ends

Micro braids were absolutely everywhere during the Y2K era, and adding curled ends gives them a romantic, feminine touch that I absolutely adore. This style is a serious commitment in terms of installation time, but the versatility and longevity make it completely worthwhile.
The Delicate Beauty of Micro Braids
Micro braids are exactly what they sound like—incredibly small, delicate braids that cover your entire head. We’re talking pencil-thin or even smaller. When you add curled ends to these tiny braids, you create this beautiful contrast between the sleek, uniform braids and the soft, romantic curls. The curls can be tight ringlets, loose waves, or anything in between. What I love about this style is how it moves—the lightweight nature of micro braids means they flow beautifully, and those curled ends add bounce and dimension. This style works on any length of natural hair and can be extended to whatever length you desire.
Versatility and Styling Options
Once you have micro braids installed, your styling options are virtually endless. You can wear them down for that full, flowing effect, pull them into ponytails or buns, create intricate updos, or even style them into other braid patterns. The curled ends add an extra element of versatility because you can refresh the curls whenever you want a different look. I’ve styled micro braids into everything from elegant chignons to playful half-up styles. You can also accessorize them with clips, headbands, or scarves. The fine size of the braids means they lay flat against your scalp, creating a really sleek base for any style you want to create.
Installation Process and Curl Creation
Installing micro braids is incredibly time-intensive, often taking anywhere from eight to twelve hours or more, depending on the length and your desired density. It’s crucial to find a skilled braider who has experience with this style because the braids need to be consistently sized and tensioned properly. Too tight, and you risk traction alopecia; too loose, and they won’t last. Once the braids are installed, creating the curled ends is where the magic happens. You can achieve this in several ways. The most popular method is using perm rods—small rods that you wrap the ends around, then dip briefly in hot water to set the curl. The size of the rod determines your curl pattern. You can also use flexi-rods for a no-heat option, though this takes longer to set. Some people prefer to use a curling iron on synthetic braids, but you need to be extremely careful with heat settings to avoid melting.
Crimped Hair with Hair Jewelry

Crimped hair was the ultimate Y2K texture, creating that distinctive zigzag pattern that added incredible volume and dimension. When you add hair jewelry into the mix, you elevate the style from fun to absolutely fabulous.
Recreating the Crimped Texture
Crimping involves using a special crimping iron or three-barrel waver to create a textured, zigzag pattern in your hair. The result is massive volume, incredible texture, and that unmistakable Y2K vibe. On natural black hair, crimping creates beautiful dimension and shows off the versatility of our hair texture. You can crimp your entire head for maximum drama or just do sections for a more subtle effect. I love mixing crimped sections with smooth sections for a really interesting textural contrast. The key to successful crimping on textured hair is making sure your hair is completely stretched and smooth before you begin—whether that’s through blow-drying, flat-ironing, or banding.
Hair Jewelry Selection and Placement
Hair jewelry was having a major moment in the Y2K era, and it’s back in full force. We’re talking hair cuffs, decorative bobby pins, jeweled hair vines, stick-on gems, and metallic thread wraps. With crimped hair, the added volume and texture create the perfect foundation for showcasing these accessories. I love using metallic cuffs on individual sections of crimped hair, placing them at varying heights for visual interest. Jeweled pins can be scattered throughout for a fairy-like effect, or concentrated in one area as a focal point. Hair vines, which are flexible pieces of wire adorned with crystals or beads, can be woven through crimped sections to create an ethereal, romantic look.
Heat Protection and Styling Techniques
Crimping requires heat, which means heat protection is absolutely non-negotiable. Start with clean, completely dry hair and apply a generous amount of heat protectant spray or cream. Work in small sections, no more than an inch or two wide, to ensure even crimping. Clamp the crimping iron at the roots and hold for three to five seconds, then move down the hair shaft, making sure each section overlaps slightly to avoid gaps. The temperature setting depends on your hair type—finer hair requires lower heat, while thicker, coarser hair can handle higher temperatures. Once you’ve crimped your desired sections, run your fingers through gently to soften the texture slightly and create more volume. Add your hair jewelry strategically, making sure pieces are secure but not so tight that they create tension or discomfort.
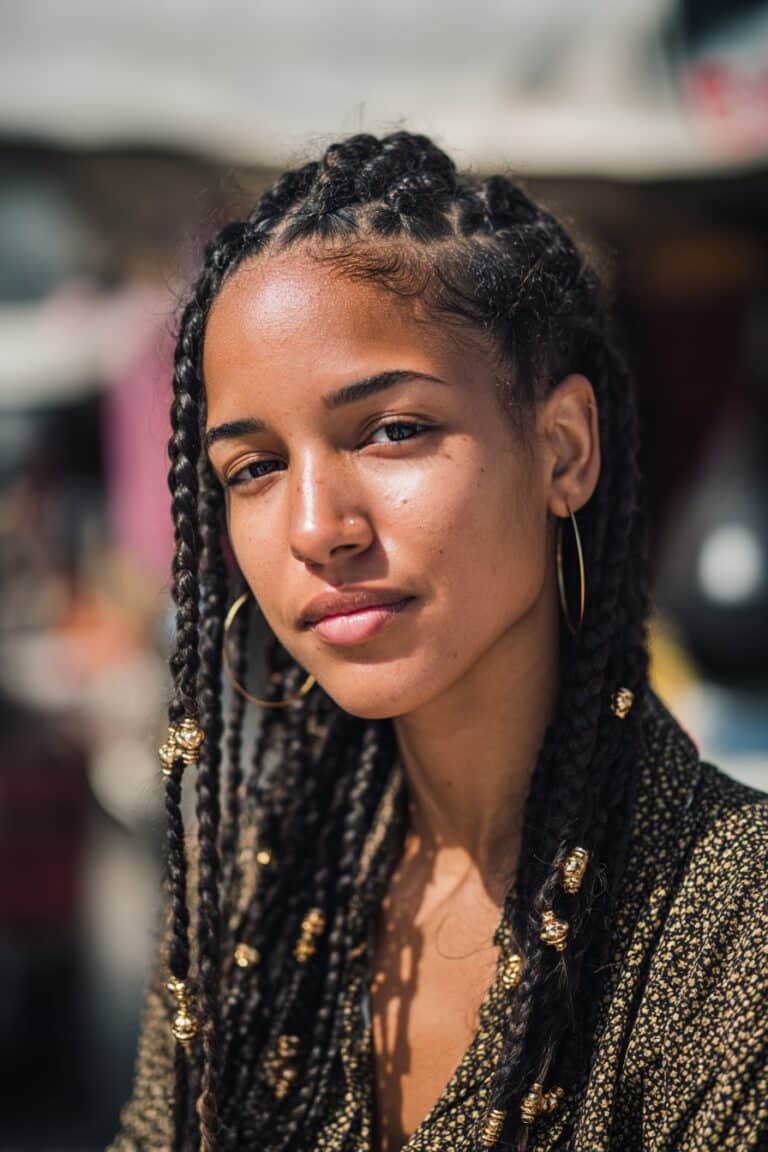
Fulani Braids with Beads

Fulani braids are a traditional West African braiding style that became incredibly popular during the Y2K era and continue to be a stunning choice today. These braids combine cornrows, individual braids, and distinctive patterns that are both beautiful and culturally significant.
The Traditional Foundation
Fulani braids typically feature one or more cornrows braided straight back in the center of the head, with the rest of the hair styled in individual braids or left loose. What makes them distinctive is the decorative beading, hair cuffs, and sometimes cowrie shells that adorn the braids. During the Y2K era, these braids were everywhere, celebrating both heritage and style. I love how they frame the face with those signature braids at the front while still giving you the versatility of loose braids throughout the rest of your head. The style is protective, beautiful, and incredibly meaningful, connecting us to our roots while allowing for modern interpretation.
Pattern Variations and Customization
While traditional Fulani braids follow specific patterns, the Y2K era brought all kinds of creative variations. You might have one central cornrow or several, thin cornrows or thicker ones, straight-back patterns or curved designs. The braids that hang loose can be any size you prefer, from micro to jumbo. Some people add extensions for length and volume, while others keep it natural. I’ve created Fulani braids with side parts, center parts, and even zigzag parts for that extra Y2K flair. You can also play with the direction of the braids—some hanging forward, some back, creating beautiful movement and dimension.
Beading Techniques and Styling Tips
The beading in Fulani braids is what really makes them special. Traditional styles might use gold or amber beads, cowrie shells, or hair cuffs at strategic points. The Y2K version often incorporated more colorful beads, mixing metallics with bright plastics for maximum impact. I typically place larger beads or cuffs on the braids that frame the face, making them focal points. Smaller beads can be distributed throughout the rest of the braids, either at the ends or scattered along the length. The front braids—the ones that hang down alongside your face—are usually adorned more heavily than the braids in back. To install beads, thread each braid through and secure with a small elastic or by tying a knot beneath the bead. The overall effect should be balanced and intentional, not random or overwhelming.
Bantu Knots with Colorful Bands

Bantu knots are a gorgeous protective style that doubles as a setting technique, and when you add pops of colorful bands, they become a true Y2K statement. These small, coiled buns are sculptural, beautiful, and incredibly versatile.
Understanding the Bantu Knot Style
Bantu knots are created by sectioning the hair and twisting each section tightly before wrapping it around itself to form a small, secure knot. They can be done on natural hair, on stretched hair, or even on braids or twists. What makes them so special is their dual purpose—they look stunning as a finished style, but when you unravel them, you’re left with beautiful, defined curls. Adding colorful bands to Bantu knots elevates them from a simple protective style to a work of art. You can use colored extensions, temporary hair color sprays, or even colored gels to add vibrant pops of color to individual knots.
Color Application Methods
There are several ways to incorporate color into your Bantu knots. If you want a temporary option, colored edge controls or hair gels work beautifully and wash out easily. I love using different colors on different sections—maybe purple on the left side, blue on the right, and pink in the back. Colored hair wax is another great temporary option that provides vibrant color and extra hold. For something more long-lasting, you can braid colored extensions into sections before creating the knots, or use colored yarn or thread wrapped around each knot. The Y2K aesthetic was all about bold, unapologetic color, so don’t be afraid to go bright and mix multiple shades.
Creating Perfect Knots Every Time
The key to beautiful Bantu knots is consistent sectioning and tight twisting. Start with moisturized, detangled hair—this style works best on hair that has some slip to it. Section your hair into squares or triangles, depending on your preferred look. Apply your styling product and twist each section tightly from root to tip. Once the section is fully twisted, begin wrapping it around itself in a circular motion, tucking the ends underneath and securing with bobby pins or small elastics. The knots should be firm and neat, sitting close to your scalp. If you’re adding color, apply it before or during the twisting process. The finished look should be uniform and sculptural, with each knot approximately the same size and tension.
Cornrows with Curly Ponytail

Combining sleek cornrows with a voluminous curly ponytail creates this gorgeous contrast between textures that’s both protective and stylish. This was a go-to look during the Y2K era and it’s still absolutely stunning today.
The Perfect Textural Contrast
What makes this style so visually appealing is the juxtaposition between the flat, smooth cornrows and the big, bouncy ponytail. The cornrows keep the front and sides of your hair neat and protected while showcasing your braiding pattern. The curly ponytail adds volume, movement, and personality. You can create this look with your natural curls, curly extensions, or even a curly drawstring ponytail for maximum convenience. The versatility is incredible—you can change up your cornrow pattern, adjust the placement of your ponytail, or switch between different curl types for completely different looks.
Cornrow Pattern Options
The cornrow portion of this style offers so much creative potential. Classic straight-back cornrows create clean, simple lines that draw the eye toward the ponytail. Side-swept cornrows add drama and asymmetry. You can create curved patterns, geometric designs, or even feed-in cornrows that start small and gradually get thicker for a really polished look. I typically recommend anywhere from four to eight cornrows, depending on the size you prefer. Thicker cornrows are quicker to install and create bold lines, while thinner cornrows offer more intricate patterns and detail.
Ponytail Installation and Curl Definition
Once your cornrows are complete, it’s time to create that curly ponytail. Gather the loose hair at the back of your head and secure it at your desired height. High ponytails are very Y2K and give you maximum bounce and movement, while mid-level ponytails are a bit more casual and wearable for everyday. If you’re using your natural curl pattern, make sure your hair is well-moisturized and defined before gathering it into the ponytail. You can also add curly extensions for extra length and volume—either clip them in, braid them in, or use a drawstring ponytail attachment. For the best curl definition, use a curl-enhancing cream and scrunch the ponytail gently, allowing the curls to form naturally. You can also use perm rods or flexi rods on extensions to create consistent curl patterns.
Pin-Straight Middle Part with Sleek Sides

Sometimes the most impactful looks are the simplest ones. A pin-straight middle part with sleek sides is the epitome of Y2K sophistication, offering a polished, editorial look that never goes out of style.
Achieving Ultimate Sleekness
This style is all about that glass-like smoothness and razor-sharp precision. Your hair is parted perfectly down the center and flat-ironed to absolute straightness. Every strand should lay perfectly flat, catching the light beautifully. What makes this particularly stunning on textured hair is the transformation—it’s a complete departure from natural curl patterns, showcasing the versatility of black hair. The key is achieving smoothness without causing damage, which requires proper technique and heat protection.
The Perfect Middle Part
Creating a perfect middle part is both an art and a science. Start with damp, detangled hair and use a fine-tooth comb to section your hair from your forehead straight back to the nape of your neck. The line should be completely straight and precise. I always tell my clients to find the center point between their eyebrows and use that as their starting guide. Once you’ve established your part, blow-dry your hair in sections, using a paddle brush to pull the hair smooth and directing the airflow down the hair shaft to seal the cuticle. The blow-dry is just as important as the flat-ironing—you want your hair as straight as possible before you even pick up the flat iron.
Heat Styling for Lasting Results
Now comes the flat-ironing process. Make sure your hair is completely dry before you begin. Work in thin sections, no more than an inch wide, to ensure complete straightness. Use a high-quality ceramic or titanium flat iron heated to the appropriate temperature for your hair type. Pass the flat iron through each section slowly and smoothly, from roots to ends, applying consistent tension. For the sleekest results, you might need to pass over each section two or three times. Pay special attention to your edges and the hair around your part—this is what people notice first. Finish with a light serum or oil for shine, being careful not to apply too much or your hair will look greasy rather than sleek. For longevity, wrap your hair at night in a silk or satin scarf and touch up any pieces that revert with your flat iron in the morning.
Stacked Braids with Colorful Extensions

Stacked braids, also called feed-in braids or stitch braids, create beautiful raised lines across the scalp. When you incorporate colorful extensions, they become an absolute showstopper that screams Y2K energy.
Understanding the Stacked Effect
Stacked braids are created using the feed-in technique, where extension hair is gradually added as you braid, creating a braid that appears to sit on top of your natural hair rather than hanging from it. This creates these gorgeous, raised lines that look almost 3D. The braids typically start very thin at the hairline and gradually get thicker as more extension hair is incorporated. Adding colorful extensions to this style creates beautiful dimension and visual interest, as the color becomes part of the raised design. You can use one color throughout, create ombre effects, or alternate between multiple colors for a rainbow effect.
Color Selection and Placement Strategy
Choosing your colors is where your personality really gets to shine through. During the Y2K era, bold contrasts were the name of the game—think hot pink with black, platinum blonde with dark brown, or electric blue with natural tones. You can go monochromatic with different shades of the same color family, or create wild combinations that celebrate your adventurous side. I love creating ombre effects where the color gradually transitions from natural at the roots to vibrant at the ends, or vice versa. You can also alternate colored extensions between braids—one braid with blue, the next with purple, creating a striped effect across your head.
Feed-In Technique for Professional Results
Mastering the feed-in technique takes practice, but the results are absolutely worth it. Start with small sections at your hairline, braiding with just your natural hair for the first few stitches. Then, begin adding small amounts of extension hair, feeding it in gradually as you continue braiding. The key is to add the extensions slowly and evenly, making sure the braid remains smooth and raised. Too much extension added at once creates bulk and an uneven appearance. The braiding should be firm enough to create that beautiful raised effect but not so tight that it causes discomfort or tension. Each braid should be consistent in size and tension, creating a uniform, polished look across your entire head.
Wrapped Ponytail with Spiral Curls

A wrapped ponytail, where a section of hair is wrapped around the elastic to hide it, takes on new life when paired with cascading spiral curls. This combination is sleek, elegant, and unmistakably Y2K.
Creating the Wrapped Base
The wrapped ponytail technique is a simple way to elevate a basic ponytail into something more polished and refined. After securing your hair into a ponytail at your desired height, take a small section of hair from the ponytail and wrap it tightly around the elastic, concealing it completely. Secure the end with a bobby pin, tucking it underneath the wrapped section so it’s invisible. This creates a seamless, cohesive look where all you see is hair—no elastic in sight. The wrapping should be smooth and tight, creating a clean base for your curls.
Achieving Perfect Spiral Curls
Spiral curls are those beautiful, elongated ringlets that bounce and move beautifully. You can create them with a curling wand, spiral curling iron, or even flexi-rods if you prefer a heat-free option. For the best results, work with small sections of hair, no more than half an inch wide. Wrap each section around your styling tool in a spiral motion, making sure the hair doesn’t overlap on itself. Hold for about ten seconds if using heat, then release carefully without disturbing the curl. Allow the curl to cool completely before touching it—this is when it sets and becomes lasting. For a fuller look, you can gently separate the curls with your fingers once they’ve all cooled, but be careful not to over-manipulate them or they’ll lose their definition.
Styling and Finishing Touches
Once all your curls are set, you can arrange them for maximum impact. I love pulling some curls forward over the shoulders while leaving others cascading down the back. You can also pin a few curls up or to the side with decorative pins for added interest. A light mist of flexible hold hairspray helps maintain the curls without making them crunchy or stiff. For extra Y2K flair, consider adding a hair cuff to the wrapped section of your ponytail, or incorporate a colorful scrunchie underneath the wrapped hair for a hidden pop of color that peeks through.
Side-Swept Curls with Hair Gems

Side-swept styles were absolutely everywhere during the Y2K era, and when you add glamorous curls and sparkly hair gems, you create a look that’s red-carpet ready and absolutely stunning.
The Side-Swept Foundation
A side-swept style involves creating a deep side part and sweeping all or most of your hair to one side. This creates beautiful asymmetry that’s both dramatic and flattering. The heavy side draws the eye and creates interest, while the lighter side shows off your bone structure. When you add voluminous curls to the heavy side, you create this gorgeous, cascading effect that’s romantic and eye-catching. The style works whether your hair is natural, relaxed, or extended, and it’s incredibly versatile in terms of curl size and definition.
Curl Formation Techniques
For side-swept curls, I prefer using a curling iron or wand to create uniform, bouncy curls that have plenty of body and movement. The size of the barrel determines your curl size—larger barrels create those big, voluminous Hollywood curls, while smaller barrels give you tighter, more defined ringlets. Work in sections, curling away from your face on the heavy side to create that sweeping motion. Let each curl cool completely in your hand before releasing it—this helps set the curl and makes it last longer. Once all your hair is curled, use your fingers to gently arrange and separate the curls, creating volume and dimension.
Hair Gem Application
Hair gems are the ultimate Y2K accessory, adding sparkle and glamour to any hairstyle. They come in all shapes and sizes—from tiny rhinestones to larger crystals, from individual stones to pre-made clusters. For a side-swept style, I love concentrating gems on the lighter side of the part, creating a sparkling accent that balances the volume on the heavy side. You can create patterns, scatter them randomly, or place them strategically to catch the light. Most hair gems come with adhesive backing—just peel and stick them directly onto your hair or scalp. For a more secure hold, especially if you’re going to be moving around a lot, you can use eyelash glue or hair gem adhesive. The key is not to overdo it—a few well-placed gems create elegance, while too many can look costume-y.
Conclusion
As I sit here reflecting on these fifteen incredible Y2K hairstyles, I’m filled with so much excitement for anyone embarking on their own hair journey. You know, one of the things I love most about working in beauty is witnessing those moments when someone sees themselves in a completely new light—when a hairstyle isn’t just about aesthetics, but about confidence, self-expression, and joy.
The Y2K era taught us something really important that I think we’re still learning today: beauty doesn’t have to be serious all the time. It can be playful, experimental, and bold. It can change with our moods, our aspirations, and our growth as individuals. Every single one of these hairstyles represents an opportunity to try something new, to step outside your comfort zone, and to celebrate the incredible versatility of black hair.
Throughout my career, I’ve had the privilege of working with so many beautiful souls, each with their own unique hair story. What I’ve learned is that the best hairstyle isn’t necessarily the most complicated or the most trendy—it’s the one that makes you feel like the most authentic version of yourself. Whether that’s sleek and sophisticated, bold and colorful, or textured and natural, your hair should be an extension of who you are and how you want to move through the world.
I remember when I first started experimenting with Y2K styles on myself. I was working long hours, constantly creating looks for other people, and somewhere along the way, I’d forgotten to have fun with my own hair. One day, I decided to give myself zigzag part box braids with bright purple extensions, and honestly, it changed something in me. Every time I caught my reflection, I smiled. The style reminded me why I fell in love with beauty in the first place—the transformation, the creativity, the pure joy of it all.
That’s what I want for anyone reading this: that feeling of joy when you look in the mirror. Whether you’re rocking butterfly clips in your twist-out, sporting colorful beads in your Fulani braids, or keeping it sleek with a wrapped ponytail, I hope you feel beautiful, confident, and unapologetically yourself. These styles are just starting points—templates for you to add your own flair, your own personality, your own magic.
One thing I always tell my clients is that hair is one of the few things in life that’s truly reversible. Don’t like the color? It’ll grow out or wash out. Bored with your style? Switch it up. Made a mistake? Learn from it and try something new. This freedom to experiment is such a gift, and I encourage everyone to take advantage of it. Try that bold color you’ve been thinking about. Attempt that intricate braiding pattern. Play with accessories you’ve never worn before. The worst that can happen is you learn what doesn’t work for you, which is just as valuable as discovering what does.
I’m also incredibly passionate about the health of your hair beneath all these gorgeous styles. No matter which Y2K look you choose, please remember that healthy hair is the foundation of every beautiful hairstyle. Keep your hair moisturized, don’t skip your deep conditioning treatments, protect your edges, and give your hair breaks between protective styles. Beauty should never come at the cost of your hair’s health or your comfort. If something hurts, if you’re experiencing excessive breakage, or if your scalp is constantly irritated, those are signs that something needs to change.
As we navigate this Y2K revival, I’m seeing so many young people embracing these styles with fresh perspectives, and it fills my heart with hope. This generation understands that representation matters, that our hair is political and personal and powerful. They’re not just copying trends—they’re reclaiming them, reinterpreting them, and making them their own. That’s exactly how it should be.
To all my beautiful people out there experimenting with these styles: document your journey. Take photos. Try new things. Make mistakes. Laugh at yourself. Share your creations with others. Build community around your love of hair and beauty. These are the moments that shape not just our appearance, but our confidence and our connection to ourselves and each other.
Remember that beauty is not about perfection. It’s about confidence, creativity, and feeling empowered to express yourself however you choose. Your hair is your crown, your canvas, your creative playground. Treat it with love, style it with joy, and wear it with confidence. The world is ready for your unique interpretation of these Y2K classics.
Thank you for allowing me to share this journey with you. Whether you’re a longtime lover of Y2K aesthetics or you’re just discovering these styles for the first time, I hope this guide has inspired you, educated you, and most importantly, excited you about the possibilities. Your hair story is uniquely yours—make it beautiful, make it bold, and make it unmistakably you.