Memorial Day is one of those holidays that genuinely stirs something deep inside me. Growing up in Savannah, I watched my community come together every year to honor and remember those who gave everything for this country. And as someone who has spent her entire career believing that beauty is a form of expression, I’ve always seen Memorial Day nails as a meaningful way to carry that patriotic spirit right on your fingertips. Whether you’re heading to a backyard barbecue, a parade, or simply spending the day in quiet reflection, your nails can tell a story. I’ve gathered fourteen of my absolute favorite nail designs that blend creativity, craftsmanship, and a whole lot of heart. Let’s dive in.
Classic Red, White, and Blue French Tips

Nails: Classic red, white, and blue french tips (inspiration from timeless patriotic elegance)
There is something endlessly chic about a French tip nail, and when you swap out the traditional white for red, white, and blue, you get something that feels both polished and festive. I first experimented with this look years ago when I was preparing a client for a rooftop gathering, and I remember thinking, this is it. This is the nail look that never goes out of style. The idea is simple: you take the classic French tip silhouette and give it a patriotic twist by alternating each nail with a red, white, or blue tip over a sheer nude base. The result is clean, sophisticated, and unmistakably celebratory without being over the top. What I love most about this design is that it works for absolutely everyone, regardless of nail length or shape. Short nails look just as stunning as long almond-shaped ones. The key is keeping the lines crisp and the colors true. When the light catches those tips, something magical happens. It whispers elegance while shouting pride.
Tools needed to create the nails design
To bring this look to life, you will need a sheer nude base coat, red nail polish, white nail polish, navy blue nail polish, a thin nail art brush or French tip guides, a top coat for longevity, and a small nail art tape or striping tape to keep your lines perfectly straight. A clean-up brush dipped in acetone is also essential for fixing any small imperfections along the tip line.
Step by step guide to create nails design
- Apply your sheer nude base coat to all ten nails and allow it to dry completely before moving forward.
- Use your French tip guides or striping tape to section off the tip of each nail, then carefully paint each nail’s tip in either red, white, or blue, alternating colors across your hand for a balanced look.
- Once dry, use your thin nail art brush and acetone-dipped cleanup brush to perfect any uneven lines or smudges along the curve of each tip.
- Seal everything with two coats of a high-shine top coat to lock in the design, add depth to the colors, and ensure your tips last through all the weekend festivities.
Star-Spangled Glitter Nails

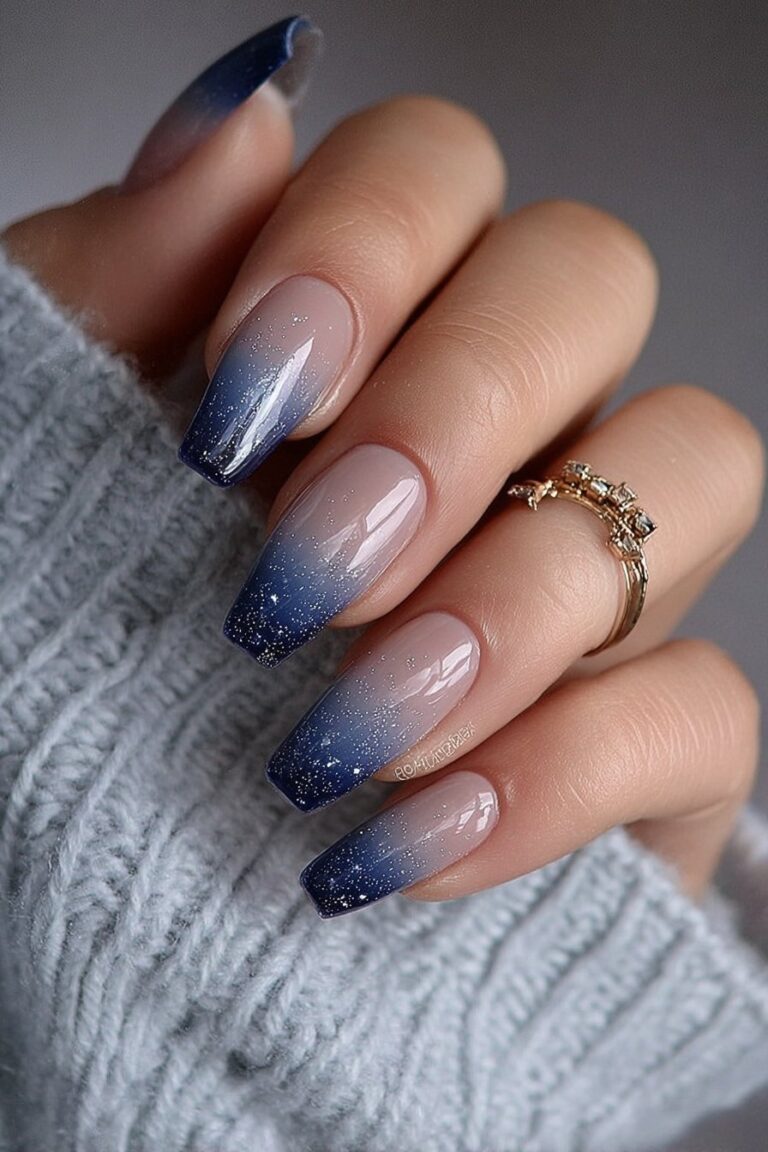
Nails: Star-spangled glitter nails (inspiration from the night sky on a warm summer evening)
There is nothing quite like looking up at a sky full of stars and feeling completely overwhelmed by beauty. That feeling is exactly what inspired me to create star-spangled glitter nails. I remember working late one summer evening and stepping outside to catch some fresh air, and the sky just stopped me in my tracks. The next morning, I was mixing glitters and planning this design. The concept centers around a deep navy base dressed with scattered fine gold and silver glitter, topped with tiny hand-painted or stamped star accents. The effect is breathtaking in person, especially when the light hits and your nails seem to shimmer and sparkle like an actual night sky. I love pairing this look with a simple white outfit so the nails become the focal point. It is one of those designs that makes people stop mid-conversation just to grab your hand and take a closer look.
Tools needed to create the nails design
For this design, you will need a deep navy blue nail polish, fine gold glitter, fine silver glitter, a loose glitter applicator or fan brush, a small star nail art sticker or a stamping plate with star patterns, a stamping polish in white or gold, a top coat, and a no-wipe gel top coat if you want an extra glossy and durable finish.
Step by step guide to create nails design
- Paint all nails with two smooth coats of deep navy blue polish and let them dry thoroughly until completely matte to the touch.
- While the nails are still slightly tacky from the final polish coat, use a fan brush to dust fine gold and silver glitter across each nail, concentrating more at the cuticle area and letting it fade toward the tip for a gradient starry effect.
- Apply your star accent either using a stamp or carefully placing tiny star stickers on the ring finger nail as your feature nail, pressing them down gently and smoothing out any air bubbles.
- Finish with a generous layer of top coat, encapsulating all the glitter and ensuring nothing flakes or lifts, and reapply top coat every two days to maintain the sparkle.
Navy Blue Ombre Nails

Nails: Navy blue ombre nails (inspiration from the vast open ocean and patriotic depth)
Ombre nails have been close to my heart ever since I first learned the technique. There is something so artistic about watching two colors bleed beautifully into one another, creating something that feels almost painterly. For Memorial Day, I lean into a navy-to-white ombre that starts deep and rich at the cuticle and fades into the softest white at the tip. It evokes the feeling of the ocean meeting a clear sky, which ties perfectly into the season. I’ve done this look on clients of all ages and it consistently receives the most compliments. The beauty of ombre is that even if your blending isn’t perfect, it still looks intentional and artistic. There’s forgiveness built into the design, and I think that’s something every beginner nail artist needs to hear. You don’t need to be perfect. You just need to be willing to try.
Tools needed to create the nails design
You will need navy blue nail polish, white nail polish, a makeup sponge cut into a small wedge shape, a base coat, a glossy top coat, nail tape or liquid latex to protect the skin around your nails, and a small dish or palette to mix and layer your polish before sponging it on.
Step by step guide to create nails design
- Apply your base coat and one solid layer of white nail polish to all ten nails, allowing full drying time since white serves as the brightest canvas for your ombre gradient.
- On your small sponge wedge, paint a stripe of navy at the top and white at the bottom, overlapping them slightly in the middle, then gently dab this onto each nail with a pressing and rolling motion rather than swiping.
- Layer the sponge application two to three times, building up the color intensity and allowing a brief drying moment between each pass to avoid smearing.
- Clean up the skin around your nails with acetone and a cleanup brush, then seal the entire design with two coats of glossy top coat to smooth the texture created by the sponge.
Patriotic Floral Nails

Nails: Patriotic floral nails (inspiration from blooming gardens at the height of spring)
Flowers and femininity go hand in hand in my world. I grew up surrounded by the lush gardens of Savannah, and floral motifs have always found their way into my creative work, whether in makeup or nails. For Memorial Day, I designed a patriotic floral look that places delicate painted flowers in red, white, and blue against a soft cream or nude background. The flowers don’t need to be complicated. Simple five-petal blooms with dot centers are enough to create something stunning. I love placing one large floral accent on the ring finger and scattering smaller blooms across the other nails. It feels romantic, celebratory, and thoroughly spring-appropriate. This is also a wonderful design to use if you enjoy the meditative process of nail art because painting each tiny petal by hand is genuinely calming and rewarding.
Tools needed to create the nails design
You will need a soft cream or nude base polish, red nail polish, white nail polish, blue nail polish, a thin detail nail art brush, a dotting tool, a toothpick for fine detail work, and a top coat. Having a small mixing palette to control the amount of polish on your brush is also very helpful.
Step by step guide to create nails design
- Apply two coats of your cream or nude base to all nails and let them dry completely, as a clean base will make your floral colors pop with full vibrancy.
- Using your thin detail brush dipped in red, white, or blue polish, paint five small curved petals radiating from a central point on the nail, working petal by petal and cleaning your brush between color changes.
- Add a contrasting dot at the center of each flower using your dotting tool, for example, a yellow or gold dot on red petals for warmth, or a navy dot on white petals for contrast.
- Seal with a top coat once all flowers are fully dry, applying it carefully to avoid smearing the delicate petal edges, and add a second top coat after twenty-four hours for extra protection.
American Flag Accent Nails

Nails: American flag accent nails (inspiration from the iconic symbol of freedom and unity)
The flag is one of the most recognizable and emotionally charged symbols in the world, and painting it on a nail is something I approach with genuine reverence. I don’t aim for a photorealistic flag on every nail because that would be overwhelming. Instead, I love using the flag design as an accent, typically on the ring finger, while keeping the remaining nails in solid patriotic shades. The result is a design that honors the symbol without overpowering the overall look. I remember the first time I painted this for a client before a large outdoor celebration, and when she looked at her hands, her eyes filled with tears. That moment reminded me of exactly why I do what I do. Beauty, in all its forms, carries emotion.
Tools needed to create the nails design
For this design, you will need red nail polish, white nail polish, navy blue nail polish, a very fine striping brush, a dotting tool or a fine toothpick, a base coat, top coat, and steady hands paired with patience. A magnifying glass can also help if you want extra precision on your flag accent nail.
Step by step guide to create nails design
- Paint your accent nail, typically the ring finger, with a blue base in the upper left corner and fill the rest with alternating horizontal red and white stripes using your striping brush, keeping stripes as even and parallel as possible.
- Add tiny white dots in the blue corner of the flag nail to represent stars, using the tip of your toothpick dipped in white polish and placing dots in a grid pattern.
- Paint the remaining nails in solid red, white, or navy, mixing them across the hand for a coordinated but varied look that frames the flag accent nail beautifully.
- Once fully dry, apply two generous layers of top coat to seal all details and prevent any fine stripe lines from lifting or chipping over the long weekend.
Fireworks-Inspired Nails

Nails: Fireworks-inspired nails (inspiration from the explosive celebration of summer nights)
I am genuinely the kind of person who tears up a little at fireworks. There is something so communal and joyful about everyone looking up at the same sky at the same time. I wanted to capture that energy in a nail design, and the fireworks-inspired look does exactly that. This design features a black or very dark navy base with bursting lines of red, gold, silver, and white radiating outward from a central point, mimicking the exact moment a firework explodes in the sky. It is dramatic, eye-catching, and incredibly fun to wear. When the light catches the metallic pigments, your nails genuinely look like they are glowing from within.
Tools needed to create the nails design
You will need a dark navy or black base polish, a fine striping brush, red metallic polish, gold polish, silver polish, white polish, a top coat, and ideally a fan brush for adding any loose shimmer pigment if you want an extra dimensional effect.
Step by step guide to create nails design
- Begin with two coats of your dark navy or black base and ensure it is completely dry before adding any detail work, as contrast is everything with this design.
- Using your fine striping brush loaded with metallic red or gold polish, draw lines radiating outward from a single central point on each nail, varying the line lengths so some extend to the nail edges and others stop halfway for a burst effect.
- Add a second layer of radiating lines in a different color, such as silver or white, between your first set of lines to create a multi-dimensional firework effect with visual depth and complexity.
- Finish with a crystal-clear, high-shine top coat to bring all the metallic elements together and amplify the glow of your fireworks design when seen in different lighting conditions.
Red Velvet Matte Nails

Nails: Red velvet matte nails (inspiration from old hollywood glamour with a patriotic twist)
Sometimes the most powerful statements are the quietest ones. Red is the quintessential patriotic color, but when you finish it with a matte top coat instead of a glossy one, something shifts. The color deepens. The vibe becomes moody, sophisticated, and completely grown-up. I call this look red velvet because the matte finish gives the polish almost a fabric-like quality that just feels luxurious. I wore this look myself at a Memorial Day gathering a few years back, and the number of people who asked me about my nails was remarkable. They kept saying they couldn’t figure out what made the look so different. It is matte, I told them, and their eyes lit up. Sometimes it really is that simple.
Tools needed to create the nails design
You will need a rich, pigmented red nail polish, a matte top coat, a base coat, and optionally a white or gold striping brush to add a thin accent line near the cuticle or at the tip for a barely-there detail that elevates the look even further.
Step by step guide to create nails design
- Apply a base coat to protect your natural nails and then follow with two smooth, even coats of your chosen red polish, making sure there are no streaks or bubbles before moving forward.
- Allow the red polish to dry for at least ten minutes, then apply one coat of matte top coat over every nail, using slow and deliberate strokes to avoid streaking the matte finish and ensure even coverage.
- If adding an accent line, use a fine striping brush and white or gold polish to draw a hairline along the cuticle edge once the matte layer is dry, adding a modern geometric element that pairs beautifully with the velvet texture.
- Avoid applying a glossy top coat over your matte finish, and when the design chips, touch up with your red polish and reapply matte top coat to maintain that gorgeous velvety appearance throughout the holiday.
White Marble with Gold Star Accents

Nails: White marble with gold star accents (inspiration from classic architecture and patriotic pride)
I’ve always been obsessed with marble. Something about its organic swirling veins feels simultaneously ancient and modern. When I add gold star accents to a white marble nail, the result is something that feels almost architectural, like a monument translated onto a nail. This design is elegant enough for more formal Memorial Day gatherings and still festive enough for casual celebrations. The marble effect looks intricate but is actually more forgiving than it appears, since the swirling veins naturally disguise any imperfections in your brushwork. The gold stars are the finishing touch that anchor the patriotic theme without overwhelming the delicate marble background.
Tools needed to create the nails design
You will need white nail polish, a thin nail art brush or a small piece of plastic wrap for the marble vein effect, grey or black polish for the veins, gold nail polish or gold metallic foil, a star-shaped nail sticker or stamp, and a glossy top coat to seal everything and enhance the marble’s depth.
Step by step guide to create nails design
- Apply two coats of white nail polish and let them dry, then dip your thin brush or torn piece of plastic wrap lightly into grey or black polish and drag it across the nail in irregular diagonal sweeping strokes to mimic natural marble veining.
- While the veins are still slightly wet, soften them by lightly tapping a clean brush or finger over the lines to blur the edges and create that authentic blended marble look.
- Apply small gold star accents using either a stamp, sticker, or carefully hand-painted stars in gold polish, placing one or two on select nails rather than every finger to maintain the elegant, restrained aesthetic.
- Seal with a generous high-gloss top coat to unify the layers, smooth the texture, and give the marble its characteristic deep, reflective luminosity that truly makes this design look like art.
Butterfly Blue Memorial Nails

Nails: Butterfly blue memorial nails (inspiration from transformation, freedom, and natural beauty)
Butterflies carry a lot of symbolic weight for me personally. They represent transformation, which is something I think about often in my work. Every client who sits in my chair is seeking some kind of transformation, whether it is for a special occasion or simply for themselves. A butterfly nail design in shades of blue, white, and red feels deeply fitting for Memorial Day because it honors the idea of freedom in the most literal and beautiful way. The design centers around a detailed butterfly painted on the ring finger, with wings made up of patriotic colors and delicate details, while the remaining nails stay in solid complementary shades.
Tools needed to create the nails design
You will need a nude or white base, navy blue, red, and white nail polishes, a fine detail brush, a dotting tool, iridescent shimmer pigment in blue or silver, and a top coat. Butterfly nail stickers are also a great option for those who prefer a more precise and beginner-friendly version of this design.
Step by step guide to create nails design
- Apply your nude or white base to all nails, then on your feature nail, sketch the outline of butterfly wings using a fine detail brush dipped in navy blue, keeping the upper wings slightly larger and more dramatic than the lower wings.
- Fill in the wings with blue, red, and white sections, adding tiny dots along the wing edges with your dotting tool and applying a dusting of iridescent shimmer pigment over the blue sections while still wet for a luminous, almost holographic wing effect.
- Paint the remaining nails in solid navy blue, soft white, or muted red, keeping them clean and simple to let the butterfly feature nail take center stage.
- Finish with a careful application of top coat over the butterfly nail using a light hand to avoid smearing the fine edge details, then apply top coat to the remaining nails as well for a cohesive, lasting finish.
Poppy Red Minimalist Nails
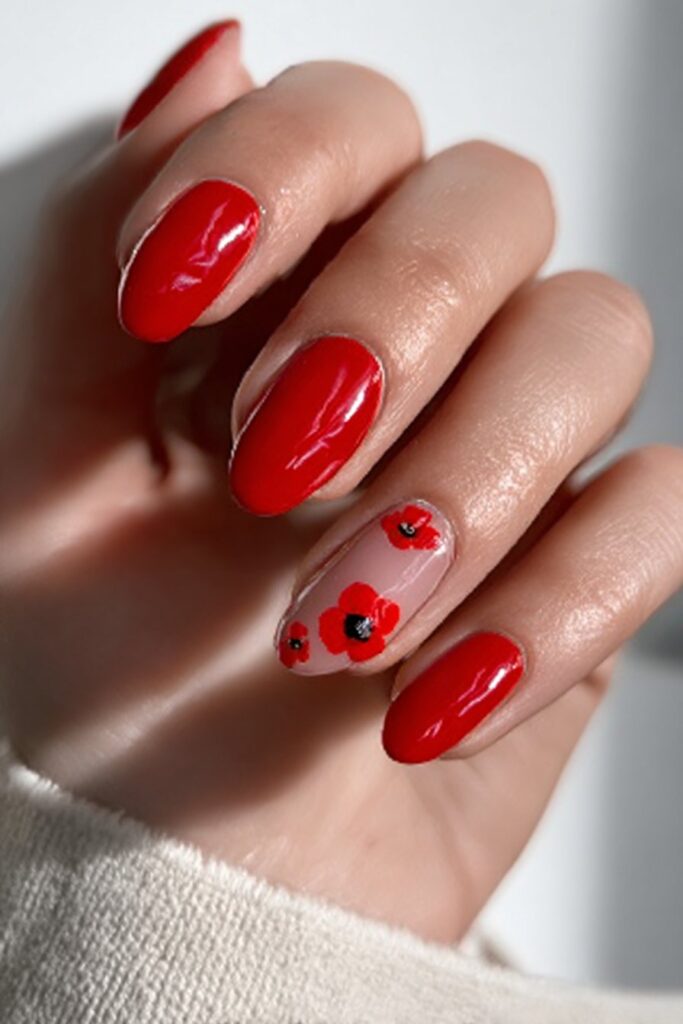
Nails: Poppy red minimalist nails (inspiration from the symbolism of remembrance and quiet honor)
The poppy has long been a symbol of remembrance, and when I think about what Memorial Day truly means at its core, I keep coming back to this image. A single red poppy painted against a pale, almost ghostly white base is one of the most quietly powerful nail designs I have ever created. Minimalism has its own kind of loudness when done well, and this design speaks in whispers that somehow carry further than shouts. I designed this look during a particularly reflective period, and every time I see it, it brings me back to a sense of stillness and gratitude. You don’t need complexity to make something meaningful. Sometimes one flower, painted with care, is everything.
Tools needed to create the nails design
You will need a sheer or opaque white base polish, bright red nail polish, a dark green or black polish for the stem and leaves, a fine detail brush, a dotting tool, and a matte or satin finish top coat to honor the understated nature of the design.
Step by step guide to create nails design
- Apply two coats of your white or off-white base to all nails and ensure full drying time, as this clean canvas is essential for the delicate red petals to stand out with full clarity and impact.
- Using your fine detail brush loaded with red polish, paint a simple poppy bloom on one or two nails by creating four to five rounded petal shapes clustered around a central point, keeping the petals slightly imperfect for an organic, hand-painted feel.
- Add a thin curved stem and two or three small leaf shapes in dark green or black coming down from the base of the flower, keeping the lines loose and natural rather than stiff or geometric.
- Seal with a matte or satin top coat to complete the understated, almost watercolor quality of the design, and leave the remaining nails in plain white with the same matte finish for a cohesive, serene look across the entire hand.
Patriotic Striped Nails

Nails: Patriotic striped nails (inspiration from the bold graphic lines of the american flag)
Stripes are one of those graphic elements that never feel dated. They are bold, clean, and impactful, and when executed in patriotic colors, they carry an unmistakable energy that is both playful and proud. My patriotic striped nail design uses horizontal stripes in varying widths across each nail, alternating between red, white, and blue. The key to making this look elevated rather than elementary is spacing and precision. When your stripes are crisp and intentional, the design reads as graphic art rather than a craft project. I love this look on shorter square nails where the boldness of the stripes really commands attention.
Tools needed to create the nails design
You will need red nail polish, white nail polish, navy blue nail polish, thin striping tape or nail guides, a base coat and top coat, a fine cleanup brush, and acetone for corrections. A steady hand and a little patience are the most important tools of all.
Step by step guide to create nails design
- Start with a white base coat on all nails, as white provides the clearest foundation and ensures the red and blue stripes read true and vibrant without muddying or dulling.
- Apply strips of nail tape horizontally across each nail, spacing them evenly and alternating sections where you will apply red, white, and blue paint, pressing the tape down firmly at the edges to prevent any polish from bleeding underneath.
- Paint each exposed section in your desired color, remove the tape immediately while the polish is still wet by pulling it back slowly and at a low angle to reveal sharp, clean stripe edges, then allow the design to dry fully before touching.
- Apply two coats of high-shine top coat to seal the stripes, smooth any ridges left by the tape, and add a glossy finish that makes the bold graphic design look polished and professionally done.
Holographic Patriotic Nails

Nails: Holographic patriotic nails (inspiration from the future of patriotism and modern beauty)
If classic Americana got a futuristic upgrade, it would look exactly like holographic patriotic nails. This design blends the traditional red, white, and blue palette with a holographic shimmer that shifts between colors in the light, creating a mesmerizing, almost ethereal effect. I started experimenting with holographic pigments a few years into my career, and I genuinely fell in love with the way they transform an ordinary nail into something that looks three-dimensional and almost alive. For Memorial Day, I use a holographic silver or rainbow powder over a base of deep navy, bright red, or clean white depending on the nail, then add subtle patriotic detailing for context and grounding.
Tools needed to create the nails design
You will need navy blue, bright red, and white gel or regular nail polishes, a holographic nail powder, an eyeshadow applicator or silicone fingertip brush for applying the powder, a gel lamp if using gel polish, a no-wipe top coat, and a gel or regular top coat to seal the holographic effect.
Step by step guide to create nails design
- Apply your chosen base color, whether red, white, or navy, to each nail in two smooth coats, and if using gel polish, cure under the lamp at each stage without wiping the inhibition layer on your final color coat.
- While the final polish layer is still tacky, use your silicone brush or applicator to rub holographic powder in small circular motions over the surface of the nail, building up the pigment transfer gradually until you achieve a full mirror-like holographic effect.
- Dust away any loose powder from the skin around the nail with a clean brush, then seal the holographic layer immediately with a no-wipe top coat applied carefully to lock in the powder without dulling its reflective quality.
- Add any patriotic accents, such as a tiny star stamp or fine stripe in a contrasting color, after the top coat, and seal once more with a final layer of top coat to protect both the holographic effect and any added detail work.
Vintage Americana Nails

Nails: Vintage americana nails (inspiration from retro posters and the nostalgic heart of the holiday)
There is a warmth and nostalgia to vintage Americana that I find completely irresistible. Think faded reds, dusty blues, and warm creams that look like they belong on a weathered poster from another era. This nail design leans into those muted, antique tones rather than bright primary colors, creating a look that feels sentimental and rich with history. I first developed this aesthetic when I was going through a phase of collecting old patriotic memorabilia, and I wanted my nails to echo that same sense of time and memory. Layering a slightly translucent base over the muted shades and adding tiny hand-painted details like stars or small script elements gives this design its unique vintage character.
Tools needed to create the nails design
You will need muted red, dusty blue, and warm cream nail polishes, a translucent or matte top coat, a fine detail brush, a stamping plate with distressed star or stripe patterns, a stamping polish in off-white or gold, and a matte top coat to enhance the vintage quality of the finished look.
Step by step guide to create nails design
- Apply your warm cream base to all nails, then layer a thin wash of muted red or dusty blue over select nails, keeping the coverage slightly sheer rather than opaque to give the colors a sun-faded, vintage quality that feels authentic and aged.
- Use your stamping plate and off-white or gold stamping polish to add distressed star or stripe motifs across the nails, pressing the stamp firmly and evenly, then lifting quickly to transfer the pattern cleanly onto the nail surface.
- Layer a very thin coat of translucent or beige-tinted top coat over the entire design to unify the colors and give them that cohesive, slightly aged quality that defines the vintage Americana aesthetic you are going for.
- Seal with a matte top coat to eliminate any shine that might undermine the vintage feel, giving your nails the look of something beautiful and enduring rather than brand new and contemporary.
Navy and Gold Geometric Nails

Nails: Navy and gold geometric nails (inspiration from modern art and architectural elegance)
My final Memorial Day nail design is one I return to every year because it combines two of my greatest loves: precision and luxury. Navy and gold is one of the most stunning color combinations in existence. It is rich, regal, and endlessly sophisticated. When you add geometric line work in gold over a deep navy base, the result looks like something out of an art deco jewelry collection. This design requires a steady hand and a fine striping brush, but the payoff is absolutely worth it. I have painted this look on clients before some of the most elegant gatherings, and it never fails to draw exactly the right kind of attention.
Tools needed to create the nails design
You will need a deep navy blue nail polish, gold metallic nail polish, a very fine striping brush, nail tape for straight lines if needed, a base coat, and a glossy top coat. Gold nail foil or gold striping tape can also be used as an alternative to hand-painting the geometric lines for a cleaner and more consistent result.
Step by step guide to create nails design
- Apply two coats of your deep navy base to all nails and allow them to dry completely, as the richness and depth of the navy is the entire foundation of this design and must be flawless before any gold work begins.
- Using your fine striping brush loaded with gold metallic polish, draw clean geometric lines across each nail, creating patterns like triangles, diamond shapes, or angular frames, keeping your lines as confident and deliberate as possible without going back and forth too much.
- Allow the gold lines to dry fully before adding any second layer of detail, such as a filled triangle in the corner of a nail or a tiny gold dot at the intersection of two lines, adding dimension without overcomplicating the clean geometric theme.
- Seal with a high-gloss top coat to make the gold truly gleam against the dark navy background, and reapply top coat every two to three days to maintain the sharpness and brilliance of your geometric lines throughout the entire holiday weekend.
Conclusion
As I look back at all fourteen of these designs, what strikes me most isn’t the color combinations or the techniques. It’s the feeling behind each one. Memorial Day is a day of remembrance, of gratitude, and of coming together as a community to honor something larger than ourselves. And while nail art might seem like a small thing in that context, I genuinely believe that beauty is never small. The way we present ourselves to the world, the choices we make in how we decorate and express ourselves, these are acts of intention and love.
I’ve been doing this long enough to know that people underestimate the emotional power of looking down at your hands and feeling proud of what you see. When your nails are done in a way that reflects something meaningful, a holiday, a value, a memory, it changes the way you carry yourself throughout the day. I have watched quiet, hesitant people walk into my studio and walk out standing two inches taller simply because they felt beautiful and seen.
Memorial Day deserves that kind of attention. Whether you choose the regal simplicity of red velvet matte nails, the nostalgic warmth of vintage Americana, or the futuristic shimmer of holographic patriotic nails, you are making a statement about who you are and what you value. You are saying, I remember. I am grateful. I celebrate.
My personal advice, as someone who has spent years learning that beauty is ultimately about confidence and authenticity, is to choose the design that makes your heart beat just a little faster when you imagine wearing it. Don’t choose based on what’s trendy or what someone else might think. Choose the one that feels like you. Because the most beautiful version of any nail design is the one worn with pride and joy.