If you know me, you know I treat every birthday like a full-blown celebration — and that celebration always starts at the fingertips. As a makeup artist and beauty educator who has spent years helping people feel their most confident selves, I can tell you with absolute certainty that your nails are a statement before you even speak a word. And when it comes to Taurus season, the energy is just chef’s kiss — grounded, gorgeous, luxurious, and deeply connected to nature. Taurus birthdays fall between April 20th and May 20th, which means the world is blooming, the air is warm, and the vibes are rich with earthy elegance. Taurus energy is ruled by Venus, the planet of beauty, love, and all things sensual, so naturally, Taurus birthday nails deserve something truly special. Whether you are a Taurus yourself, or you are gifting inspiration to someone who is, I have curated fourteen stunning and unique nail looks that are inspired by everything this earth sign embodies — from lush botanicals and golden warmth to moody mauve and shimmering chrome. Every single look I am sharing comes with a personal touch from my own experience as an artist, along with tools and a step by step guide so you can recreate these beauties at home or in your salon. Let’s get into it, because Taurus birthday nails are about to become your new obsession.
Earthy Terracotta Nails

There is something about terracotta that just speaks to me every single time I work with it. I remember the first time I did a terracotta nail set for a client with a late April birthday, and she literally gasped when she saw the final result. This warm, clay-inspired shade is everything a Taurus represents — rooted, strong, beautiful in its simplicity, and deeply connected to the earth. Terracotta nails feel like a warm hug, and they complement literally every skin tone, which is why I keep coming back to this look season after season. It is one of those shades that feels both trendy and timeless.
Nails: Inspiration from warm clay earth and Taurus season grounding
The entire inspiration behind this look is the visual of rich, sunbaked clay — think of pottery, terracotta pots overflowing with spring flowers, or the warm reddish-brown soil of a garden in bloom. Taurus is an earth sign, and this nail look leans fully into that identity. I love pairing a terracotta base with a subtle golden shimmer accent nail to elevate the earthiness into something truly luxurious. The finish I prefer is a satin or semi-matte top coat, which keeps it looking sophisticated and modern rather than overly glossy. It is grounded glamour at its finest.
Tools needed to create the nail design
You will need a terracotta nail polish in your preferred shade, a thin detail brush for any accent work, a gold shimmer polish or chrome powder, a matte or satin top coat, a base coat, nail file, and a cuticle pusher to prep your nails beautifully before you start.
Step by step guide to create the nail design
- Begin by prepping your nails — file them into your preferred shape, push back cuticles, and apply a clear base coat and let it dry fully.
- Apply two coats of your terracotta polish evenly across all nails, allowing each coat to dry before the next.
- On your ring finger, use a thin brush to add a diagonal swipe or half-moon of gold shimmer polish as your accent nail detail.
- Seal everything with a satin top coat for a finished, modern look that lasts.
Floral Garden Nails

Every Taurus season, the world is literally bursting with flowers, and I think nails should reflect that natural celebration. Floral garden nails are one of my absolute favorite looks to create because they allow for so much creativity and personality. I have done everything from delicate hand-painted roses to loose, impressionistic floral blobs, and every version has been met with the most beautiful reactions. This look channels the lush, blooming gardens that are in full swing during Taurus birthday season — soft petals, green leaves, and that gentle spring warmth that makes everything feel alive.
Nails: Inspiration from blooming spring gardens in full Taurus season bloom
The inspiration here is pure spring — think wildflower fields, window boxes overflowing with pansies, and garden paths lined with tulips and roses. I love using a soft nude or white base so the florals really pop. The palette I gravitate toward includes blush pink, soft lavender, warm yellow, and creamy white for the petals, with a deep hunter green for the leaves. Mixing different flower sizes across the nails creates such a dynamic, editorial finish. It is romantic, feminine, and perfectly aligned with Taurus’s love of beauty and nature.
Tools needed to create the nail design
You will need a white polish, fine nail art brushes in various sizes, floral nail art polishes in pink, lavender, yellow, and white, a green polish for leaves, a dotting tool, a glossy top coat, and a clean-up brush dipped in acetone for any precision corrections.
Step by step guide to create the nail design
- Apply your base coat followed by two coats of your chosen nude or white base and let it dry completely before beginning any art.
- Using your fine brush and floral colors, paint small five-petal flowers starting from the cuticle area and working toward the tip in a scattered, organic pattern.
- Add tiny green leaf strokes around the flowers using the tip of your detail brush, then dot the centers of each flower with a contrasting color using your dotting tool.
- Finish with a high-gloss top coat to give the florals a fresh, dewy look that really brings them to life.
Rose Gold Glam Nails

Oh, rose gold. I do not think I will ever get tired of this shade — it is one of those colors that feels simultaneously warm and luxurious, which is exactly the energy Taurus season calls for. I have painted rose gold nails on so many clients for special occasions and birthday celebrations, and it never, ever fails to make someone feel absolutely radiant. Rose gold sits right at the intersection of glamour and softness, which mirrors Taurus energy perfectly. It is bold enough to be a statement but elegant enough to feel refined. This is the nail look for the Taurus who loves a little sparkle with their sophistication.
Nails: Inspiration from the luxurious warmth of rose gold and Venus-ruled beauty
Venus, the ruling planet of Taurus, is all about beauty, luxury, and indulgence — and what better color to represent that energy than rose gold? The inspiration here is that warm metallic glow you get from candlelight hitting polished copper, or the sheen of a rose gold bracelet against warm skin. I love creating this look with a foil or chrome finish for maximum impact, and pairing it with a classic almond or coffin nail shape to really lean into the glamour. You can keep all ten nails rose gold for a full glam moment, or do a rose gold ombre blending into a soft pink for something a little more dreamy.
Tools needed to create the nail design
You will need a rose gold chrome powder or metallic rose gold nail polish, a gel base and top coat if working with chrome powder, a silicone applicator brush for the chrome, nail glue tabs or a prep kit, and a UV lamp if you are working in gel format.
Step by step guide to create the nail design
- Prep and shape your nails, then apply a thin base coat followed by a gel base layer and cure under your UV lamp.
- Apply a pink or dusty mauve gel polish as your undertone color and cure it, as this helps the rose gold chrome powder pop more vibrantly.
- Using your silicone applicator, rub the chrome powder directly onto the cured gel surface in circular motions until you see a full mirror-like rose gold finish.
- Seal with a no-wipe gel top coat and cure again — the result is a stunning, long-lasting rose gold nail that looks like it came straight out of a high-end salon.
Emerald Green Nails

If there is one color that instantly makes me think of lush, thriving nature during Taurus season, it is emerald green. This deep, jewel-toned green is one of the most striking nail shades you can wear, and it carries such an energy of abundance and vitality. I once wore an emerald green set to a dinner party and I cannot tell you how many compliments I received — from strangers, no less. For a Taurus birthday, emerald green nails feel deeply connected to the earth, to growth, and to that beautiful sense of prosperity that this sign embodies so naturally. It is bold, it is lush, and it is absolutely unforgettable.
Nails: Inspiration from lush emerald forests and the abundance of Taurus earth energy
Imagine walking through a dense green forest in May, sunlight filtering through layers of deep green canopy above you — that is the feeling this nail look is reaching for. The emerald shade I love most has a slightly cool, jewel-like quality that catches the light beautifully. I like to add a glossy top coat to get that wet, gemstone-like finish, and sometimes I will press a tiny rhinestone at the base of one nail for a subtle sparkle that feels like a hidden jewel in the forest. It is one of those looks that feels powerful and serene at the same time.
Tools needed to create the nail design
You will need a deep emerald green nail polish in a cream or jelly finish, a high-shine glossy top coat, a base coat, small rhinestones and nail glue for optional embellishment, and a cuticle oil to finish.
Step by step guide to create the nail design
- Start with clean, shaped nails and apply your base coat generously to protect and prime.
- Apply two to three thin coats of emerald green polish, ensuring each layer is dry before applying the next for a smooth, opaque finish.
- If adding rhinestones, use a small dot of nail glue on one accent nail and place a tiny clear or green gemstone at the cuticle line for a refined embellishment detail.
- Seal with a thick, glossy top coat and finish with a drop of cuticle oil around each nail for a polished, professional result.
Turus Marble Nails

I have always believed that restraint is its own form of luxury, and nude marble nails are the perfect example of that philosophy in action. This look is for the Taurus who appreciates understated elegance — someone who does not need flash to make an impression because their confidence does all the talking. Marble has been a symbol of wealth and artistry for centuries, and translating that onto nails creates something that feels genuinely sophisticated. The nude base keeps it wearable for any occasion, making these nails as appropriate for a birthday brunch as they are for a gala.
Nails: Inspiration from classical marble sculptures and timeless Taurus elegance
The inspiration is as old as art itself — think of the veined white marble used in grand architecture and classical sculptures, but softened with a warm, skin-tone base to make it feel modern and personal. I love using very fine, featherweight brush strokes in gray and warm beige to create the marble veining, moving diagonally across the nail in an organic, unpredictable way. No two marble nails should look exactly the same, which is what makes this design feel so artistic and authentic. The result is something that looks incredibly difficult to achieve but is actually very manageable once you understand the technique.
Tools needed to create the nail design
You will need a soft nude or off-white base polish, a thin detail brush or a fan brush for veining, gray and light brown nail polish for the marble effect, a matte or glossy top coat, and a fine-tipped nail art pen for any precise detail lines.
Step by step guide to create the nail design
- Apply your base coat and then two smooth coats of your nude base polish, letting each layer dry completely before moving on.
- Using a thin brush, draw diagonal lines in gray across the nail in an irregular, natural pattern — vary the thickness and let some lines branch off to mimic real marble.
- Add secondary veining in a lighter brown or beige shade to create depth and dimension within the marble design for a realistic finish.
- Seal with your chosen top coat — matte gives a stone-like quality while glossy gives a polished slab effect, both are stunning.
Golden Honey Nails

There is nothing quite like the warmth of golden honey shades to make nails look absolutely radiant, especially when the sun is shining and Taurus season is in full swing. I created this look for a birthday photoshoot once and the way those nails caught the natural light was genuinely breathtaking. Golden honey nails sit in that sweet spot between nude and gold — they are warm, glowing, and incredibly flattering against every skin tone. They feel like liquid sunshine on your fingertips, and for a Taurus who loves all things sensual and indulgent, this is an absolutely perfect birthday nail choice.
Nails: Inspiration from warm golden honey tones and the sensual beauty of Taurus Venus energy
The color palette here draws directly from the warm amber spectrum — honeycomb, golden syrup, warm candlelight, and late-afternoon sun. I love creating this look with a slightly sheer, jelly-finish polish that allows your natural nail to peek through and add depth, topped with a golden shimmer on the accent nails. The overall effect is glowing, luminous, and effortlessly chic. It is the kind of nail look that makes people lean in for a closer look, wondering how you achieved that impossible warmth and glow.
Tools needed to create the nail design
You will need a warm golden honey or amber jelly nail polish, a gold shimmer or flake polish for the accent, a glossy top coat, a base coat, and a small fan brush to apply flake details if desired.
Step by step guide to create the nail design
- Prep your nails and apply your base coat, then build your golden honey shade in two to three thin coats, noting the jelly finish will build beautifully with each layer.
- On your ring finger and thumb, apply a gold foil flake polish or brush loose gold flakes over tacky polish for a textured, dimensional accent nail.
- Use a fan brush to blend the flakes naturally so they look organic rather than too structured or uniform.
- Finish with a high-gloss top coat across all nails to seal everything and amplify that gorgeous golden glow.
Sage Botanical Nails

Sage green is one of those colors I fell in love with the moment it started appearing in nail art, and I have not stopped reaching for it since. There is something incredibly calming and grounding about this muted, dusty green — it feels like the color of herbs growing in a sunlit kitchen window, or the soft underside of a leaf. For Taurus birthday nails, sage botanical designs feel deeply aligned with the sign’s connection to nature, growth, and the tactile pleasures of the physical world. This look works beautifully in both simple and detailed versions, making it accessible no matter your nail art skill level.
Nails: Inspiration from wild herbs, botanical gardens, and Taurus’s deep love for nature
Picture a botanical print — the kind you might find in an old natural history book, with carefully illustrated leaves, stems, and herbs in muted, earthy tones. That is the energy I bring to sage botanical nails. The base is a soft sage green, and the detail work involves thin hand-painted botanical elements like simple leaf sprigs, fern fronds, or eucalyptus stems in slightly darker greens and creamy whites. The overall look feels artistic and intentional, like wearing a piece of nature-inspired illustration on your fingertips. It is quietly stunning.
Tools needed to create the nail design
You will need a sage green base polish, a detail brush, a dark green and cream white polish for botanical details, a matte top coat for an artistic, pressed-botanical finish, and a base coat.
Step by step guide to create the nail design
- Apply your base coat and two coats of sage green, allowing full drying time between each coat for a smooth, even finish.
- Using your fine detail brush and dark green polish, paint simple leaf and stem shapes across two or three nails — think minimal, loose botanical sketches rather than perfectly symmetrical designs.
- Add tiny cream or white highlights along the leaf edges to give them dimension and a hand-painted quality that feels truly artisanal.
- Finish with a matte top coat to give the design a soft, pressed-flower finish that looks like living artwork.
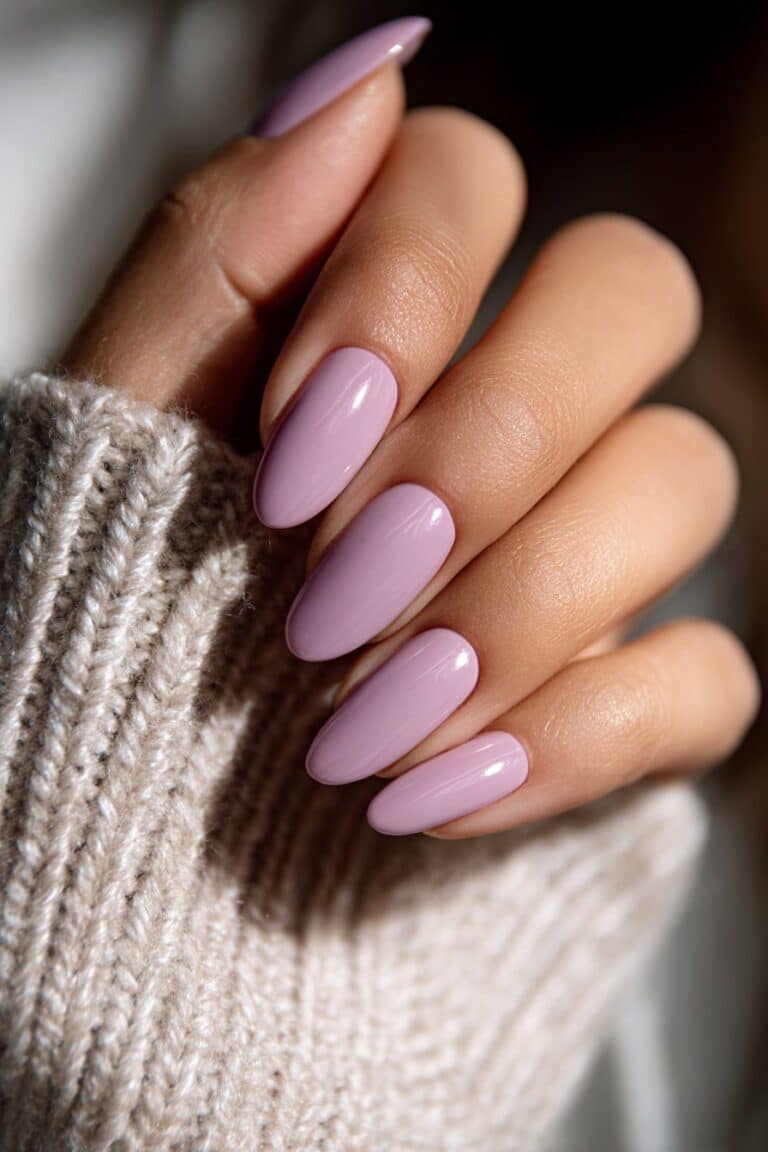
Dusty Mauve Nails

Dusty mauve is one of those shades that I genuinely consider to be universally flattering — it has that perfect balance of warmth and coolness that works on every skin tone and nail shape. I keep several dusty mauve polishes in my kit at all times because it is just that versatile. For Taurus birthday nails, this shade speaks to the sign’s love of quiet luxury — it is not loud or showy, but it is unmistakably beautiful. It carries the softness of a rose petal combined with the sophistication of a muted plum, and the result is always, always stunning.
Nails: Inspiration from the soft romantic tones of muted roses and Taurus’s love of quiet luxury
The inspiration comes from a vase of dried roses — that beautiful dusty, muted pink-purple tone that dried flowers take on after a few weeks of graceful fading. There is romance in that color, and a certain timelessness that feels very Taurus. I love pairing a dusty mauve base with a delicate gold detail — either a thin gold line at the cuticle, or a faint gold foil smudge on the accent nail — to add just enough warmth and richness to the overall look. The finished result is quietly breathtaking.
Tools needed to create the nail design
You will need a dusty mauve nail polish, a thin striping brush, gold foil or gold nail art tape, a base coat, a glossy or matte top coat, and a cuticle oil for finishing.
Step by step guide to create the nail design
- Apply your base coat and build your dusty mauve shade in two even coats, making sure each coat is fully dry for a smooth, streak-free result.
- Using your striping brush and gold polish, paint a thin line along the cuticle of your accent nail for a delicate and sophisticated detail.
- Apply a small piece of gold nail art tape across one nail at a diagonal angle for a geometric accent element, pressing firmly to seal the edges.
- Finish with your preferred top coat and a drop of cuticle oil — the overall look is polished, romantic, and absolutely gorgeous.
Warm Sunset Ombre Nails

I have a deep love for ombre nails — there is something so satisfying about watching two or three colors blend seamlessly into one another on a tiny nail canvas. Warm sunset ombre is the ombre version I return to again and again for Taurus birthday clients because it captures so much of what this season is about: warmth, beauty, the golden magic of a May evening sky. This look uses a gradient of warm peach, coral, and amber tones that together create the illusion of a glowing sunset. It is joyful, warm, and genuinely show-stopping.
Nails: Inspiration from the golden glow of a spring sunset and Taurus’s warm sensual energy
Imagine the sky at 7pm on a warm May evening — that gorgeous gradient moving from deep coral at the horizon up through golden amber and soft peach toward a pale cream at the top. That is the exact color journey we are creating on the nail. I love using a small makeup sponge to blend the colors because it creates that seamlessly diffused gradient that is so characteristic of a real sunset. The result is almost painterly, like a tiny abstract artwork on each finger, and it pairs beautifully with warm metallic jewelry and any spring outfit.
Tools needed to create the nail design
You will need three nail polishes in coral, warm amber, and soft peach, a small cosmetic sponge, a white base coat to make the colors pop, a top coat, and nail tape or liquid latex to protect your skin during sponging.
Step by step guide to create the nail design
- Apply white base coat under your colors so the ombre shades show up vibrant and true to their tone.
- Paint all three colors side by side in a stripe pattern on your cosmetic sponge, then dab the sponge onto your nail and repeat until the gradient is fully blended and opaque.
- Clean up any color that transferred to your skin using a small brush dipped in acetone, working carefully around each nail.
- Apply two coats of glossy top coat to smooth the sponged texture and give the sunset ombre a seamless, glassy finish.
Pearl White Nails

Pearl white nails feel like wearing jewelry on your hands, and that is exactly why they belong on this list. There is a softness and elegance to pearl that I find endlessly compelling, and for Taurus — a sign that loves beautiful, sensual, luxurious things — pearl nails feel deeply appropriate. I have created pearl nail looks for some of the most special occasions in my clients’ lives, and the reaction is always the same: a quiet, awed appreciation. It is the kind of nail that makes you feel like you are the most refined person in any room.
Nails: Inspiration from lustrous pearls and the timeless luxury Taurus craves
Pearls have been a symbol of elegance and inner beauty for centuries — formed slowly, deeply, from something small and simple into something breathtaking. That metaphor resonates beautifully with Taurus energy, which is also patient, persistent, and ultimately stunning in its results. The pearl nail look I love most uses a sheer, opalescent white-pink base with a subtle multidimensional shimmer that shifts between pink, lavender, and cream depending on the light. It is incredibly feminine and sophisticated without being overdone.
Tools needed to create the nail design
You will need a pearlescent or opalescent nail polish in a white-pink shimmer, a fine brush for detail work, a glossy top coat, pearl charm nail accessories or pearl rhinestones, nail glue, and your standard base coat.
Step by step guide to create the nail design
- Apply your base coat and then two coats of your pearlescent polish, allowing each to dry as you build up that beautiful lustrous finish.
- Using nail glue, place small flat pearl rhinestones along the cuticle line of one or two accent nails in a neat half-moon arrangement.
- Add a thin coat of pearl shimmer polish over the rhinestones and surrounding nail to unify the look and prevent any lifting.
- Finish with a thick glossy top coat to lock the pearls in place and intensify the luminous, jewel-like quality of the whole design.
Celestial Bull Nails

Every Taurus deserves a nod to their cosmic identity, and celestial bull nails do exactly that — they honor the Taurus symbol while wrapping it in a celestial, dreamy aesthetic that feels genuinely magical. This is one of the more detailed designs on this list, but the impact is absolutely worth it. I love creating this look for clients who have a strong connection to their star sign and want their nails to truly represent who they are on a deeper level. The combination of deep navy or midnight purple base with gold celestial details is one of the most stunning nail looks I have ever created.
Nails: Inspiration from the night sky, Taurus constellation, and celestial earth magic
The inspiration here pulls from two worlds — the deep, starry night sky and the earthbound power of the bull. A deep midnight base in navy, purple, or black serves as the canvas, and across it we paint delicate gold stars, crescent moons, and tiny bull silhouettes or Taurus constellation line art. The contrast between the deep dark base and bright gold detailing creates something that feels genuinely cosmic and special. This is a birthday nail look that tells a story and starts conversations.
Tools needed to create the nail design
You will need a deep midnight navy or purple nail polish, a gold nail art pen or fine brush with gold polish, star and moon nail stickers or stencils for guidance, a top coat, a base coat, and a steady hand or a magnifying glass for fine detail work.
Step by step guide to create the nail design
- Apply your base coat followed by two coats of your deep midnight shade, making sure the coverage is fully opaque and smooth before starting any detail work.
- Using your gold nail art pen, draw tiny scattered stars and a delicate crescent moon across two or three nails, varying the size of the stars for a realistic constellation effect.
- On your accent nail, carefully dot or draw the Taurus constellation pattern using your gold pen — it is a simple triangular shape with a few connecting stars, very achievable even for beginners.
- Finish with a glossy top coat to protect the gold detail work and make the whole celestial design shine like an actual night sky.
Chocolate Brown Nails

Brown nails have had such a beautiful moment in recent beauty culture, and I am genuinely here for it — especially the deep, rich chocolate brown shades that feel so aligned with Taurus energy. There is something incredibly grounding and luxurious about a well-done chocolate brown nail look. It feels like cashmere, like the inside of a cozy café, like rich earth between your hands. This is the Taurus nail look for the person who appreciates warmth, depth, and a touch of earthy sophistication.
Nails: Inspiration from rich chocolate tones and the grounded, sensual Taurus aesthetic
The color palette is all about warmth and richness — deep cocoa, warm espresso, and a hint of auburn when the light catches it just right. I love creating a tonal variation across the nails, with some fingers in a deeper chocolate and others in a slightly lighter mocha, which creates a dimensional effect that is incredibly beautiful and very editorial. A matte top coat on the deeper shades and a glossy one on the lighter ones plays with finish in a way that makes the overall look feel thoughtfully curated.
Tools needed to create the nail design
You will need two shades of brown nail polish — one deep chocolate and one lighter mocha, a matte top coat, a glossy top coat, a base coat, and a cuticle pusher and oil for finishing.
Step by step guide to create the nail design
- Apply your base coat across all nails and assign your deeper chocolate shade to the index, middle, and pinky fingers, and your mocha shade to the thumb and ring finger.
- Apply two coats of each color on their respective nails, making sure each layer dries completely before the next application.
- Apply a matte top coat to the chocolate nails and a glossy top coat to the mocha nails to create that beautiful tonal contrast in finish.
- Finish with cuticle oil around each nail to make the overall look feel incredibly polished and intentional.
Soft Lavender Nails

Lavender has this incredible quality of being both calming and uplifting at the same time, and that duality makes it such a fascinating nail color. I reach for lavender constantly during spring because it feels so perfectly aligned with the blooming, gentle energy of the season. For Taurus birthday nails, soft lavender speaks to the sign’s love of beauty and their deeply sensory nature — lavender is a color you can almost smell. It is dreamy, soft, and endlessly wearable.
Nails: Inspiration from blooming lavender fields and the gentle sensory beauty of Taurus season
The inspiration is a lavender field in full bloom — those long, hazy purple rows that stretch out under a bright spring sky, filling the air with fragrance and beauty. I love using a cool-toned, dusty lavender base and pairing it with very subtle butterfly or cloud nail stickers for an accent nail that feels whimsical and fresh. Alternatively, a simple lavender ombre blending into white creates something equally dreamy. This look photographs beautifully and feels genuinely joyful to wear.
Tools needed to create the nail design
You will need a soft dusty lavender nail polish, a white polish for ombre blending if desired, a small cosmetic sponge, delicate butterfly or floral nail stickers, a glossy top coat, and a base coat.
Step by step guide to create the nail design
- Apply your base coat and build two coats of your lavender shade across all nails, ensuring even, smooth coverage before any accent work begins.
- For the accent nail, blend your lavender and white polish together on a sponge and dab from the tip down toward the middle of the nail for a soft, cloud-like ombre tip effect.
- Apply your butterfly or floral sticker to the accent nail while the polish is slightly tacky, pressing firmly so it adheres completely and lies flat.
- Seal all nails with a generous layer of glossy top coat to unify the sticker and polish surface for a flawless, smooth finish.
Burgundy Wine Nails

I always save something deeply dramatic and luxurious for last, and burgundy wine nails are exactly that. This is the Taurus birthday nail look for the person who is not afraid to walk into a room and command attention. Deep, rich burgundy carries an energy of confidence, abundance, and timeless glamour that is completely irresistible. I have worn this shade myself on so many occasions when I wanted to feel like the most powerful version of myself, and it delivers every single time.
Nails: Inspiration from deep red wine, autumn richness, and the bold confidence of a Taurus in full power
The color here evokes everything luxurious — deep red wine in a crystal glass, velvet curtains in a grand room, dark roses in full bloom. Burgundy is a color with history and weight, and on nails it creates an instant sense of elegance and authority. I love doing this look with a glossy finish for maximum drama, sometimes adding a single gold leaf flake on the accent nail for a detail that feels like liquid opulence. It is the kind of nail look that makes you feel like you own every room you walk into.
Tools needed to create the nail design
You will need a rich burgundy nail polish with good opacity, a glossy top coat, gold leaf nail flakes, a base coat, a cuticle pusher and oil, and a small detail brush for placing gold flakes precisely.
Step by step guide to create the nail design
- Prep your nails thoroughly and apply your base coat, then build your burgundy shade in two to three thin, even coats for a deeply saturated, opaque finish.
- While your ring finger accent nail is still slightly tacky, use your detail brush to press small pieces of gold leaf flake onto the surface in an organic, scattered arrangement.
- Once dry, use your detail brush to gently remove any excess gold flake from areas where you do not want it, keeping the detail looking intentional and refined.
- Apply a thick glossy top coat over all nails — and a careful extra layer over the gold flake accent — to seal everything and create that stunning, lacquered finish.
Conclusion
As I wrap up this guide, I want to come back to something that I genuinely believe with my whole heart: beauty is one of the most powerful forms of self-expression we have. Your nails are a tiny canvas that you carry with you everywhere, and choosing a look that resonates with who you are — or who you want to celebrate — is an act of love and creativity that I never take for granted.
Taurus energy is some of the most beautiful, grounded, sensual, and abundant energy in the entire zodiac, and every single one of these fourteen nail looks is designed to honor that. Whether you gravitate toward the earthy warmth of terracotta, the dramatic luxury of burgundy wine, the dreamy softness of lavender, or the cosmic magic of celestial bull nails, there is something here that speaks to every dimension of this incredible earth sign.
What I love most about creating nail looks is the same thing I love about makeup: it is not about covering up or conforming. It is about amplifying. It is about choosing something that makes you feel more fully yourself and walking into your birthday — and your life — with that confidence radiating from every fingertip. Taurus knows better than any other sign that beauty is not superficial. Beauty is meaningful. It is intentional. It is a celebration of existing in this body, on this earth, in this moment.
So whether you are doing your nails yourself at your kitchen table, or sitting in your favorite salon chair, I hope this guide gives you not just inspiration but a genuine sense of excitement about what is possible. You deserve nails that feel as beautiful and abundant as the season you were born into. And trust me — with any of these fourteen looks, you will have exactly that.
Happy Taurus season, and happy birthday to every bull out there reading this. Go celebrate yourself, because you absolutely deserve it.