Summer is my absolute favorite season for nail artistry. There is something so freeing about the warmth in the air, the vibrant energy all around, and the way everyone naturally wants to show off their hands a little more. And if you know me at all, you know that I am completely and unapologetically obsessed with square nails. They are clean, bold, and give you the most beautiful canvas for every kind of design you can imagine. Square nails have this extraordinary quality of making any nail art look more deliberate, more polished, and more intentional — whether you are going for something minimal and chic or something full-on artistic and expressive.
Over the years of working with so many incredible clients in my studio and on set, I have developed a genuinely deep love for helping people discover their signature summer nail look. Summer is the season to experiment, to be playful, and to let your nails do the talking. I always say, your nails are the accessories you never take off — so why not make them absolutely stunning every single day?
I have put together this guide of thirteen of my all-time favorite summer square nail designs, each completely unique and each with its own soul and personality. Whether you are heading to a beach getaway, a rooftop brunch with your girls, or simply spending the summer exploring your city, there is something in here that was made for you. I am going to walk you through the inspiration behind each look, the tools you will need, and a simple step-by-step process so you can recreate these at home or bring them to your nail technician. Let us dive into the beauty together.
Coral Sunset Square Nails

Coral is one of those shades that makes me feel instantly, deeply happy. The moment I see it, I am transported to a beach at dusk, watching the sky melt into the most gorgeous warm hues. Coral sunset square nails are one of my absolute perennial favorites for summer because they complement every skin tone beautifully and carry this natural warmth that just radiates joy and confidence. This is the kind of look that feels equally perfect for a casual afternoon and a dressed-up evening event.
Inspiration from coral sunset
The inspiration for this look comes straight from nature’s most breathtaking moments. Think about that golden hour right before the sun dips below the horizon — the sky becomes a living painting of coral, amber, peach, and rich orange. I vividly remember sitting on a balcony one summer evening, completely mesmerized by the colors the sky was offering me so generously. I thought to myself, I need to translate this onto someone’s nails. That single moment of pure natural beauty became the entire foundation for this design. The coral sunset nail look captures warmth, a little romance, and the feeling of a long, golden summer evening that you never want to end. It is soft enough to be wearable every single day but stunning enough to absolutely turn heads.
Tools needed to create the nail design
To achieve this look beautifully, you will need a warm coral base polish, a sheer peach polish, a thin liner brush or small nail art brush, a light gold or champagne polish for highlights, a glossy top coat, a nourishing base coat, and a small makeup sponge for blending. A cuticle pusher and nail buffer are essential for prepping the nail surface so your color sits perfectly and lasts longer without chipping.
Step by step guide to create the nail design
- Apply your base coat first and allow it to dry fully, then apply two smooth coats of your coral polish, letting each layer dry between applications.
- Using your small makeup sponge, dab the peach polish along the lower portion of the nail, gently blending upward into the coral for a seamless, dreamy gradient transition.
- With your thin liner brush, add soft, wispy golden strokes near the tip of the nail to mimic the effect of sunlight catching the horizon line.
- Seal the entire design with a generous layer of glossy top coat to lock everything in and give your nails that stunning, glass-like luminosity.
Tropical Floral Square Nails

Nothing says summer to me quite like tropical florals. There is an absolute explosion of life and color that comes with tropical flower-inspired nail art, and on a square shape, those flowers look like tiny, gorgeous paintings. This is one of the looks I find myself reaching for when a client tells me they want something that feels like a vacation, even when they are right at home.
Inspiration from tropical gardens
My inspiration for this design was born during a walk through a botanical garden that was overflowing with hibiscus, bird of paradise, and palm leaves. The colors were so vivid and so unapologetically bold — hot pinks, deep purples, lush greens, brilliant yellows. I stood there thinking about how beautiful it would be to carry a little piece of that garden on your fingertips through every summer day. Tropical floral square nails are bold, joyful, and full of life. They are for the woman who is not afraid to be seen and who finds beauty in the most colorful corners of the world. Every time you look at your hands, you get to feel like you are standing in that tropical paradise.
Tools needed to create the nail design
You will need a white or nude base polish, a dotting tool, a fine nail art brush, tropical-colored polishes in shades like hot pink, yellow, coral, green, and purple, a small detail brush for leaves and stems, a matte or glossy top coat depending on your preference, and a base coat. Having a thin striper brush will also help you create delicate leaf veins and flower outlines with precision and ease.
Step by step guide to create the nail design
- After applying your base coat, lay down two clean coats of white or nude polish and allow each coat to dry completely before moving forward.
- Use your dotting tool and detail brush to paint small hibiscus or frangipani flowers in your chosen tropical shades, placing them toward one corner or across the tip of the nail for a natural, organic arrangement.
- Add tiny green leaves and stems around the flowers using your striper brush, creating depth and a lush, garden-like feel to the overall design.
- Finish with your preferred top coat to seal the art and protect those beautiful details throughout your summer adventures.
Ocean Blue Ombre Square Nails

I have an absolute love affair with the ocean. The way the water shifts from deep navy near the horizon to bright turquoise near the shore, and then to the palest aqua foam at your feet — it is endlessly inspiring. Ocean blue ombre square nails capture that same mesmerizing gradient, and wearing them makes you feel like you are carrying the sea with you wherever you go.
Inspiration from the ocean
I grew up hearing stories about the coast, and the first time I actually stood at the edge of the ocean and looked out, something in me just settled. The colors of the sea are unlike anything else in nature — layered, shifting, and impossibly beautiful. That experience of watching the water change from deep to light as it moved toward shore planted a seed in my creative mind that eventually became this nail design. Ocean blue ombre nails are for the person who feels most at peace near the water, who loves the idea of carrying that sense of calm and vastness with them. On a square nail, the gradient is long and clean, which makes the ombre effect even more dramatic and striking.
Tools needed to create the nail design
For this look, you will need a deep navy or cobalt polish, a medium turquoise polish, a pale aqua or sky blue polish, a makeup sponge for blending, a glossy top coat, a base coat, and a small cleanup brush with acetone for cleaning up any sponged polish around the cuticles. Having all three shades ready before you begin makes the blending process much smoother and more controlled.
Step by step guide to create the nail design
- Apply your base coat, then lay down the deepest navy shade at the base of the nail, applying it about halfway up and allowing it to dry.
- On your sponge, layer the turquoise in the middle section, overlapping slightly with the navy, and dab it onto the nail in gentle, pressing motions to create a soft blend.
- Apply the lightest aqua shade toward the tip using the same sponge technique, then repeat the sponge application two to three times to build up color intensity and smooth out the gradient.
- Clean the edges with acetone, apply a glossy top coat, and admire your wearable little ocean on every finger.
Lemon Zest Square Nails

Bright, cheerful, and absolutely bursting with energy — lemon yellow square nails are the definition of summer in a bottle. I love this design because it is simple, clean, and yet completely eye-catching. Yellow nails have this magical way of brightening not just your hands but your entire mood, and paired with a square shape, they look incredibly modern and cool.
Inspiration from lemon groves
I once had the most wonderful experience visiting a small citrus grove during a summer trip, and the sight of those heavy, sun-ripened lemons hanging from bright green branches against a brilliant blue sky was absolutely unforgettable. The yellow was so saturated, so alive, and so full of that pure summer energy. I came back to my studio and immediately started experimenting with lemon-inspired nail designs. What I love most about lemon zest nails is that you can keep them perfectly simple with a solid bright yellow, or you can add tiny green leaf accents, a lemon slice detail, or a playful white swirl to elevate the look. Either way, you end up with something that makes people smile the moment they see it.
Tools needed to create the nail design
You will need a bright lemon yellow polish, a fine detail brush, a white polish for accents, a green polish for leaf details, a top coat, and a base coat. A nail stamping plate with citrus or floral patterns can also be a fun addition if you want to create more intricate designs without freehand painting.
Step by step guide to create the nail design
- After your base coat, apply two even coats of lemon yellow polish, ensuring full, opaque coverage, and allow each coat to dry thoroughly before continuing.
- Using your fine detail brush and white polish, paint a tiny lemon slice on one or two accent nails, creating a half-circle shape with wedge lines radiating from the center.
- Add small green leaf shapes alongside the lemon slices with your green polish and detail brush to bring a fresh, organic feel to the design.
- Finish with a clear glossy top coat to make those lemon shades pop and to protect your artwork all summer long.
Pastel Rainbow Square Nails

Pastel rainbow nails are pure joy on your fingertips. I absolutely adore this look for summer because it is playful, inclusive, and uplifting in the most genuine way. Each nail gets its own color, and together they create this gorgeous, soft spectrum that feels both modern and whimsical. This is one of those designs that makes everyone around you smile, and honestly, that is one of the greatest things a nail look can do.
Inspiration from summer skies after rain
I drew the inspiration for this design from something I witnessed one summer morning — a beautiful, soft rainbow stretching across the sky after an early rain shower. The colors were pastel and delicate rather than harsh and saturated, and they blended together in the most dreamlike way. I thought about how perfect those colors would look on a set of clean square nails, one color per finger, creating a mini rainbow across both hands. The beauty of pastel rainbow nails is that they are universally flattering, endlessly cheerful, and they photograph beautifully in natural light. This is the look you wear when you want your nails to match the energy of a perfect summer day.
Tools needed to create the nail design
You will need a set of pastel polishes — including lavender, baby blue, mint green, soft yellow, and blush pink at minimum — a base coat, a glossy or matte top coat, and nail tape or thin tape strips if you want to create clean lines between colors for a more graphic, structured rainbow look rather than one solid color per nail.
Step by step guide to create the nail design
- After your base coat is dry, assign each finger a different pastel shade and apply two even coats of each color, working one nail at a time and allowing adequate drying time.
- For a more elevated version, use nail tape to section off portions of each nail and apply two coordinating pastel shades per nail for a split or colorblock effect.
- Once all nails are fully dry, add tiny white or gold star details on one or two nails as a finishing touch using a fine dotting tool.
- Apply your top coat generously over all nails to unify the look and extend the wear of your rainbow masterpiece.
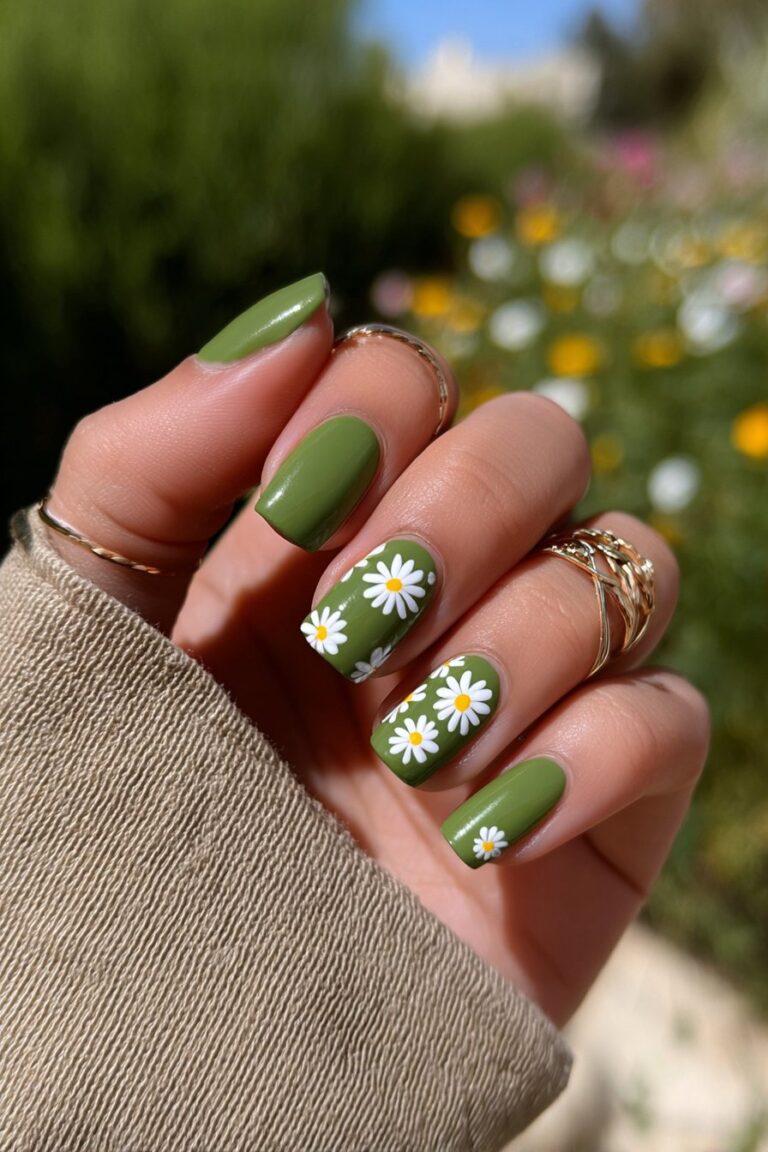
Daisy Garden Square Nails

Daisies are my forever flower. There is something so honest and so cheerful about them — they never try too hard, and yet they are absolutely beautiful. Daisy garden square nails are one of the most requested designs I get during the summer months, and I never get tired of creating them. They work on every nail length within the square family, and they bring an effortless, garden-fresh energy to any look.
Inspiration from wildflower fields
My love for daisy nails was born from a memory of walking through a wildflower field as a child with my mother on a lazy summer afternoon. The daisies were everywhere — white and yellow, some tinier than my pinky nail, swaying gently in the breeze. My mother had always said that beauty is found in the simplest things, and those daisies were the perfect example of that truth. I carry that memory into my work all the time, especially in the summer when floral nail designs are so perfectly on season. Daisy garden nails are simple enough for a beginner to try at home but beautiful enough to make even the most experienced nail lover fall in love all over again.
Tools needed to create the nail design
You will need a sheer or nude base polish, white polish for the petals, yellow polish for the centers, a dotting tool in two sizes, a thin detail brush, a green polish for stems and leaves if desired, and a top coat. A cuticle oil applied after the look is complete adds a beautiful finishing touch and keeps your skin looking fresh alongside the floral design.
Step by step guide to create the nail design
- After your base coat, apply two coats of nude or sheer pink polish and allow everything to dry completely before starting the floral details.
- Using your larger dotting tool dipped in white polish, create five small petal dots arranged in a flower circle pattern, repeating this across multiple spots on the nail for a scattered garden effect.
- Dip your smaller dotting tool in yellow polish and place a single dot in the center of each white flower cluster to complete the daisy shape.
- Seal with a glossy or matte top coat based on your preference — both finishes look stunning with daisies and give you a completely different vibe.
Holographic Glitter Square Nails

If you want your summer nails to absolutely command attention without a single word, holographic glitter square nails are your answer. I am completely obsessed with the way holographic polish catches the light — it shifts from silver to pink to green to gold depending on the angle, and it is genuinely mesmerizing. This is the look for the woman who loves to be her own spotlight.
Inspiration from summer light and festivals
My inspiration here comes from the feeling of being at an outdoor summer gathering just as the sun begins to set and the golden light hits everything at once. There is that magical moment when the light bounces off people’s jewelry, off glasses, off shiny surfaces, and everything seems to shimmer and pulse with life. Holographic glitter nails recreate that feeling on your fingertips. They are the nail equivalent of wearing your most dazzling accessories, and on a square shape, they look particularly dramatic and beautiful. I have seen this look photograph with the most extraordinary, otherworldly quality — like your nails are little prisms capturing every color at once.
Tools needed to create the nail design
You will need a holographic glitter top coat or a holographic pigment powder, a base polish in silver or clear, a silicone eyeshadow applicator or a sponge tip applicator for pressing in the powder, a no-wipe gel top coat if using powder, a UV lamp for gel applications, and a cuticle oil for finishing. If you are using a standard holographic glitter polish rather than powder, the process is much simpler and requires only the polish and top coat.
Step by step guide to create the nail design
- Apply your base coat followed by your silver or clear base polish and allow it to dry completely, then cure under a UV lamp if you are using a gel base.
- If using holographic powder, press it firmly onto the tacky surface of the gel using your silicone applicator in circular buffing motions until the holographic shift becomes vivid and full.
- If using a holographic glitter polish instead, apply two to three coats directly over your base, allowing drying time between each coat to build up that intense shimmer effect.
- Seal with a glossy top coat or a no-wipe gel top coat for the smoothest, most mirror-like finish, and finish with cuticle oil for a polished and professional final look.
Begie with Gold Foil Square Nails

Begie and gold is one of those eternal combinations that will never go out of style, and I fall deeper in love with it every single summer. There is something so refined and so effortlessly luxurious about a clean nude square nail decorated with scattered gold foil accents. It is understated glamour at its absolute finest, and I recommend it to clients who want something that feels both elevated and wearable for everyday life.
Inspiration from desert landscapes
This design was inspired by the colors and textures of a desert landscape — sandy begie, warm taupes, and the glint of mica and mineral flakes catching the sunlight across the terrain. There is a kind of quiet elegance in desert scenery that I find deeply beautiful, and the nude-and-gold nail look channels exactly that energy. Gold foil on nails mimics the way light fractures across sand and rock — unpredictable, organic, and endlessly interesting. No two nail applications of gold foil look exactly the same, which means each person who wears this design has something entirely unique to them. That element of individuality is something I treasure deeply in my work.
Tools needed to create the nail design
You will need a warm nude polish in a shade that complements your skin tone, gold foil sheets or foil flakes, a nail foil adhesive or a slightly tacky top coat, tweezers or a fine brush for placing the foil, a glossy top coat, and a base coat. Small foil pieces give a more delicate, scattered effect, while larger sheets create a bolder, more graphic statement depending on your style preference.
Step by step guide to create the nail design
- Apply your base coat, then apply two coats of your chosen nude polish, ensuring smooth, streak-free coverage, and allow both layers to dry fully.
- Apply a thin layer of foil adhesive or a tacky top coat over the areas where you want the gold foil to sit, and wait until it becomes slightly sticky to the touch.
- Using tweezers or your fingertip, gently press small pieces of gold foil onto the adhesive areas and lift away the backing sheet to reveal the metallic transfer, repeating until you have achieved your desired level of coverage.
- Seal everything with a generous layer of glossy top coat, pressing gently over the foil edges to ensure they are fully secured and smooth.
Watermelon Sugar Square Nails

Is there any image more perfectly summer than a fresh slice of watermelon? I do not think so. Watermelon sugar square nails are one of those designs that brings out absolute delight in everyone who sees them — they are fun, they are bold, and they are undeniably seasonal in the best possible way. I love creating this look because it is playful without trying too hard and it works beautifully on square nails thanks to that clean, flat tip.
Inspiration from summer fruit markets
My inspiration for watermelon nails came from one of my favorite summer rituals — visiting a local farmers market and seeing enormous slices of watermelon stacked up with their vivid red flesh and dark green rinds glinting in the morning sunshine. There is something so purely joyful about a watermelon. It represents summer gatherings, laughter, childhood afternoons, and the kind of simple pleasures that make life feel really good. I wanted to put all of that on someone’s nails. The watermelon design combines bright pops of red or coral with white and green rinds, and tiny black seed details that bring the whole fruit to life in miniature form across your fingertips.
Tools needed to create the nail design
You will need a bright red or coral polish, a white polish, a green polish, a black dotting tool or fine detail brush for seeds, a base coat, a top coat, and nail tape if you want crisp, clean lines between the red flesh and the white and green rind sections of the design.
Step by step guide to create the nail design
- After your base coat, apply your bright red polish across most of the nail, leaving the bottom portion bare for the rind, and allow it to dry before proceeding to the next step.
- Apply a thin stripe of white polish at the base of the red where the flesh meets the rind, then apply a curved strip of green polish below the white for the outer rind layer.
- Using your dotting tool with black polish, add small, slightly elongated seed shapes scattered across the red section of the nail to complete the watermelon fruit illusion.
- Finish with your top coat to seal and smooth everything together into one gorgeous, cohesive summer look.
Mint French Tip Square Nails

The French manicure is a classic that I deeply respect, but I love giving it a fresh summer personality by swapping the traditional white tip for a cool, refreshing mint green. Mint French tip square nails are modern, sophisticated, and have this clean, cool-girl energy that I find completely irresistible. On a square nail, the tip line is crisp and defined, which makes this look especially polished and intentional.
Inspiration from garden herbs and cool breezes
This design was inspired by walking through an herb garden on a warm summer morning and brushing my fingers against the mint plants. That scent, that color — cool, green, fresh, and alive — immediately made me think of nails. Mint is such a satisfying color because it is cheerful without being loud, and it carries this inherently refreshing quality that feels absolutely made for summer. The mint French tip takes all of those feelings and translates them into a look that is wearable enough for a professional setting but stylish enough to stand out at a summer event. I have done this look on clients with every skin tone and nail length, and it always, always works.
Tools needed to create the nail design
You will need a sheer or nude base polish, a mint green polish, a French tip guide sticker or thin nail tape for clean tip lines, a fine liner brush for any freehand work, a glossy top coat, and a base coat. A steady hand and good lighting will help you achieve the most precise, professional-looking tip line.
Step by step guide to create the nail design
- Apply your base coat and then two smooth coats of nude or sheer base polish, allowing full drying time before you move on to the tip application.
- Place your French tip guide stickers at the smile line of each nail, press them down firmly along the edge, and paint your mint green polish over the tip in two coats, removing the guides while the polish is still slightly wet for the cleanest line.
- Use your liner brush dipped in mint green to touch up any uneven areas along the smile line and refine the shape for a flawlessly clean result.
- Apply your top coat in long, smooth strokes from base to tip to seal the French line and create that glossy, salon-fresh finish that makes this look so timeless.
Tie-Dye Square Nails

Tie-dye had its big fashion comeback a few years ago and honestly, it never left my heart. Tie-dye square nails are such a fun and creative look for summer because no two sets ever look the same — the nature of the design means every pair of hands gets something completely original. This is the look for the free spirit, the artist, the person who loves color without limits.
Inspiration from summer fashion and artistic expression
My inspiration for tie-dye nails came directly from the world of summer fashion and the way tie-dye patterns became such a powerful symbol of creative freedom and self-expression. I have always been drawn to the organic, unpredictable nature of actual tie-dye fabric — the way colors bleed into each other, creating unexpected combinations and shapes that you could never plan but always find beautiful. Translating that onto nails was such a joyful challenge. The key to great tie-dye nails is embracing imperfection and letting the colors do their own thing while you guide them gently in the right direction. It is one of the most liberating designs I create because there is no wrong answer.
Tools needed to create the nail design
You will need at least three to four nail polish colors in complementary summer shades such as pink, purple, orange, and yellow, a small cup of water, a toothpick or thin nail art brush, a white base polish, a top coat, petroleum jelly or tape to protect your skin around the nail, and a base coat for proper adhesion and nail protection.
Step by step guide to create the nail design
- After your base coat and white base polish are dry, drop individual small drops of each colored polish onto the surface of water in your cup and use a toothpick to gently swirl them into a marbled, tie-dye pattern.
- Dip your finger into the water with the nail facing down, press it gently into the color pattern, and lift straight up, then use a toothpick to clean up any excess polish floating on the water’s surface before removing your finger.
- Allow the water-marbled design to dry completely on your nail before touching or moving on to cleaning up the skin around your nail with acetone on a brush.
- Apply a generous top coat over each nail to smooth the slightly textured marble surface and create a seamless, glossy, perfectly finished result.
Abstract Geometric Square Nails

Abstract geometric nail art is one of my true passions as a nail artist. There is something deeply satisfying about the precision of clean lines, bold color blocks, and angular shapes arranged across a nail in unexpected and visually interesting ways. Square nails are genuinely the ideal canvas for geometric designs because the shape of the nail itself is already geometric, so the overall look has a beautiful sense of cohesion and intentionality.
Inspiration from modern art and architecture
My inspiration for abstract geometric nails comes directly from my love of modern art and architecture. I have always been drawn to the way artists use simple shapes — triangles, rectangles, lines, and angles — to create complex, emotionally resonant compositions. Walking through galleries or even just looking at the geometric patterns on a building facade fills me with the same creative excitement I feel when I sit down to design nails. For summer, I love playing with bold color combinations — electric blue with white and gold, hot coral with black, or warm terra cotta with soft cream — layered in clean geometric arrangements that feel both contemporary and striking.
Tools needed to create the nail design
You will need a base color in white or nude, at least two to three accent polish colors, nail tape or thin striping tape in multiple widths, a fine liner brush, a top coat, a base coat, and a dotting tool for any circular accent elements. Having tweezers on hand makes removing tape cleanly much easier and reduces the risk of smudging your freshly painted shapes.
Step by step guide to create the nail design
- After your base coat and base color are completely dry, lay strips of nail tape across the nail in diagonal, horizontal, or angular patterns to create your geometric sections, pressing down firmly along every edge.
- Paint your accent colors into the exposed sections between the tape strips, working carefully to stay within the lines, and allow the polish to become slightly tacky before removing the tape in one smooth, confident motion.
- Add any additional details — fine lines with your liner brush, dots with your dotting tool, or additional tape sections for more layers — building up complexity gradually until you reach the level of detail you want.
- Finish with a glossy top coat applied in smooth, deliberate strokes to seal all your tape lines and create a clean, gallery-worthy result that shows off every geometric element beautifully.
Lavender Dreams Square Nails

Lavender is having a truly magnificent moment in the beauty world, and I am here for every second of it. Lavender square nails carry this ethereal, dreamy quality that feels perfectly suited to long summer evenings, garden parties, and those beautiful, hazy days of midsummer when everything feels a little magical. This is one of those looks that is simultaneously trendy and timeless, which is rare and worth celebrating.
Inspiration from lavender fields and soft summer evenings
The inspiration for this design came to me during a summer when I became completely obsessed with images of lavender fields — those endless rows of purple blooms stretching toward the horizon under golden afternoon light. There is something almost otherworldly about lavender fields, something soft and dreamy and deeply calming. I wanted to create a nail look that gave people that same feeling — a little escape into something beautiful and peaceful every time they glanced at their hands. Lavender square nails achieve that perfectly. Whether you choose a solid lavender shade, a lavender ombre, or lavender with soft white floral accents, the result is consistently romantic and quietly stunning in the most captivating way.
Tools needed to create the nail design
You will need a soft lavender polish, a deeper purple polish for shadow or gradient effects, a white polish for accent details, a fine detail brush for any floral or swirl accents, a makeup sponge for ombre applications, a glossy or matte top coat depending on your preference, and a base coat. A purple glitter top coat can also be added as an optional finishing accent for nails that catch the light in the most enchanting way.
Step by step guide to create the nail design
- Apply your base coat and then two smooth, even coats of lavender polish, giving each layer full drying time before you move on to any accent work or gradient applications.
- If creating a lavender ombre, use your makeup sponge to blend the deeper purple shade at the base of the nail, fading it gradually up into the lighter lavender for a soft, seamless color melt effect that looks dreamy and dimensional.
- Using your fine detail brush and white polish, add tiny hand-painted swirl accents or small lavender flower clusters on one or two accent nails to bring in a delicate botanical element that completes the lavender dream aesthetic.
- Seal everything with your chosen top coat — glossy for a polished, modern finish or matte for a softer, more editorial look that emphasizes the pigment of the lavender itself.
Conclusion
I want to close out this guide by speaking to you directly from my heart, because I truly believe that what we put on our nails is more than decoration — it is a form of self-expression, self-care, and self-celebration. Every summer, I watch my clients light up when they find a nail look that feels like them. That moment when someone looks down at their hands and just smiles — that is everything to me. That is the entire reason I do this work.
These thirteen summer square nail designs represent so many things I love: the warmth of the season, the joy of color, the satisfaction of precision and artistry, and most importantly, the beauty of individuality. Every single one of these looks can be adapted, personalized, and made uniquely yours. Add more glitter, swap out a color, combine two designs into one — your nails are your canvas and you are always the artist, no matter what level of experience you have.
Square nails are my personal favorite shape for the summer because of how clean and deliberate they look. They give every design a structured, intentional framework that makes even the simplest color look polished and considered. If you have been hesitant to try the square shape, I genuinely encourage you to go for it this summer. You might just discover your new signature look.
My biggest piece of advice for summer nails is this — do not be afraid to try something that excites you, even if it feels a little outside your comfort zone. Beauty is not about playing it safe. It is about exploration, creativity, and finding joy in the details of your everyday life. Your nails are with you every single moment of every single day — on your morning coffee, during your afternoon adventures, at your evening gatherings. Let them be something that brings you genuine happiness.
As I always say, makeup and beauty are not about hiding who you are — they are about amplifying everything that makes you wonderful. The same is completely true of nail art. So go pick your favorite look from this list, gather your tools, and let this summer be the one where your nails truly shine. I am rooting for you every step of the way, and I cannot wait to see what beautiful things you create.