
There is something so magical about the Fourth of July that gets my creative energy flowing every single year. As someone who has spent years working with color, texture, and artistry, I can tell you that this holiday is one of my absolute favorites for nail art. The combination of bold reds, crisp whites, and deep blues just speaks to my soul as a beauty artist. Whether you are heading to a backyard barbecue, watching fireworks with your loved ones, or simply want to feel festive and fabulous from your fingertips, the right nail design can pull your whole look together in the most beautiful way. I am so excited to walk you through fourteen of my favorite simple Fourth of July nail ideas that are not only gorgeous but also totally doable right at home. Get ready to celebrate in style, because your nails are about to become the most festive accessory you own this summer.
Classic Red, White and Blue Stripes
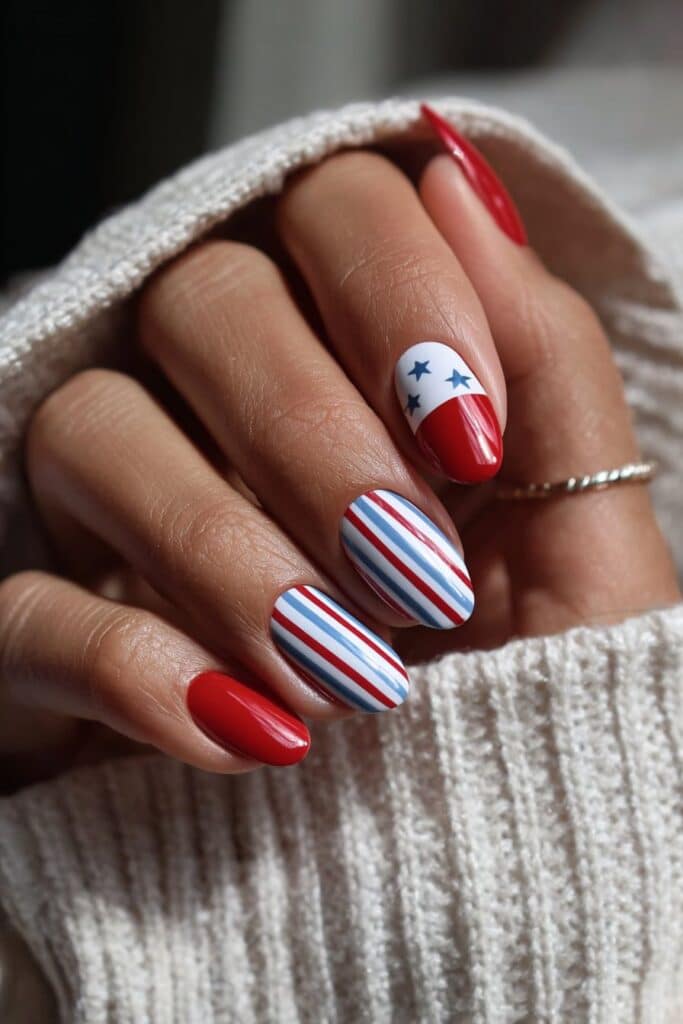
Nails: Inspiration from classic red, white and blue stripes
When I think about the Fourth of July, stripes are always the very first image that comes to mind. There is something timeless and effortlessly patriotic about a clean stripe design in red, white, and blue. I remember working on a summer editorial shoot where the stylist requested patriotic-themed nail art for the models, and I reached straight for my striping tape and these three iconic colors. The result was absolutely stunning and incredibly simple to achieve. Stripes bring a sense of order and elegance to your nails while still screaming festive and celebratory energy. Whether you choose thin pinstripes or bold chunky bands, this design works beautifully on short, medium, and long nails alike. The key is to keep your lines as crisp and clean as possible so the overall look feels polished and intentional. I always tell my clients that simplicity done well is always better than complexity done messily, and this design proves exactly that. It is one of those looks that feels like a classic for a reason — because it genuinely never fails to impress.
Tools needed to create the nail design
To create this look at home, you will need a red nail polish, a white nail polish, and a navy blue nail polish. A clear base coat and a glossy top coat are essential for protecting your design and making it last through all your holiday celebrations. Striping tape or thin nail art brushes will help you achieve those clean, precise lines that make this design so striking. A nail art dotting tool can also come in handy if you want to add small dot accents between stripes for extra detail and visual interest.
Step by step guide to create nail design
- Start by applying your clear base coat and letting it dry completely before moving on to any color.
- Apply your white nail polish as the base color across all nails and allow it to dry fully before adding stripes.
- Use striping tape to section off areas on the nail, then paint your red and navy blue stripes carefully and remove the tape while polish is still slightly wet.
- Seal everything with a glossy top coat for a long-lasting, professional finish that will hold up all day long.
Glitter Star Accent Nails

Nails: Inspiration from glitter star accent nails
Stars have always been one of those symbols that feel both deeply patriotic and endlessly glamorous to me. There is something about a glittery star catching the light that just makes you feel like the most festive and fabulous person in the entire room. I absolutely love recommending this design for people who want something that feels a little more elevated without being too complicated or time-consuming. The idea is beautifully simple — keep most of your nails in a solid patriotic shade and then use one or two accent nails to showcase gorgeous glitter star details. It is a design that photographs beautifully and catches every bit of sunlight during those outdoor Fourth of July celebrations. I have done versions of this look on so many of my clients over the years, and it never fails to turn heads and spark compliments. The contrast between a simple solid nail and a sparkling glitter accent nail creates such a beautiful and balanced visual effect.
Tools needed to create the nail design
For this design, you will need a solid navy blue or deep red nail polish for the base and a fine glitter nail polish in silver or gold. A small nail art brush for precise star placement will give you the most control over your design. Star-shaped nail stickers or stencils are a wonderful shortcut if you want perfectly shaped stars without having to freehand them. A clear top coat will lock in all the sparkle and prevent any glitter fallout throughout the festivities.
Step by step guide to create nail design
- Apply your base coat followed by your chosen solid color on all nails and let them dry fully before moving on.
- On your accent nails, apply the glitter polish generously or use your nail art brush to carefully paint small star shapes using the glitter formula.
- If using star stickers or stencils, place them while the base is still slightly tacky for the best adhesion and cleanest result.
- Finish with a generous layer of clear top coat to seal in the stars and add an extra layer of gorgeous shine.
Watercolor Patriotic Nails

Nails: Inspiration from watercolor patriotic nails
I am someone who deeply appreciates art in all its forms, and watercolor nail art is one of those techniques that truly combines beauty and artistry in the most breathtaking way. Watercolor patriotic nails take the traditional red, white, and blue palette and soften it into something dreamy, painterly, and artistic. Instead of harsh lines and bold blocks of color, you get soft, blended washes of color that look like a delicate painting right on your nails. I was inspired to try this look after attending an art gallery opening years ago where watercolor paintings lined the walls, and I immediately began thinking about how to translate that soft and romantic beauty onto nails. This design is perfect for someone who loves patriotic themes but also wants something that feels more artistic and unexpected than the traditional stripe or star pattern. It works beautifully on both short and long nails and feels absolutely stunning in photographs.
Tools needed to create the nail design
You will need red, white, and blue nail polishes with slightly sheer or semi-transparent formulas to achieve that soft watercolor effect. A small fan brush or a slightly dried-out regular nail polish brush works wonderfully for blending and creating that soft, washed-out look. Rubbing alcohol or nail polish thinner can help you achieve a more diluted, watercolor-like consistency if your polish is too thick. A white base coat is essential here to make the colors pop, and a matte or satin top coat will enhance the artistic, painted feel of the finished design.
Step by step guide to create nail design
- Apply a white base coat across all nails and let it dry fully to give the colors a bright canvas to sit on.
- Using a thin brush dipped in slightly thinned nail polish, sweep soft strokes of red and blue across the nail, letting them bleed softly into each other at the edges.
- Build up color gradually, layering soft washes until you achieve the depth and blended look that you love.
- Seal with a matte top coat for that authentic watercolor, painted-art finish that makes this design truly special.
Minimalist Star Nails
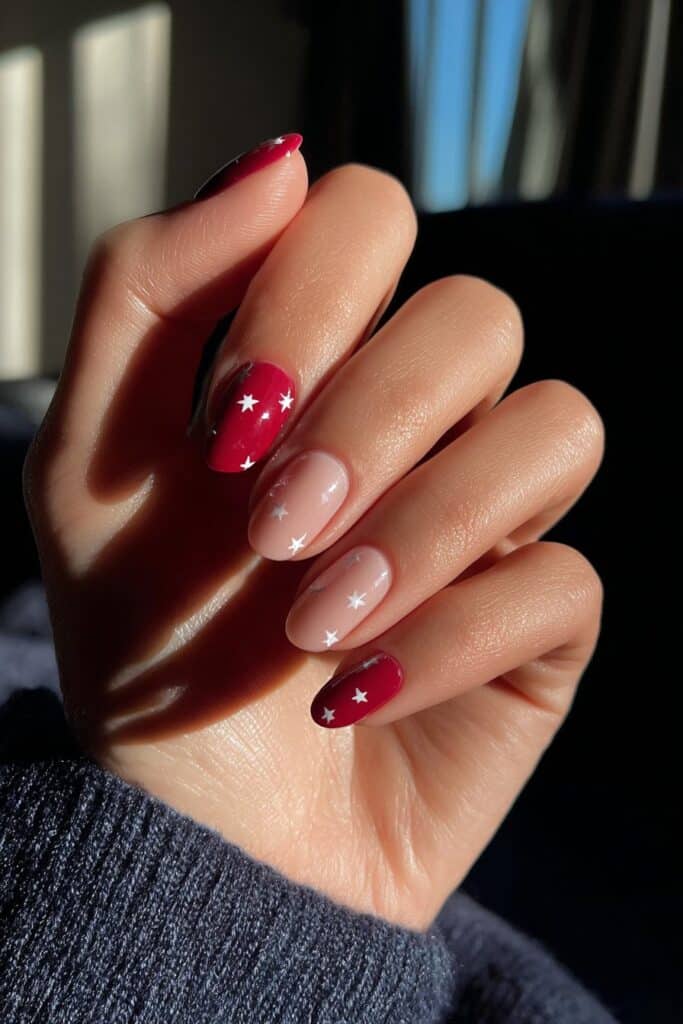
Nails: Inspiration from minimalist star nails
Less is more — that is one of my absolute favorite mantras, both in makeup and in nail art. Minimalist nail designs have become incredibly popular over the years, and I completely understand why because there is such genuine elegance in simplicity. For a minimalist Fourth of July look, I love the idea of a clean nude or white base with a single tiny star painted or stamped onto each nail. It feels sophisticated, modern, and festive all at once without feeling over the top or costumey. I remember doing a variation of this look for a bride who had a Fourth of July wedding, and she wanted something patriotic but still bridal and elegant. The minimalist star design was the absolute perfect solution — it celebrated the holiday beautifully while keeping her overall look refined and breathtaking. This is a design that suits everyone, from those with the simplest tastes to the most fashion-forward individuals.
Tools needed to create the nail design
For this look, you will need a nude, white, or sheer pink nail polish as your base to keep things clean and understated. A fine-tipped nail art pen or a very small nail art brush will allow you to paint tiny stars with precision and control. Alternatively, a stamping kit with star designs makes this even easier for beginners who are just starting out with nail art. Red or blue nail polish works beautifully for the stars themselves, and a clear gloss top coat will complete the look with a polished shine.
Step by step guide to create nail design
- Apply your base coat followed by your chosen neutral or white shade and allow it to dry completely before adding any details.
- Using your nail art pen or fine brush, carefully draw small stars in your chosen patriotic color at the base, tip, or center of each nail.
- Keep the design light and delicate because the beauty of minimalism is truly in its restraint and quiet precision.
- Seal with a clear gloss top coat to protect your stars and give the nails a polished, finished appearance that lasts.
Fireworks Burst Nails

Nails: Inspiration from fireworks burst nails
Every Fourth of July, the moment those fireworks light up the sky, I am completely and utterly mesmerized. There is so much color, energy, and movement in a fireworks display, and it has always felt like an open invitation to be bold and expressive. Fireworks-inspired nail art captures that same sense of joy and explosive excitement right at your fingertips. Picture bursts of color radiating outward from a center point, like tiny brilliant explosions of glitter and brightness on each nail. I love this design because it is so joyful and full of life. It genuinely feels like wearing a celebration on your fingertips. I first created this design during a particularly memorable outdoor celebration several years ago, and my nails became the talk of the entire evening. People kept asking how I did it, and I was thrilled to discover it was far easier than it appeared. The secret is truly in having the right tools and a little bit of patience.
Tools needed to create the nail design
To create fireworks nails, you will need a dark base polish — deep navy or black works best to make the bursts pop with maximum drama. A fan brush, a starburst stamping plate, or a fine nail art brush will help you create those dynamic radiating lines. Glitter polishes in red, gold, and silver create the most realistic fireworks effect. A dotting tool is useful for adding the tiny sparkle dots at the tips of each burst, and a generous top coat will lock in all that dazzle beautifully.
Step by step guide to create nail design
- Apply your dark base coat — navy or black — and let it dry fully before beginning the fireworks design on top.
- Using a fine brush, paint thin radiating lines outward from a central point using gold or silver glitter polish to mimic a fireworks burst in motion.
- Add small dots at the very tips of each radiating line using your dotting tool for that authentic sparkling fireworks detail.
- Finish with a clear top coat to seal and protect the design while adding extra brilliance and depth to the glitter.
Navy Blue with Gold Star Nails

Nails: Inspiration from navy blue with gold star nails
There is something deeply luxurious about the combination of navy blue and gold that I find absolutely irresistible. It is a pairing that feels both powerfully patriotic and utterly glamorous, and I am always reaching for this combination whenever I want my holiday nails to feel a little more elevated and special. Navy blue is such a rich, sophisticated shade that instantly gives any nail design a sense of depth and drama. When you pair it with shimmering gold stars, the result is truly striking and beautiful in the most refined way. I always think of a clear summer night sky when I look at this combination — dark, deep, and full of twinkling golden lights. I created this exact design for a client attending a rooftop Fourth of July celebration, and she told me afterward that her nails received more compliments than anything else she wore that evening.
Tools needed to create the nail design
You will need a rich navy blue nail polish as your base and a gold glitter or metallic nail polish for the stars. A fine nail art brush or pre-cut gold star stickers will make the star placement precise and easy. A glossy top coat is especially important here to enhance the metallic quality of the gold and add that deeply luxurious, high-shine finish to the completed design.
Step by step guide to create nail design
- Apply your base coat, followed by two layers of navy blue polish for full, rich, and deeply saturated color coverage.
- Once the base is fully dry, use a fine brush dipped in gold polish to carefully paint small stars across the nails in a scattered and organic pattern.
- Alternatively, place pre-cut gold star stickers or nail foil pieces for a perfectly crisp and symmetrical star shape.
- Seal with a high-shine top coat to bring out the full glamour of the gold stars against the rich, dark navy background.
Tie-Dye Patriotic Nails

Nails: Inspiration from tie-dye patriotic nails
Tie-dye has had such an incredible comeback over the last few years, and honestly, I am completely here for it. There is something so free-spirited, playful, and wonderfully summery about tie-dye that makes it absolutely perfect for a joyful celebration like the Fourth of July. When you combine the classic swirling tie-dye technique with a red, white, and blue color palette, you get something that is simultaneously festive and incredibly cool-looking in the most modern way. I remember the very first time I experimented with tie-dye nail art in my studio on a rainy afternoon, testing new techniques and letting my creativity run wild. I was completely blown away by how gorgeous the results were. The colors blend and swirl in the most unpredictable and beautiful ways, so every nail ends up looking slightly different, which makes the whole design feel so dynamic, alive, and one-of-a-kind.
Tools needed to create the nail design
For tie-dye nails, you will need red, white, and blue nail polishes along with a small cup of room-temperature water and a toothpick for swirling the colors. Tape to protect the skin around your nails will save you so much cleanup time afterward. A clean-up brush and nail polish remover are helpful for tidying up the edges, and a clear top coat seals the finished look beautifully and securely.
Step by step guide to create nail design
- Apply a clear base coat, then tape off the skin around your nails to make the cleanup process significantly easier and neater.
- Drop small amounts of red, white, and blue polish into a cup of water and use a toothpick to swirl the colors gently into a swirling tie-dye pattern.
- Dip your nail into the water pattern and lift carefully to transfer the swirling design, then remove the tape and clean up any edges.
- Seal with a clear top coat once the design has dried completely for a smooth, glossy, and long-lasting finish.
French Tip with Patriotic Twist Nails

Nails: Inspiration from French tip with patriotic twist nails
The French tip is one of those genuinely timeless nail designs that I do not believe will ever truly go out of style. It is clean, elegant, and universally flattering on every nail shape and skin tone. But for the Fourth of July, I love giving the classic French tip a patriotic twist that makes it feel fun and festive while still retaining that signature sophistication and polish. Instead of the traditional white tip, imagine alternating red and blue tips on a crisp white base, or a navy tip beautifully accented with a tiny red stripe detail. It is a design that works especially well in professional or semi-formal settings where you still want to celebrate the holiday without going too bold. I love doing this look for clients who want something festive but refined — it strikes that perfect balance between celebration and elegance every single time.
Tools needed to create the nail design
You will need a sheer or white nail polish for the base along with red and navy blue polishes for the tips. French tip guides or small pieces of tape will help you achieve those perfectly straight and even tip lines that define this design. A fine nail art brush can add any additional details like thin stripe accents along the tip line for extra patriotic detail. A glossy top coat is essential for that classic French manicure high-shine finish.
Step by step guide to create nail design
- Apply your base coat followed by a sheer or nude base color across all nails and allow it to dry completely before starting the tips.
- Use French tip guides or tape to mask off the base of the nail, then paint your chosen tip color in a clean, even curve across the nail tip.
- Remove the guide carefully while the polish is still slightly wet for the sharpest and most precise lines possible.
- Finish with a clear top coat and optionally add a tiny stripe or subtle dot detail at the tip line for an extra touch of patriotic personality.
Confetti Nails

Nails: Inspiration from confetti nails
Confetti just instantly makes me feel like it is time to celebrate, and that is absolutely the energy I want to bring to my Fourth of July nail art every single year. Confetti nails are one of those designs that look incredibly fun, complex, and party-ready but are actually quite easy to achieve at home with the right materials. The idea is to use small pieces of nail foil, glitter shapes, or confetti nail stickers in red, white, blue, and gold, scattered joyfully across a clear or white base for a look that is pure festive fun. I love this design because it radiates a sense of joy and carefreeness that is perfectly in step with the spirit of the holiday. I wore a version of this design to a Fourth of July gathering a few summers ago and received compliments throughout the entire day, from the moment I arrived until the very last firework lit up the sky.
Tools needed to create the nail design
You will need a clear or white nail polish for your base and confetti-shaped glitter or nail foil in red, white, blue, and gold shades. A pair of tweezers allows for precise placement of the larger confetti and foil pieces. Nail glue or a thick layer of top coat helps secure larger foil pieces firmly in place. A clear gloss top coat is absolutely essential to seal everything in and prevent any confetti from lifting or falling off during wear.
Step by step guide to create nail design
- Apply your clear or white base and let it become partially dry — a slightly tacky surface is actually ideal for confetti piece placement.
- Using tweezers, place individual confetti pieces, glitter shapes, or foil pieces across the nail surface in a scattered and joyful random pattern.
- Gently press each piece firmly down to ensure it adheres completely to the surface of the nail without any lifting at the edges.
- Apply two generous layers of clear top coat over everything, making sure to cap the edges for maximum durability and a smooth finish.
Sunburst Nails

Nails: Inspiration from sunburst nails
The sun is the ultimate symbol of summer, and sunburst nails are a design that celebrates that warm, radiant energy in the most beautiful way. I am genuinely drawn to sunburst designs because they feel so bold, graphic, and striking — there is something almost retro-inspired about them that I absolutely love from both an artistic and a fashion standpoint. For a Fourth of July version of this design, I use a combination of red, white, gold, and blue to create a starburst pattern that radiates outward from the base or center of the nail. It is a design that feels genuinely artistic and eye-catching without being overly complicated to create at home. I first experimented with sunburst nails after seeing a vintage-style graphic poster and immediately knowing that the design would translate beautifully onto nails — and I was completely right about that.
Tools needed to create the nail design
For sunburst nails, you will need a white or pale yellow base polish and red or blue polishes for the radiating lines that form the burst pattern. A fine nail art brush is absolutely key for creating those clean, straight lines radiating outward from the central point. Striping tape can also help guide your lines for extra precision and uniformity. A clear top coat will seal the design and enhance those bold, graphic lines to their fullest visual impact.
Step by step guide to create nail design
- Apply your white or pale yellow base color and allow it to dry completely before starting the sunburst lines on top.
- Using a fine nail art brush, paint thin lines radiating outward from a central point at the base or center of the nail using red or blue polish.
- Alternate colors between adjacent lines for a more dynamic, multi-colored sunburst effect that really catches the eye.
- Seal with a clear top coat to protect the radiating lines and give the whole design a crisp, clean, and finished appearance.
Marble Effect Patriotic Nails

Nails: Inspiration from marble effect patriotic nails
Marble nail art has been one of my genuine obsessions for years because it looks so luxurious and sophisticated while still being achievable at home with a little practice. When you combine the marble technique with a red, white, and blue palette, the result is something that feels simultaneously elevated and beautifully festive. The swirling veins of color running through each nail create a sense of movement, depth, and artistry that is genuinely stunning to look at in any lighting. I love doing marble nails for clients who want something that feels more like wearable art than traditional holiday nail art. This design consistently becomes a conversation starter at every event, and it photographs absolutely beautifully no matter the setting or lighting conditions.
Tools needed to create the nail design
You will need a white nail polish as your base along with red and navy blue polishes for the marble veining effect. A fine nail art brush or a thin striping brush is essential for creating those delicate, wispy, branching veins that define the marble look. A slightly thicker consistency of polish works better for marble veining as it holds its shape more effectively. A gloss or satin top coat will complete the luxurious, polished, stone-like finish of this stunning design.
Step by step guide to create nail design
- Apply a white base coat and let it dry fully, as the white background is absolutely essential for the marble effect to show with full clarity.
- Using a thin brush, draw irregular and naturally branching lines across the nail in red and blue, mimicking the organic veins found in real marble stone.
- Soften the lines slightly with a small brush dipped in a tiny amount of acetone for a more blended and authentically realistic marble appearance.
- Finish with a high-gloss top coat to add that polished, stone-like sheen that makes this design look truly extraordinary.
Negative Space Stars Nails

Nails: Inspiration from negative space stars nails
Negative space nail art is one of those techniques that feels so modern, editorial, and genuinely ahead of the trend curve to me. The concept of intentionally leaving portions of the nail unpainted to form the actual design is something I find endlessly fascinating and creatively exciting. For a Fourth of July twist on this technique, I love using a deep red or navy blue polish and leaving tiny star-shaped spaces unpainted so that the natural nail shows through as the star shape itself. It is such an unexpected and clever approach to patriotic nail art, and the result feels incredibly chic, contemporary, and artistic. I remember doing a version of this look for an editorial shoot centered around modern patriotism, and the finished images were absolutely striking. The negative space stars created a graphic, clean aesthetic that felt both artistic and festively patriotic.
Tools needed to create the nail design
You will need star-shaped nail stickers or stencils along with a deep red or navy blue nail polish that provides full, opaque coverage. You apply the star stickers to a bare nail before painting so that when you remove them, the star shape is revealed as unpainted nail. A fine clean-up brush and acetone help tidy up any rough edges, and a clear top coat seals the finished look beautifully without flooding the negative space areas.
Step by step guide to create nail design
- Apply a clear base coat and allow it to dry completely, then carefully place star-shaped stickers or stencils onto the nail exactly where you want the negative space stars to appear.
- Paint over the entire nail with your chosen deep red or navy blue polish, ensuring full and even coverage all around the stickers.
- Allow the polish to partially dry until it is no longer wet but still slightly flexible, then carefully peel away the stickers to reveal the clean star shapes beneath.
- Seal with a thin and careful layer of clear top coat, being mindful not to flood the delicate negative space areas with too much product.
Glitter Gradient Nails

Nails: Inspiration from glitter gradient nails
A glitter gradient — also known as a glitter ombre — is one of those techniques that I genuinely never get tired of creating, wearing, or recommending to my clients. There is something so romantic and magical about color that fades gradually and seamlessly from one shade into another, and when you add glitter into the equation, the result is absolutely dazzling and completely show-stopping. For a Fourth of July version of this design, I love starting with a deep, rich red at the base of the nail, blending gradually into white at the center, and then fading into a sparkling blue at the tips to create a full patriotic color gradient across the nail. It is bold, beautiful, and perfectly festive for the holiday. I have done this design for so many clients over the years, and it consistently receives the most incredible reactions from everyone who sees it. It is one of those looks that appears complicated but is surprisingly achievable with the right technique.
Tools needed to create the nail design
You will need red, white, and navy blue nail polishes along with their glitter equivalents or a fine loose glitter in matching shades. A small makeup sponge is the real secret tool for achieving that seamless and beautifully blended gradient effect. A base coat, a white base polish to make the gradient colors pop vibrantly, and a clear top coat are all absolutely essential for the best and longest-lasting results.
Step by step guide to create nail design
- Apply a white base to ensure your gradient colors appear bright, vivid, and true from the very first application.
- Paint your three colors side by side on a makeup sponge — red on one end, white in the middle, and blue on the other — and dab the sponge onto the nail in a gentle pressing and rocking motion.
- Repeat the sponge application two to three more times, building up the gradient intensity and color saturation with each additional layer.
- Seal with a clear top coat, optionally buffing the surface lightly before sealing to smooth out any sponge texture for a completely flawless and glass-like finish.
Bold Red with White Polka Dot Nails

Nails: Inspiration from bold red with white polka dot nails
Polka dots are one of those endlessly charming classic patterns that will absolutely never go out of style in my eyes, and I say that with complete conviction. They are fun, retro-inspired, and adorable on nails in a way that feels both timeless and perfectly playful. For a Fourth of July look, I love pairing a bold, cherry red base with crisp white polka dots of varying sizes scattered across the nail for a design that is both festive and wonderfully charming. It has a bit of a vintage, retro Americana flair that I personally adore — it reminds me of summer celebrations from decades past that still feel fresh and relevant today. I did this design for a group of friends before a Fourth of July picnic one year, and we all wore matching polka dot nails together. It was such a sweet, joyful, and genuinely memorable moment that I still smile thinking about it.
Tools needed to create the nail design
You will need a bold red nail polish as your base and a bright white nail polish for creating the dots. A dotting tool in various sizes will help you create perfectly round dots of different diameters across the nail. If you do not have a dotting tool readily available, the end of a bobby pin or a toothpick works wonderfully as a substitute. A clear top coat seals the finished design and protects those bright, crisp white dots from chipping throughout the day.
Step by step guide to create nail design
- Apply your base coat followed by two full coats of bold red polish and allow the color to dry completely before starting the dots.
- Dip your dotting tool into the white nail polish and carefully press it onto the nail surface to create evenly sized dots in your chosen placement.
- Scatter the dots across each nail in a random but visually balanced pattern, mixing larger and smaller dots for a playful and dynamic look.
- Seal with a clear top coat once all dots are fully dry to lock in the design, protect the white dots, and add a beautiful glossy finishing shine.
Conclusion
As I reflect on all fourteen of these stunning Fourth of July nail designs, I feel such a deep and genuine sense of joy and gratitude for the art of beauty and what it means to truly celebrate through creativity. Nails have always been one of those beautiful, slightly underappreciated forms of self-expression that I believe every single person deserves to enjoy and explore. For me, creating nail art — whether for myself, for my clients, or for the communities I am lucky enough to serve — has always been about so much more than color and polish. It is about celebrating who you are, embracing your creativity without apology, and feeling confident and completely empowered in your own skin every single day.
The Fourth of July is a holiday overflowing with warmth, energy, vibrant color, and a beautiful sense of shared community, and your nails can reflect every single bit of that magic. Whether you are someone who loves bold glitter gradients and explosive fireworks bursts or someone who prefers the understated elegance of minimalist stars and sophisticated negative space designs, there is absolutely a look on this list that was made for you and your unique sense of style. I have always believed, from the very beginning of my journey in this industry, that beauty is not about perfection — it is about expressing yourself with confidence, creativity, and unshakeable joy.
I encourage you to pick one or two of these designs that speak to your heart and just have fun with the process. Do not worry about getting every line perfectly straight or every dot exactly the same size. The beauty of doing your own nails at home is that there are no real rules — only creativity, self-expression, and the pure pleasure of creating something beautiful with your own hands. Even the simplest design, done with love and intention, can look absolutely stunning when it comes from a genuine place of joy and confidence.
From my heart to yours — have a beautiful, festive, and joy-filled Fourth of July celebration. Make your nails sparkle, make them bold, and most importantly, make them entirely your own. Because as I always say, beauty is not about hiding who you are. It is about amplifying everything that makes you uniquely and wonderfully yourself. Happy Fourth of July, and may your nails be as brilliant as every firework lighting up that summer sky.