Throughout my career, I’ve learned that eye makeup for women over 50 requires a completely different approach than what worked in our younger years. As we age, our eyelids become hooded, thinner, and more delicate. The skin loses collagen and elastin, which means traditional makeup techniques can actually emphasize fine lines rather than flatter them. The good news? With a few simple techniques using the right products, you can enhance your eyes beautifully. I’ve curated 14 eye makeup essentials that work specifically for mature eyes, celebrating the confidence and radiance you deserve.
Hydrating Eye Primer for Mature Eyes

Why Eye Primer Matters for Mature Women
I’ll be honest – for years, I skipped eye primer altogether. Then I started noticing my eyeshadow creasing within hours, settling into the fine lines on my lids. Working with clients over 50, I saw the same frustration. One client told me she’d stopped wearing eyeshadow entirely because it looked worse by lunchtime than if she’d worn nothing at all.
Primer became my answer to this problem. The skin on our eyelids becomes thinner and more delicate as we age, producing less natural oils in some areas while creating excess in others. This inconsistency causes eyeshadow to grab unevenly, fade quickly, or bunch into creases. A good eye primer creates an even base that grips shadow and liner, keeping everything locked in place from morning to evening.
Specifically, primers absorb oil and prevent makeup from breaking down throughout the day. They also smooth out the texture of crepey skin, which stops powder shadows from emphasizing every tiny line. Think of primer as creating a second skin – one that’s perfectly smooth and ready for color.
Best Formula Types for Aging Lids
After testing countless formulas on myself and clients, I’ve learned that hydrating primers work best for mature women. Sheer, transparent formulas glide on without feeling tacky or heavy. They disappear into skin while still providing grip.
Look for primers containing hyaluronic acid, which draws moisture into the delicate eye area. Niacinamide supports collagen production and reduces the appearance of fine lines. Hemp seed extract and aloe water provide additional hydration that keeps lids smooth and comfortable. Glycerin and vitamin E help ward off flaking, making your base more comfortable for all-day wear.
Optical blurring powders in some formulas create a soft-focus effect that minimizes texture and redness[13]. This blurring effect makes skin look smoother before you even apply shadow.
The consistency matters too. Tacky primers work like glue for shadow, while serum-like formulas absorb into skin and illuminate. For dry or aging lids, I prefer the lighter, hydrating versions that don’t emphasize texture.
Hydrating Eye Primer Application Tips
Use a pea-sized amount for both eyes – you need less than you think. Dab the primer onto your lids with your ring finger, which applies the gentlest pressure. Pat it gently across the entire lid, extending up to the brow bone and down to the lash line.
Wait a full minute before applying eyeshadow. During this time, the primer sets into your skin and creates that smooth, grippable canvas. Rushing this step means your shadows won’t blend as beautifully or last as long.
I apply primer even under my concealer for a crease-proof finish. This trick changed how my under-eye area looks by midday.
Satin-Finish Eyeshadow Application

Benefits of Satin Finish Over Shimmer
After years of working with mature women, I discovered that satin finishes are the sweet spot for eye makeup for women over 50. You get light and dimension without glitter muscling into every fine line. During a makeup session with a client who’d avoided eyeshadow for years, I showed her the difference between shimmer and satin. The shimmer settled into her creases within minutes, while the satin formula sat comfortably on the lid instead of sinking into lines. The overall effect was soft-focus glamor rather than disco ball regret.
Satiny shades reflect light without being a true shimmer, which might highlight less-than-perfect skin. They add a soft-focus effect without settling into fine lines. I always like a bit of luminosity because it catches the light and makes the skin look more youthful. For the same reason, many of my clients over 50 have switched from purely matte looks to incorporating satin textures.
The key is balance. My go-to trick involves using both matte and luminous textures together. I apply a soft matte neutral shade in the crease to create a natural lift, then use a satin-finish shadow across the lid for a smooth, youthful glow. Note that a matte or satin finish is the most flattering on older skin.
Satin-Finish Eyeshadow Color Selection
When selecting colors for the best eye makeup for older women over 50, choose shades that complement your skin tone without overwhelming it. Soft neutrals work beautifully – think taupes, warm browns, and muted roses. These colors provide definition without looking harsh.
How to Apply Satin Eyeshadow
I recommend the ‘Satin Sandwich’ technique for mature women eye makeup. Apply a matte tone in the crease for depth and structure, then layer a satin finish on the lid. Finally, add soft shimmer only on the inner corners. You’re applying shimmer in a very small, concentrated area that acts as a brightener rather than a wrinkle-emphasizer.
Blend thoroughly – I see too many people just placing shadow on top, but blending is what makes it look effortless. The warmth of your fingers helps cream-based satin formulas melt in seamlessly.
Cream Eyeshadow Sticks for Effortless Color

Why Cream Sticks Work for Mature Eyes
One afternoon, a client arrived frustrated after spending money on yet another powder palette that creased within an hour. I handed her a cream eyeshadow stick, and her skepticism turned to surprise as she watched how smoothly it glided across her lids. Cream eyeshadow sticks changed how I approach eye makeup for women over 50.
These sticks glide on effortlessly without the dust that powder eyeshadows leave behind. More importantly, they don’t settle into fine lines the way powder shadows can. The creamy texture is more hydrating and blends seamlessly onto the eyelids. I’ve watched clients with dry, crepey lids struggle with powder for years, only to discover that cream formulas make application feel weightless and comfortable.
The built-in convenience matters too. You don’t need a brush because the formula is foolproof enough to apply directly from the stick. During busy mornings or travel, this simplicity becomes invaluable. Many cream sticks deliver 24 hours of life-proof wear with waterproof, color-true formulas that won’t crease.
Cream Eyeshadow Sticks Best Shades
Choose shades that complement your skin tone and eye color. Warm tones like peaches and soft browns brighten the eyes, while cool tones add depth. For the best eye makeup for older women over 50, I recommend:
- Neutral and earthy shades that enhance features without overwhelming natural beauty
- Shades a few tones deeper than your skin tone for subtle depth
- Warm tones: Pearl (light pink), Champagne (gold), Copper (bronze)
- Cool tones: Smoke (light gray)
Avoid overly bold or dark colors that can be harsh on mature skin.
Cream Eyeshadow Sticks Application Technique
Apply using soft, small feather strokes, starting from the inner corner and working outward. This allows better control and a natural finish. Blend with your fingertip or a brush to soften edges. I often use the windscreen wiper technique – working the shadow backwards and forwards for a gorgeous wash of color.
Timing matters. Cream formulas take a few seconds to settle, giving you a brief window to blend before they set. Work one eye at a time to maintain control.
Cream Eyeshadow Sticks Longevity Tips
Many cream sticks have primer built into the formula, so they prime as they shade and define. For extra staying power, look for formulas marked as “long-lasting” or “crease-proof”. Waterproof options prevent smudging in humid conditions. Once blended, cream eyeshadows set and resist creasing, fading, or smudging.
Soft Matte Eyeshadow Palette Blend

Choosing the Right Matte Shades
During a photoshoot backstage, I watched a seasoned model struggle with shimmer eyeshadow that emphasized every crease. I switched her to a soft matte palette, and the transformation was immediate. Matte eyeshadows became my secret weapon for the best eye makeup for women over 50 because they deliver a clean, soft-focus look. The formula minimizes texture instead of highlighting it, which is exactly what mature eyes need.
Specifically, matte shades excel at contouring and defining eyes without adding extra shine. However, I learned the hard way that not all mattes work equally well. Overly dry, powdery formulas can make eyelids look crepey or dull. I steer my clients toward cream-based mattes that have a slight satin quality, reflecting light subtly for a more youthful appearance. These formulas provide opaque coverage that helps conceal darkening on the lids common with aging.
When selecting colors for eye makeup older ladies, I recommend medium-toned neutrals that create depth without severity. Rich browns and warm grays work better than harsh black, which can make eyes appear smaller.
Soft Matte Eyeshadow Palette Placement for Lifting Effect
Placement matters more than color when creating eye makeup for the mature woman. I teach clients to apply matte shadow in the crease while the eye is open, pushing back any hooded lid space. The trick involves placing darker shades along the crease or slightly above to lift the eyes rather than emphasizing drooping.
Blending slightly above the natural crease creates the illusion of a lifted lid, counteracting that heavier eyelid appearance.
Soft Matte Eyeshadow Palette Blending Secrets
The blending technique transforms good eye makeup into great mature women eye makeup. I use a small, fluffy brush with soft, circular motions, keeping tight to the natural crease. The key is blending upward and inward, which creates a more youthful, lifted appearance. Conversely, blending outward pulls the eyes down.
I tell every client: blend thoroughly and work the shadow into the skin. Don’t just pat it on top. This seamless, airbrushed effect enhances shape without looking heavy.
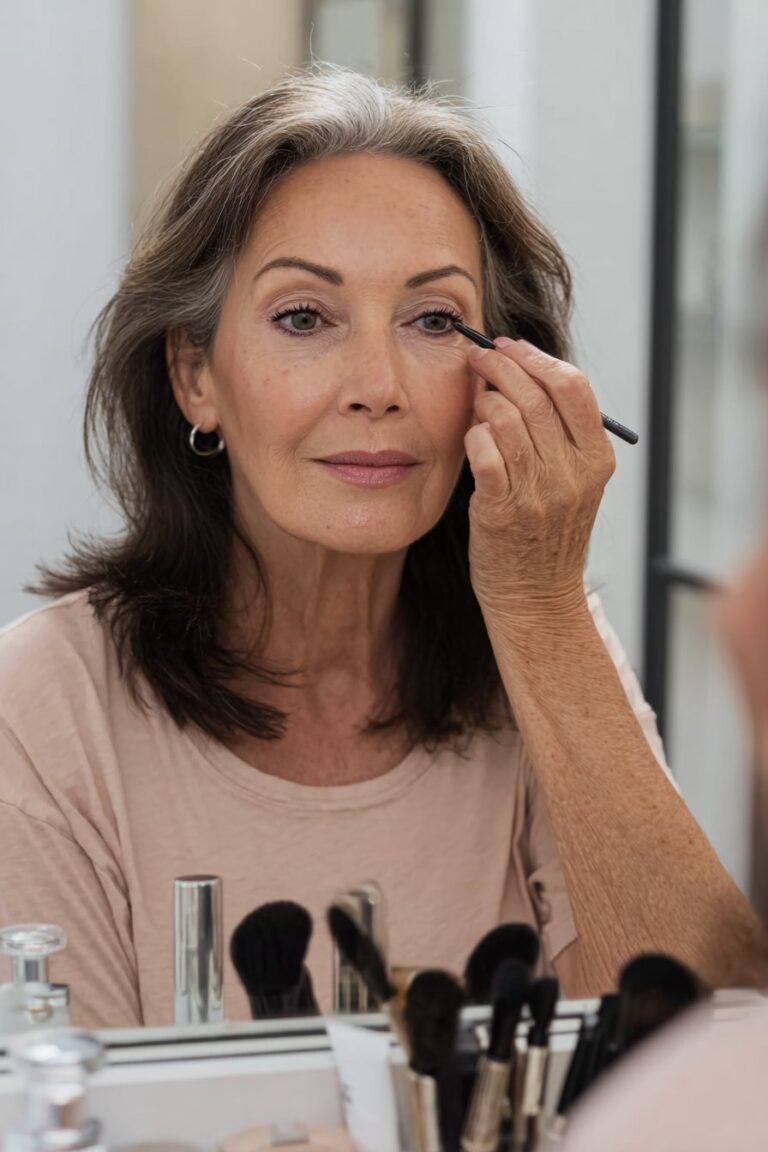
Waterproof Gel Eyeliner Pencil Precision

Why Gel Pencils Beat Liquid Liners
I remember the frustration of watching liquid liner pool into the creases of hooded lids during a wedding makeup session. The bride’s sister, in her late 50s, had tears in her eyes – not from joy, but from the tugging and pulling required to get that liner in place. That experience pushed me toward gel pencils for the best eye makeup for older women over 50.
Gel formulas give you control and precision, applying thick like a pencil without rubbing your eye or leaving gaps. Consequently, you avoid the harsh definition that liquid liner creates, which can look cheap and tends to turn back to liquid when moisture from your eye gets on it. The smooth glide of gel doesn’t tug on delicate skin the way traditional pencils do.
Specifically, waterproof gel formulas matter for mature women eye makeup. Look for products with long-wear claims that stay where you apply them until removal time. I’ve seen excellent results with formulas promising 12 hours of waterproof wear. The film-forming silicones and waxes create a flexible yet budge-proof seal that locks pigment in place, eliminating constant touch-ups.
Waterproof Gel Eyeliner Pencil Best Colors
While black remains classic, I encourage experimentation. Brown, bronze, blue, purple, and green all look amazing for tightlining. Lighter shades like brown add definition without excess darkness, particularly flattering for eye makeup for the mature woman.
Waterproof Gel Eyeliner Pencil Tightlining Technique
Tightlining transforms how lashes appear. Press lightly on the eyelid, then gently lift it back into the eye crease to expose the bottom of the lash line. Using a dot and wiggle motion, apply gel pencil between the lashes. The ultrafine tip makes defining right at the base easy, perfect for hooded eyes.
Skip heavy liner on the lower lash or waterline – it makes eyes look smaller or tired. Rather, softly smudge a neutral shade just under the outer third of the lower lash line for balance.
Volumizing Black Mascara for Fuller Lashes

Why Black Mascara Brightens Mature Eyes
A client once confessed she’d switched to brown mascara because someone told her black looked “too harsh” for her age. I immediately switched her back to black, and she was amazed at how much more awake her eyes appeared. Black mascara creates contrast that brightens and opens the eyes, particularly against mature skin. The pigment enhances the whites of your eyes, making them appear well-rested and bright.
Specifically, black works beautifully regardless of skin tone or eye color. While brown creates depth for some, black delivers the definition most mature women need for the best eye makeup for women over 50.
Volumizing Black Mascara Brush Selection
Brush shape dramatically affects results. Diamond-shaped brushes get down to the roots to grab and separate, while big, fluffy brushes create a full-fan effect. Larger eyes work well with big, fluffy wands, whereas smaller, deep-set, and hooded eyes do best with smaller brushes that reach every lash without creating a mess on the eyelids.
Volumizing Black Mascara Application for Lift
Lock your brush into the base of your lash line and wiggle it gently as you pull upward to create separation and openness. This wiggling motion distributes product evenly, preventing clumps. Apply a little extra on the outer third of the eye to create a slight cat-eye effect.
One to two coats is usually enough. Layering beyond this makes lashes look heavy and closes the eye instead of opening it.
Volumizing Black Mascara Avoiding Spider Lashes
As lashes become drier, more brittle, and less dense with age, lightweight formulas with conditioning ingredients like keratin become necessary. I typically avoid waterproof mascara because it’s harsher on lashes, causes a harder removal process, and can cause hair loss.
Tubing mascaras slide off without rubbing, making them ideal for mature women eye makeup. They’re non-flaky and easy to remove.
Brightening Under-Eye Concealer Technique

The under-eye area reveals more about our age than any other facial feature. Over the years, I’ve watched pigmentation and undertones shift as skin thins, allowing blood vessels and discoloration to show through more clearly. This creates darkness that can lean blue, purple, or brown, making concealer selection tricky for the best eye makeup for women over 50.
Concealer Shade Selection
For under-eye brightening, choose a shade one or two shades lighter than your skin tone. This brightens dark circles and brings that area forward. Specifically, consider undertones when selecting your concealer. To cover blue and purple dark circles, use the color opposite on the color wheel. For lighter skin, peach, pink, or yellow concealer works best, while darker skin tones benefit from orange.
Your concealer shade shouldn’t remain constant year-round. I recommend having two shades on hand to accommodate seasonal skin tone changes from sun exposure.
Brightening Under-Eye Concealer Coverage Needs
Light-diffusing formulas work by reflecting light, making your under-eye area look brighter and fresh. They feel lighter, have fluid texture, and look dewier. For mature women eye makeup, hydrating, radiant concealers work better than matte formulas, which enhance fine lines and look harsh on drier skin.
Look for ingredients like hyaluronic acid for deep hydration, niacinamide to reduce inflammation, and vitamin C to brighten[261]. Glycerin provides additional moisture while dimethicone creates silky texture.
Brightening Under-Eye Concealer Strategic Placement
Apply one dot of product at the inner corner and another at the outer corner. Between both dots, add a small amount of hydrating eye cream. Starting at the inner corner, blend outward using a damp sponge rather than fingers, which can look blotchy. Once you reach the outer corner, angle the blending upward toward your temple.
Build coverage in thin layers for eye makeup older ladies. This technique prevents creasing while achieving desired coverage naturally.
Neutral Shimmer for Inner Corners

Strategic Shimmer Placement
Shimmer doesn’t need to be your enemy just because you’re over 50. During a bridal makeup trial, I showed a mother-of-the-bride how a tiny dot of shimmer in the right spot transformed her entire eye look. She went from tired to radiant in seconds. Accordingly, I never rule out sparkles completely – I just apply them strategically to make the most of shimmery formulas.
For the best eye makeup for women over 50, I recommend cream-to-powder formulas, which help shimmer stick exactly where you applied it. The inner corner highlight creates a brightening effect that draws attention to this area. This technique makes your eyes appear larger, more awake, and adds glamor to your overall eye makeup for the mature woman.
Avoid shimmer in the crease or anywhere you want to add depth, like the lash line. Those areas need definition, not sparkle.
Neutral Shimmer for Inner Corners Best Shades
Champagne and ivory shadows work beautifully for inner corner highlights. Try shades like Moonlight, RoseGold, and Sugarfrost for that perfect brightening pop. Pearlescent or finely milled shimmer delivers subtle radiance without emphasizing texture.
Neutral Shimmer for Inner Corners Application Amount
Always go in with a light hand. Use a small, precise brush to apply the eyeshadow and blend it seamlessly. Too much shimmer looks harsh or frosty – if that happens, soften the edges with your fingertip.
Soft Brow Pencil for Natural Definition

Brow Shape for Lifting Effect
Brows are the architectural frame of your whole face, capable of lifting, defining and balancing your features. During my early days working backstage, I watched a skilled artist transform a model’s entire look simply by reshaping her brows. That moment changed how I approach the best eye makeup for women over 50.
As we age, brows naturally thin, lose density and can drop slightly at the outer corners. Focus on softness and gentle shaping rather than sculpting. Avoid overly sharp angles or dramatic arches, which look aging. Follow your natural curve and enhance it subtly for a soft, slightly lifted shape that opens the eye area. Tail placement is key – too low can drag the face downward, while too high looks unnatural.
Soft Brow Pencil Color Matching
Choose softer tones like taupe, soft brown, light gray, or dark gray. Many women default to brow shades that are too dark, appearing harsh and unnatural. For mature women eye makeup, opt for a shade one to two shades darker than your natural hair color.
Soft Brow Pencil Feathering Technique
Use light, hairlike strokes along your brow’s natural shape. Apply small, hair-like strokes in the direction of hair growth, then use a spoolie brush to diffuse any harsh lines. Barely graze the skin with a light flick to build density where needed.
Soft Brow Pencil Common Mistakes to Avoid
Over-plucking leads to permanent thinning and aged appearance. Skipping brow grooming altogether leaves features undefined. Look for creamy pencils with fine tips rather than hard, waxy formulas that drag across skin and tug on fragile hairs.
Clear or Tinted Brow Gel Finishing Step

Why Brow Gel Matters
Years ago, Luna nudged my makeup bag off the counter, scattering products everywhere. When I picked up a forgotten brow gel, I realized I’d been skipping this step entirely. After testing it for a week on myself and clients, I couldn’t believe the difference. Brow gel holds eyebrows in place, transforming filled-in brows from good to polished.
For the best eye makeup for women over 50, gel completes your brow routine. Tinted gel defines and sets brows while adding volume to fine hairs. On the other hand, clear gel maintains your natural brow color without adding pigment, making it universally flattering and beginner-friendly. Tinted versions can clump on dry patches and coarse hairs, so I typically recommend clear gel for mature women eye makeup.
Clear or Tinted Brow Gel Best Formulas
Look for flexible formulas that don’t feel crunchy or stiff. Medium-hold gels set unruly brows without flaking, while waterproof options resist humidity. Some formulas include growth-boosting ingredients that support thicker, fuller hairs over time.
Clear or Tinted Brow Gel Application Method
Apply using short, upward strokes following the natural direction of brow hair. Avoid overloading the wand, which creates stiffness. I brush the product through after penciling to lock everything in place for the best eye makeup for older women over 50.
Half or Full False Lashes Application

Choosing the Right Lash Style
False lashes intimidate many of my clients over 50, but they shouldn’t. The secret lies in choosing lightweight, feathery lashes instead of heavy, dramatic styles. For the best eye makeup for women over 50, I recommend wispy strip lashes for beginners because they’re easy to apply and enhance without overwhelming.
Cluster lashes offer more control, allowing you to place lashes exactly where needed, filling gaps and lifting specific areas like outer corners. This customization creates a natural yet refined look for mature women eye makeup. For hooded eyes specifically, choose lashes with more length in the middle rather than the outer corner to prevent a droopy effect.
Half or Full False Lashes Placement for Lift
Half lashes or outer-corner lashes work beautifully for eye makeup for the mature woman. Instead of covering the entire lash line, they focus on the outer edge, gently lifting the eye shape without adding unnecessary weight. Always trim lashes to fit your eye shape, preventing them from extending too far beyond the natural lash line.
Accordingly, apply a nice coat of mascara after placing falsies to mold them into your natural lashes. This final step creates the most natural finish.
Half or Full False Lashes Magnetic vs Strip Options
Magnetic lashes eliminate glue-related irritation, making them ideal for sensitive eyes. They’re easier to remove at the end of the day and repositionable during application. Conversely, strip lashes tend to be heavier regardless of material, potentially weighing down delicate lids.
Medium-Tone Transition Shade Blending

Creating Crease Definition
Transition shades transformed how I teach the best eye makeup for women over 50. In essence, these medium-toned neutrals create a seamless gradient between two contrasting eyeshadow colors. They serve as a buffer, ensuring darker crease shades don’t look harsh against your skin. Specifically, choose a shade just a few shades darker than your skin tone. Neutrals, beiges, browns, grays, and soft purples work beautifully.
The secret lies in creating depth without heaviness. A well-placed transition shade defines the area, forming an almost fake crease line that makes eyes appear larger.
Medium-Tone Transition Shade Placement Above Natural Crease
Apply this shade while your eye is open, looking straight into the mirror. This technique pushes back any hooded lid space. Work the color in a half-moon shape from your inner upper lash line up towards the socket and center of your lids. You can go slightly above your natural socket, but not too high.
Avoid placing transition color all over your eyelid first, as it dilutes darker shades and prevents them from showing their true color.
Medium-Tone Transition Shade Blending Technique
Use a fluffy blending brush with windshield wiper motions in the crease. Small circular motions also work beautifully. The key is applying just above your crease where two shades will meet. Keep the tone light underneath your brow for best results.
Champagne Brow Bone Highlighter

Strategic Highlighting for Mature Eyes
Placement dictates the overall look and effect highlighter has on the shape, size, and definition of your eye and brow area. During a session with a client who felt her eyes looked tired no matter how much sleep she got, I showed her the power of brow bone highlighting. One subtle sweep of champagne powder, and her entire eye area looked lifted.
According to my experience, highlighting under the brows creates a wider, perkier gaze. Apply a smudge of highlighter directly under the brow bone for an instant lift. Light placed just under the eyebrow makes the structure look lifted and the eyes brighter. In reality, this technique makes skin look luminous and line-free.
In midlife, highlighter becomes less about sparkle and more about strategy. Too much in this area looks distracting, so subtlety matters.
Champagne Brow Bone Highlighter Application Tips
Start under the arch of your brow and brush outward along the brow bone. This distributes less product at the tail, creating natural dimension. For crepey skin under the brow, use a hydrating cream highlighter and apply the thinnest layer possible. The finish should look like skin – a subtle satin or natural cream works beautifully.
Avoid powder highlighters, as powder increases the appearance of fine lines and wrinkles.
Light-Reflecting Setting Powder Finish

Setting Without Caking
Setting powder once felt like the kiss of death for my mature clients. I remember one woman who swore off powder entirely after watching it settle into every fine line within minutes. Her experience isn’t unique. Powder plays an important role in keeping makeup in place, but the key is being light-handed and prudent, and having the right product.
Older formulas are talc-like and heavy, and should be avoided. Modern light-reflecting powders use advanced technology that creates a soft-focus effect by optically fading the appearance of fine lines, wrinkles, and pores. NARS’ Light Reflecting Complex visibly restores skin’s youthful radiance, while photochromic technology diffuses and adjusts to new sources of light, so skin looks perfect in person and on camera.
Finely-milled loose powders that are super lightweight offer a sheer veil rather than full coverage. Look for formulas with hydrating ingredients like squalane, glycerin, and hydrolyzed protein to guard against dryness and keep skin comfortable all day.
Light-Reflecting Setting Powder Best Areas to Apply
Apply strategically only where you need to set makeup and around your T-zone to mattify. A little powder is great for taking down unwanted shine on the sides of nose and chin and the area between the brows. Be ultra, ultra-sparing on the under-eye area if you need powder to set concealer.
Keep powder away from creases around the nostrils and nasolabial folds, plus any other place where there is obvious texture or lines.
Light-Reflecting Setting Powder Tools and Techniques
Use a nice fluffy brush, one that’s not dense. With a good fluffy brush you can apply a gossamer-light veil to set makeup, and then you’re able to whisk any excess away.
Conversely, pressing powder into skin with a soft powder puff is the most effective way to get that blurring effect without leaving a powdery finish. Press and roll onto skin with a powder puff to lock complexion products in place, which works well for targeted application to smaller areas like the under-eye area or around the nose.
For mature skin, brushes over a puff provide lightweight application. Dry or mature skin should use a bit less product to avoid emphasizing texture.
Conclusion
After all, mastering eye makeup for women over 50 comes down to understanding what works for mature eyes and letting go of what doesn’t. These 14 essentials transformed how my clients approach their daily routines, replacing frustration with confidence. Luna often watches me perfect these techniques in my studio, reminding me that beauty is about celebrating who we are today. Start with one or two products that address your biggest concern, then build from there. You don’t need everything at once. Eye makeup should enhance your natural radiance, not hide it. Embrace this new chapter with techniques designed specifically for you.