Spring is here, and while everyone else is reaching for pastel pinks and baby blues, I’m over here with my black polish, dark florals, and a whole lot of Gothic magic. I’m Belle Hathaway, and I have spent years in this industry watching trends come and go. But Gothic spring nails? That is something I will never let go of. There is something so beautifully contradictory about pairing the softness of spring with the depth and drama of Gothic aesthetics. It creates a look that is hauntingly beautiful, deeply personal, and completely unforgettable.
Gothic spring nails are not just a trend — they are a statement. They say that you embrace both the bloom and the shadow, that you are not afraid to stand out, and that you understand beauty is not one-dimensional. Over the years, I have created hundreds of Gothic-inspired nail looks for clients, editorial shoots, and my own personal style experiments. And today, I am sharing thirteen of my absolute favorites with you. Each one is unique, each one tells a story, and each one carries that signature dark elegance that I have grown to love deeply. Let’s dive in.
Black Rose Bloom Nails

Inspiration from the timeless black rose
When I think about Gothic beauty, the black rose is the first image that comes to mind. It represents mystery, passion, and an untamed kind of beauty that refuses to be ordinary. I remember creating this look for a client who wanted something that felt both romantic and fierce for a springtime event. The moment I finished those nails, she looked at her hands and said, “These tell my whole story.” That moment stayed with me. Black rose bloom nails are inspired by the idea that something dark can still be breathtakingly beautiful. The deep, velvety black petals painted against a sheer or matte background evoke a feeling of romance that is entirely Gothic. You can pair the roses with tiny dewdrops in iridescent glitter, or add a touch of deep crimson to the center of the petals to suggest that secret, smoldering passion underneath.
Tools needed to create the nail design
To bring this look to life, you will need a black gel polish or a highly pigmented black nail lacquer as your base. A fine nail art brush is absolutely essential here — I personally love a thin liner brush for the petal details. You will also need a deep crimson or burgundy polish for the petal centers, a clear topcoat, and a dotting tool for adding dewdrop details. A UV lamp is useful if you are working with gel products.
Step by step guide to create nails design
- Apply a black base coat and cure or dry completely before beginning any art work on the nail surface.
- Using your fine liner brush dipped in a slightly lighter black or dark grey, paint curved petal shapes starting from the center of the nail and fanning outward to build the rose.
- Add a tiny drop of deep crimson at the heart of each rose with your dotting tool to create depth and warmth in the design.
- Seal everything with a glossy or matte topcoat depending on your preferred finish and allow it to set fully.
Lavender Skull Garden Nails

Inspiration from gothic gardens in bloom
This one is close to my heart because it was born from a personal obsession with Gothic gardens — those mysterious, overgrown spaces where wildflowers grow around iron gates and stone figures. Lavender skull garden nails take the playful edge of skull imagery and soften it with the most unexpected spring color: lavender. I created this design during a creative phase where I was exploring how Gothic and feminine could coexist without one overpowering the other. The result was a nail look that felt like walking through an enchanted garden at dusk. Small, delicate skulls nestled among lavender blooms and tiny green leaves, all against a soft lilac or dusty purple base. It is eerie, it is charming, and it is completely spring.
Tools needed to create the nail design
You will need a dusty lavender or lilac polish as your base color, a fine detail brush for skull outlines, white and black polish for skull features, small floral nail stickers or a steady hand with a thin brush for the flowers, and a matte topcoat to give the whole design that moody, velvety finish that really makes Gothic nails sing.
Step by step guide to create nails design
- Paint all nails with two coats of your dusty lavender base and allow each coat to dry fully before the next.
- Using a white polish and a fine detail brush, sketch small oval skull shapes on accent nails, then add tiny black dots for eyes and a curved line for the smile.
- Around the skull shapes, paint small five-petal lavender flowers and tiny leaf details using your liner brush and a soft green polish.
- Finish with a matte topcoat to unify the design and give it that Gothic garden atmosphere.
Dark Butterfly Wings Nails

Inspiration from shadow and transformation
I have always been fascinated by butterflies — not the bright, sunlit ones you typically see in spring, but the dark-winged ones that seem to carry the night with them. Dark butterfly wings nails were inspired by the concept of transformation, which is something deeply personal to me. Beauty, in my world, is always about becoming. These nails feature sweeping, angular black butterfly wings with subtle iridescent shimmer built into the design — as if the wings catch the light just enough to reveal something magical underneath all that darkness. Against a black or deep navy base, the wings shimmer with hints of purple, teal, or green. It is dramatic, it is otherworldly, and it is absolutely perfect for spring because transformation is the whole theme of the season.
Tools needed to create the nail design
Gather a deep black or navy base polish, a fine angular brush for wing shapes, iridescent or duochrome shimmer polish in purple or teal, a thin liner brush for wing veins, a clear topcoat, and optionally some fine holographic glitter to add depth to the wing surfaces.
Step by step guide to create nails design
- Apply your black or deep navy base and allow it to dry completely before adding any decorative elements.
- Using the angular brush, sweep two large wing shapes from the center of the nail outward, creating the characteristic butterfly silhouette with your iridescent shimmer polish.
- With a thin liner brush dipped in black, draw delicate vein lines through the wings to add that realistic, organic quality that makes the design truly come alive.
- Add a light dusting of holographic glitter over the wing area and seal with a glossy topcoat to enhance the otherworldly shimmer effect.
Midnight Cherry Blossom Nails

Inspiration from blossoms under a dark sky
Cherry blossoms are the quintessential spring flower, but I have always wondered what they would look like if you saw them not under a bright afternoon sun, but under a midnight sky. That wondering led me to create midnight cherry blossom nails — a design that places delicate, dark pink blossoms against a deep, inky black background, as if the flowers are caught in the soft glow of moonlight. I wore this design to an editorial shoot once and the photographer actually commented on my nails mid-shoot. That does not happen often, but when it does, I know I have created something special. The contrast between the softness of the blossoms and the intensity of the black background is what makes this design so visually stunning.
Tools needed to create the nail design
You will need a true black base polish, a deep dusty pink or mauve polish for the blossoms, a fine detail brush, a white polish for petal highlights, a dotting tool for flower centers, and a glossy topcoat. You can also add fine gold or silver detailing around the petals for extra elegance.
Step by step guide to create nails design
- Apply two coats of black polish to all nails and allow them to dry thoroughly between each coat.
- Using your fine brush and the dusty pink polish, paint small clusters of five-petal blossoms across the nail, varying the sizes for a natural and organic feel throughout the design.
- Add a tiny white highlight to one petal on each blossom and place a small gold or yellow dot at the center using your dotting tool.
- Seal with a glossy topcoat that enhances the contrast between the dark background and the soft blossoms perfectly.
Thorned Vine Nails

Inspiration from dark botanical beauty
There is something about thorned vines that has always spoken to me on a deeply artistic level. They are protective, they are wild, and they carry both beauty and danger in the same breath. Thorned vine nails are inspired by the idea of growth that is untamed — the kind of beauty that has edges and refuses to be contained. I think about the way a rose vine grows, reaching and curling around whatever it touches, and I feel like that is a very Gothic-spring energy. On the nail, this translates into delicate black vine lines that curl and twist across a pale base — either white, cream, or a soft sage green — with tiny thorns and small dark leaves painted along the length of each vine. Sometimes I add a small dark flower at the end of the vine for a finishing touch.
Tools needed to create the nail design
You will need a pale base polish in white, cream, or sage, a fine liner brush for the vine lines, a black or dark green polish, a dotting tool for small leaf details, and optionally a deep plum or burgundy for accent flowers. A matte topcoat works beautifully with this design.
Step by step guide to create nails design
- Apply your pale base color in two coats and allow it to dry completely before beginning the vine work.
- Using the liner brush and black polish, draw a single continuous vine line starting near the cuticle and curling toward the tip, varying the curve on each nail.
- Add small pointed thorn shapes along the vine and paint tiny elongated leaves in dark green branching off the main vine line throughout.
- Finish with a matte topcoat to give the design a botanical illustration quality that feels both sophisticated and Gothic.
Gothic Moon Phase Nails

Inspiration from lunar mysticism in spring
Springtime has always felt deeply connected to the moon to me. There is something ancient and mystical about the way the moon governs the tides, the seasons, and — I believe — our inner worlds. Gothic moon phase nails were inspired by the practice of moon watching, something I started doing years ago as a way to slow down and reconnect with something bigger than my daily routine. This nail design features the phases of the moon painted in silver, gold, or white across a set of black or deep midnight blue nails. Each nail shows a different phase — new moon, waxing crescent, first quarter, waxing gibbous, full moon — and together, the full set tells the story of the lunar cycle. It is meditative, it is mystical, and it is absolutely breathtaking.
Tools needed to create the nail design
You will need a black or deep midnight blue base polish, a fine detail brush, silver or white polish for the moon phases, a circular stencil or dotting tool for clean moon shapes, fine metallic glitter, and a glossy topcoat to give the moons their luminous quality.
Step by step guide to create nails design
- Paint all nails with your black or midnight blue base and allow them to cure or dry completely before adding any moon imagery.
- Using a fine detail brush and silver polish, paint each moon phase on a different nail — start with a full circle on the middle nail and work outward with progressively smaller, crescent shapes.
- Add a tiny scattering of fine silver glitter around each moon shape to suggest a starfield and give the design cosmic depth.
- Seal with a glossy topcoat to enhance the luminous, otherworldly quality of the moon phases against the dark background.
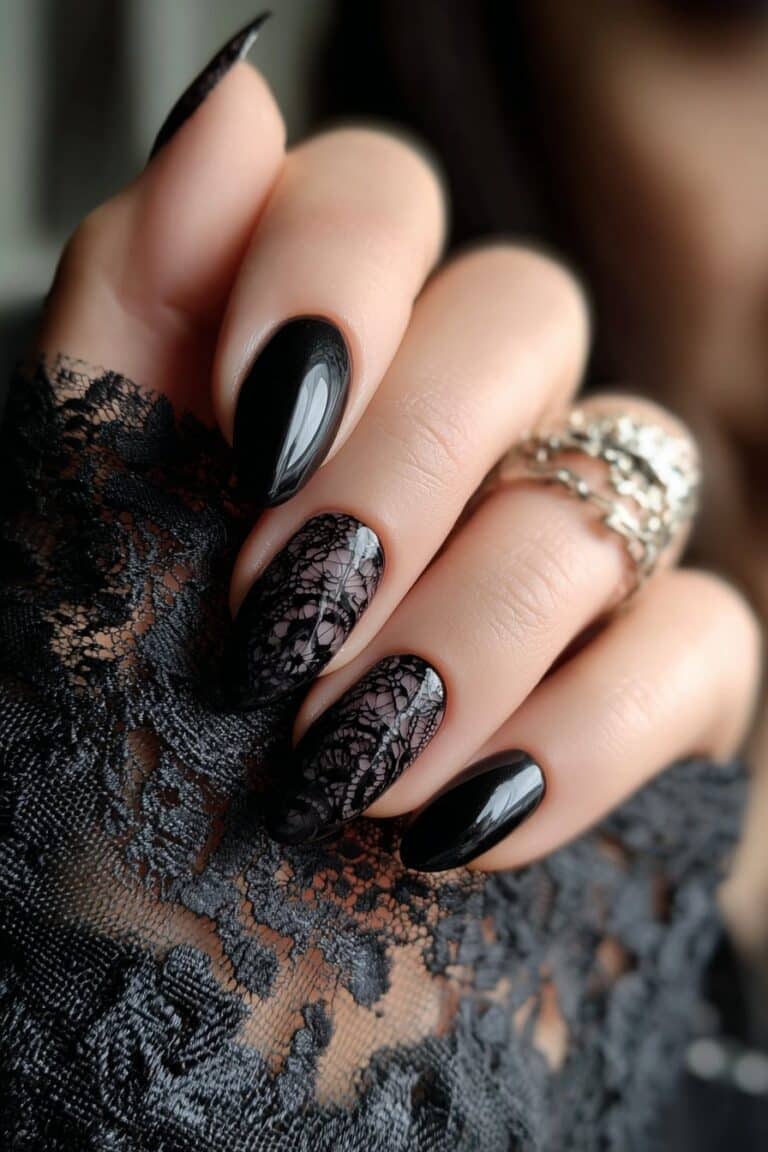
Dark Floral Lace Nails

Inspiration from Victorian Gothic elegance
If there is one era of beauty history that I return to again and again for inspiration, it is the Victorian Gothic period. There is an ornate, deliberate quality to the beauty of that time that feels incredibly relevant to modern nail art. Dark floral lace nails are my tribute to that era — a design that pairs intricate lace patterns with dark florals in a way that feels both historical and completely fresh. The lace is painted in white or cream against a black base, and woven into the lace are small dark flowers — roses, lilies, or pansies — in deep purple or burgundy. The result looks like a piece of antique fabric has been captured on the nail, and it is honestly one of the most romantic nail designs I have ever created.
Tools needed to create the nail design
You will need a black base polish, an extra-fine liner brush for lace details, white or cream polish, a deep purple or burgundy polish for the florals, a magnifying glass if your lace work is very fine, and a glossy topcoat to give the design its polished, finished appearance.
Step by step guide to create nails design
- Apply two coats of black base and allow to dry, as a smooth even base is critical for detailed lace work to read clearly.
- Using the fine liner brush and white polish, paint small repeated geometric lace motifs — small diamonds, loops, or honeycomb patterns — across the surface of the nail.
- Nest small floral shapes within the lace pattern using your deep purple polish, keeping the flowers simple enough that they complement rather than overwhelm the lace.
- Finish with a glossy topcoat to make the white lace pop brilliantly against the dark background.
Bleeding Heart Nails

Inspiration from the gothic romance of the bleeding heart flower
The bleeding heart flower is one of nature’s most Gothic gifts. With its distinctive heart shape and the small teardrop that hangs below each bloom, it has been a symbol of love, loss, and poetic beauty for centuries. When I first incorporated this flower into a nail design, I was going through a particularly reflective season of my life, and the result was one of the most personal and emotionally resonant designs I have ever created. Bleeding heart nails feature the distinctive pendulous flower in deep pink, magenta, or dark red against a black or deep plum background, with delicate stems and the characteristic hanging teardrops that give the flower its name. It is romantic, it is slightly melancholic, and it is deeply beautiful.
Tools needed to create the nail design
You will need a black or deep plum base, a fine detail brush, deep pink or magenta polish, a liner brush for stems, a dotting tool for the teardrop details, and a glossy or satin topcoat. A small amount of white polish for highlights on the heart shapes adds dimension beautifully.
Step by step guide to create nails design
- Apply your dark base color and dry completely, ensuring full, even coverage before adding the delicate flower details.
- Using the fine brush and deep pink polish, paint the distinctive heart shape of the bleeding heart bloom, then add a small elongated teardrop shape hanging beneath each heart.
- Paint a delicate curved stem connecting multiple blooms in a cascading arrangement and add tiny leaves in a dark green along the stem.
- Add a small white highlight to one side of each heart for dimension and seal with a glossy topcoat to make the colors sing.
Enchanted Forest Nails

Inspiration from dark woodland magic
I grew up hearing stories about enchanted forests — places where magic lived in the roots of trees and the silence between the leaves. Those stories shaped my imagination, and they absolutely shaped my approach to nail art. Enchanted forest nails are a design that takes you into that world. Gnarled dark tree branches spread across a deep forest green or black base, with tiny glowing mushrooms, small delicate moths, and wisps of white fog painted between the branches. It is the kind of design that tells a whole story across ten nails, and I think that storytelling quality is what makes nail art truly special. When my clients wear these, they always say they feel like they are carrying a little piece of magic with them.
Tools needed to create the nail design
You will need a deep forest green or black base polish, a fine liner brush for branches, brown and grey polish, a dotting tool for mushroom details, white polish for fog and moth wings, fine iridescent glitter for magical dust effects, and a matte topcoat to enhance the forest atmosphere.
Step by step guide to create nails design
- Apply two coats of deep forest green or black as your base and allow to dry fully before adding the detailed forest elements.
- Using the liner brush and dark brown polish, paint spreading bare branch shapes starting from the corners or edges of the nail and reaching inward organically.
- Add small mushroom caps with your dotting tool in dusty red or orange, tiny white moth shapes between branches, and soft strokes of white polish near the base of the nail for a fog effect.
- Dust a small amount of iridescent glitter over the fog area and seal with matte topcoat to preserve the moody, woodland atmosphere throughout.
Dark Iridescent Holographic Nails

Inspiration from the dark rainbow of light
Not all Gothic nails have to be painted in darkness and shadow alone. Some of the most stunning Gothic looks I have ever created play with light in the most unexpected and breathtaking ways. Dark iridescent holographic nails are proof that Gothic and luminous can exist in perfect harmony. Inspired by the way oil slicks create rainbows on dark surfaces, this design uses holographic and duochrome polishes over a dark base to create a shifting, color-changing effect that seems to pulse with life. As you move your hands, the nails shift from deep black to electric purple to teal to green — like looking into the depths of a Gothic gemstone. It is mesmerizing, it is modern, and it is deeply Gothic in the most beautiful way.
Tools needed to create the nail design
You will need a deep black base polish, a holographic or duochrome topcoat in purple-to-teal or black-to-rainbow shift, a chrome powder and a silicone applicator if you want maximum intensity, a no-wipe gel topcoat for gel applications, and a glossy topcoat for a lacquer finish.
Step by step guide to create nails design
- Apply two coats of black base and cure or dry fully, as the dark base is essential for making the holographic shift appear as deep and dramatic as possible.
- Apply a thin coat of your holographic or duochrome topcoat over the black base, working in thin layers to build up the intensity of the color shift gradually.
- For maximum chrome effect, apply a no-wipe topcoat and before it sets, buff chrome powder over the nail using a silicone applicator in small circular motions.
- Seal with a final glossy topcoat to protect the chrome or holographic finish and enhance its mirror-like, otherworldly reflective quality.
Gothic Stained Glass Nails

Inspiration from cathedral windows and colored light
There are few things in this world as beautiful as the light coming through stained glass windows. The way color is held within dark leading, the way each pane glows — it is one of the most Gothic and most spiritual visual experiences I know. Gothic stained glass nails translate that cathedral beauty to the nail, and every single time I create this design, I am reminded of why I fell in love with nail art in the first place. The design features bold black leading lines dividing the nail into geometric sections, each filled with a different rich jewel tone — deep ruby, sapphire blue, emerald green, amethyst purple. The overall effect is like wearing tiny stained glass windows on your fingertips, and it is extraordinary.
Tools needed to create the nail design
You will need a white or clear base to make colors appear more vibrant, a striping brush for the black leading lines, black nail art gel or polish, jewel-toned polishes in ruby, sapphire, emerald, and amethyst, and a glossy topcoat to enhance the glowing, light-filled quality of the stained glass effect.
Step by step guide to create nails design
- Apply a white or clear base coat to all nails and allow to dry, as this luminous foundation makes the jewel tone colors appear significantly brighter and more vibrant.
- Using a striping brush and black polish, paint bold leading lines across the nail in irregular geometric patterns — think of dividing the nail into irregular puzzle-like sections with thick black borders.
- Fill each section with a different jewel-toned polish color, keeping within the black borders as cleanly as possible for a true stained glass effect.
- Finish with two coats of glossy topcoat to give the design its characteristic luminous, glowing stained glass quality.
Raven Feather Nails

Inspiration from the beauty and mystery of ravens
The raven is one of the most iconic symbols in Gothic culture, and I have always felt a deep personal connection to these birds. There is something both intelligent and mysterious about them that mirrors what I try to capture in my art — something that knows more than it lets on, something beautiful in its darkness. Raven feather nails are inspired by the individual feather, which up close is not simply black but contains multitudes — blues and greens and purples shimmering in the dark. This design recreates that effect on the nail using layered dark polishes and fine brush strokes to build the barbs and shaft of a feather, with subtle iridescent shimmer woven throughout to capture that raven-wing magic.
Tools needed to create the nail design
You will need a black base polish, a fine liner brush, a deep iridescent navy or teal polish for shimmer, a thin angled brush for feather barbs, a fine detail brush for the central shaft, and a glossy or satin topcoat to enhance the feather’s depth and dimensional quality.
Step by step guide to create nails design
- Apply a black base to all nails and allow it to dry completely before starting the feather work, which requires a smooth, stable surface for precision.
- Using the fine detail brush and a slightly lighter black or dark grey, paint a central shaft line running the length of the nail from cuticle to tip.
- Using the angled brush, pull short diagonal strokes outward from the shaft on both sides to create feather barbs, overlapping slightly for a natural, layered look throughout the design.
- Brush a thin layer of iridescent navy or teal over the feather area and seal with a satin topcoat to recreate that magical raven-wing iridescence.
Dark Watercolor Bloom Nails

Inspiration from soft darkness and painterly beauty
My final design is perhaps the most painterly of all the looks in this collection, and it holds a special place in my heart because it feels like a true synthesis of my two worlds — art and beauty. Dark watercolor bloom nails are inspired by the soft, unpredictable quality of watercolor painting, but reimagined in a deeply Gothic palette. Instead of the typical bright watercolor florals, this design uses deep navy, forest green, burgundy, and black in soft washes that bleed into each other, with delicate flower outlines sketched in fine lines over the top of the color washes. The result is a design that looks like a moody, atmospheric painting — deeply beautiful, slightly abstract, and utterly unique on every single nail.
Tools needed to create the nail design
You will need a white or very pale base for the watercolor effect to show through, highly pigmented polishes in navy, forest green, and burgundy thinned slightly for a watercolor wash effect, a fine liner brush for floral outlines in black or dark ink polish, a clean brush for blending edges while still wet, and a matte topcoat to give it that true watercolor paper finish.
Step by step guide to create nails design
- Apply a white or pale base to all nails and allow to dry fully, as the pale base is essential for achieving the luminous, translucent watercolor wash effect.
- Drop small pools of your thinned navy, green, and burgundy polish onto the nail and quickly blend the edges together with a clean brush while the polish is still wet, allowing the colors to bleed organically into each other.
- Once the wash layer is dry, use the fine liner brush and black polish to sketch delicate floral outlines — roses, dahlias, or abstract blooms — over the color wash without completely outlining every petal for a true painterly quality.
- Seal with a matte topcoat to mimic the texture of watercolor paper and give the entire design that soft, artistic, atmospheric finish.
Conclusion
I want to take a moment here at the end of this journey through Gothic spring nails to speak to you directly — not just as a nail artist, but as someone who has spent her life believing in the transformative power of beauty. When I was growing up, watching my mother prepare for special occasions, I learned that what you put on your face — or your nails — is never just decoration. It is communication. It is self-expression. It is a declaration of who you are to the world.
Gothic spring nails, in my view, are one of the most honest forms of that self-expression. They do not follow the easy, predictable path. They do not simply do what is expected of a spring aesthetic. Instead, they take the season’s themes — growth, transformation, bloom, renewal — and they explore them through a lens that is deeper, more layered, more complex. And I think that is profoundly beautiful.
I have created Gothic nail looks for clients who were navigating some of the most significant transformations of their lives. I have painted dark blooms on the nails of women who were stepping into new chapters, leaving old ones behind, discovering parts of themselves they had never before acknowledged. And every single time, I watched something shift in them when they looked at their nails. They stood a little taller. They smiled a little differently. They carried themselves with a kind of quiet confidence that I believe is the truest form of beauty there is.
That is what nail art can do. That is what Gothic spring nails, specifically, do for so many people who feel that the conventional beauty world does not quite have a space for their particular brand of magic. These designs create that space. They say: your darkness is beautiful. Your complexity is beautiful. Your refusal to be simple or predictable or easy to categorize — that is beautiful too.
As I always say, makeup and beauty are not about hiding who you are. They are about amplifying the very best, most authentic version of yourself. And for those of us who feel most ourselves in the space between the dark and the bloom, between shadow and flower, between the Gothic and the spring — these nails are for you.
I hope this collection inspires you, challenges you, and reminds you that beauty has no single definition. Go create something hauntingly gorgeous. And as always, remember that confidence is the most beautiful thing you will ever wear — it is the foundation under every look, the topcoat over every design, and the thing that makes all the difference in the world.