
Fingers getting confused, arms getting tired, and you can’t remember what crosses where? I’ve been there, and I know how frustrating learning how to french braid step by step easy can feel at first.
Here’s what I’ve learned through years of teaching: French braids are classic, versatile hairstyles that work everywhere (from the gym to fancy events), and they’re much simpler than they look. In this french braid tutorial, I’ll walk you through exactly how to french braid your own hair using clear steps and helpful pictures. You’ll learn the prep work, master the technique through my french braid step by step guide, and discover tips that make how to do a french braid on yourself actually achievable. Let’s get started!
What You Need to Know Before You Start

Before I teach you how to french braid your own hair, we need to cover some groundwork that’ll save you hours of frustration. When I started doing hair in my early days, I assumed everyone knew how to do a basic braid. Wrong. So many clients would come to me wanting intricate styles without understanding the foundation.
Understanding the Basic Three-Strand Braid
The three-strand braid is your starting point for this french braid tutorial. Think of it as learning to walk before you run. You divide hair into three sections (left, middle, right), then cross the left strand over the middle one. Next, cross the right strand over what’s now the middle strand. Keep alternating this pattern all the way down. Once you can do this without thinking, French braiding becomes much simpler because you’re just adding hair to those same crossing motions.
Why French Braiding Feels Difficult at First
Here’s what nobody tells you: the physical challenge matters just as much as the technique. Your shoulders and arms need flexibility to hold that elevated position behind your head. When I first learned, my arms would shake after five minutes. The solution? Stretch before you start. Bring one elbow up and behind your head, gently push until you feel a mild stretch in your shoulder. Do this regularly.
The other struggle is transferring the braid from one hand to the other as you work down your head. This hand-off confused me for weeks until I realized it’s basically a rhythm you develop through repetition. Your fingers need to learn the dance.
Best Hair Conditions for French Braiding
Hair that’s too clean becomes your enemy. Freshly washed hair is slippery and won’t hold. I always tell people that second-day hair works best. If you must start with clean hair, apply texturizing spray or dry shampoo to create grip.
Curly or wavy hair stays in place naturally, though you might deal with frizz. For smoother results, use a smoothing cream before drying. Straight, fine hair needs extra texture products to prevent sliding.
Tools and Products You’ll Need
Gather these essentials before you start your french braid step by step practice:
- Paddle brush or detangling brush (avoid frizz-causing tools)
- Hair elastics
- Bobby pins
- Sectioning clips
- Texturizing spray or dry shampoo
- Smoothing cream (for textured hair)
- Light hairspray
Having everything within reach prevents that awkward moment when you’re holding half-finished sections and need to hunt for an elastic.
How to French Braid Step by Step
Now that you’re prepared, here’s my foolproof method for how to french braid step by step easy. When I first started doing hair in my studio, I taught this exact sequence to hundreds of clients who swore they’d never get it.
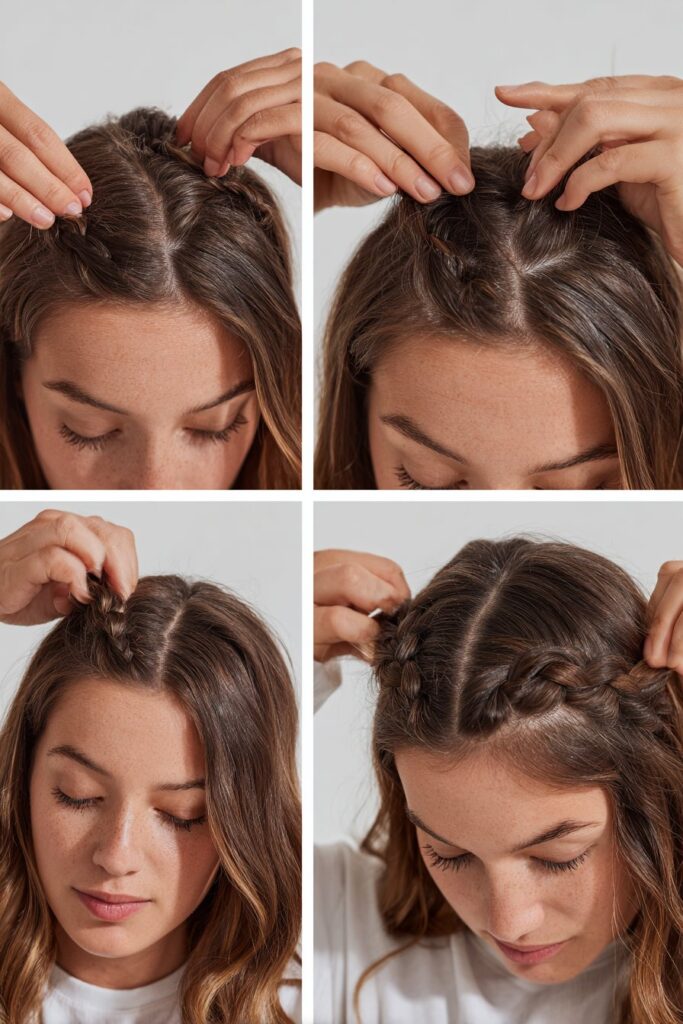
Step 1: Section Your Starting Hair
Grab hair from your hairline or crown, about 2-3 inches wide. I learned early in my career that this starting section determines your entire braid’s thickness. Pull this section straight back and hold it taut. Position matters more than you’d think.
Step 2: Divide Into Three Equal Strands
Split your starting section into three equal parts. Hold the right strand in your right hand, left in your left hand, middle resting between them. Uneven strands create lopsided braids, something I see constantly when clients first attempt this french braid tutorial.
Step 3: Make Your First Cross
Cross the right strand over the middle. Now cross the left strand over the new middle. Do this once or twice. You’re creating a regular braid anchor before the French technique begins.
Step 4: Add Hair and Cross Again
Here’s the game-changer: cross first, then add hair. Take your right strand, cross it over the middle, then pick up a small section from the right side of your head and combine it with that strand. Repeat on the left side. This rhythm keeps your braid tight and smooth, a technique I use on every client.
Step 5: Continue Adding and Crossing Down
Keep repeating the gather-combine-cross pattern. Pull each cross snugly and keep your hands close to your scalp for maximum control. Tilt your head forward as you move toward your nape. The pattern becomes automatic after a few attempts.
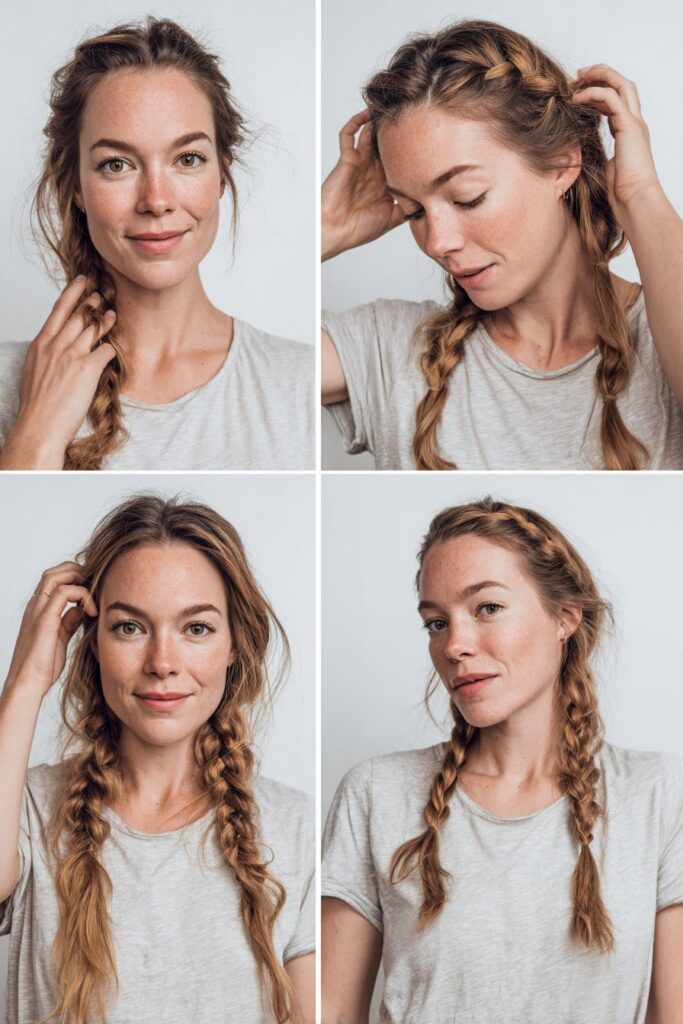
Step 6: Finish With a Regular Braid
Once you’ve incorporated all loose hair at your neckline, continue with a standard three-strand braid down to your ends. Secure with an elastic. Congratulations on learning how to do a french braid on yourself!
Tips for Perfect French Braids Every Time

After teaching this french braid tutorial to countless clients in my LA studio, I’ve identified four techniques that separate okay braids from stunning ones.
Keep Your Hands Close to the Head
Your hand position controls everything. When I first moved to New York and started working backstage, I watched seasoned artists braid with their hands practically glued to models’ scalps. Holding your hands away from the head creates loose, saggy braids. Rest your hands against the scalp as you work. This single adjustment tightens your braid and eliminates that frustrating drooping at the nape.
Add Hair at the Same Height
Grab hair at the exact horizontal level where you’re forming the braid. When you reach down or pull from above, you create diagonal lines, lumps, and bumps. I learned this the hard way during a shoot when my braid looked perfect from the front but had weird ridges on the sides. Take full slices from the hairline straight across to just under the braid.
Practice on Others Before Yourself
Braiding your own hair requires shoulder flexibility and spatial awareness that takes time to develop. Start with dolls or patient friends. The muscle memory you build transfers directly when you flip your arms behind your own head. I still remember practicing on my roommate for weeks before attempting my first self-braid.
How to Keep Your Braid Tight and Secure
Hold hair taut as you create the braid to prevent buckling. At the nape, ask the person (or tilt your own head) to look down at their feet. This keeps the lowest section tight where sagging happens most. Slightly damp hair provides better grip than freshly washed.
Common French Braiding Mistakes and How to Fix Them
Every braid I’ve created in my studio taught me something about what goes wrong. After years backstage and working with clients, I’ve seen these same four issues repeatedly.
Loose or Messy Sections
Messy braids twist randomly and look different every time. When sections sag or buckle, your braid loses its clean appearance. The fix: hold hair as taut as possible while you create the braid. Keep every section tight and clean to avoid gaps. I learned this during my New York days when loose braids would fall apart during long shoots.
Uneven Braid Thickness
Divide your hair into three equal sections at the start, then add the same amount of hair to each section as you work down. Inconsistent sections cause that lopsided look I used to struggle with. Try pancaking by gently tugging the outer edges of your braid. Start at the topmost section and work down carefully.
Bumps and Lumps
That annoying bubble near the nape happens when you don’t collect large enough sections below the ears. Tilt your neck down when braiding this area.
Tired Arms and Confused Fingers
Use clips to hold sections and give your arms breaks. Rest your arms on a table mid-braid. Braid on the side of your head where your arms sit lower. Transfer the braid from one hand to the other as you work down.
Conclusion
You now have everything you need to master French braiding. The technique felt impossible to me at first, but with practice, my fingers learned the rhythm naturally. Your first attempts might feel awkward, and your arms will definitely get tired. That’s completely normal. Keep practicing this french braid step by step method, be patient with yourself, and remember that even I spent weeks getting it right. Soon enough, you’ll braid without thinking, and those beautiful, tight French braids will become second nature.
How long does it take to learn how to French braid your own hair?
Most beginners start seeing real improvement within one to two weeks of daily practice. Your fingers need time to build muscle memory for the gather-cross rhythm, and your shoulders need to adjust to holding that elevated position. Be patient with yourself during the first few attempts.
What is the best hair type for French braiding?
Second-day hair works best because it has natural texture and grip. Freshly washed hair tends to be too slippery to hold the braid in place. If you only have clean hair to work with, apply a texturizing spray or dry shampoo beforehand to create the grip you need.
Why does my French braid look lumpy or uneven?
This usually comes down to two things: unequal sections at the start, or picking up different amounts of hair as you work down. Make sure your three starting strands are equal in thickness, and try to gather the same amount of new hair on each side with every pass.
Do I need any special products to French braid my hair?
Not necessarily. The basics — a detangling brush, hair elastics, and bobby pins — are enough to get started. Texturizing spray or dry shampoo can help if your hair is too smooth or freshly washed, and a light hairspray can keep flyaways down once you’re done.
Why do my arms get so tired when I French braid my own hair?
Braiding your own hair requires your arms and shoulders to hold an elevated position for an extended period, which most people are not used to. Stretching your shoulders before you start helps significantly. You can also take short breaks by clipping your sections in place and resting your arms.