
Indie makeup has grown from basic DIY experiments into powerful trend-setting statements. My work as a celebrity makeup artist lets me see this progress up close. The vibrant tropical colors from Technical Tropics and moody esthetics inspired by Taylor Swift’s eras make 2025 an exciting year for creative expression.
Many people believe indie makeup needs expensive products or professional skills – but that’s not the case at all. These stunning styles are more available than you’d expect. Dreamy ethereal looks with silver chromes and bold navy eyeshadows can be achieved easily. My experience creating looks for celebrities and everyday makeup enthusiasts proves these effects aren’t as complex as they seem.
I’ve put together 25 doable indie makeup looks that blend creativity with simplicity. Each style ranges from natural, dewy finishes to bold, avant-garde designs. My professional tips will help you become skilled at these techniques at home. These gorgeous styles will help you find the perfect match for your personality and skill level.
Ethereal Glow Indie Makeup
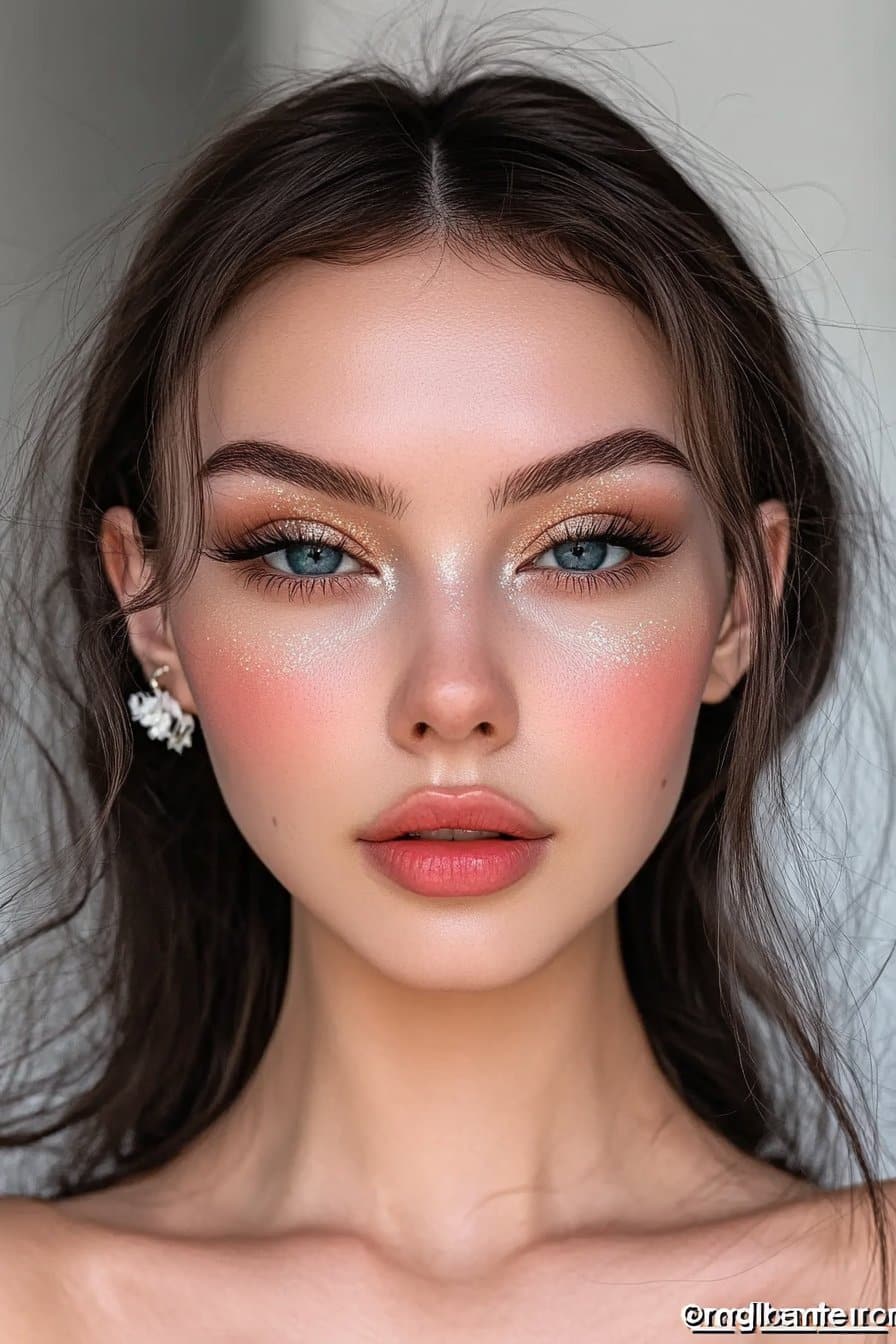
My work as a celebrity makeup artist has helped me become skilled at creating ethereal glow looks that capture light beautifully. This whimsical, minimalist style creates a smooth, dewy complexion with rosy cheeks and shimmery highlights.
Essential Products
This dreamy look starts with a hydrating serum containing hyaluronic acid and niacinamide that gives instant radiance. My go-to products include:
- A lightweight foundation or skin tint
- Multi-use balmy highlighter
- Cream blush in soft rose tones
- Clear or pearl-tinted lip gloss
Step-by-Step Tutorial
The skin needs proper hydration before anything else. I use a lightweight foundation instead of full coverage to keep that natural luminosity. The signature glow comes from layering two different highlighters – a face gloss on the high points first, followed by a shimmery powder highlight.
The cream blush goes on the apples of cheeks and blends outward for a natural flush. The key is to dab the product gently and blend it well. The eyes get a soft, creamy smokey shadow in the crease that blends until it’s barely visible.
Ethereal Makeup Tips
Over the last several years, I’ve found that the secret to this look lies in extreme skin prep. On top of that, it’s best to skip powder products as they can diminish the dewy effect. A hydrating setting spray works great as the final step for long-lasting results.
This look works beautifully for special occasions or everyday wear. Note that less is more – the goal is to improve your natural beauty while creating that magical, lit-from-within glow.
Grunge Glam Eyeshadow
My experience creating celebrity looks has taught me that grunge glam eyeshadow strikes the perfect balance between edgy style and sophisticated glamor. Many of my clients love this versatile look because it lets them make a bold statement while staying elegant.
Product Selection
You’ll need these items to create the perfect grunge glam look:
- Black or cool-toned brown eyeshadow
- Creamy eyeliner for smudging
- Primer for long-lasting wear
- Multichrome liquid eyeshadow
- Large fluffy blending brush
Application Technique
Start with primer on the entire lid to create a perfect base that lasts. Next, use a creamy eyeliner to tightly line both upper and lower lashlines. The magic happens when you smudge the liner with a small eyeshadow brush and create a subtle cat-eye flick at the outer corners.
Layer a cool-toned neutral shade across the lid to get that signature smoky effect. You can build depth by adding a darker shade in the crease and outer corner. The most vital step is blending – use circular motions with a clean fluffy brush to soften any harsh lines.
Grunge Makeup Tips
The classic grunge look puts all the focus on the eyes. Keep the rest of the face minimal to make it work. Add several layers of mascara to create that perfectly imperfect, slightly clumpy look that’s true to the style.
Prep your skin with oil-free moisturizer to help the look last. The beauty of grunge makeup lies in its imperfection – don’t stress about getting perfectly symmetrical lines. You want that lived-in, effortlessly cool look that gets better as the day goes on.
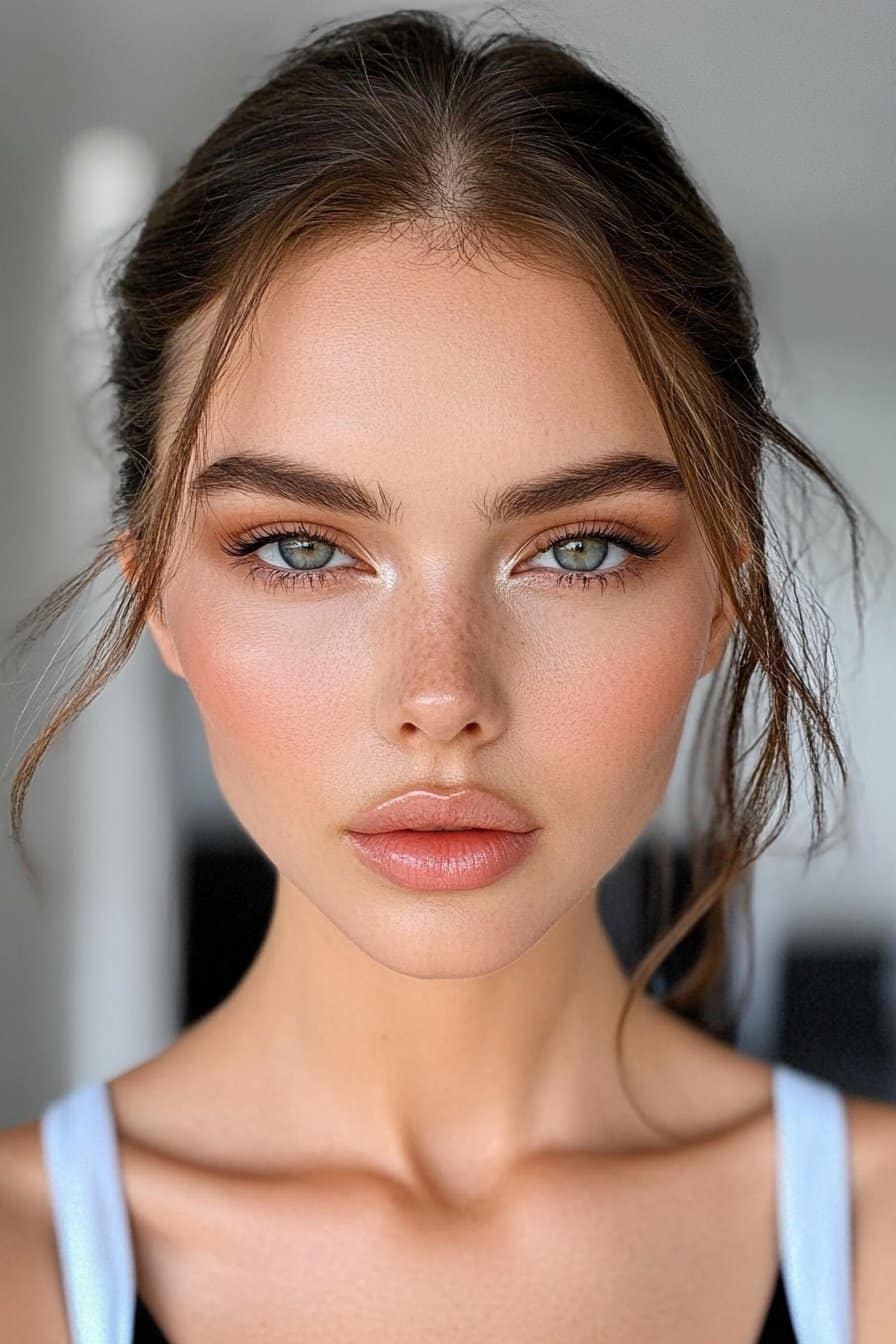
Natural Bohemian Chic
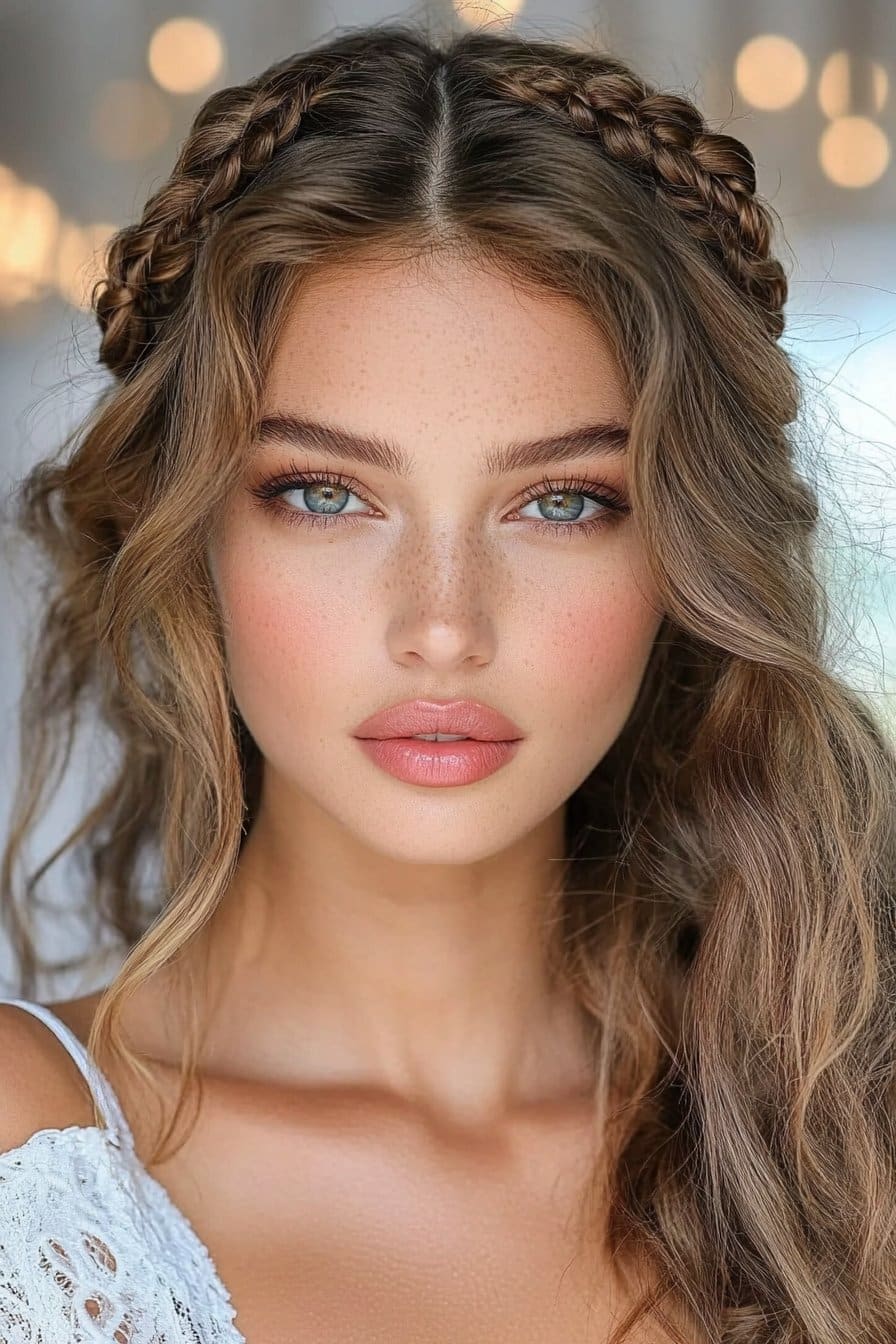
My work with celebrities and fashion shows in New York has shown me that bohemian chic makeup creates a free-spirited, artistic approach to beauty. This style celebrates natural radiance and lets you express your creativity.
Key Products
You need these essentials to create an authentic bohemian look:
- A non-matte foundation to get that dewy finish
- Rose water or hydrating face mist
- Highlighter that gives a strobing effect
- Natural-toned bronzer
- Neutral lip products
Application Steps
Start by spraying rose water on your face for instant hydration. Skip heavy coverage products and use a lightweight, dewy foundation that keeps your skin’s natural glow. The strobing technique works best when you apply highlighter to your face’s high points, which creates a natural contour.
The signature bohemian glow comes from using bronzer as blush. Warm orange or pink-toned shades work better than ashy ones. Your eyes are where you can really express yourself – go natural or add creative touches like flowers or subtle color.
Bohemian Style Tips
Experience has taught me that bohemian makeup should look effortless. A dewy complexion and neutral lips with a touch of gloss create that perfect balance. The final look should be simple yet polished.
This makeup style pairs beautifully with flowing dresses and bohemian-inspired braids for special occasions. You can wear it to summer weddings or themed parties while staying true to its artistic roots.
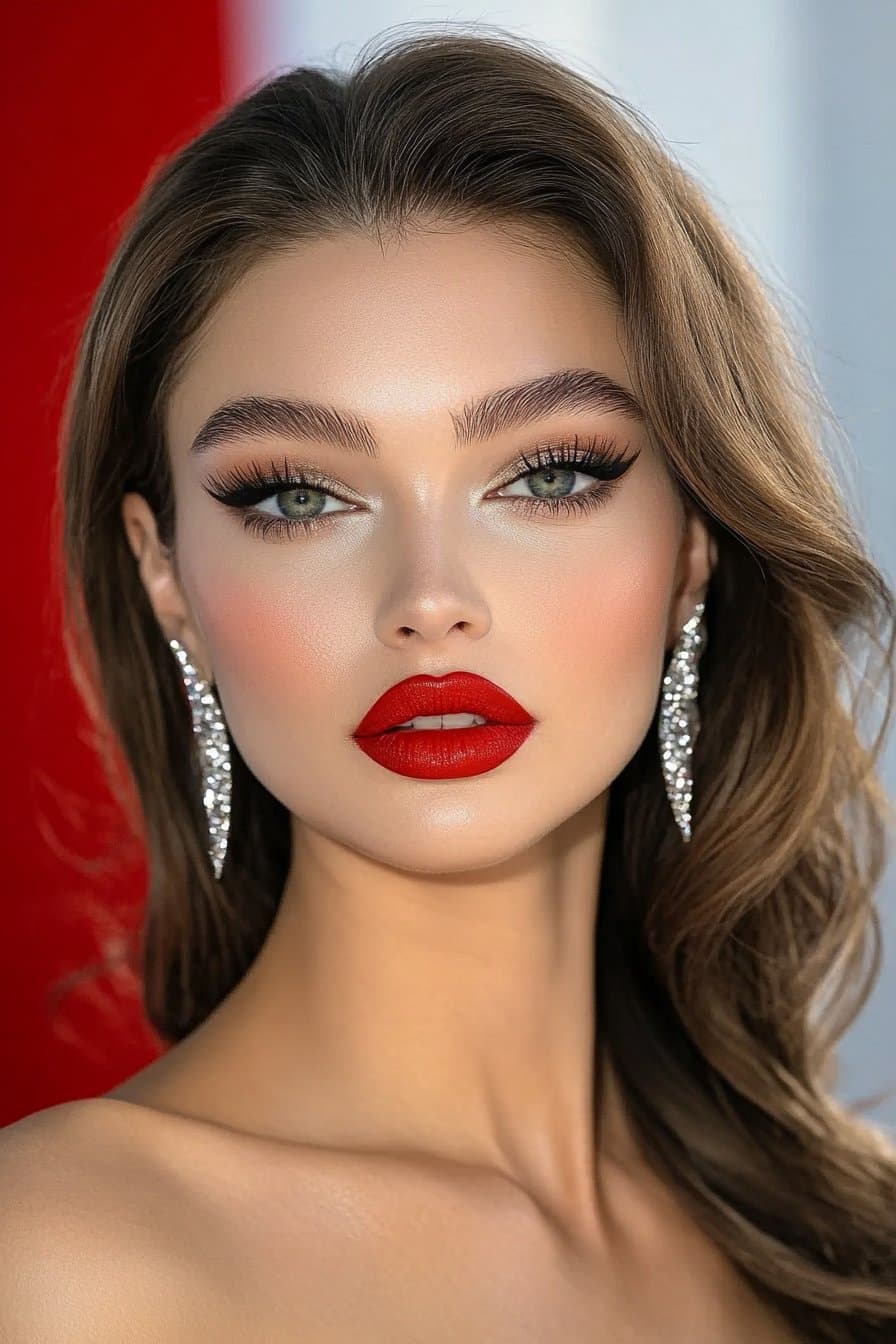
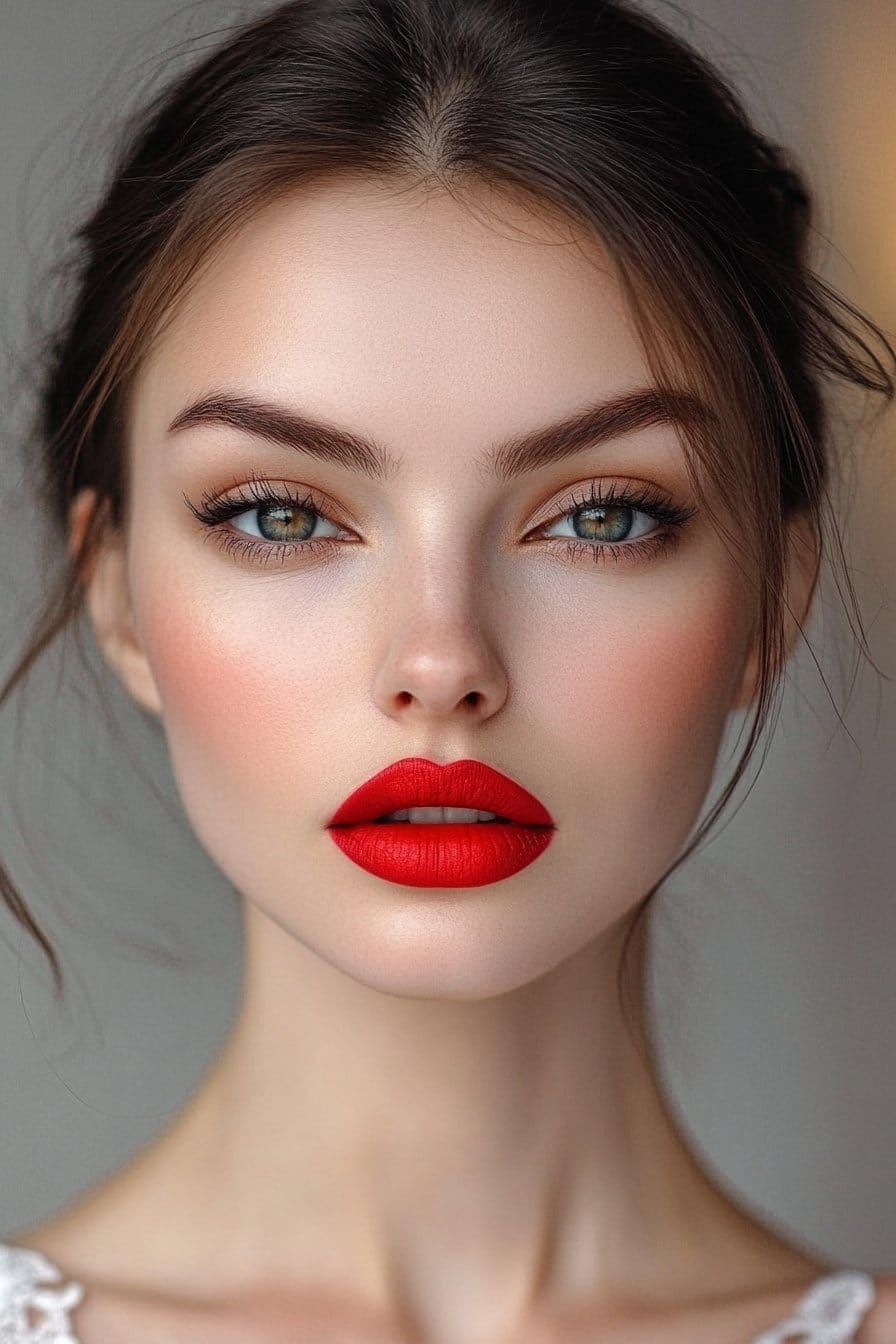
Vintage Pin-Up Style
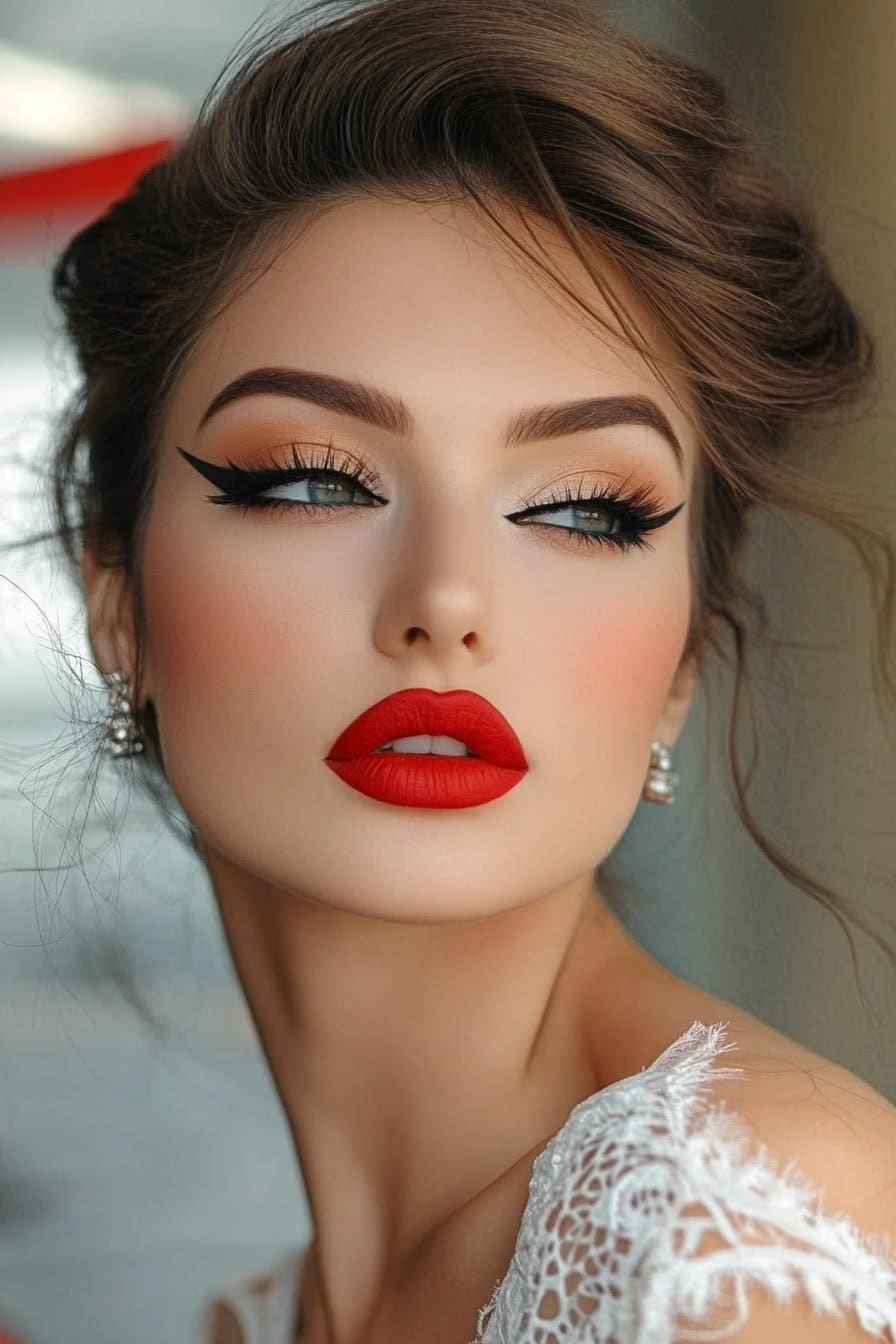
My fascination with pin-up makeup began after I found an unopened vintage lipstick tube from the 1940s in my grandmother’s attic. The dense, velvety texture of that classic red lipstick got me started in thinking about how to recreate authentic pin-up looks.
Required Products
You’ll just need these essentials to create an authentic pin-up look:
- A full-coverage foundation that matches your skin perfectly
- Cream blush to create that characteristic flush
- Matte red lipstick with matching lip liner
- Liquid eyeliner to create precise wings
- False lashes that add glamor
Application Guide
The process starts with a well-primed face and concealer under the eyes and around the nose. Foundation comes next, followed by highlighting and contouring to create that signature sculpted face. The highlighter goes on the bridge of the nose, forehead, cheekbones, and above the cupid’s bow.
A generous amount of blush between the highlight and contour creates the signature pin-up look. The eyes need a subtle cat-eye flick with liquid eyeliner, while the mobile lid stays natural with neutral shadows. False lashes or multiple coats of mascara will give you those fluttery lashes that defined the era.
Pin-Up Styling Tips
Red lips ruled the 1940s, but the 1950s brought a variety of lipstick shades. In spite of that, start with a sharp lip liner that matches your chosen shade. Define and slightly overdraw the lips to create that classic pin-up pout. Besame Cosmetics offers products with colors and packaging that authentically recreate vintage formulas.
The story behind pin-up makeup started with G.I.’s overseas who would pin up photos of glamorous actresses. This timeless style inspires modern interpretations today while keeping its classic elements of elegance and femininity.
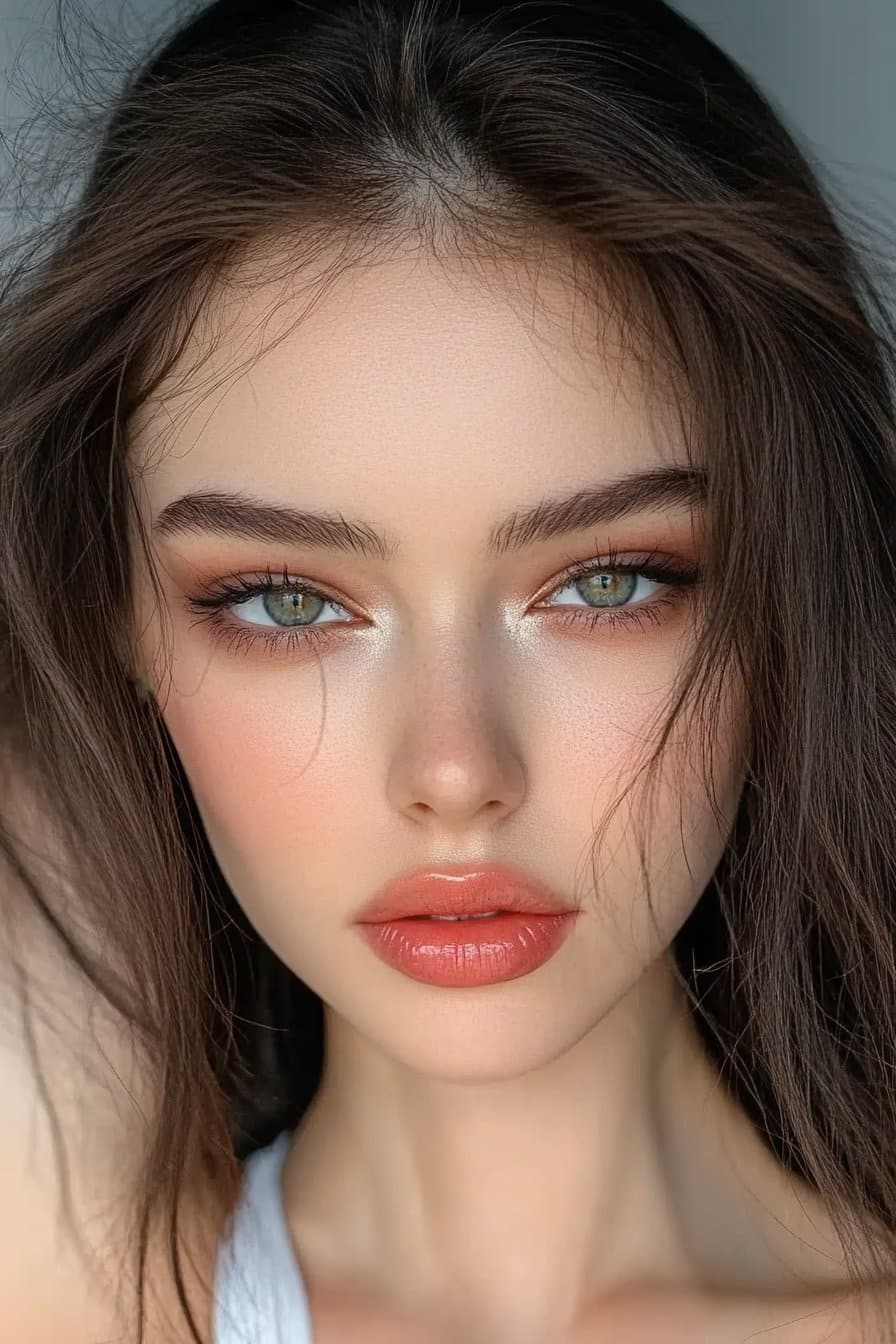
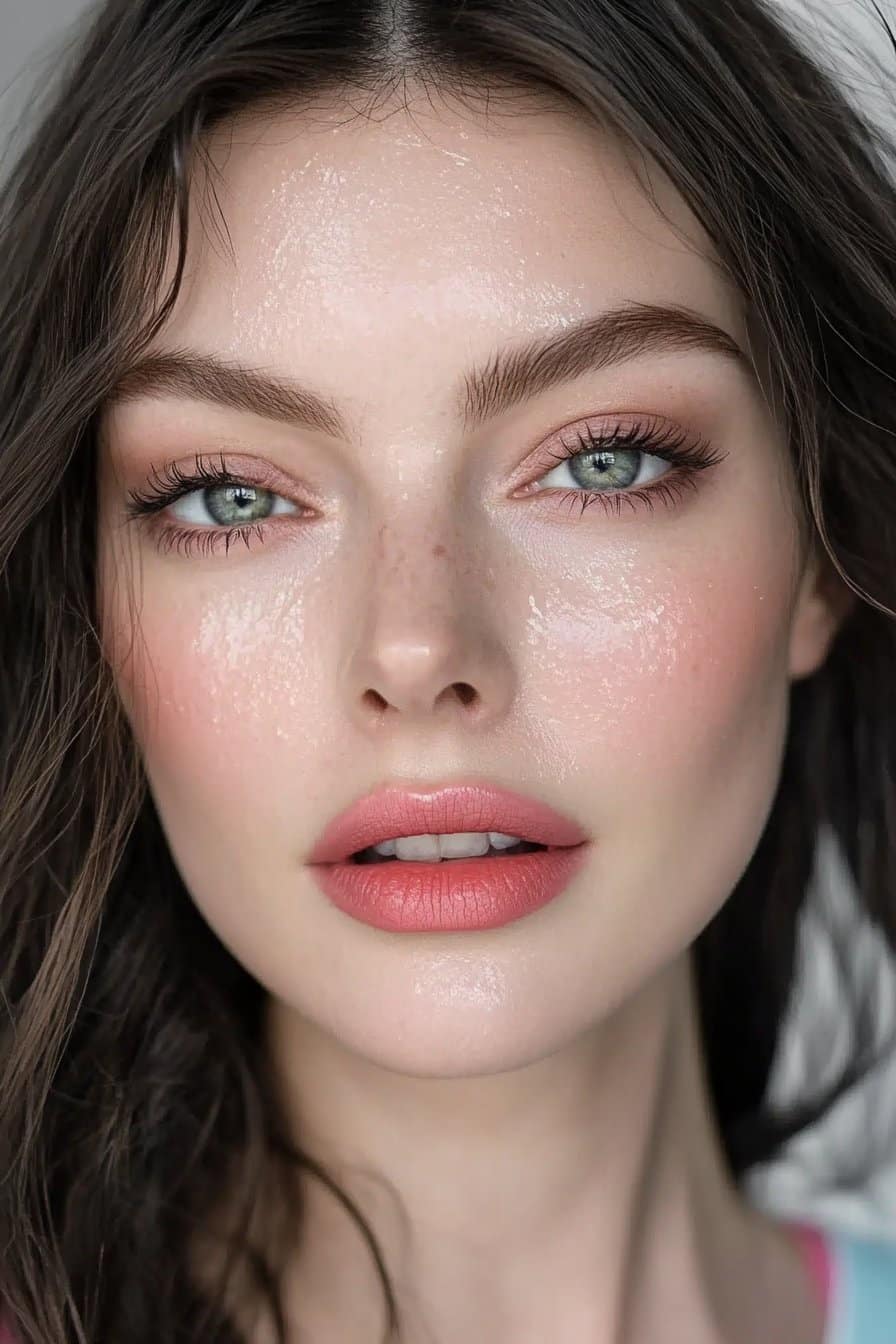
Simple Dewy Skin Look

The perfect dewy skin look has become my signature style during my career in Los Angeles. My work with clients who have different skin types helped me develop a quick way to create naturally luminous skin that never looks oily.
Product List
You need ultra-hydrating skincare to achieve that coveted dewy finish. Here are my go-to products:
- A water-based primer with hyaluronic acid
- Luminescent foundation or tinted moisturizer
- Cream blush and highlighter formulations
- Setting spray with light-reflecting elements
Application Method
My process starts with a hydrating serum and moisturizer to lock in hydration. The next step involves applying a luminous base. I use fingers to create sheer coverage or a damp beauty sponge when I want an airbrushed effect.
The perfect glow comes from tapping cream products into the skin’s high points with upward motions. The magic happens with strategic placement – highlighter goes on the cheekbones, bridge of the nose, and cupid’s bow. A light dusting of illuminating powder seals everything, especially when you have a T-zone that needs shine control.
Dewy Skin Tips
My experience shows that layering rich face creams with liquid foundations creates the most natural-looking dewiness. Cream blush works better than powder options to keep that fresh, glowing finish.
The biggest challenge is targeted highlighting. The outer portions of the face should glow while the T-zone stays more controlled. A hydrating setting spray makes the perfect final step. This helps maintain your dewy finish throughout the day.
Graphic Liner Art

My love for graphic liner art grew after I created bold looks for New York Fashion Week runway shows. I found that there was a way to change any indie makeup look from simple to striking through lots of testing and practice.
Essential Tools
You need felt-tip liners or water-activated liners to create precise graphic liner looks. A high-quality liquid eyeliner with a precision-fine tip will improve your accuracy. My must-have items include:
- A good eye primer or concealer for longevity
- Precision eyeshadow brush for cleanup
- Marker liner for sharp edges
- Setting spray for lasting wear
Application Steps
The process starts with prepping eyelids using primer so the liner stays put without smudging. Your perfect graphic liner depends on creating the shape outline while your eyes are open and you look straight into the mirror. Beginners should try a floating crease graphic liner – a simple line above their natural crease.
Tape works great as a guide when placed at the right angle for clean edges. The most significant step is to draw short, connecting lines rather than trying one continuous stroke. The double floating graphic liner trend adds an extra dimension to the classic look, and it’s my current favorite.
Liner Tips
My fashion show experience taught me that prep makes all the difference. I ended up using concealer two shades lighter than skin tone as an eyelid base to create vibrant liner looks. The Extended Feline Flick technique works best for hooded eyes – just place the liner slightly higher so it shows.
Black liner looks more professional when set with matte black eyeshadow. When working with colored graphic liner looks, keep your lip makeup simple and let your eyes steal the show.
Mauve Monochrome Magic
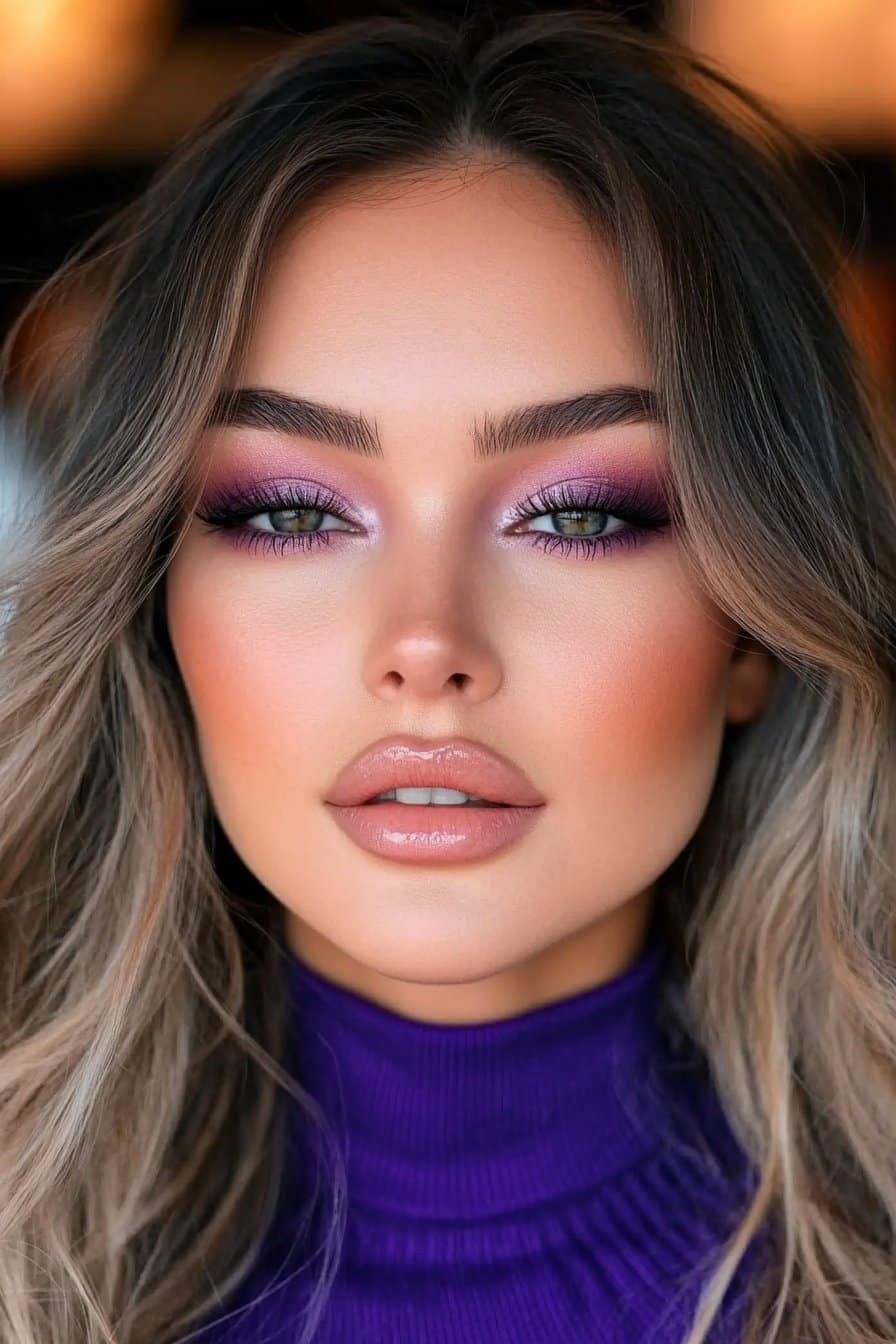
My work as a celebrity makeup artist has shown me that mauve monochromatic makeup creates a versatile and sophisticated look. This subdued yet bold pink shade has turned into the most captivating fall makeup trend this season.
Product Selection
Creating a flawless mauve monochrome look starts with products from the same color family. A mauve eyeshadow palette with matte, shimmer, and metallic finishes works best. The next step is picking a long-lasting mauve lipstick that matches your skin’s undertone. Using three tones of similar mauve color adds the perfect depth to eye makeup.
Application Guide
The process begins with moisturizer to create a smooth canvas. A deep, matte mauve shade goes on the eyelids, blended from the lash line up to the crease. The look comes together when I layer a mid-tone hue overtop and soften the line just past the crease. The cheeks need a powder blush in a coordinating mauve tone, swept over the apples and blended toward the temples for the softest effect.
Monochrome Tips
Experience has taught me that texture variation is a vital part of creating dimension. My best advice is to mix finishes – maybe a matte eyeshadow with a glossy lip in the same shade. A liquid highlighter on your face’s high points adds sophistication. Note that a balanced monochromatic look isn’t about using one exact shade everywhere – it’s about creating harmony between complementary hues.
Sunset Eyes Blend
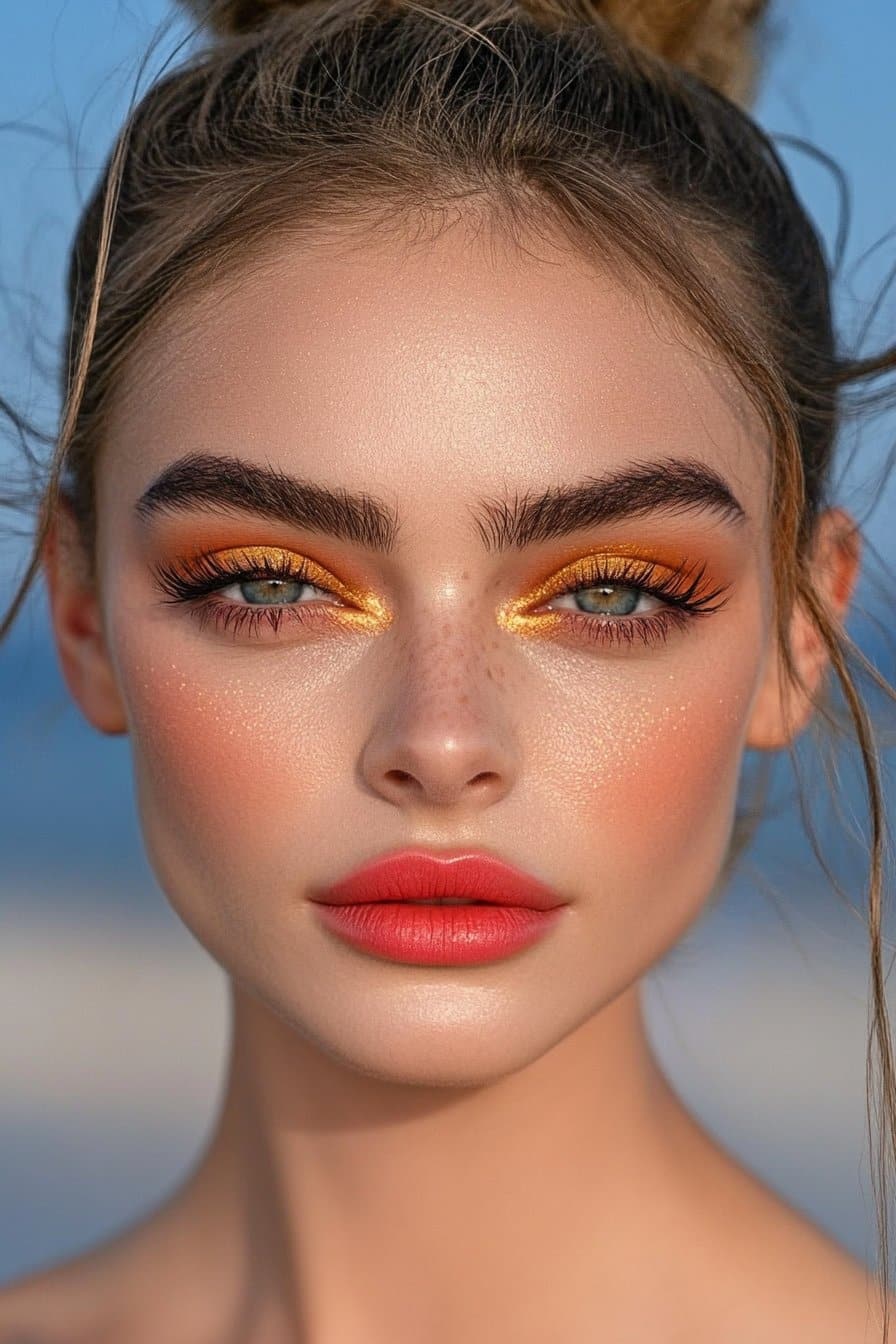
My years of creating runway looks have taught me that sunset eye makeup fascinates audiences with its warm, dimensional appeal. The technique brings together vibrant oranges, pinks, and purples that recreate dusk’s magical colors.
Product Choices
A successful sunset eye look needs the right products. We start with an eyeshadow primer that ensures long-lasting wear. The perfect palette should contain orange, pink, gold, and purple shades. Your essential items include:
- A light base shade to start
- Hot pink and orange shadows that create the main sunset effect
- Deep purple to add depth
- Shimmery white or gold to highlight inner corners
Blending Technique
The secret to a flawless sunset eye comes from proper application sequence. The process begins with the lightest color to create an even base and prevent muddy blending. The vital step involves placing orange shadow on the outer two-thirds of the lids and hot pink on the outer third.
Perfect gradient effects need careful attention to shadow transitions. The outer corner needs purple shadow that builds depth gradually. The effect becomes more dramatic with purple liner on the lower lash line, which blends outward for a soft, shadowy finish.
Color Tips
Fashion shows have taught me that sunset eyes look best when built from lighter bronzes to darker shades. Gold tones boost luminosity and work beautifully in a variety of skin tones. A shimmery highlight around the inner corner and under the brow tail adds that final touch of dimension.
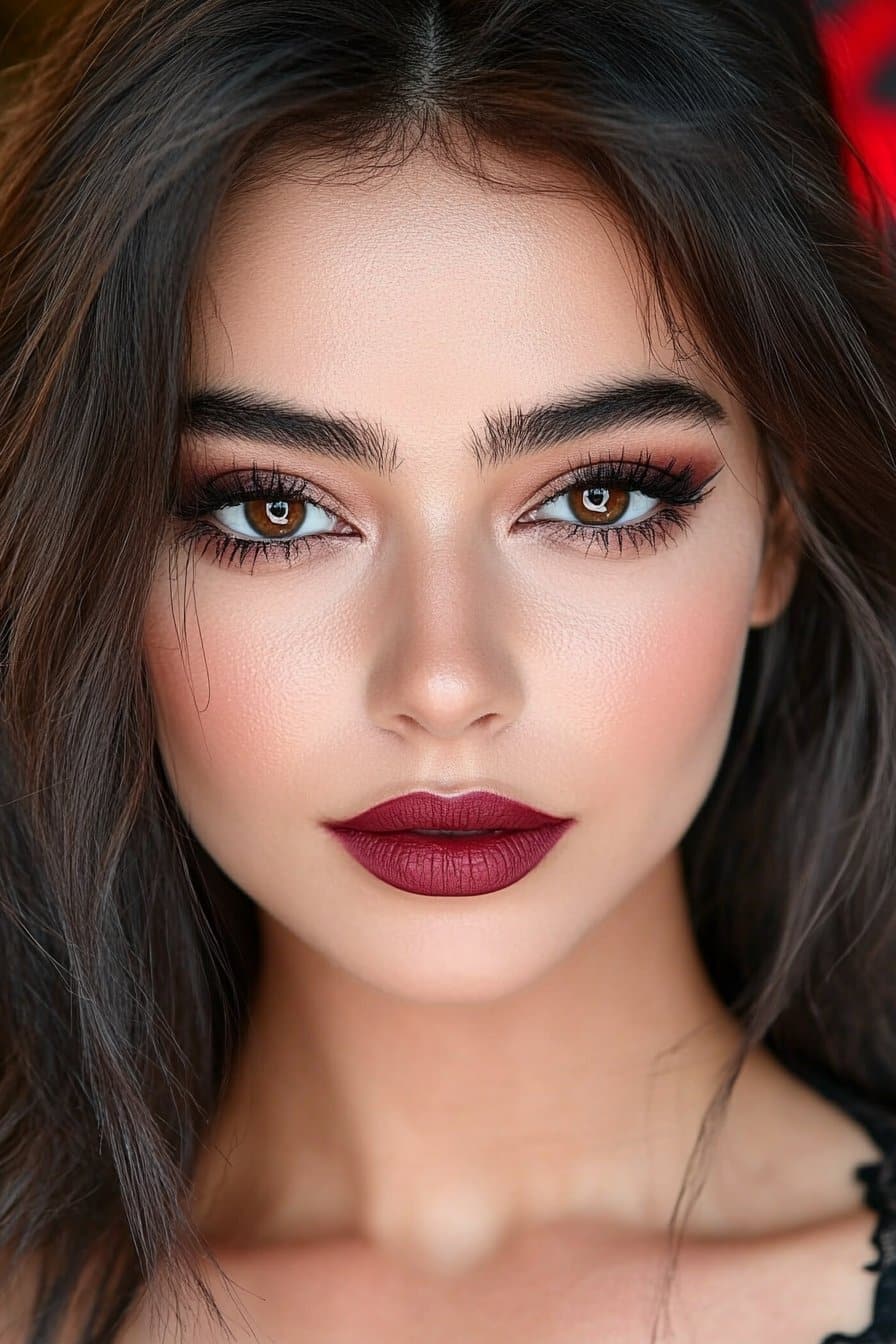
Gothic Romance Look
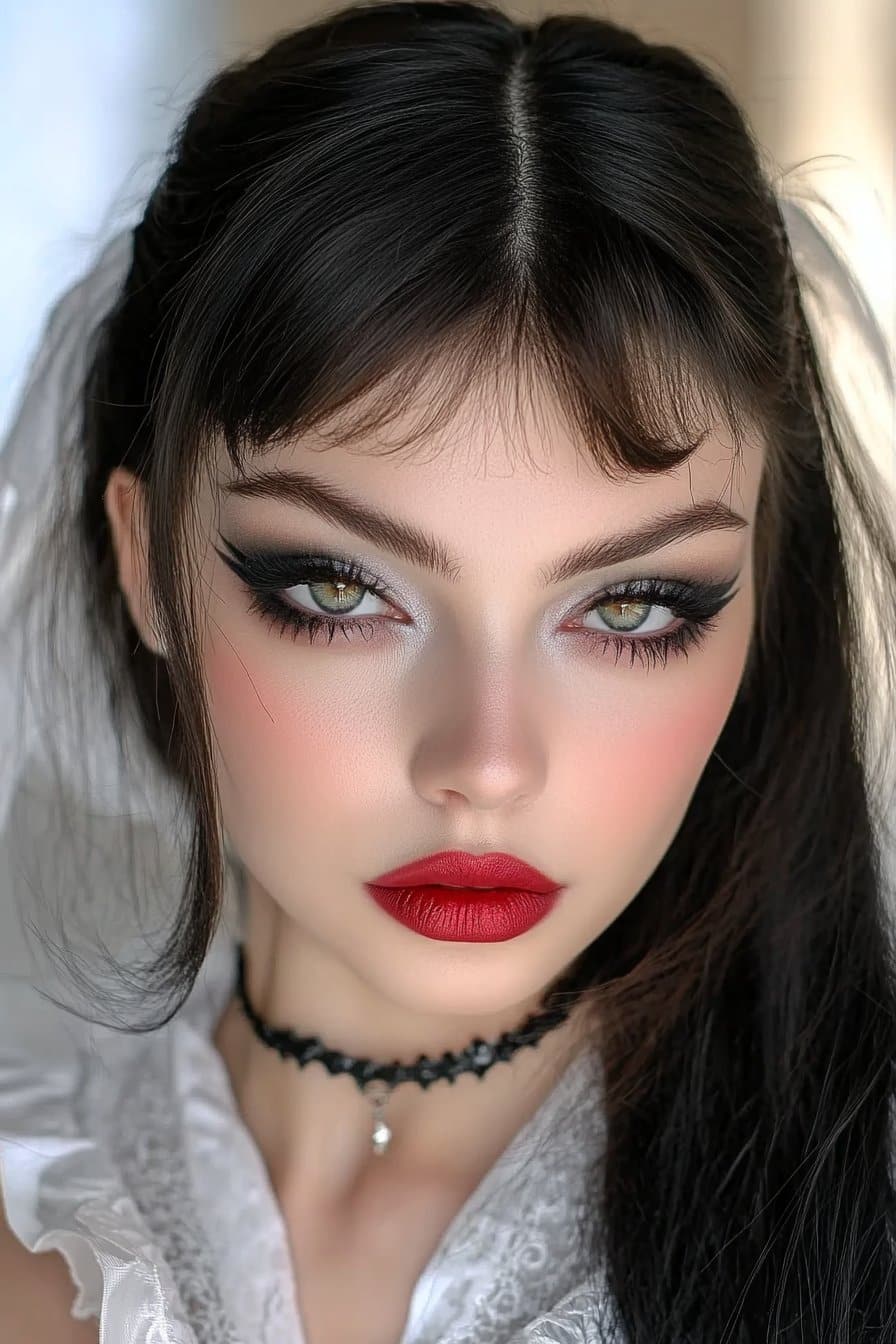
My gothic romance makeup journey started backstage at Paris Fashion Week. That’s where I first saw how this darkly elegant style creates a perfect balance of mystery and sophistication. Working countless runway shows helped me refine this look into something both dramatic and wearable.
Essential Items
You need specific items to create an authentic gothic romance look. We started with a pale foundation that matches your undertones. Quality brushes are vital for smooth application and blending. Here’s what else you’ll need:
- A goth-friendly primer for longevity
- Soft, smoky eyeshadows in grays and muted purples
- Gothic eyeliner for dramatic effect
- Deep mauve or plum lipstick
Application Steps
The process starts with skin prep using a smooth primer. Then apply foundation evenly with a brush or sponge. My experience shows that contouring works best when focused on cheekbones, jawline, and nose to create a sculpted yet natural look.
Eyes begin with a soft base color blended over the lids. You’ll want to add darker shades to the crease for depth. Creating smooth transitions between colors is a vital step. Add drama by lining eyes with kohl pencil and smudge it slightly to get that signature romantic effect.
Gothic Style Tips
The sort of thing I love about gothic romance makeup is finding the right balance. Try different finishes – maybe matte eyeshadows paired with satin-finish lips. Special occasions call for dark crystals or intricate lace patterns in your makeup design.
Note that gothic romance makeup celebrates both darkness and elegance. I tell my celebrity clients it’s about creating depth while staying sophisticated. The goal? A look that’s mysterious and refined – perfect for anyone drawn to beauty’s darker side.
Dreamy Pastel Creation
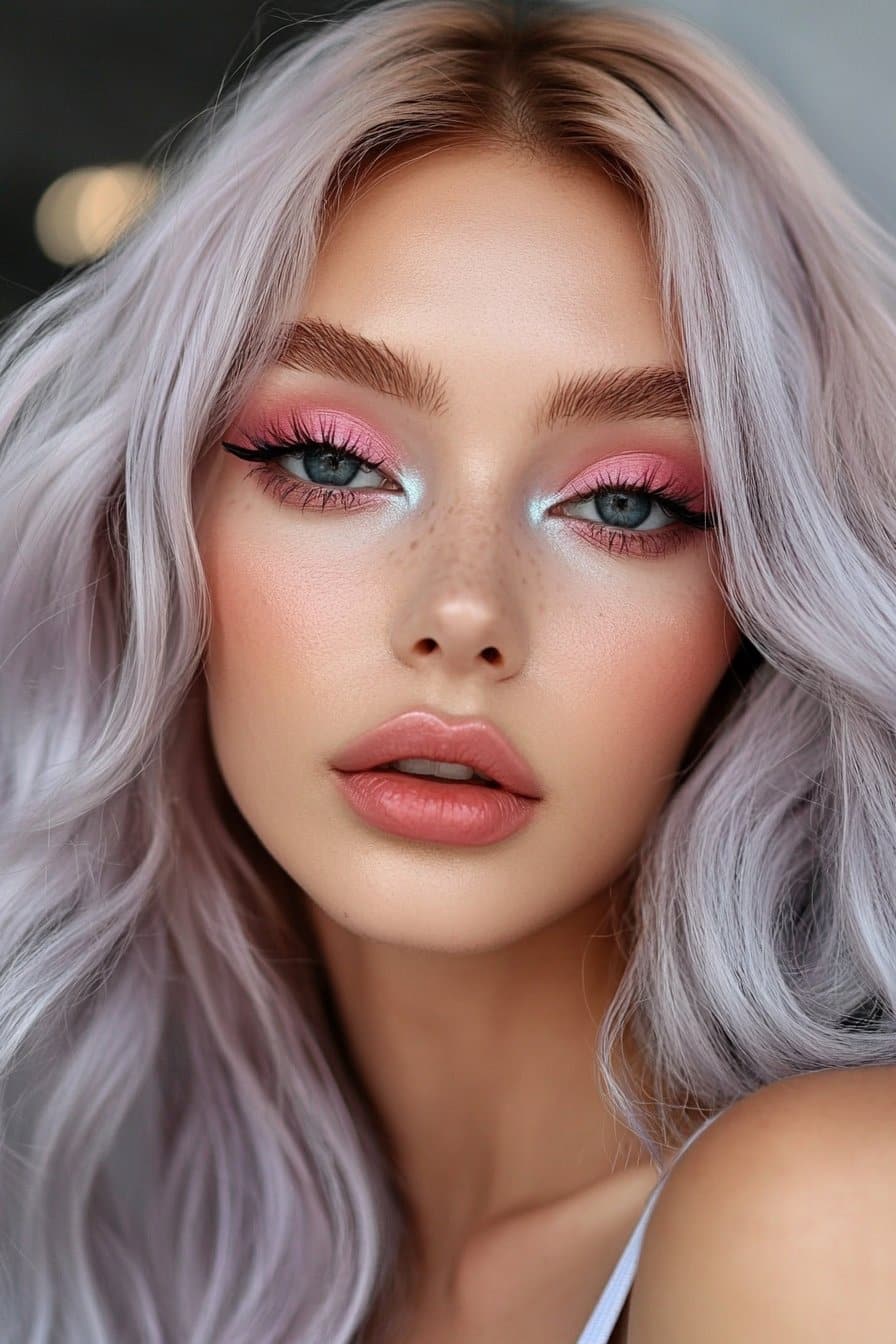
My Los Angeles studio offers a perfect view as I create pastel makeup looks that blend softness with sophistication. Working with skin tones and textures of all types has taught me techniques that make pastel shades wearable for everyone.
Product List
A tacky base helps create dreamy pastel looks and enhances color intensity. The ideal palette should have icy blue, frosty pink, and twinkling lavender shades. You’ll need these basics:
- A hydrating primer for smooth application
- Multi-finish pastel eyeshadows
- Precise shader blending brushes
- Setting spray for longevity
Application Guide
Pastel application needs strategic layering to work well. The eyes need a white base to make colors pop. Colors work best when lighter shades go from the inner corner to the middle lid, staying above the crease.
Glitter glue in the center of the eyelid adds beautiful dimension. My runway work has shown that mixing finishes creates captivating looks – matte eyeshadows with shimmer toppers work magic. The cheeks need a bright, pigmented blush that matches your chosen eye colors.
Pastel Tips
Editorial work has taught me that skin tone determines the best pastel colors. Medium to deep skin tones look stunning with more pigmented versions of pastels. Fair skin tones can use lighter hues directly.
Glitter glue or cream base under powder shadows keeps the look fresh all day. Try unexpected combinations like lavender with mint green, or baby blue with soft peach to create modern looks. Note that pastel makeup explains and softens features for a defined yet dreamy appearance.
Neon Liner Pop
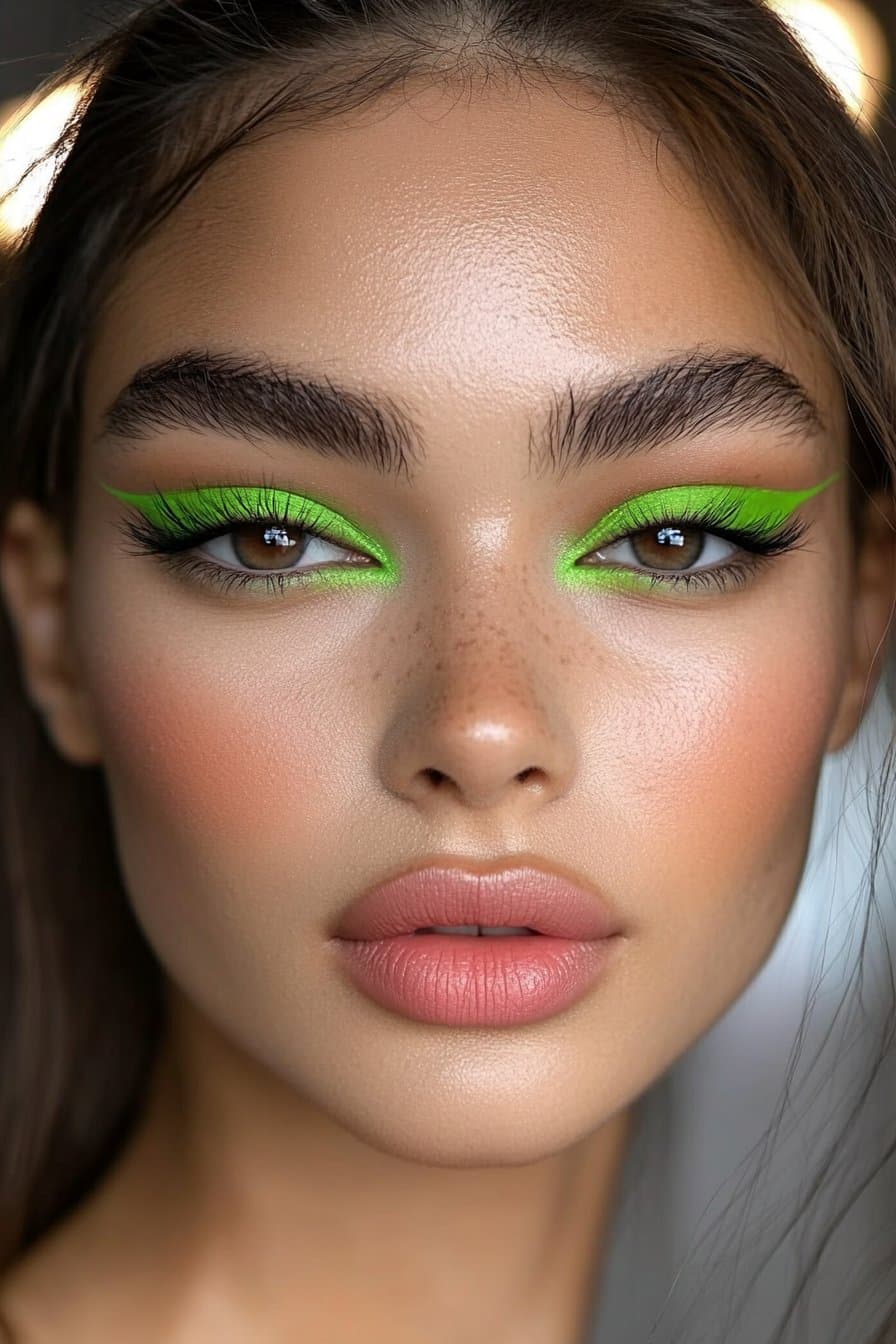
My backstage experience at Off-White’s Laboratory of Fun show taught me about the amazing power of neon liner looks. Creating vibrant eye designs for runway models has helped me become skilled at making neon liner both wearable and effective.
Required Tools
High-quality products make perfect neon liner looks possible. You’ll need a precision-tip liner for clean lines. Here are other essentials you’ll need:
- A white base or eyeshadow primer
- Neon liquid liners or water-activated liners
- Small cotton swabs for cleanup
- Setting spray for longevity
Application Steps
My runway experience has taught me that neon liner application needs smart placement. The eyelids need good prep with primer. Tape works great as a guide to create graphic elements and ensure precise lines.
A small detail or splash of color creates the most important impact, so don’t use too much liner. My fashion show work has shown that a natural face boosts the neon effect. The look works best without blush, contour, and mascara to keep a simple canvas.
Neon Style Tips
After many editorial shoots, I’ve learned that less is more with neon liner. Modern looks need graphic elements that complement your eyes without overwhelming them. Micellar water-dipped cotton swabs help clean up any mistakes and keep results professional.
Beginners should start with inner corner accents or small graphic details. Note that neon works like bringing a flashlight to your face, so placement is vital. My experience with a variety of clients shows this technique works for everyone, whatever their age or gender.
Soft Grunge Esthetic
I found the allure of soft grunge makeup while creating looks backstage at London Fashion Week. These looks blend rebellion with sophistication. The esthetic combines elements of ’90s grunge with modern refinements, emerging between 2013 and 2015.
Product Selection
A matte foundation works best to create an authentic soft grunge look. You’ll need these items:
- Dark-toned eyeshadows in grays and muted purples
- Velvet-finish lipsticks in wine or plum shades
- Black kohl eyeliner for smudging
- Setting powder for a matte finish
Application Method
My runway experience taught me that soft grunge makeup emphasizes the eyes. The process starts with oil-free moisturizer to create a natural base. Cool-toned neutrals, especially grays and taupes, add depth around the eyes.
Black kohl on both upper and lower lashlines creates the signature lived-in effect when gently smudged at the edges. Practice showed me that the secret lies in creating a slightly undone appearance – like morning-after makeup that still looks intentional.
Grunge Tips
The authentic soft grunge esthetic needs matte skin with powder and a dark wine lip color. Different textures add interest – try matte eyeshadows with a touch of gloss on the lips.
Note that soft grunge celebrates imperfection. The look should appear effortlessly cool, as if you’ve just left a rock concert. Experience has taught me that strategic placement matters more than perfect application.
Retro 80s Bold Eyes
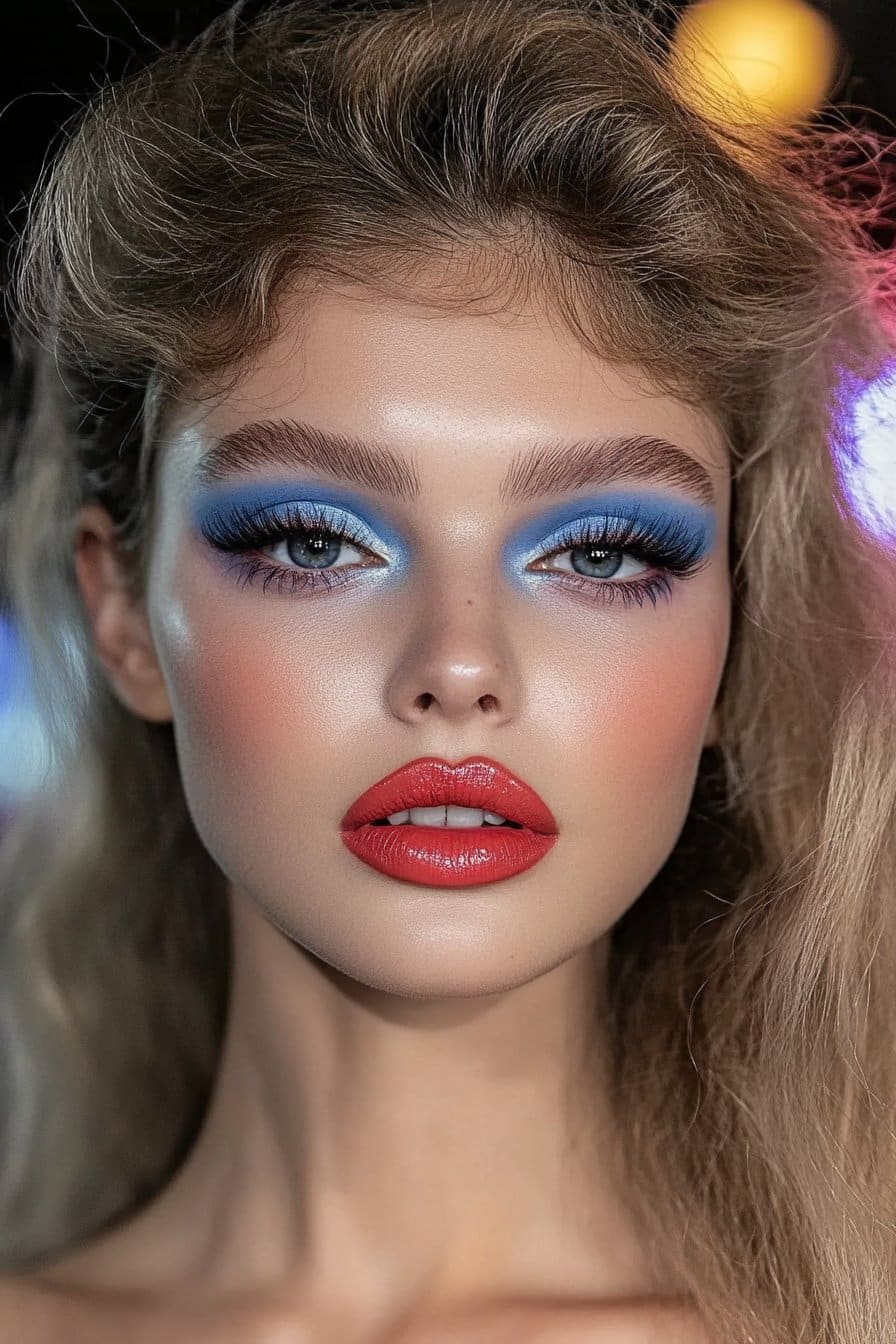
My time backstage at Milan Fashion Week helped me find the magic of 80s bold eye makeup while creating dramatic runway looks. This era’s makeup artistry broke conventional rules and embraced electric colors and theatrical effects that still inspire indie makeup looks.
Essential Products
You just need an eyeshadow primer to intensify colors when creating authentic 80s bold eyes. Start with vibrant shades in electric blues, bright pinks, and rich purples. Here’s what else you’ll need:
- Cream eyeshadow base in pink tones
- Plum and burgundy shadows for depth
- Velvet-finish eyeliner
- Volumizing mascara
Application Guide
My runway experience taught me that 80s eye makeup requires careful layering. The process starts with a pink cream base across the lids and along the lower lash line. Rich plum and burgundy tones blend into the crease to add drama, with deeper shades concentrated along the lash line.
The classic 80s look extends eyeshadow from lash to brow. Tight-lining with velvet violet eyeliner creates definition. Years of practice showed me that multiple mascara coats create that bold lash effect we love.
Retro Tips
Authentic 80s glamor comes from exaggerated, lifted effects. The secret lies in bright, bold colors with a modern edge. My work with clients of all backgrounds taught me that matte black liner smudged around both upper and lower lash lines creates that iconic rocker style.
Bronze or tan shades offer a more subdued approach to this retro look. Note that 80s makeup celebrates excess – mix multiple bright colors to create maximum effect.
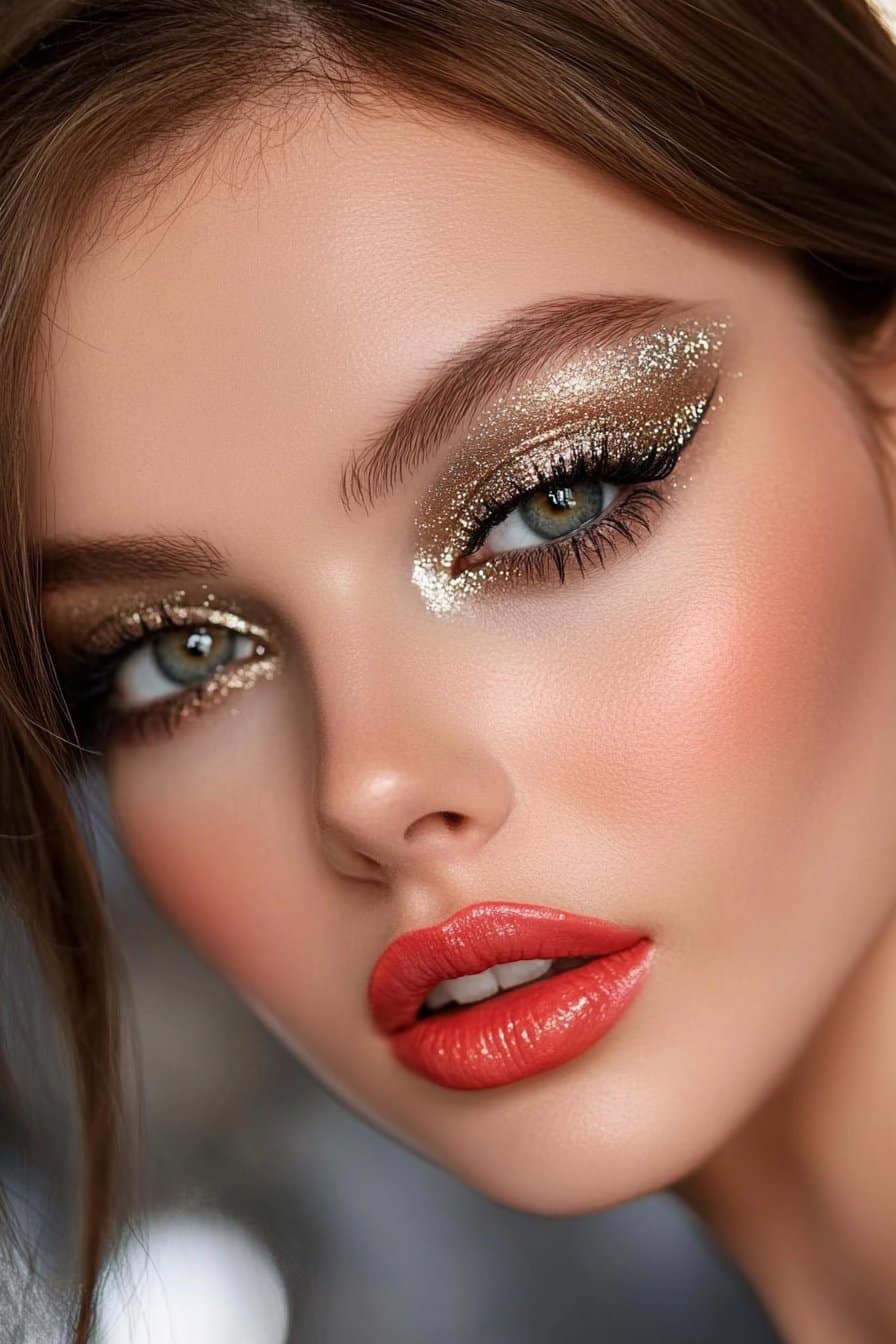
Glitter Eyes Fantasy

My signature style of creating fantasy glitter eye looks emerged after a breakthrough moment at Paris Couture Week. I transformed models’ eyes into mesmerizing constellations of light. My work with clients in a variety of settings has helped me perfect techniques that make glitter wearable for any occasion.
Product List
Quality adhesives are the foundation of stunning glitter eyes. A lid primer prevents creasing. Here are the essentials you’ll need:
- Glitter glue or DUO eyelash adhesive
- Fine powder glitter for subtle effects
- Microporous tape for cleanup
- Dense synthetic brushes for application
Application Steps
The process starts with prepping eyelids using primer, followed by a creamy eyeshadow base for fine glitter looks. Coarse glitter applications need glitter primer or glue before the main product. The most significant step involves applying glitter over the adhesive while blinking vigorously to release excess product.
Dimension comes from focusing glitter application on the center of the lids. I found that there was a way to prevent transfer on hooded eyes by avoiding the crease line. Liquid glitter products with built-in applicators work best for precise placement.
Glitter Tips
My runway experience taught me that translucent powder under the eyes prevents fallout. Microporous tape works better than wet wipes for cleanup, as wipes only spread the glitter around. Setting spray helps with longevity when each layer dries completely.
Note that quality matters – cosmetic-grade glitter is the only safe choice for eyes, not craft varieties. A subtle yet effective look comes from adding glitter to the eye’s inner corner or as a center lid accent. This technique opens up the eyes naturally.
Natural Earth Tones
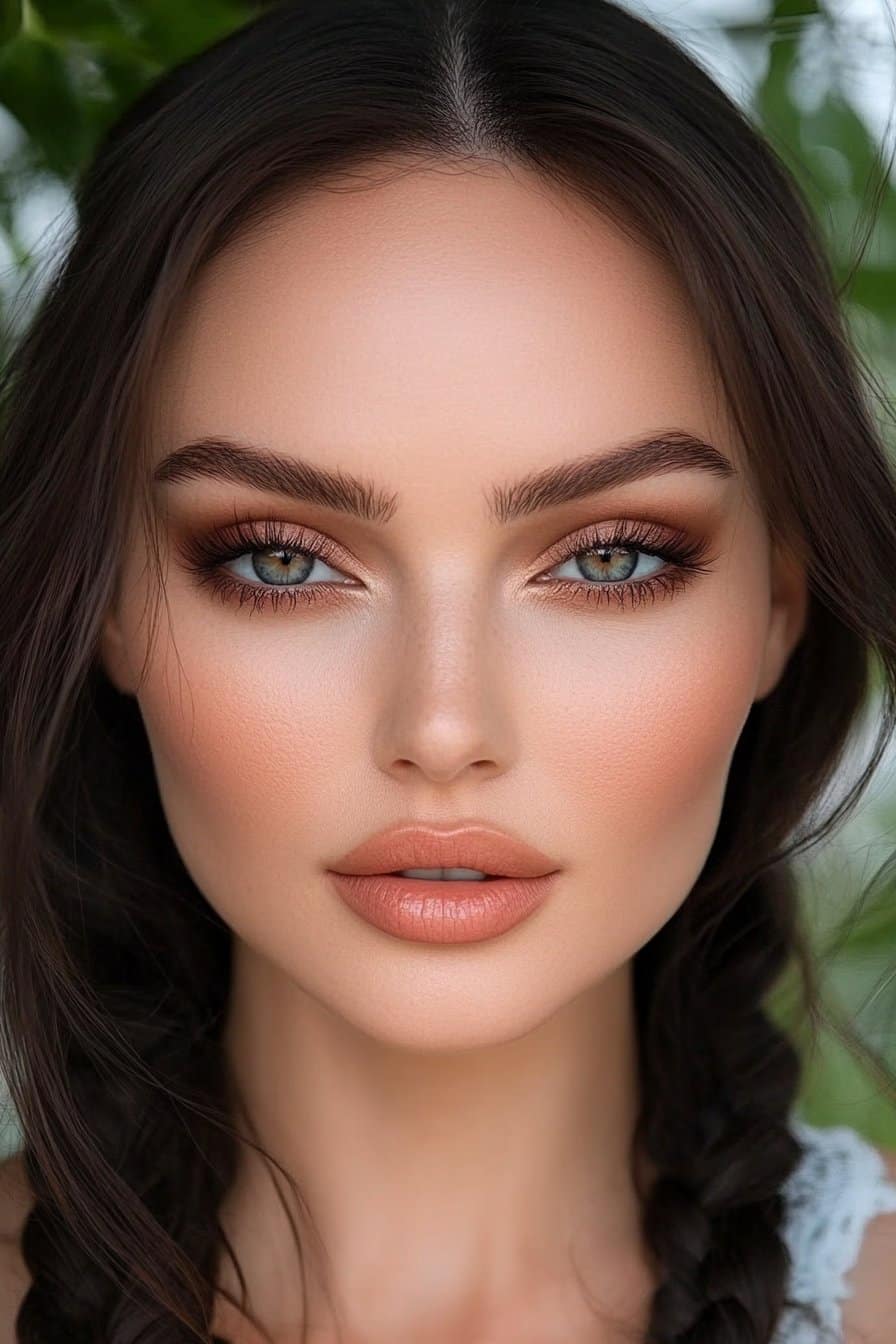
My trip to Savannah sparked my passion for earth tone makeup when nature’s colors inspired my artistic journey. I’ve created looks for clients of all types and found that earth tones are versatile yet maintain a grounded, authentic appeal.
Product Selection
You need products with brown pigments to create natural earth tone looks. Start with an eyeshadow palette that has shades like tumbleweed matte, hazelwood metallic, and amber brown. Here are other must-have items:
- A silky-smooth textured foundation
- Powder blush in warm, orange-toned shades
- Velvet-finish lipsticks in neutral hues
Application Method
Good skin preparation sets the foundation for earth tone makeup. A lightweight foundation creates an even canvas. I start eye makeup with a soft base shade and build depth with warmer browns and terracottas.
The magic happens with smart color placement. Deeper shades go along the lash line while lighter tones stay on the mobile lid. Brown-toned blush should be applied from the eye’s corner to the cheekbone to create a natural shadow effect.
Natural Tips
Earth tones complement all skin tones beautifully when chosen correctly. Fair-skinned people look most natural in lighter shades like beige or sand. Medium to deeper skin tones shine with richer chocolate and coffee hues that add subtle dimension.
Mix textures to add sophistication by combining matte eyeshadows with subtle shimmer finishes. Note that earth tone makeup enhances your natural features while adding warmth and definition to your look.
Metallic Future Eyes
Space NK’s exclusive launch event sparked my passion for metallic eye makeup. I found that there was a way to turn everyday looks into stunning artistic statements with futuristic metallics. Working with clients of all types has helped me become skilled at techniques that make metallic eyes both wearable and striking.
Required Products
You’ll need quality eyeshadow primer to create captivating metallic eyes. Here’s what I suggest:
- Metallic Berry Nudes Mini Kit to achieve subtle looks
- Rose Metals Palette that creates bold futuristic effects
- Multi-use Hy-Power Pigment Paint to ensure versatile application
- Setting spray to make it last
Application Guide
Metallic eye makeup works best with strategic layering. Start by priming your eyelids with eyeshadow primer or concealer and blend it really well with your fingertips. The metallic eyeshadow goes on best with fingers, especially when you focus on the lid’s center.
A pop of gold eyeshadow creates beautiful dimension that works on all skin tones. To create graphic effects, clean edges and define shapes with a pointed cotton swab dipped in micellar water.
Metallic Tips
Years of experience have taught me that metallics go beyond bronze, silver, and gold. ‘Metallic’ in makeup simply means lustrous, which opens up endless creative color combinations. Your metallic shadows will shine more intensely when applied with damp brushes.
Note that futuristic metallics help you make a statement, whatever the occasion. Try different finishes – maybe even combine matte bases with metallic accents. This approach adds depth while keeping things sophisticated.
Classic Hollywood Glam
My red carpet experience with A-list celebrities has shown me that classic Hollywood glamor never loses its appeal. I’ve become skilled at creating timeless looks for award ceremonies and can now make this sophisticated style available to everyone.
Essential Items
You just need these core products to achieve authentic Hollywood glamor. I start with skincare prep using a hydrating serum and eye cream. Here’s what you’ll want:
- Full-coverage foundation with Hollywood Flawless Filter
- Magic Vanish color corrector for dark circles
- Matte red lipstick with matching liner
- Liquid eyeliner for precise wings
- Highlighting powder for strategic glow
Application Steps
The process begins with skin prep using moisturizer, followed by a primer with SPF50 that creates a camera-ready finish. The secret lies in mixing foundation with a glow booster to create a luminous yet flawless base. You’ll get that characteristic lifted effect by applying concealer under eyes and around the nose, then blending upward with a tapered brush.
The eyes need subtle dimension using neutral shades, with focus on the crease area. I define brows softly to keep them wispy and elegant while adding subtle definition. A signature red lip requires precision – start with sharp lip liner, slightly overdrawing to create that classic Hollywood pout.
Glamor Tips
Years of experience have taught me that playing with light creates that coveted Hollywood radiance. Your cheekbones can rival silver screen stars when you apply highlighter on the face’s high points. The makeup stays flawless throughout events when set with a brightening powder, especially under eyes and along smile lines.
Note that classic Hollywood glamor celebrates timeless beauty while keeping sophistication intact. I tell my celebrity clients to focus on creating depth while preserving elegance – this look surpasses trends and occasions.
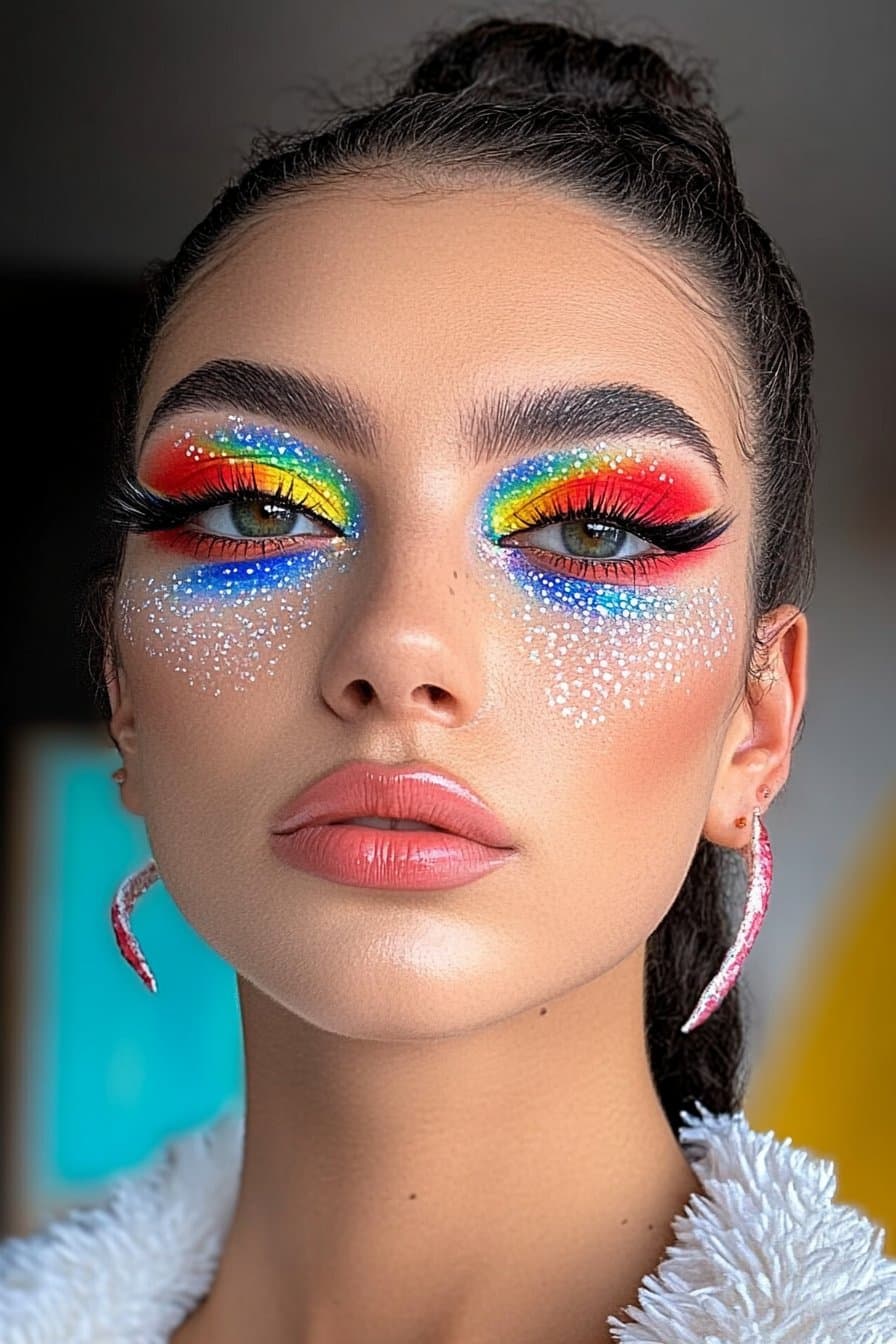
Festival Rainbow Art

My love for festival rainbow makeup started at Coachella. The vibrant colors and artistic expression blend perfectly to create unforgettable looks. Years of festival seasons have taught me techniques that make rainbow artistry both striking and long-lasting.
Product List
A white base makes colors pop when creating festival rainbow looks. These essentials create the perfect foundation:
- A tacky eyeshadow primer for color intensity
- Rainbow series eyeshadow palette with multiple finishes
- Setting spray for extended wear
- Precision brushes for detailed work
Application Guide
Rainbow festival makeup needs strategic color placement. Clean and moisturize your skin really well before applying primer. The signature rainbow effect starts with red at the inner corner and blends outward through orange, yellow, green, blue, and purple in uninterrupted transitions.
Success comes from blending each shade individually before they meet. Short, connecting strokes work better than continuous lines. Shimmery highlights add dimension when applied strategically in the inner corners and under the brow bone.
Festival Tips
Experience has taught me that primer application is vital for longevity. Face jewels or biodegradable glitter can boost the rainbow effect and give it a modern twist.
A small touch-up kit with setting spray helps maintain professional results throughout the day. Beginners should start with softer pastels before moving to vivid neons. Note that festival makeup celebrates both artistry and durability – create looks that last from sunrise to sunset while you dance.
Emerald Smoke Eyes
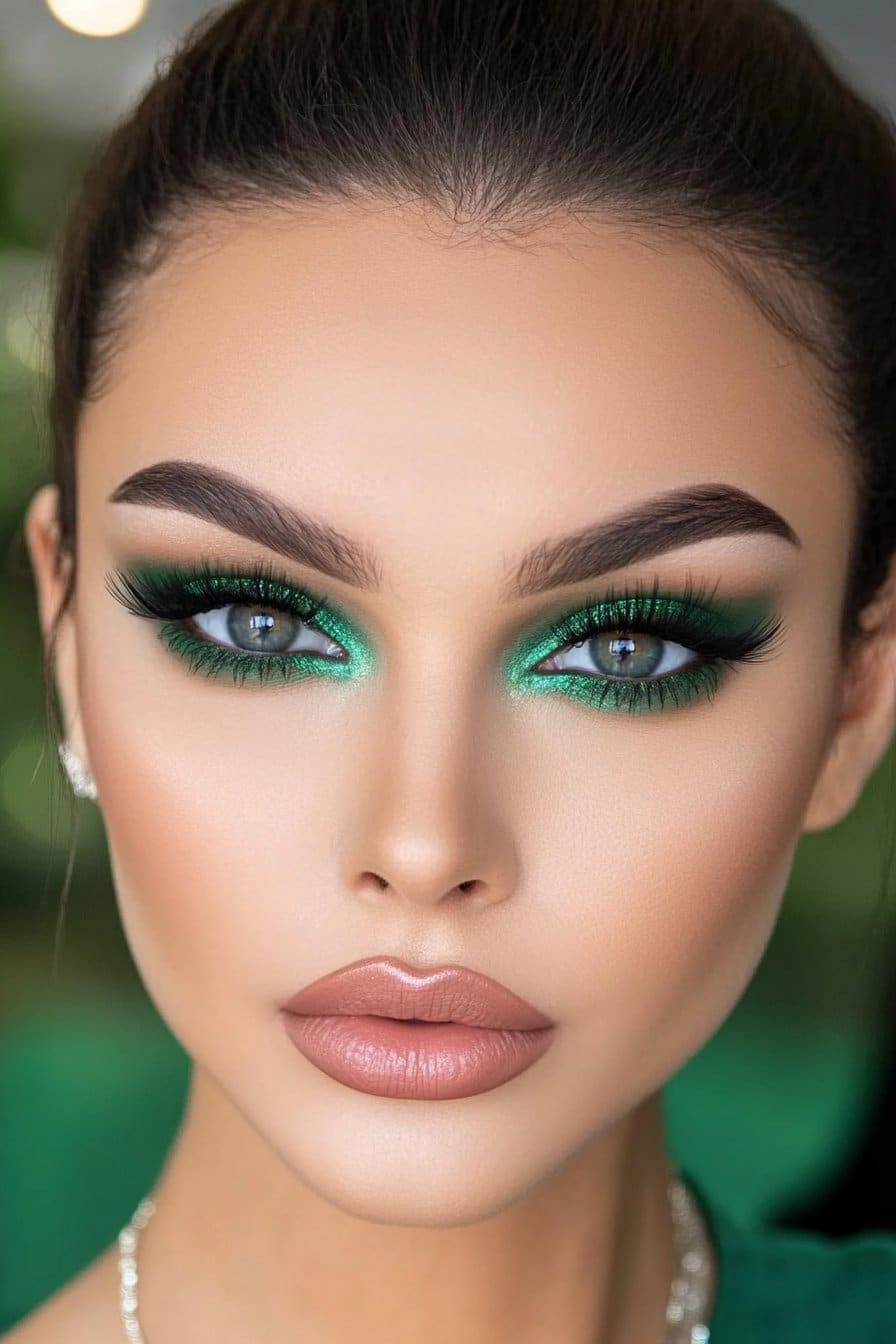
I mastered emerald smokey eyes during an unforgettable editorial shoot. The model’s gaze was stunning with rich, forest-green hues. Years of red carpet events helped me perfect this look into something both dramatic and wearable.
Product Selection
A quality eyeshadow primer is crucial to create authentic emerald smokey eyes. You’ll need these items:
- An emerald green eyeshadow palette with multiple finishes
- Black gel eyeliner for intensity base
- Cream shadow or pencil base in neutral shade
- Setting spray for extended wear
Application Method
The perfect emerald smokey eye needs strategic layering. Start by prepping the lids with primer and add a cream shadow base. The black gel liner should go close to the lash line and extend past outer corners.
The magic happens in the blending process. Rich brown eyeshadow goes along the top edge of liner before it sets. Layer emerald green shadow from inner corners through the center. A champagne shimmer under the brow bone adds dimension.
Smoky Tips
My years of experience show that tight-lining the inside rims creates extra darkness. Loose powders give you better blending control. The emerald shadow becomes more vibrant when applied with dampened brushes over a black base.
A modern approach uses warm brown tones blended into the emerald for a gradient effect. Note that the darkest line along the lash line naturally draws attention to the eyes.
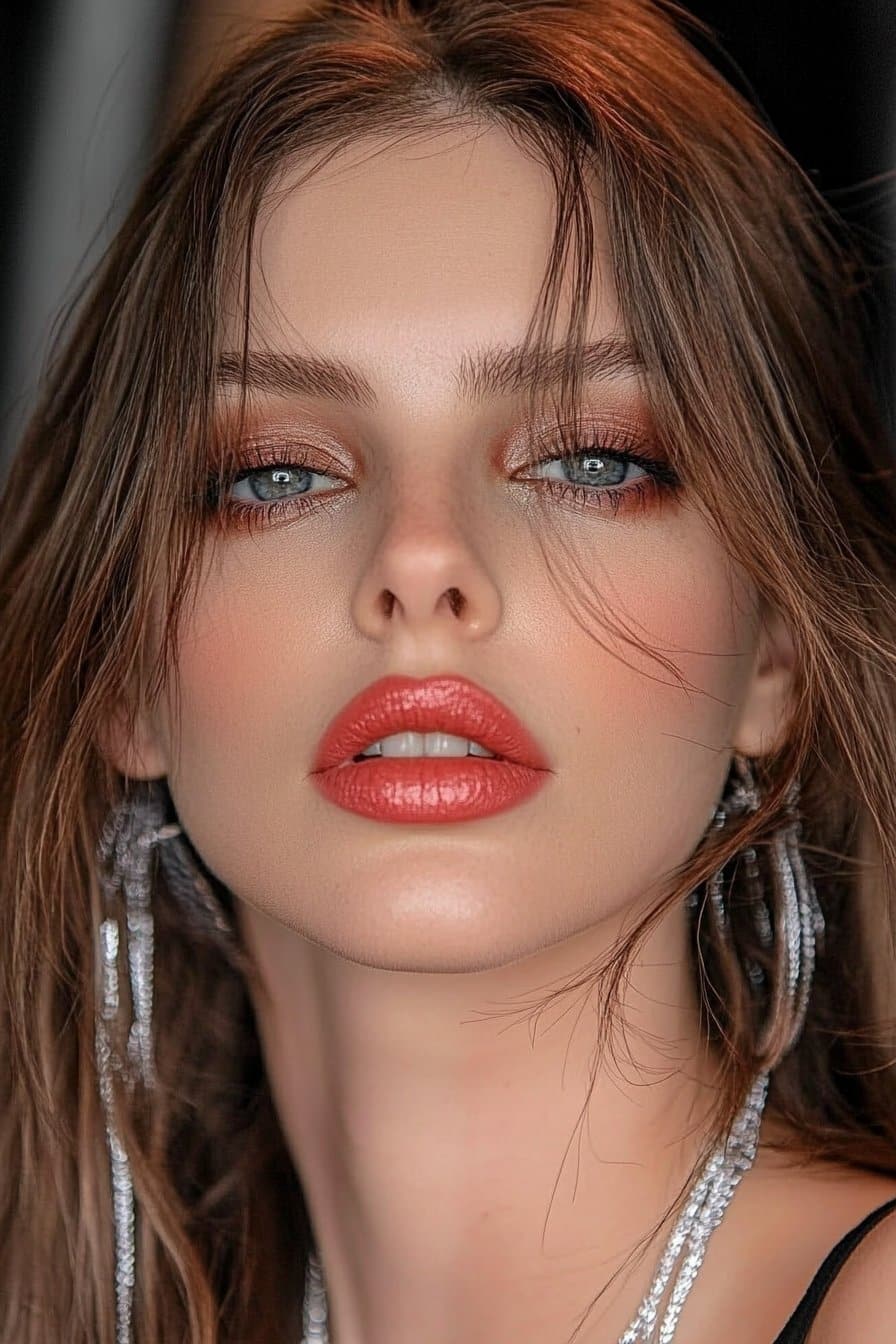
Peachy Glow Beauty
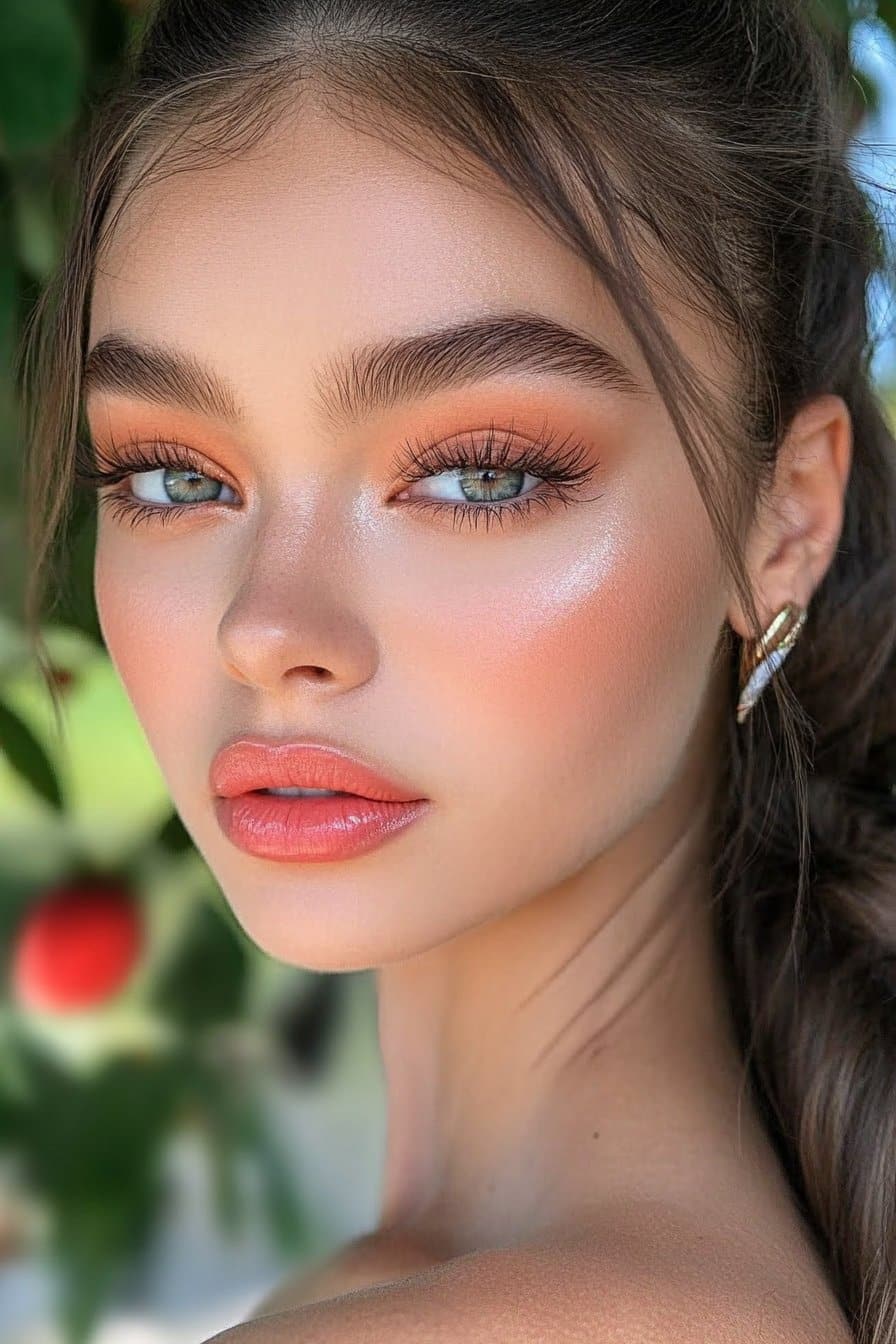
My work with celebrity clients in Los Angeles has found that there was something amazing – peach makeup creates an instant brightening effect that works beautifully on every skin tone. This flattering trend keeps gaining popularity for both daytime and evening looks.
Essential Products
You’ll need these core items to create a flawless peach makeup look:
- A dewy foundation or skin tint that gives natural radiance
- Peach-toned blush for a healthy flush
- Complementary eyeshadow palette with varying peach hues
- Peach-tinted lip products that tie everything together
- Setting spray that locks your look in place
Application Steps
Great peach makeup starts with proper skin preparation. The process begins with a hydrating primer and a lightweight foundation. The characteristic glow comes from a brightening concealer one shade lighter than your skin tone, especially when you have dark areas under eyes and around the nose.
The peach blush goes on the apples of your cheeks and blends upward toward the temples. Your eyes need depth from different peach tones – lighter shades on the lid that build intensity with darker hues in the crease. The same peach blush works great on eyelids to create a cohesive look.
Peach Tips
My unique experience shows that peach makeup needs careful color selection based on your skin tone. Night-time looks benefit from gel eyeliner that creates a soft, smudged effect. A golden highlighter on your face’s high points adds sophistication.
A light dusting of translucent powder on the T-zone keeps everything in place. Your lips need a sharp lip liner first, then either a matte peach lipstick or hydrating lip balm depending on the finish you want.
Bold Lip Minimal Eyes
I found something interesting at a recent Off-White runway show – minimal eye makeup paired with bold lips creates the most striking indie makeup looks. This combination has become a favorite among my celebrity clients who want to make a statement while keeping it sophisticated.
Product Choices
You just need these items to create effective bold lip looks. We started with a lip scrub and moisturizing balm. The right lip color should complement your skin tone – even a red has different undertones that can make you look like a complete diva or clash with your features. Here’s what you’ll need:
- A brownish nude lip liner for priming
- Bold lipstick in your chosen shade
- Translucent setting powder
- Minimal eye products (mascara and concealer)
Application Guide
I start by prepping lips with exfoliation using a lip scrub or soft toothbrush. The secret lies in precise application – I line lips with a pencil one shade darker than the chosen color. A lip brush helps apply lipstick perfectly into all grooves and lines.
The eyes should stay subtle yet defined. Years of experience taught me that concealer mixed with moisturizer creates the perfect natural base. I apply mascara only to the top-outer corners of lashes for subtle drama.
Bold Lip Tips
A light dusting of translucent setting powder over lips after application works wonders. You can add shimmer or gloss to the center of your bottom lip for a plumping effect. The look stays intact when you brush brows upward with gel and fill them slightly if needed.
Note that bold lips need confidence – they’re not just about looking different, but about standing out and getting noticed. My work with clients in a variety of settings shows this look works beautifully for both daytime events and evening occasions.
Under-Eye Blush Trend
My latest find at New York Fashion Week changed how I do under-eye makeup. After trying different color combinations, I found that under-eye blush creates an unexpectedly fresh, brightening effect that works on all skin tones.
Required Items
You’ll need cream or liquid blush formulations to create this innovative look. My runway experience shows these products are the foundations of a perfect application:
- A buildable, blendable cream blush
- Your regular concealer
- Small blending brush
- Setting powder to make it last
Application Steps
This technique needs strategic product layering. Start by applying two small dots of blush under each eye. Orange or coral shades work best for color correction on medium to deep skin tones. You need to blend quickly since cream products dry fast.
Layer concealer directly on top after the blush. A lightweight formula works best to avoid heavy layers under the eyes. Use gentle circular motions with a small brush to blend seamlessly and create a natural transition between under-eye and cheek areas.
Blush Tips
My work with celebrity clients has taught me that using less product gives better results. Pink setting powder makes a great final step to boost brightness. This method is especially effective when you have dark circles – reddish tones neutralize blue-gray discoloration naturally.
Note that choosing shades that match your undertone makes all the difference – warm skin tones look great with peach hues, while cool undertones pop with rose-tinted products. This technique gives you a fresh-faced, youthful look that’s perfect for everyday wear and special occasions.
Indie Sleaze Revival
The indie sleaze makeup trend has made a comeback. I’ve seen it firsthand backstage at New York’s most iconic underground venues. This style celebrates imperfection and raw creativity. The trend that ruled from 2006-2012 now returns with a modern twist that balances rebellion and sophistication.
Product List
These products are the foundations for creating authentic indie sleaze looks:
- A creamy black pencil eyeliner with 36-hour staying power
- Glitter eyeliner in silver or iridescent shades
- Matte red lipstick with hyaluronic acid
- Lip and cheek tint to create subtle flush
Application Method
The process starts with black liner traced around the eyes to create that signature lived-in effect. Next, the liner gets smudged outward with fingers or a brush to form a dark, smoky halo. This makeup style thrives on messiness – the more worn-in it looks, the better.
Sleaze Tips
The right product selection is vital despite this trend’s relaxed nature. The focus should be on eye makeup while keeping the rest of the face minimal. You can play with different textures by combining matte lipstick with glossy eyes.
Creating depth without looking too polished makes this style work. Skip undereye concealer unless you want maximum drama. Silver glitter trails down the cheeks or temporary colored hair streaks can add extra flair to special occasions.
Glossy Lid Creation
My work with editorial shoots has shown me that glossy lid creation stands out as one of the most striking indie makeup looks. This wet-look technique has grown from runway experiments into wearable everyday art.
Essential Products
You need an eye primer to prevent creasing when creating perfect glossy lids. Pick a high-quality eye gloss made specifically for lids – stay away from lip glosses as they’re too sticky. My experience shows these items are the foundations of a perfect look:
- A water-based primer for smooth application
- Face or eye gloss (never lip gloss)
- Dense synthetic brush for precise application
- Setting spray for extended wear
Application Guide
Glossy lids need strategic layering. The process starts with priming your eyelids using an eyeshadow base. You’ll get the best effect by applying nude eyeshadow that matches your lid color into the crease before adding any gloss. Years of practice taught me to use small patting motions with a flat synthetic brush when applying gloss. Keep away from the lash line to stop product migration.
Gloss Tips
Photo shoots have taught me that glossy lids look best when you stay away from the lash line. Your mascara should be minimal or skip it completely, as gloss can make it flake. The look lasts longer when you use face gloss or eye gloss made specifically for lids.
Note that glossy lids won’t last all day – they shine in photoshoots or special events. If you want to wear this look daily, focus the gloss on the center of your lid. This cuts down on creasing while keeping that editorial effect.
Abstract Face Design
My creative trip with abstract face designs started at an avant-garde exhibition in Paris. I found how makeup could surpass traditional boundaries and become wearable art. Creating countless editorial looks helped me develop techniques that make abstract face designs both striking and achievable.
Required Tools
We started with high-quality, precision tools to create abstract face designs. Here are the essential items you’ll need:
- A white base or eyeshadow primer for clean lines
- Precision-tip liquid liners in multiple colors
- Small detail brushes for intricate work
- Setting spray for extended wear
- Micellar water for cleanup
Application Steps
My extensive runway experience taught me that abstract face design needs strategic planning. The skin needs proper priming to create a smooth canvas. Simple shapes like semicircles or curved lines establish the foundation of the design and create maximum effect.
Building layers gradually is crucial. My work at fashion shows showed me that simple shapes interacting with each other create the most striking effects. Each section needs time to dry completely before adding adjacent details.
Abstract Tips
Lighter colors should go on before adding darker elements for professional results. Abstract face design celebrates creative expression – there are no wrong answers. Working with a variety of clients taught me that personal elements make each design unique.
Taking photos of your work from multiple angles helps maintain the look’s integrity. Note that abstract face design isn’t about perfection – it creates visual interest through unexpected combinations of shapes, lines, and colors.
Conclusion
My years of creating celebrity looks and teaching aspiring artists have shown indie makeup’s evolution from underground experimentation to mainstream artistry. These 25 looks go beyond trends and showcase makeup’s ability to transform and express individuality.
Moving from Savannah to Los Angeles taught me that stunning makeup doesn’t need expensive products or professional training. Of course, proper technique matters, but creativity and confidence create the real difference. These looks adapt to your unique style and skill level, whether you prefer ethereal glows or bold graphic liners.
I’ve developed each technique through hands-on experience with clients in a variety of runway shows. The secret is to start simple and build complexity as your confidence grows. Some days need glossy lids and abstract designs, while others call for natural earth tones or classic Hollywood glamor.
Indie makeup celebrates personal expression while keeping sophistication intact. These looks demonstrate that artistic makeup can be both striking and wearable. Makeup isn’t about perfection – it gives you the ability to express yourself authentically.
Try these looks, adapt them to your style, and enjoy creating your unique beauty statement. That’s what indie makeup truly represents – breaking rules and making them your own.