
Rainbow nails have completely taken over my Instagram feed this year, and honestly, I couldn’t be happier about it! As a makeup artist who’s always searching for new ways to express creativity, I’ve fallen in love with this vibrant trend that’s brightening up 2024.
With over 900 Pinterest pins dedicated to rainbow nail ideas and more than 1,200 stock photos showcasing these colorful designs, it’s clear I’m not alone in my obsession. The beauty of rainbow nail designs is their versatility – from simple skittle nails that alternate between all colors to more intricate ombre patterns that are especially popular during Pride month. What I particularly love about rainbow nail design is how it instantly boosts your mood and self-expression. In fact, some of my clients tell me their rainbow nails make them smile every time they glance down at their hands!
If you’ve been admiring these colorful creations but thought they were too complicated to try at home, I’ve got good news for you. With just a few basic tools like nail art brushes and dotting tools, you can actually create stunning rainbow nail designs right in your own bathroom. Whether you’re a complete beginner looking for simple rainbow nails or someone ready to take on more detailed work, I’ve gathered 17 doable designs that will help you bring this joyful trend to life.
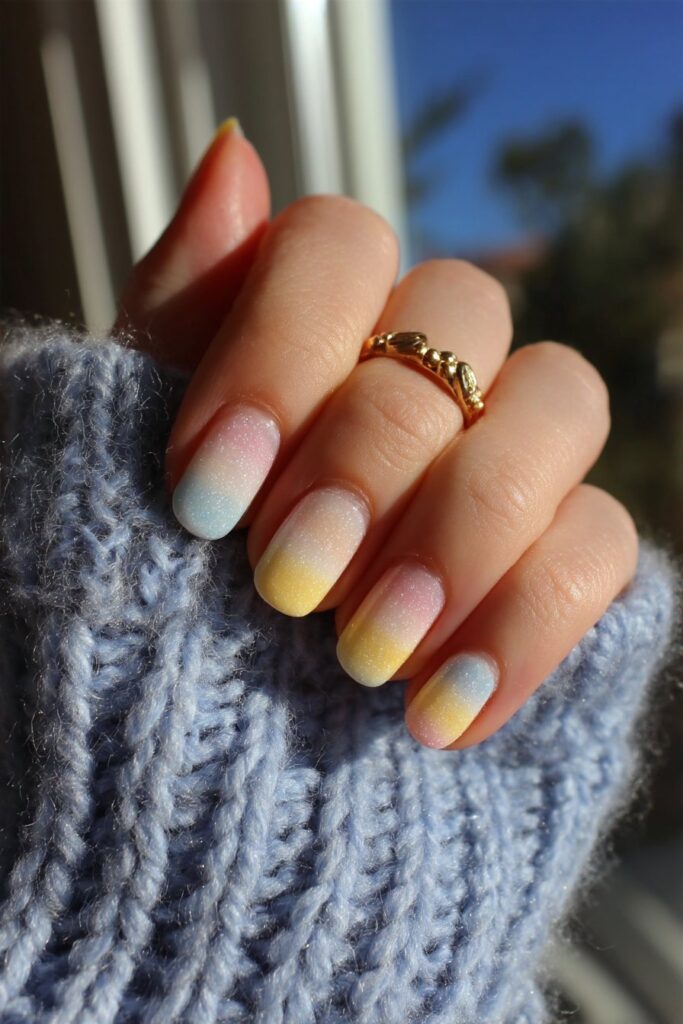
Pastel Rainbow French Tips
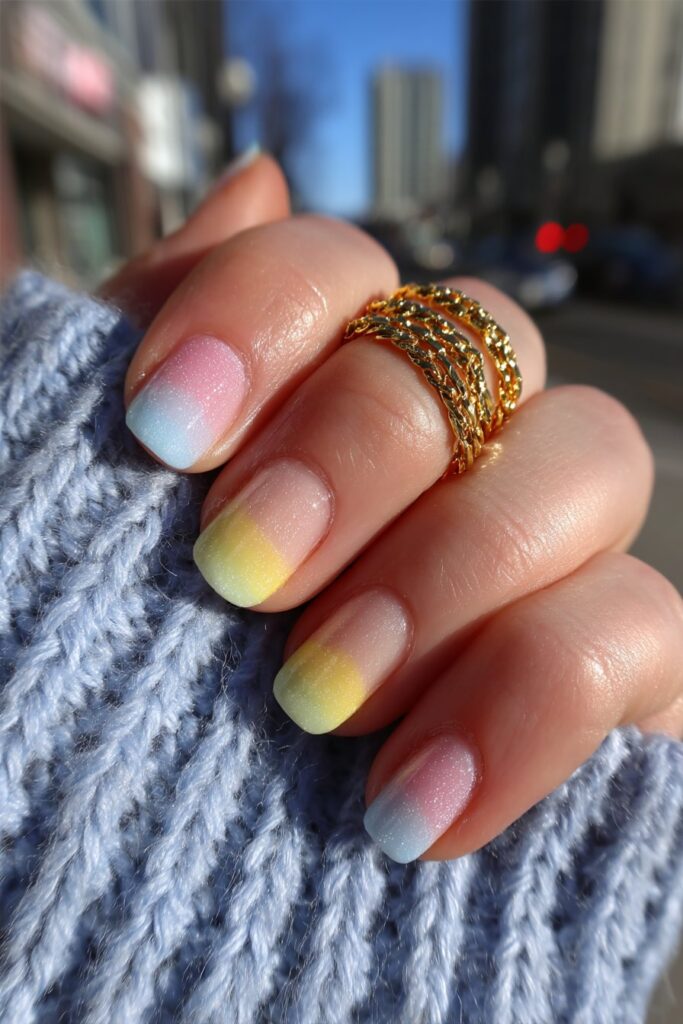
Pastel Rainbow French Tips have stolen my heart this season! As someone who’s created countless nail looks over the years, I’ve noticed these colorful tips consistently bring smiles to my clients’ faces.
Design description of Pastel Rainbow French Tips
Pastel Rainbow French Tips offer a cheerful twist on the classic French manicure. Instead of traditional white tips, this design features a beautiful array of soft pastel colors—typically light pink, yellow, green, blue, and purple—applied to the tips of your nails while keeping the nail bed natural or with a subtle nude base. The colors create a continuous rainbow effect across your fingertips, with each shade blending harmoniously into the next. When I create this look in my studio, I often arrange the colors in traditional rainbow order or sometimes create a waterfall effect where the colors cascade across the tip.
Why Pastel Rainbow French Tips work
These dreamy tips work wonderfully because they combine timeless elegance with playful color. Unlike bold rainbow designs, the pastel version remains subtle enough for any occasion while still making a statement. Moreover, the nude base makes them remarkably versatile—they’ll complement virtually any outfit in your wardrobe! I’ve had clients wear these to professional meetings and weekend brunches alike. Additionally, the design flatters all nail shapes and lengths, making it accessible to everyone.
How to DIY Pastel Rainbow French Tips
Ready to create this look at home? Here’s my professional approach:
- Gather your supplies:
- Base coat
- Clear or nude polish for nail beds
- Pastel polishes (pink, yellow, green, blue, purple)
- Thin detail brush or striping brush
- Top coat
- Optional: plastic lid for mixing colors
- Prep and base: Start with clean, dry nails and apply your base coat. Once dry, apply a clear or nude polish to your nail beds.
- Create your tips: Using your thin brush, begin with the middle color (often green) and work outward. Apply each color in small strokes, joining them together for a waterfall effect. For beginners, placing a piece of tape as a guide can help achieve a clean line.
- Perfect and seal: Clean up any mistakes with a brush dipped in polish remover. Finally, seal your rainbow nail design with a good quality top coat to ensure longevity and shine.
While this technique takes practice, I find most of my clients can master it after a few attempts—so don’t get discouraged if your first try isn’t perfect!
Skittle Pastel Rainbow Nails

For nail art beginners who love color, Skittle Pastel Rainbow Nails have become my go-to recommendation in my Los Angeles studio. Unlike other complex designs, this playful manicure requires minimal technical skill yet delivers maximum impact.
Design description of Skittle Pastel Rainbow Nails
Skittle nails showcase a different color on each finger, creating a rainbow effect across your hand. The pastel version uses softer, more subdued hues rather than bold primary colors. What makes this design special is its flexibility—you can arrange colors in traditional rainbow order or mix them however you prefer. As I explain to my clients from Georgia to California, this style works with any combination of pastels: pinks, yellows, mint greens, light blues, and lavenders. Furthermore, you can customize with various finishes, from creamy solid colors to subtle shimmer.
Why Skittle Pastel Rainbow Nails work
After years of creating nail art for countless clients, I’ve discovered why this design remains popular. First, as a simpler alternative to intricate rainbow patterns, skittle nails require no special tools or advanced techniques. Second, they offer remarkable versatility—they complement virtually any outfit without clashing. Above all, these nails provide a mood-boosting splash of color that’s understated enough for professional settings yet fun enough for weekends.
My clients often tell me their pastel skittle manicures remind them of nostalgic candy colors and well-worn tie-dyes, evoking feelings of carefree summer days.
How to DIY Skittle Pastel Rainbow Nails
As a beauty educator who believes in accessible nail art, here’s my foolproof method:
- Gather supplies: Base coat, 5-10 pastel polishes in your favorite rainbow hues, top coat
- Prep nails: File, push back cuticles, and apply base coat
- Apply colors: Paint each nail with a different pastel shade (2 coats for opacity)
- Consider variations:
- Stay within one color family for a more cohesive look
- Try alternating finishes (matte and glossy) for dimension
- For beginners, pastels are more forgiving than bright neons
- Seal your work: Apply a quality top coat—glossy for vibrance or matte for a modern twist
Even my most nervous clients master this design on their first try! Remember, uneven application is easily fixed with a second coat, making this perfect for those new to at-home manicures.
Minimalist Pastel Rainbow Nails
My clients seeking elegance with a touch of whimsy often gravitate toward Minimalist Pastel Rainbow Nails. Despite their simplicity, these designs make a sophisticated statement without overwhelming your overall look.
Design description of Minimalist Pastel Rainbow Nails
Minimalist Pastel Rainbow Nails embrace color while maintaining clean, understated esthetics. The beauty lies in their restraint—typically featuring thin horizontal or vertical stripes across an otherwise nude nail, modified French tips with rainbow colors, or small colorful dots arranged along the base or tip. What makes these designs special is the negative space, allowing the natural nail to remain visible. Some of my favorite variations include diagonal color placement that creates visual interest or focusing the rainbow elements on a single accent nail while keeping other nails in complementary solid colors.
Why Minimalist Pastel Rainbow Nails work
These subtle designs work wonderfully even for those hesitant about vibrant nail art. First, they’re remarkably versatile, proving perfect for professional settings where personality meets propriety. Additionally, the nude base creates harmony with virtually any outfit choice. Throughout my years at my Los Angeles studio, I’ve noticed clients who select minimalist rainbow designs often receive more compliments than those with bolder patterns—there’s something captivating about restraint. Although flashy designs have their place, sometimes subtlety truly makes a stronger statement.
How to DIY Minimalist Pastel Rainbow Nails
Creating these sophisticated nails at home is surprisingly achievable:
- Start with preparation: Apply a quality base coat on clean, shaped nails
- Choose your technique: For beginners, I recommend the single stripe method—it’s forgiving yet effective
- Execute with precision: For stripes, use thin nail art brushes or striping tape to create clean lines; for dots, a dotting tool ensures perfect circles
- Select complementary pastels: Soft hues like mint green, baby blue, and lavender create that dreamy feel
- Seal properly: Finish with a fast-drying top coat to smooth any uneven surfaces
Despite working with celebrities heading to important events, I still consider these minimalist designs among my favorites for everyday elegance. Their subtle beauty consistently brings joy without overwhelming your overall esthetic.
Maximalist Pastel Rainbow Swirls

If you’re ready to embrace bold self-expression, Maximalist Pastel Rainbow Swirls might just be your perfect match! These vibrant creations have become a staple in my nail art toolbox for clients who want to make a statement without holding back.
Design description of Maximalist Pastel Rainbow Swirls
Maximalist Pastel Rainbow Swirls are unabashedly joyful nail designs that feature bright pastel colors arranged in groovy, retro-inspired swirl patterns. Identically to abstract art, each nail becomes a tiny canvas with swooping lines of color that dance and intertwine. The design involves layered pastel hues—think soft pinks, oranges, yellows, greens, blues, and purples—creating a psychedelic effect that reminds me of the dreamy tie-dye patterns from my childhood. What makes this design stand out is how the colors blend where they meet, creating a seamless flow across each nail. Consequently, no two nails look exactly alike, giving each manicure a unique, one-of-a-kind quality.
Why Maximalist Pastel Rainbow Swirls work
These vibrant designs work wonderfully as the ultimate mood booster! Last month, I had a client come in feeling quite down after a difficult week. Forthwith after applying these rainbow swirls, her entire demeanor changed—she couldn’t stop smiling every time she glanced at her hands. The playful patterns simply radiate positive energy. Prior to embracing bolder designs, many clients worry about pulling off vibrant nail art, but these swirls are surprisingly versatile despite their maximalist approach. Simultaneously eye-catching and harmonious, the pastel color palette softens what might otherwise be overwhelming, making these nails appropriate for both casual settings and special occasions.
How to DIY Maximalist Pastel Rainbow Swirls
Creating this psychedelic look at home is easier than you might think:
- Prep your canvas – Apply a milky white or nude base coat and let it fully dry.
- Create your swirls – Place a small dot of your first pastel color (I recommend starting with pink), then use a thin art brush to pull it upward in a curved motion.
- Build your rainbow – Continue with orange, yellow, green, blue, and purple, placing dots near each other but not touching.
- Flash cure between colors – If using gel polish, cure for 10 seconds between colors to prevent bleeding.
- Add definition – Once your swirls are complete, use a tiny amount of black polish on a clean thin brush to draw extremely thin lines along some swirl edges for definition.
- Seal your masterpiece – Apply a generous layer of top coat to smooth any uneven surfaces.
Remember not to overthink your swirls—in my experience, the less you plan each stroke, the more natural and beautiful your rainbow nail design will appear!
Diagonal Pastel Rainbow Tips
Diagonal pastel rainbow tips have currently become one of my most requested designs in the studio! Their unique geometric placement offers a fresh spin on traditional rainbow nails that both my trendy teens and sophisticated adults adore.
Design description of Diagonal Pastel Rainbow Tips
Diagonal Pastel Rainbow Tips feature a stunning arrangement where colors flow at an angle rather than across the traditional nail tip. Think of these as geometric Pride flags for your fingertips! What makes this design stand out is how the pastel colors—typically reds, oranges, yellows, greens, blues, and purples—create a cascading effect starting from one corner of your nail and sweeping diagonally upward to the opposite side. Throughout my years doing celebrity manicures, I’ve found the diagonal placement creates visual interest that regular horizontal rainbows simply can’t match. The angled perspective draws the eye along the nail, creating an illusion of length that’s particularly flattering on shorter nails.
Why Diagonal Pastel Rainbow Tips work
After creating countless rainbow nail designs, I’ve discovered why diagonal tips remain a favorite among my clients. Notably, they match any Spring or Summer outfit since they incorporate a full rainbow spectrum. Even more impressive, these diagonal lines create an elongating effect on fingers, making them appear slimmer and more elegant. For clients who find traditional rainbow designs overwhelming, this geometric approach offers a structured yet playful alternative. Whenever a client asks for something “unique but wearable,” this is often my first suggestion—the diagonal placement feels modern without being outlandish.
How to DIY Diagonal Pastel Rainbow Tips
Creating this eye-catching look at home is easier than it appears:
- Start with prep – Apply a neutral or clear base coat and cure if using gel
- Set up your workspace – Arrange your pastel polishes and have a fan brush or small detail brush ready
- Create your diagonal base – Apply another clear coat but don’t cure if using gel
- Apply your rainbow – Starting at one corner (I typically begin at the base), use your brush to tap on your first color (red works well), then continue with each color diagonally across your nail
- Clean between colors – Wipe excess glitter on a paper towel before moving to the next shade
- Seal and protect – Once complete, cure and apply a top coat for lasting shine
Remember to work quickly if using regular polish as the base will dry. For best results, I recommend starting with red at the nail base, then moving through orange, yellow, green, blue, and purple as you work diagonally upward.
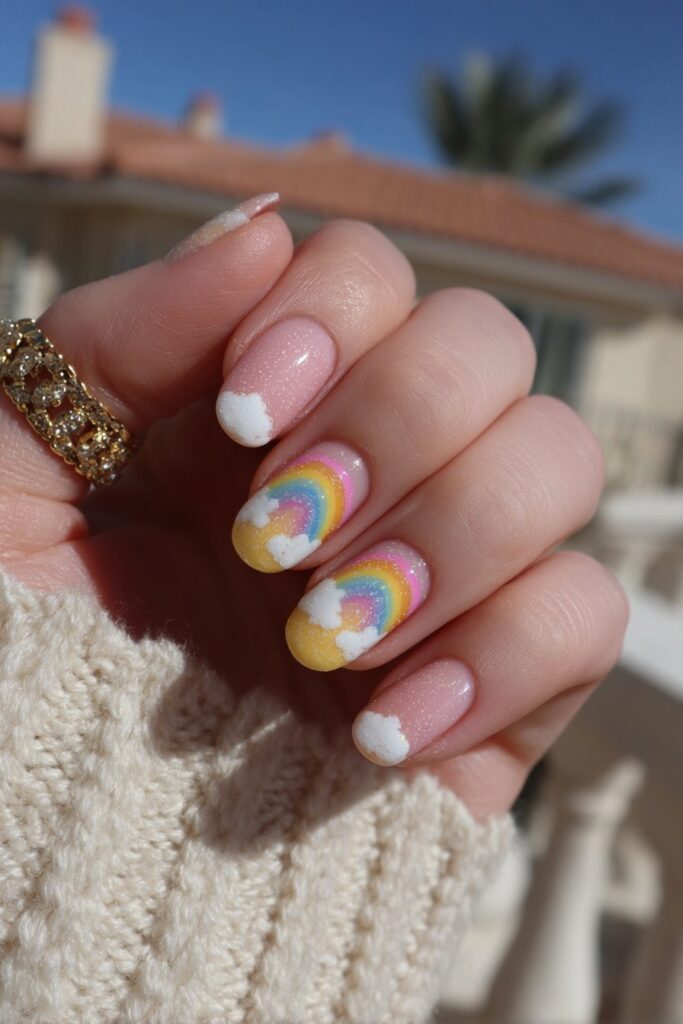
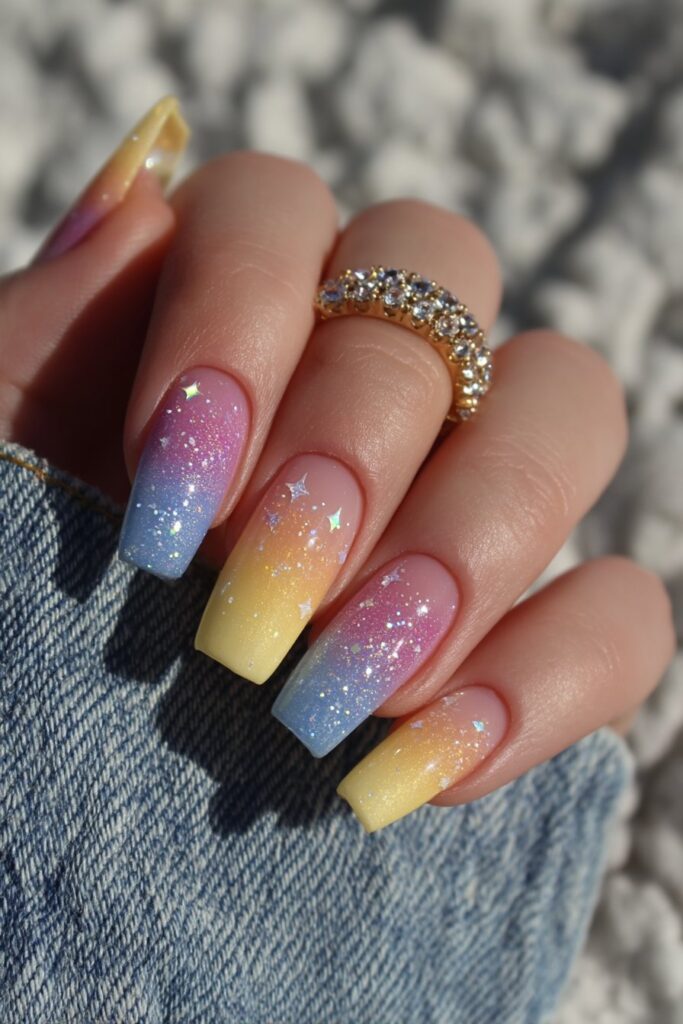
Dreamy Pastel Rainbow with Stars
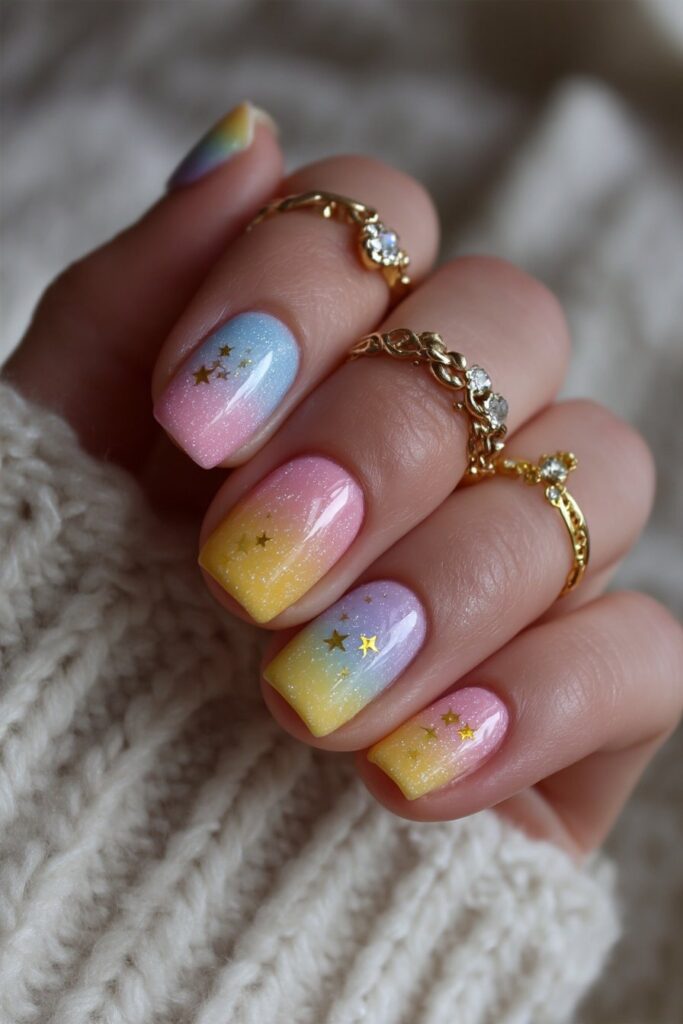
Among all the rainbow nail designs I create in my studio, Dreamy Pastel Rainbow with Stars consistently elicits the most joyful reactions from my clients. The combination of soft colors and celestial elements creates a whimsical esthetic that’s hard to resist!
Design description of Dreamy Pastel Rainbow with Stars
Dreamy Pastel Rainbow with Stars features enchanting pastel rainbow tips accented with delicate hand-painted white stars. The design typically showcases a base of soft cloud-like gradients using pastel colors that blend seamlessly, creating a dreamy backdrop for the star details. Essentially, these nails look like a slice of cosmic heaven right at your fingertips! What makes this design special is how the clouds and stars create a celestial, breathtaking look that reminds me of candy-colored skies. I often customize this look with different star placements—sometimes scattered randomly, other times creating constellation-like patterns that tell a story across the nails.
Why Dreamy Pastel Rainbow with Stars work
These nails work wonderfully as mood boosters! The whimsical pastel tips are guaranteed to increase serotonin levels every time you glance at your hands. Presently, I have clients who specifically request this design before important meetings or events as they say it gives them a little spark of joy throughout their day. Additionally, the design offers versatility—the dreamy esthetic pairs beautifully with both casual and formal looks. Recently, a bride in my studio chose this design for her wedding day, describing it as “something magical without being overwhelming.” This design also resonates deeply with those celebrating Pride, as it incorporates all the joyful rainbow elements in a subtle, ethereal way.
How to DIY Dreamy Pastel Rainbow with Stars
Creating this celestial look at home is manageable with the right approach:
- Prep your canvas – Apply a clear base coat to protect your natural nails
- Create your cloud backdrop – Using white polish, make soft cloud shapes near your tips (a bobby pin or dotting tool works perfectly for this)
- Add your rainbow – Once the white begins drying, use a thin brush to add pastel colors (purple, blue, green, yellow, orange, pink) onto the cloud areas
- Star application – After your rainbow colors dry, use a thin nail art brush to create stars by making a center dot and five small lines extending outward
- Seal your creation – Apply a quality top coat to ensure longevity
For beginners struggling with star shapes, I recommend practicing on paper first. Subsequently, you can also use star nail stickers as an alternative until you master freehand techniques. With proper application and care, these enchanting nails can last up to two weeks!
Two-Tone Chevron Rainbow Tips
The boldness of Two-Tone Chevron Rainbow Tips never fails to turn heads! As a nail artist who’s created countless designs, I can confidently say this geometric pattern brings an exciting dimension to rainbow nail art that basic designs simply can’t match.
Design description of Two-Tone Chevron Rainbow Tips
Two-Tone Chevron Rainbow Tips feature a striking V-shaped pattern that creates visual interest through contrasting color combinations. Unlike traditional French tips, these chevron-shaped designs use a rainbow color palette applied in a bold angular pattern that points downward toward your cuticle. What makes this design truly special is the two-tone approach — each bright rainbow hue is paired with its corresponding pastel shade, creating depth and dimension across your nails. The design works exceptionally well on longer nails, letting those dramatic chevron points truly shine. Throughout my career, I’ve found clients almost always gasp with delight when they see the finished look — there’s something about those perfect V-shaped lines that feels both retro and modern.
Why Two-Tone Chevron Rainbow Tips work
The magic of this design lies in its versatility and visual impact. First, the combination of bright and pastel versions of the same colors creates fascinating dimension that flat rainbow designs lack. Beyond that, the angular pattern elongates your fingers visually, making them appear longer and more elegant. For clients concerned about wearing rainbow nails to professional settings, I often recommend this style as the geometric structure gives it a sophisticated edge despite the playful colors.
How to DIY Two-Tone Chevron Rainbow Tips
Creating this eye-catching look at home requires patience but yields amazing results:
- Start with prep – Apply a clear base coat to clean, shaped nails
- Create your pastel palette – Mix each of your bright rainbow polishes with white to create matching pastel shades
- Apply base colors – Paint each nail with a neutral base that complements your skin tone
- Create your chevrons – Using thin nail art brushes, apply the pastel shade first, then its corresponding bright shade below it in a V-pattern
- Protect your work – Always apply base to the pastel area first, then to the brighter area to prevent color bleeding
- Seal with topcoat – Apply a generous layer of clear topcoat for longevity and shine
Indeed, the stunning results are worth the extra effort! Having created this design for numerous clients, I can assure you that mastering these two-tone chevron tips will certainly elevate your nail art game.
Pride Inspired Rainbow with Clouds
Pride-inspired nail designs have become a special request in my salon, especially with clients seeking to celebrate both their individuality and community. The rainbow with clouds design embodies everything I love about expressive nail art!
Design description of Pride Inspired Rainbow with Clouds
Pride Inspired Rainbow with Clouds features vibrant rainbow colors weaving in and out of dreamy white cloud formations. The design typically showcases a clear background with floating clouds that serve as the perfect backdrop for colorful rainbow accents. What makes this design particularly charming is how the clouds and rainbows interact – sometimes the rainbow appears to emerge from behind the clouds, while other times it seems to dissolve into them. This creates a whimsical, almost magical effect that catches light beautifully. Throughout my years at my Los Angeles studio, I’ve created countless variations – from subtle pastel rainbows with wispy clouds to bold, vibrant pride flags with puffy cloud formations.
Why Pride Inspired Rainbow with Clouds work
This design resonates deeply with my clients primarily because it combines playfulness with meaningful symbolism. The rainbow elements serve as both a cheerful accent and, for many, a meaningful celebration of Pride. Moreover, the cloud-rainbow combination offers that perfect blend of whimsy and sophistication that works for diverse occasions. Even clients who normally prefer minimalist designs find themselves drawn to this look – there’s something universally uplifting about tiny rainbows peeking through clouds! Beyond their symbolic significance, these nails are incredibly versatile and guaranteed to boost your mood each time you glance at your hands.
How to DIY Pride Inspired Rainbow with Clouds
Creating this enchanting design at home is surprisingly achievable:
- Begin with preparation – Apply a clear base coat to clean, dry nails
- Create your clouds – Using white polish, apply three small blobs in a triangular formation where you want your cloud to appear
- Shape your clouds – While the white polish is still wet, use a clean brush to gently pull downward, creating a fluffy cloud effect
- Add your rainbow – Once dry, use colored polishes to create your rainbow, starting with red nearest the cloud
- Rainbow placement – Position your rainbow so it appears to emerge from or disappear into your clouds
- Final touches – Seal with a quality top coat for longevity and shine
Remember, the beauty of this design lies in its imperfection – your lines don’t need to be perfectly straight or uniform in thickness. As I often tell my clients from Georgia to California, sometimes the most charming nail art comes when you simply “go with the flow” of the design!
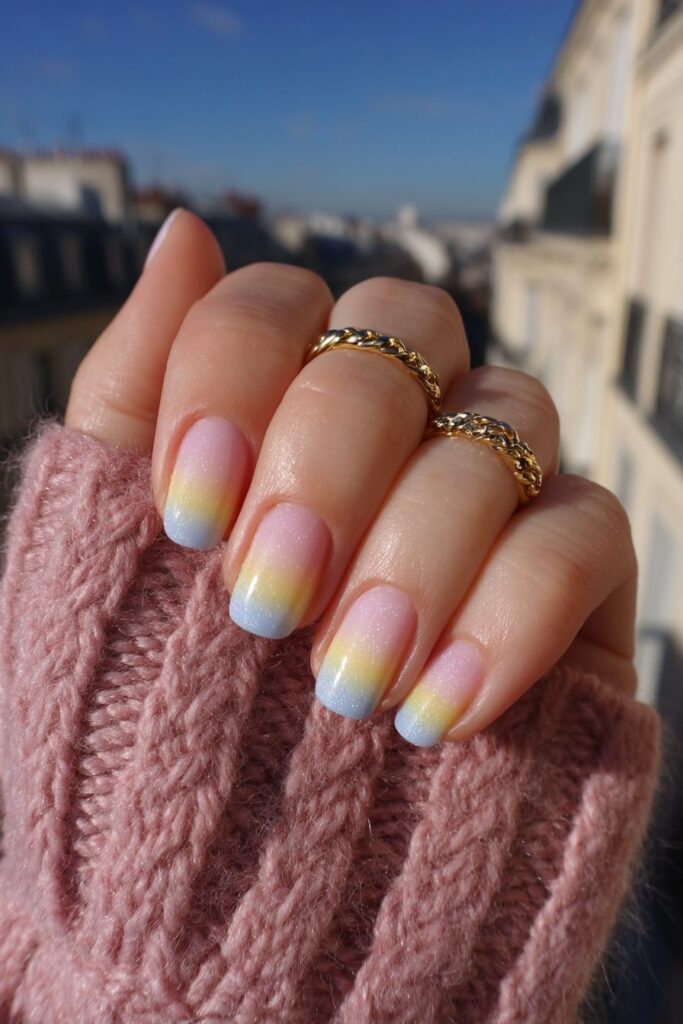
Ombre Rainbow French Tips

As a nail artist always searching for fresh spins on classics, I’ve fallen in love with Ombre Rainbow French Tips—a technique that perfectly balances sophistication with playfulness in one stunning manicure!
Design description of Ombre Rainbow French Tips
Ombre Rainbow French Tips feature a nude or neutral base color with rainbow hues gently fading into each other along the tips. Unlike traditional white French tips, this design incorporates a slice of color along the edge for a gorgeous gradient accent. The beauty of this rainbow nail design lies in its subtle sophistication—you still get the clean look of a French manicure but with that magical color transition that catches the light as your hands move. Comparatively, it’s more refined than full rainbow nails yet still makes a vibrant statement. I love creating different variations for my clients, from pastel rainbow ombres that fade softly into each other to more vibrant neon versions that really pop against a nude base.
Why Ombre Rainbow French Tips work
Given these points, it’s no wonder these nails have become a staple in my studio! Firstly, they offer versatility—perfect for those who love nude nails but want a pop of color. The rainbow gradient adds just enough personality without overwhelming your overall look. In addition to this, the ombre effect creates dimension that flat colors simply can’t achieve. Accordingly, they suit both professional settings and casual occasions. Many of my clients tell me these nails constantly catch their eye throughout the day, giving them little moments of joy with every glance.
How to DIY Ombre Rainbow French Tips
Creating this look at home is absolutely achievable with these steps:
- Prep properly – Push back cuticles, file the nail plate for texture, and sanitize thoroughly for proper adhesion
- Create your base – Apply a neutral or nude polish and let dry completely
- Gradient technique – Apply a thin clear coat and immediately add a small amount of each rainbow color (starting with red) along the tip
- Layer strategically – For a smoother ombre, reverse color application order between layers (top to bottom, then bottom to top)
- Seal and protect – Apply a high-quality top coat in quick, thin strokes for lasting shine
Remember to work quickly before your base dries! For best results, practice your rainbow placement on paper first—nail art improves with patience and practice.
Neon Rainbow Daisy Nails
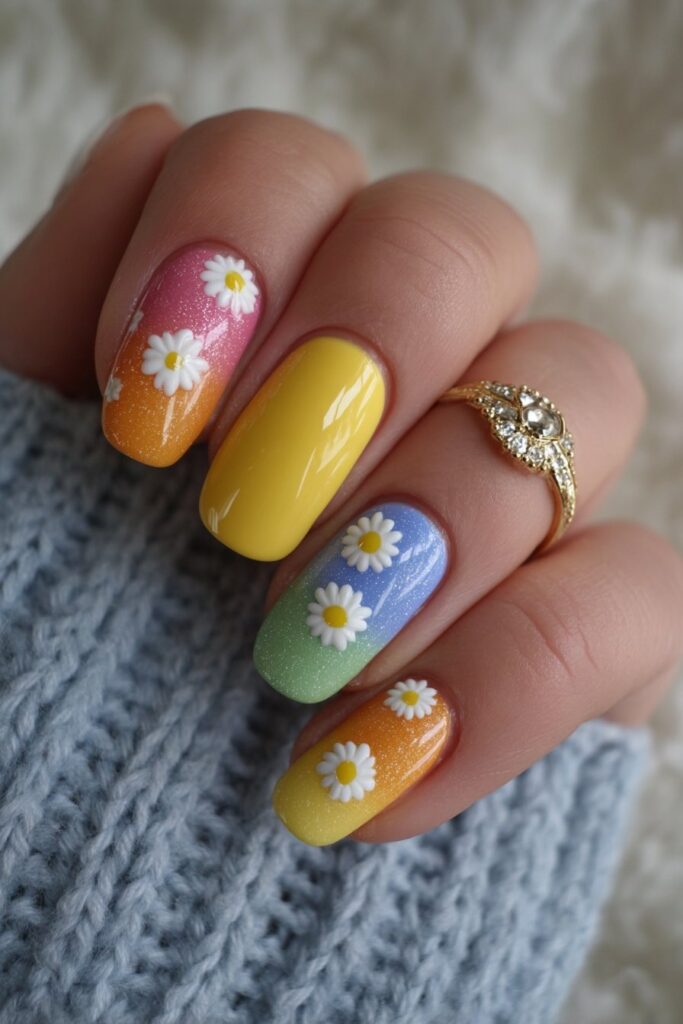
Neon rainbow daisies capture attention like nothing else in my nail art collection! Whenever a client wants something both floral and vibrant, this eye-catching design becomes my immediate suggestion.
Design description of Neon Rainbow Daisy Nails
Neon Rainbow Daisy Nails showcase a botanical design featuring the brightest colors of the rainbow arranged into cheerful daisies. Unlike subtle pastel flowers, these neon blooms create a look that resembles a vibrant bouquet of wildflowers right on your fingertips. The design typically features a contrasting background—often black, white, or clear—to make those electric colors truly pop. What makes this design special is the dimensional effect created by layering various shades, giving your daisies a lifelike quality that catches light beautifully. Some versions even incorporate glow-in-the-dark elements for an extra wow factor at night!
Why Neon Rainbow Daisy Nails work
These vibrant blooms work wonderfully as seasonal manicures, particularly for spring and summer occasions. Throughout my years at my studio, I’ve noticed clients choose these rainbow nail designs when they need an instant mood boost. The psychedelic color combination creates a groovy, retro vibe that pairs perfectly with festival outfits or beach days. Plus, the botanical element adds a touch of sweetness that balances the boldness of neon shades. Hence, these nails become conversation starters while remaining universally flattering.
How to DIY Neon Rainbow Daisy Nails
Creating this blooming rainbow nail design is manageable even for beginners:
- Start with a neutral base—white works wonderfully to make colors pop
- Using a dotting tool, create gray circles where you want your flowers
- With a thin brush, add darker pink dots around each gray circle
- Layer lighter pink dots slightly smaller than your first layer for dimension
- Create flower centers using various neon colors (purple, yellow, pink)
- Add thin black outlines or dots in the center to create definition
- Finish with a glossy top coat to seal and enhance vibrancy
For those struggling with freehand techniques, colorful daisy nail decals offer a perfect alternative. Just apply them over your base color and seal with top coat for a similar effect with minimal effort. Whichever method you choose, these blooming neon designs will bring joy every time you glance at your hands!
Dripping Neon Rainbow Tips
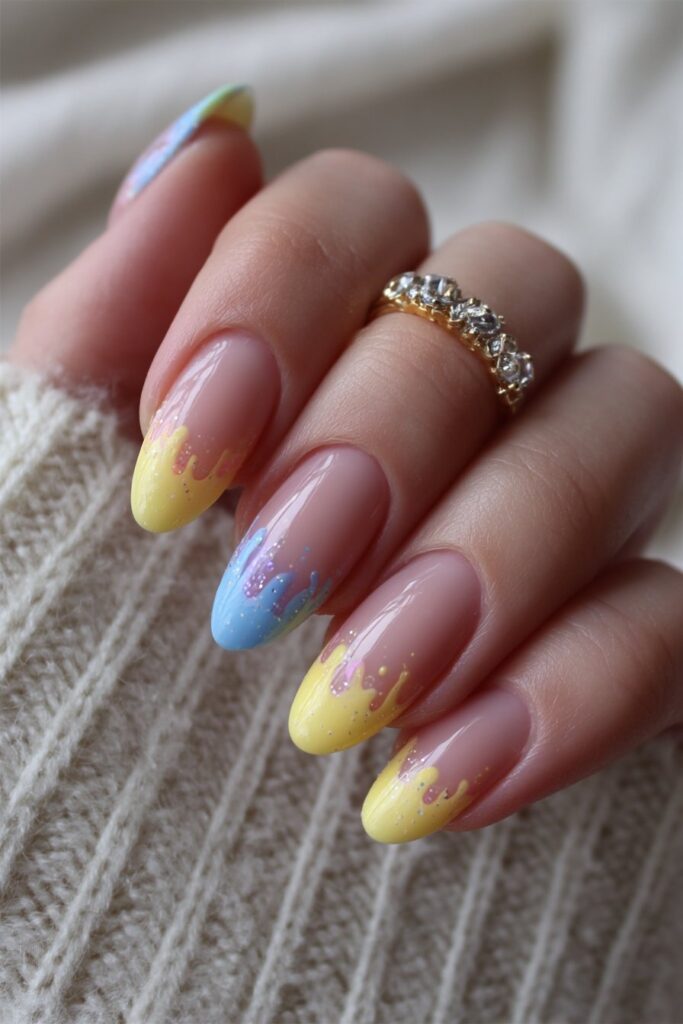
My clients absolutely adore the edgy vibe of Dripping Neon Rainbow Tips! These eye-catching designs have quickly become one of my signature styles for those wanting something bolder than traditional French manicures.
Design description of Dripping Neon Rainbow Tips
Dripping Neon Rainbow Tips feature vibrant rainbow colors arranged along the nail tip in a way that creates the illusion of paint dripping down toward the cuticle. The design typically uses a white or clear base color that makes those electric neon shades truly pop. What makes this look so special is how each “drip” connects to form a continuous rainbow effect, with colors flowing into one another like melting snowcones. The drips themselves vary in length and placement, creating an organic, almost graffiti-like appearance that’s both playful and edgy. Thus, each nail becomes its own tiny canvas with a unique pattern!
Why Dripping Neon Rainbow Tips work
The dramatic effect of these nails makes them perfect for making a statement. In contrast to subtler rainbow designs, these dripping tips capture attention immediately yet remain versatile enough for various occasions. Plus, they’re guaranteed to boost your mood—one client told me she couldn’t stop smiling every time she looked at her hands! Correspondingly, these nails work wonderfully for Pride celebrations, as they incorporate rainbow elements in a bold, artistic way that feels both meaningful and fashionable. The dripping effect likewise creates visual interest that flat designs simply can’t match.
How to DIY Dripping Neon Rainbow Tips
Creating this drippy design at home is easier than it looks:
- Start with a white base coat on clean, prepped nails
- Place a small dot of your first color (typically red) at the tip
- Create your drips by connecting multiple dots with curved lines—start with straight drips, then connect them with curves
- Cycle through all rainbow colors, working with one color at a time
- Connect the colors slightly at the tip for a cohesive look
- Seal everything with a high-quality top coat for shine and longevity
For best results, I recommend using a neon polish set—my favorite is Olive and June’s snowcone-inspired collection that delivers that perfect electric brightness!
White Glitter Neon Rainbow Swirls
For a truly show-stopping manicure that sparkles from every angle, White Glitter Neon Rainbow Swirls never fail to amaze my clients. This design combines two powerful elements—holographic shimmer and electric brights—creating nail art that’s both magical and eye-catching.
Design description of White Glitter Neon Rainbow Swirls
White Glitter Neon Rainbow Swirls feature a dreamy holographic white glitter base coat that serves as the perfect canvas for vibrant neon swirls. The design often incorporates black celestial elements that create stunning contrast against the bright colors. As someone who’s created countless nail designs, I find this particular combination absolutely breathtaking—the way light catches both the glitter and neon elements creates a multi-dimensional effect unlike any other rainbow nail design. The swirls themselves have a psychedelic quality, with colors bleeding into each other for that perfect tie-dye effect. Once complete, these nails look like tiny pieces of wearable art straight from your wildest dreams.
Why White Glitter Neon Rainbow Swirls work
These statement nails work magnificently as conversation starters. The holographic white glitter adds texture and dimension that makes the neon colors truly pop. Even my most conservative clients find themselves drawn to this design—there’s something universally appealing about that magical shimmer. Across my years working between Georgia and California, I’ve noticed this style brings joy regardless of age or personal style. Furthermore, the design offers versatility; depending on the application technique, it can appear either boldly dramatic or subtly enchanting.
How to DIY White Glitter Neon Rainbow Swirls
Creating this magical look at home requires patience yet remains achievable:
- Apply a holographic white glitter polish as your base and let dry completely
- For the swirls, dip a tiny brush in your first neon color (typically starting with pink)
- Create swirls with short strokes rather than smooth lines for that authentic tie-dye effect
- Continue with each neon color, placing them near but not touching each other
- Allow colors to naturally blend where they meet
- Optional: Add thin black accents for celestial details
- Seal with a generous layer of glossy top coat
Remember not to press too firmly when applying colors—a gentle touch creates the most beautiful swirls. Afterward, these dazzling rainbow nails will catch light beautifully, bringing a touch of magic to your everyday life!
Star-Studded Neon Rainbow Nails
Nothing says “statement manicure” quite like star-studded neon rainbow nails! This eye-catching design has become a fan favorite among my clients who want to add a touch of celestial magic to their rainbow manicures.
Design description of Star-Studded Neon Rainbow Nails
Star-Studded Neon Rainbow Nails feature a shimmery base coat topped with vibrant neon rainbow colors and decorated with star accents that truly make the design pop. What makes this look special is how the stars create a “starstruck” effect against the rainbow backdrop. I typically start with a shimmery base coat that adds dimension and depth to the overall look. The stars themselves can be applied as stickers or hand-painted, depending on your skill level. As I create this design, I often arrange the stars in different patterns—sometimes scattered randomly for a night-sky effect, other times focused near the cuticle or tip for a more structured appearance.
Why Star-Studded Neon Rainbow Nails work
These dazzling nails work beautifully as the perfect finishing touch for special occasions. Naturally, they’re ideal for concert outfits or music festivals where that extra sparkle catches stage lights beautifully. They’re also wonderfully appropriate for Pride events, adding both color and celestial symbolism. Even more importantly, these nails provide an instant confidence boost—there’s something about those twinkling stars against vibrant colors that simply makes you feel like a rockstar! My clients often tell me they feel an extra spring in their step whenever they glance down at their star-studded rainbow manicure.
How to DIY Star-Studded Neon Rainbow Nails
Creating this celestial rainbow look at home is simpler than you might think:
- Begin with clean, prepped nails and apply a shimmery base coat
- Add your rainbow colors using either a gradient technique or individual neon polishes
- While your color layer is still slightly tacky, carefully place star nail stickers in your desired pattern
- Gently press the stars to ensure proper adhesion
- Seal everything with an extra glossy top coat for lasting shine and protection
For those without star stickers, you can create stars using a thin brush by making a center dot and five small lines extending outward. Thereafter, you’ll have a manicure that’s truly out of this world!
Pastel Ombre Rainbow Nails

Pastel ombre rainbow nails have long been my favorite nail design to create for clients seeking that perfect balance of subtlety and color. As someone who’s worked with nail designs across both coasts, I can confidently say these dreamy gradients never go out of style!
Design description of Pastel Ombre Rainbow Nails
Pastel ombre rainbow nails feature a stunning gradient effect where soft pastel colors blend seamlessly into one another across each nail. Typically starting with a white base, these designs showcase gentle transitions between colors like baby pink, soft orange, buttercup yellow, mint green, sky blue, and lavender. The magic happens in how these hues melt together, creating that dreamy, cloud-like effect that’s both sophisticated and playful. Throughout my career, I’ve created countless variations—some with the rainbow flowing horizontally across the nail, others with vertical gradients that elongate the fingers.
Why Pastel Ombre Rainbow Nails work
These ethereal designs work beautifully as an everyday option. Unlike bolder rainbow designs, the pastel version maintains a relaxation vibe while still making a statement. Hereafter, they’re perfect for those who want to add color without committing to something overwhelming. Furthermore, they’re remarkably versatile, complementing virtually any outfit or occasion. My clients from both Georgia and California consistently choose these when they need something that transitions effortlessly from professional settings to weekend brunches.
How to DIY Pastel Ombre Rainbow Nails
Creating this look at home requires:
- Base coat
- White nail polish
- 5-6 pastel rainbow shades
- Makeup sponge
- Nail polish remover
- Cotton swabs
- Top coat
Start by prepping your nails and applying a base coat. Next, paint your nails white as this creates the perfect canvas for your pastel colors. Once dry, paint your pastel polishes directly onto the makeup sponge in rainbow order, making sure colors touch slightly. Gently dab the sponge onto each nail, repeating 2-3 times for desired opacity. Clean excess polish from skin using cotton swabs dipped in remover. Finally, seal with top coat for lasting wear!
3D Glitter Ombre Rainbow Nails

The dramatic dimension of 3D Glitter Ombre Rainbow Nails completely transforms an ordinary manicure into wearable art. After creating dozens of these eye-catching designs in my studio, I’m excited to share this magical technique with you!
Design description of 3D Glitter Ombre Rainbow Nails
3D Glitter Ombre Rainbow Nails feature a mesmerizing blend of rainbow colors enhanced with holographic glitter and raised dimensional elements. The design starts with a beautiful rainbow gradient using 5-6 highly pigmented gel polishes that blend seamlessly into one another. What makes this look truly special is the addition of intense holographic glitter—called “wizardry” in the nail world—that contains reflective particles catching light from multiple angles. The 3D effect comes from strategically placed raised elements created with gel adhesive, giving the nails a textured, multi-dimensional appearance that literally pops off your fingertips.
Why 3D Glitter Ombre Rainbow Nails work
These spectacular nails work wonderfully as statement pieces for special occasions. Undoubtedly, they’re perfect for Pride celebrations with their pastel ombre designs, 3D elements, and rainbow glitter sequins. Beyond their visual impact, they offer practical benefits too. The sparkly top coat cleverly disguises any harshness or imperfections in your ombre blend, making this design surprisingly forgiving for at-home attempts. Naturally, these nails become instant conversation starters—clients constantly tell me they receive compliments wherever they go!
How to DIY 3D Glitter Ombre Rainbow Nails
Creating this show-stopping look at home is manageable with these steps:
- Apply base coat on prepped nails
- Create your rainbow: Using 6 gel polish colors, start with purple at the tip
- Apply colors side-by-side on the nail, leaving each color fairly wet
- Blend where colors meet with a gentle “tickling” motion—these colors need minimal manipulation
- Cure completely
- Apply tip and jewel adhesive in your desired 3D pattern
- Cure for 30 seconds to “freeze” the design in place
- Apply holographic glitter top coat over the entire nail
- Seal with thin stain-resistant top coat
Fortunately, even beginners can achieve this look! Remember that your first attempt might not be perfect, yet that’s what makes each set uniquely yours.
Short Rainbow Micro French Tips

For nail enthusiasts with shorter manicures, Short Rainbow Micro French Tips have become my absolute favorite recommendation! As someone who’s styled nails for clients with varying nail lengths, I’ve discovered this delicate yet impactful technique offers the perfect solution for those with less real estate to work with.
Design description of Short Rainbow Micro French Tips
Short Rainbow Micro French Tips feature razor-thin colored lines along the very edge of your nail tips. Unlike traditional French manicures with thick white borders, these micro tips use vibrant rainbow hues—typically red, yellow, green, blue, and purple—applied in ultra-thin stripes. The magic lies in their subtlety; these barely-there lines add just enough color to make your short nails pop without overwhelming them. Evidently, they’re sweeping through social media, with TikTok and Pinterest showcasing countless variations of this trending “micro” French tip style.
Why Short Rainbow Micro French Tips work
These delicate tips work beautifully on shorter nails for several reasons. Initially, they maximize limited space by focusing color precisely where it makes the most impact. The razor-thin rainbow lines are hardly detectable yet add remarkable depth to your manicure. Furthermore, French tips have an elongating effect on fingers, making them appear slimmer and more feminine—a benefit that works wonderfully even with shorter nail beds. Interestingly, I’ve noticed clients from my Georgia hometown to my Los Angeles studio consistently choose these when they want something festive yet appropriate for professional settings.
How to DIY Short Rainbow Micro French Tips
Creating this look at home requires minimal tools:
- Begin with clean, shaped nails and apply a clear base coat
- Use a nail art stamper tool for the easiest application
- Alternatively, try using thin striping brushes with steady hands
- For each nail, apply a different rainbow color in ultra-thin lines along the tip
- Apply a generous layer of top coat to seal and protect your delicate design
Remember, these are meant to be understated—their charm lies in being subtle yet making a statement through color rather than size!
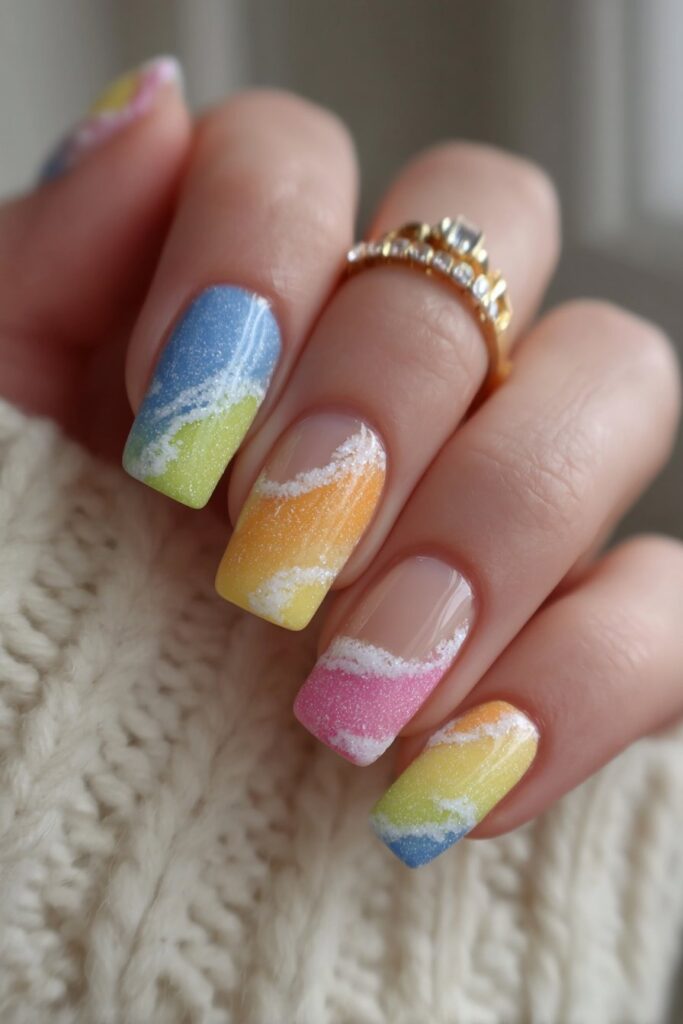
Short Rainbow Marble Nails

After breaking my nail last week and filing all my nails down, I discovered the perfect short nail canvas for my favorite rainbow marble design! These swirly, colorful creations have since become a studio favorite for clients with shorter nails.
Design description of Short Rainbow Marble Nails
Short Rainbow Marble Nails feature a mesmerizing swirled pattern created by blending multiple rainbow colors that dance across the nail surface. Unlike standard rainbow designs, marble nails create a groovy, psychedelic effect where the colors don’t just sit next to each other—they actually intertwine. What makes this design special is how each nail becomes unique with its own swirl patterns. The water marbling technique creates beautiful, random designs that almost look like candy-colored stone. On shorter nails, I typically use a bold color palette—pinks, oranges, yellows, greens, blues, and purples—that create a dramatic yet wearable effect.
Why Short Rainbow Marble Nails work
Rainbow marble nails work wonderfully on shorter lengths as they make even petite nail beds appear more dimensional. Equally important, this design is perfect for those times when you’ve broken a nail and need to file everything down. The randomness of marble patterns means there’s no “right” way to do them—you simply can’t add too much or too little of any color. Occasionally, I recommend this design to clients transitioning between seasons who want something bright yet sophisticated. The technique creates a natural ombre effect with minimal effort, as the colors blend themselves as you swirl.
How to DIY Short Rainbow Marble Nails
Creating this colorful design at home requires simple tools:
- Gather supplies: White cup (3oz dental cup works great), room temperature filtered water, rainbow polishes, orange sticks, base and top coat, q-tips, and polish remover
- Prep your canvas with base coat and apply white polish for vibrant colors
- At this point, drop your rainbow polishes into the water—I recommend placing them in circular patterns, starting from the center
- Use an orange stick to create swirls—draw from the middle to the edges for a spiral pattern
- Line up your nail with your chosen design area and dip gently
- Clean excess polish from skin using q-tips and polish remover
- Seal with top coat for lasting shine
Generally, I find this marble technique perfect for anyone who loves vibrant colors but dreads intricate detail work. As my mother taught me back in Savannah, sometimes the most beautiful designs come from embracing happy accidents!
Conclusion
Rainbow nail designs certainly bring a splash of joy to everyday life! Throughout my years of creating colorful masterpieces for clients across the country, I’ve witnessed firsthand how these vibrant manicures boost confidence and spark conversations.
These 17 rainbow nail designs offer something for everyone, regardless of skill level or nail length. Beginners might start with simple Skittle nails, which require basic polishes and minimal technique yet deliver maximum impact. Meanwhile, those feeling more adventurous can experiment with water marbling or 3D glitter ombre techniques that transform fingertips into miniature works of art.
What makes rainbow nails truly special, though, is their versatility. Pastels work beautifully for professional settings, while neons make perfect statement pieces for weekends. My clients at my Los Angeles studio often tell me their rainbow manicures serve as little pockets of happiness throughout their day—just a glance at their hands brings an instant mood boost!
Remember, nail art improves with practice, so don’t feel discouraged if your first attempt isn’t perfect. The beauty of these rainbow designs lies partly in their imperfections—each nail tells its own colorful story. My mother back in Georgia always said creative expression should bring joy, not stress.
Last weekend, I broke a nail and filed everything down, then immediately created short rainbow marble nails that received countless compliments. This experience reminded me that beautiful nail art remains possible at any length!
Your perfect rainbow manicure awaits—whether subtle French tips for work meetings or bold 3D designs for special occasions. After all, expressing yourself through color remains one of life’s simplest yet most satisfying pleasures!