
Summer is here, and honestly, it is my absolute favorite time of the year to get creative with nails. As a makeup artist, I spend most of my days focusing on faces, but I have always believed that beauty does not stop at the chin. Your nails are an extension of your personal style, and square short nails are having a major moment this season, and for the best reasons. They are chic, practical, and incredibly versatile. I have been experimenting with these looks on myself and my clients, and I am so excited to share my top fifteen summer square short nail inspirations with you. Whether you are a total beginner or someone who has been doing their own nails for years, I have got something here for everyone. So grab your nail kit, pour yourself a cold drink, and let us get into it!
Coral Sunset Square Nails

Inspiration from coral sunset square nails
Every time summer rolls around, the first color that calls my name is coral. There is something about that warm, peachy-orange tone that just screams sunshine and good vibes. I was sitting on a rooftop one evening watching the sky turn into this gorgeous blend of orange, pink, and gold, and I immediately thought, I need this on my nails. Coral sunset nails on a square short shape are flattering on every skin tone, which is one of the reasons I absolutely love recommending them. The square edge gives the look a modern, polished feel while the coral shade keeps things fun and summery. It is the kind of nail look that works at brunch, the beach, and even a casual evening event. I have done this look on so many people and the reaction is always the same — pure joy.
Tools needed to create the nail design
To achieve this look, you will need a good base coat, a coral nail polish in a cream or shimmer finish, a thin detail brush for any accent work, a top coat for longevity, and a cuticle pusher to prep your nails. A nail file specifically for shaping your square tip is also essential.
Step by step guide to create the nail design
- Start by pushing back your cuticles and filing your nails into a clean square shape with straight edges and flat tips.
- Apply one layer of base coat and let it dry completely before moving on.
- Apply two even coats of your coral polish, letting each layer dry fully between applications.
- Seal everything with a glossy top coat to lock in the color and add shine.
Tropical Floral Square Nails

Inspiration from tropical floral square nails
When I think of summer, I think of flowers. Not just any flowers, though. I mean those bold, lush, tropical blooms that you find in warm climates with bright petals and deep green leaves. This nail look was inspired by a garden I once visited that was overflowing with hibiscus and plumeria. I thought, why not bring that energy to the nails? Tropical floral square short nails are one of my all-time favorite nail art designs because they feel both artistic and wearable. You do not need to cover every single nail with flowers. Sometimes just one accent nail with a hand-painted bloom on a creamy white background is all you need to make the whole look come alive. The square shape acts like a tiny canvas, which makes it perfect for floral nail art.
Tools needed to create the nail design
You will need a white or nude base polish, a thin nail art brush or dotting tool, small pots of acrylic paint or nail art gel in pink, red, yellow, and green, a top coat, and a base coat to protect your natural nail.
Step by step guide to create the nail design
- Prep and shape your nails into a square, then apply base coat and two layers of your chosen background color.
- Using a thin brush dipped in pink or red, paint simple petal shapes radiating from a center point on your accent nail.
- Add tiny yellow dots at the center of each flower and thin green lines for leaves using your detail brush.
- Finish with a clear top coat to seal and protect your artwork.
Pastel Rainbow Square Nails

Inspiration from pastel rainbow square nails
Pastel rainbow nails are pure joy in polish form. I started doing this look during a particularly creative season when I was feeling inspired by color and playfulness. The idea is simple — each nail gets its own soft pastel shade, creating a rainbow effect across your hand. Lavender, mint, baby pink, soft yellow, and sky blue all living together in harmony on your square short nails. It is the kind of manicure that makes people stop and compliment you, and I love that it celebrates individuality. No two hands look exactly the same with this style, and that is the beauty of it. For square short nails specifically, each nail has just enough surface area to really let each color shine without feeling overwhelming.
Tools needed to create the nail design
You will need five different pastel nail polishes in your preferred shades, a base coat, a top coat, a cuticle stick, and nail polish remover on a small brush for clean-up around the edges.
Step by step guide to create the nail design
- After prepping your nails and applying base coat, assign each nail a different pastel shade in a color order you love.
- Apply two coats of each color to the corresponding nail, cleaning up any edges with a small cleanup brush.
- Let all nails dry completely before applying a glossy top coat over all five shades.
- For an extra touch, add a tiny star or dot to one nail as an accent using white polish.
Ocean Blue Ombre Square Nails

Inspiration from ocean blue ombre square nails
I grew up loving the water, and there is something deeply calming about the ocean that I always want to carry with me, even just on my fingertips. Ocean blue ombre nails move from a deep navy or teal at the base to a soft sky blue or even white at the tips, mimicking the look of waves and sea foam. On square short nails, this ombre effect looks incredibly elegant and polished. I once did this look before a coastal wedding I attended, and I received so many compliments. The key to making ombre work on short nails is blending quickly and choosing shades that are close enough in tone to blend naturally but different enough to create that beautiful gradient effect.
Tools needed to create the nail design
You will need two or three blue nail polishes ranging from deep to light, a small piece of cosmetic sponge or an ombre sponge brush, base coat, top coat, and a cleanup brush with remover.
Step by step guide to create the nail design
- After applying base coat and one layer of your lightest blue, paint the two or three colors onto a sponge in a slightly overlapping gradient.
- Dab the sponge gently onto your nail in a pressing motion to transfer the blended gradient.
- Repeat the sponge application two to three times for an opaque, even blend.
- Clean up edges, let dry, then apply two layers of top coat for a smooth finish.
Lemon Yellow Square Nails

Inspiration from lemon yellow square nails
There is nothing quite like a pop of yellow on your nails in the middle of summer. Lemon yellow is one of those shades that feels almost edible — bright, zesty, and full of energy. I started wearing yellow nails years ago and honestly, it changed my whole mood on gloomy days. On square short nails, lemon yellow looks clean and sharp. The flat square tip paired with a glossy yellow finish is both modern and playful. I love styling it with simple gold jewelry because the two tones complement each other beautifully. Whether you go for a solid yellow or add a simple lemon slice design on an accent nail, this look is going to turn heads at every summer gathering.
Tools needed to create the nail design
You will need a bright lemon yellow nail polish, a white base coat to help the yellow appear more vibrant, a thin detail brush for any art, top coat, and a nail file for shaping your square edge.
Step by step guide to create the nail design
- Apply a white base coat first, as yellow shows up much brighter over white than over bare nails or regular base coat.
- Once the white is dry, apply two to three coats of lemon yellow until the color is fully opaque and even.
- Optionally, paint a small lemon slice on one accent nail using a thin brush with white and green details.
- Seal everything with a high-gloss top coat for that fresh, just-done look.
Watermelon Square Nails
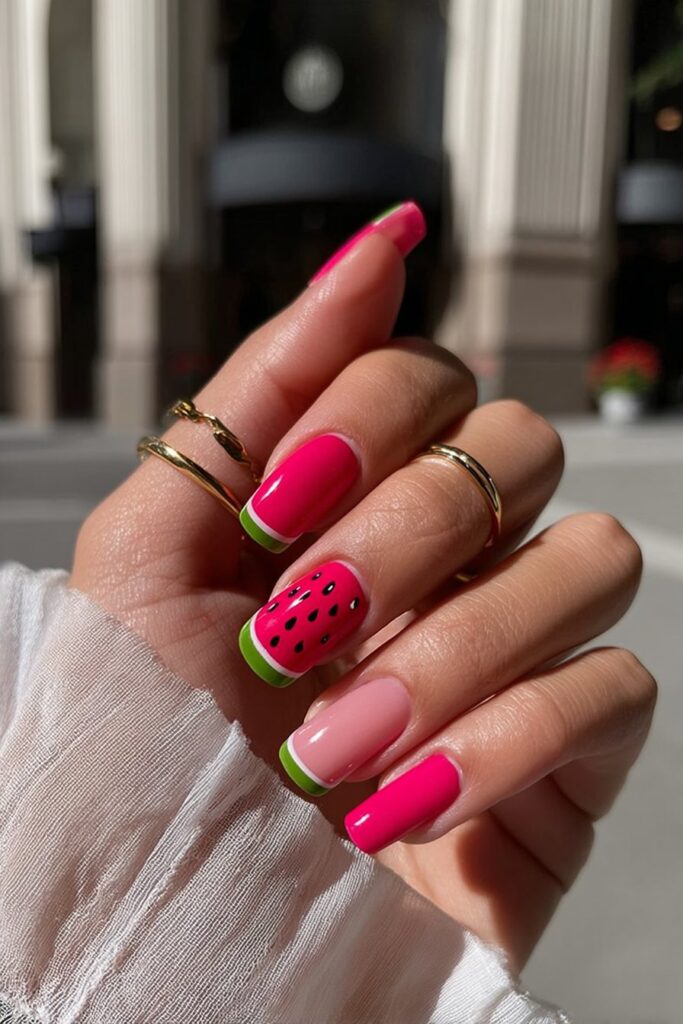
Inspiration from watermelon square nails
Watermelon nails are one of those designs that just never gets old in summer. I created this look one afternoon while snacking on actual watermelon, and I thought — this is too pretty not to wear. The classic design uses a bright pink or red base with tiny black seed details and a strip of green at the tip to mimic a watermelon slice. On square short nails, it looks absolutely adorable and the square tip perfectly frames the little seed pattern. It is playful, cheerful, and incredibly easy to do even if you are not a nail art expert. My clients always ask for this one, especially younger ones who want something fun and summery without going too over the top.
Tools needed to create the nail design
You will need a bright pink or red nail polish, white nail polish for the rind, a green nail polish for the outer tip, a thin detail brush, a dotting tool for seeds, and black nail art paint.
Step by step guide to create the nail design
- Apply your pink or red base color in two coats and let it dry fully before moving on to any detail work.
- Using a thin brush, paint a thin strip of white followed by green across the very tip of your nail to create the rind effect.
- Use a small dotting tool or toothpick dipped in black to add tiny oval seed shapes scattered across the pink base.
- Finish with a glossy top coat to seal the design and give your watermelon nails that juicy, vibrant finish.
Glam Square Nails

Inspiration from glam square nails
Sometimes the most powerful statement is a quiet one, and that is exactly what nude glam nails say. I have always been a fan of understated elegance, and this look is the embodiment of that. A warm, skin-matching nude on square short nails looks impossibly chic and put-together without requiring much effort. What elevates nude nails into the glam category is the addition of a single gold foil accent, a delicate rhinestone at the cuticle, or a glossy mirror-like top coat that gives dimension without color. I wear this look when I want to look polished but do not want my nails to compete with a bold outfit or dramatic makeup. It works for every occasion and complements every complexion.
Tools needed to create the nail design
You will need a nude polish that closely matches your skin tone, a high-gloss or chrome top coat, small nail rhinestones or gold foil pieces, a dotting tool or tweezers for placing gems, and nail glue or gel top coat to secure embellishments.
Step by step guide to create the nail design
- Apply base coat, then two smooth layers of your chosen nude shade, allowing each coat to dry completely.
- On one or two accent nails, press small rhinestones at the base using a dotting tool slightly dampened with top coat to pick them up.
- Seal rhinestones with a layer of gel top coat cured under a lamp, or a thick layer of regular top coat applied carefully around the gems.
- Apply a glossy top coat to all remaining nails for a unified, polished finish.
Tie-Dye Square Nails

Inspiration from tie-dye square nails
Tie-dye had a massive comeback in fashion a few years ago and honestly, I do not think it ever left — especially in the nail world. I love doing tie-dye nails because they are completely unique every single time. No two nails ever come out exactly the same, and that unpredictability is exactly what makes the style so special. For summer, I gravitate toward warm tie-dye tones like fuchsia, tangerine, and sunny yellow, or cool tones like purple, teal, and pink for a more psychedelic vibe. On square short nails, the swirling patterns look artistic and modern. This is a look that makes people genuinely curious about how it was done.
Tools needed to create the nail design
You will need a white base polish, two to three nail polishes in your tie-dye palette, a small piece of plastic wrap or a wet palette, a thin brush or toothpick for swirling, and top coat.
Step by step guide to create the nail design
- Apply a white base and let it dry, then drop small amounts of two or three colors onto a plastic surface and swirl them lightly together with a toothpick.
- Quickly press your nail into the blended colors or use a brush to transfer the swirled pattern directly onto each nail before it dries.
- Clean up edges and allow to dry fully — this step may take a few extra minutes due to layered polish.
- Apply a smoothing top coat to even out any texture and give the design a polished, finished look.
Neon Geometric Square Nails

Inspiration from neon geometric square nails
I went through a phase of being obsessed with geometry, clean lines, and bold color blocking, and that phase gave birth to one of my favorite nail designs. Neon geometric square nails combine the sharp, structured energy of geometric shapes with the electric excitement of neon colors. Think neon green triangles on a white base, or a neon orange color block across half the nail with negative space on the other half. The square tip is practically made for geometric nail art because the flat edge gives you a natural starting line to work from. It is graphic, bold, and very editorial — the kind of look I would wear to a fashion event or a summer rooftop gathering.
Tools needed to create the nail design
You will need nail tape or striping tape, neon nail polishes in two or three shades, a white base polish, a thin liner brush, and a matte or glossy top coat depending on the finish you want.
Step by step guide to create the nail design
- Apply white base polish and let it cure, then place nail tape across your nail in diagonal or angular patterns to create sharp geometric sections.
- Paint neon colors into the sections defined by the tape and remove the tape slowly while the polish is still slightly wet.
- Clean up any bleeding edges with a fine cleanup brush and let the design dry completely.
- Apply a matte top coat for a modern editorial feel or a glossy one for a high-shine finish that makes the neons pop even more.
Peach Fuzz Square Nails

Inspiration from peach fuzz square nails
Peach has been having its moment in the beauty world and I am here for every second of it. There is something about that soft, warm, pinkish-orange tone that feels both fresh and comforting. Peach fuzz nails on a square short shape have this dreamy, softness to them that I find incredibly appealing. I like to describe this shade as wearing a warm sunset on your fingers. It is the perfect middle ground between pink and orange, and it flatters a wide range of skin tones. I have been wearing peach shades a lot this season, and they pair beautifully with warm gold jewelry, white linen outfits, and anything that gives vacation energy.
Tools needed to create the nail design
You will need a peach nail polish with a cream or satin finish, a base coat, a glossy top coat, a nail buffer for smoothing the nail surface before application, and a cuticle oil to finish the look.
Step by step guide to create the nail design
- Buff the surface of your nails lightly to remove ridges, then apply base coat for an even foundation.
- Apply two full coats of your peach shade, making sure each coat is thin enough to dry evenly and avoid bubbling.
- Once fully dry, apply a generous layer of glossy top coat to enhance the creamy richness of the peach tone.
- Finish by massaging cuticle oil around each nail for a healthy, groomed finish that completes the polished look.
Lavender Dream Square Nails

Inspiration from lavender dream square nails
Lavender is a shade that feels like a gentle exhale. Every time I wear it I feel instantly calm and collected, which honestly is exactly the summer energy I am going for. Lavender dream square nails use soft purple tones that range from dusty lilac to pale violet, giving the nails this ethereal, romantic quality. I love pairing this look with a shimmer top coat for a little otherworldly sparkle, or keeping it matte for a more minimalist vibe. On square short nails, lavender reads as sophisticated without trying too hard. It is one of those colors that looks great on everyone and works perfectly whether you are dressing it up or keeping it casual.
Tools needed to create the nail design
You will need a lavender nail polish in your preferred tone, a shimmer or holographic top coat for added dimension, base coat, and a fine cleanup brush with remover for crisp edges.
Step by step guide to create the nail design
- Prep nails and apply base coat, then follow with two layers of lavender polish for full opacity.
- Let the color dry completely before adding a coat of shimmer or holographic top coat for a dreamy, dimensional effect.
- Apply a clear glossy top coat over everything to lock in the shimmer and extend the wear of your manicure.
- Use cuticle oil to hydrate and soften the skin around your nails for a clean, finished presentation.
Abstract Art Square Nails

Inspiration from abstract art square nails
Abstract nail art is where I truly get to let my creativity run wild. There are no rules with abstract, no patterns to follow precisely, and no right or wrong outcome. I love this style because it is different every single time I do it. Abstract summer nails might include brushstrokes of color across a nude base, wavy lines in contrasting shades, or bold splashes of paint that look like a tiny modern artwork on each finger. The square short nail shape works as a beautiful mini canvas for abstract designs. I started creating abstract nails after visiting a gallery and being moved by contemporary paintings — I thought, why not wear that feeling?
Tools needed to create the nail design
You will need a neutral or white base polish, thin and medium nail art brushes, nail art paint or gel polish in bold contrasting colors, a dotting tool, and a top coat to seal the design.
Step by step guide to create the nail design
- Apply base coat followed by two coats of your neutral background shade and let it dry completely.
- Using a thin brush, create freeform brushstrokes, swooping curves, or organic shapes across the nail using two or three contrasting colors.
- Layer shapes without overthinking — the beauty of abstract art is in its imperfection and spontaneity.
- Seal with a glossy top coat to unify the layers and give the design a polished, gallery-worthy finish.
French Tip With a Twist Square Nails

Inspiration from French tip with a twist square nails
The French manicure is a classic, but I believe classics deserve to be reinvented every now and then. My version of a French tip with a twist for summer involves swapping the traditional white tip for something unexpected — maybe a bright coral tip, a glittery gold tip, or even a pastel ombre tip. On square short nails, the French tip is especially striking because the flat edge creates a clean, defined line that looks super intentional. I have done colored French tips on clients who were nervous about trying something bold, and this style is always the perfect gateway look. You keep the elegance of the classic French while adding a personal seasonal twist.
Tools needed to create the nail design
You will need a sheer or nude base polish, your chosen tip color in a contrasting or complementary shade, French tip guides or nail tape, a thin liner brush, and a high-gloss top coat.
Step by step guide to create the nail design
- Apply base coat and one to two layers of your nude or sheer base, allowing it to dry fully before applying guides.
- Place French tip guides along the smile line of your nail and paint your chosen tip color over the free edge in one or two smooth strokes.
- Carefully peel the guides away while the tip color is still slightly tacky for a clean, sharp line.
- Finish with a glossy top coat and a drop of cuticle oil for a polished, salon-fresh result.
Mint Green Square Nails

Inspiration from mint green square nails
Mint green is the color equivalent of a cool breeze on a hot summer afternoon. It is refreshing, modern, and utterly delightful. I started wearing mint green nails a few summers ago and I still go back to this shade every single year. It has this clean, crisp quality that makes your hands look immediately polished, and it pairs beautifully with white, gold, and even denim. On square short nails, mint green has this slightly retro charm to it, reminiscent of a vintage soda shop or a classic summer film. You can keep it simple with a solid mint mani, or add a tiny daisy or geometric accent for a playful upgrade.
Tools needed to create the nail design
You will need a mint green nail polish in a cream finish, a base coat, a top coat, and optionally a white nail art pen or thin brush for adding small floral or dotted details.
Step by step guide to create the nail design
- After filing your nails into a square shape and applying base coat, apply two even coats of mint green polish for a solid, opaque result.
- Let the color dry for several minutes, then use a white nail art pen to draw tiny daisies or simple dots on one or two accent nails if desired.
- Allow all detail work to dry before sealing the design with a clear glossy top coat.
- Finish with cuticle oil for a fresh, hydrated look that completes the summer-ready feel of this manicure.
Sunflower Square Nails

Inspiration from sunflower square nails
Sunflowers are the ultimate summer flower in my opinion. They are bold, bright, and completely unapologetic in their beauty, and sunflower square nails carry all of that same energy. I love this look because it is both cheerful and artistic. A sunflower design on a yellow or white background, with hand-painted golden petals and a warm brown center, looks absolutely stunning on square short nails. The flat tip of the square shape frames the sunflower design perfectly, and the look photographs beautifully. I have done this design for outdoor summer events, picnics, and even garden parties. Every time someone sees sunflower nails, they immediately smile — and that reaction is everything.
Tools needed to create the nail design
You will need a yellow or white nail polish for the base, golden yellow and burnt orange nail art paint for the petals, dark brown polish for the center, a thin detail brush, a dotting tool, and a glossy top coat.
Step by step guide to create the nail design
- Apply your base color in two coats and let it dry completely before beginning any sunflower detail work.
- Using a thin brush dipped in golden yellow, paint elongated petal shapes radiating outward from a central point on your accent nail.
- Fill in the center with a circular blob of dark brown polish and use a dotting tool to add tiny lighter brown dots across the center for texture.
- Seal with a glossy top coat across all nails to give the sunflowers their full, vibrant, sun-kissed glow.
Conclusion
As I wrap up this little journey through fifteen of my favorite summer square short nail looks, I want to leave you with something I truly believe with my whole heart. Nails are one of the most personal and joyful forms of self-expression we have access to. They are small, but they say so much. Every time I sit down to do my nails or work on someone else’s, I am reminded that beauty is not about achieving some external standard — it is about the way you feel when you look down at your hands and see something that feels like you.
Summer is the perfect season to experiment, to be bold, to try the coral you have been eyeing for months or to finally give that sunflower design a go. Square short nails are one of my favorite shapes because they are practical and powerful at the same time. They look polished without sacrificing functionality, and they carry nail art with such elegance and clarity.
I have done all fifteen of these looks, on myself and on the beautiful people who trust me with their nails and their beauty. And what I can tell you is that the best nail look is always the one that makes you feel the most like yourself. Maybe that is a quiet, nude glam look. Maybe that is a loud, neon geometric statement. Maybe it changes from week to week, and that is more than okay. Beauty is fluid, personal, and endlessly creative.
My advice to you is to start with one design that excites you, gather your tools, take your time, and enjoy the process. Nails are not permanent — you can always remove it and try something new. That is what makes nail art such a freeing creative outlet. There is no pressure to be perfect, only an invitation to play.
So this summer, treat your nails like the tiny works of art they are. Whether you are lounging by the water, attending a gathering with loved ones, or just sitting on your porch with a cool drink and your rescue pup curled up at your feet, let your nails tell a story. Let them reflect your mood, your season, and your spirit.
Remember what I always say — beauty is not about perfection. It is about confidence, creativity, and feeling empowered to express yourself however you choose. And right now, in the warmth of summer, your nails are the perfect place to start.