
Graduation is one of the most unforgettable milestones in anyone’s life, and as someone who has spent years helping people look and feel their absolute best for life’s most important moments, I can tell you that the details matter — especially your nails. I’m Belle Hathaway, and I believe that beauty is about expressing who you are with confidence and creativity. When it comes to graduation day, your nails are a canvas that speaks volumes before you even shake a hand or accept your diploma. Square nails, in particular, have always been one of my favorite shapes to work with. They’re bold, clean, modern, and endlessly versatile. Whether you love something simple and elegant or bold and expressive, square nails deliver that perfect frame for any nail art you can dream up. I’ve curated fifteen of my absolute favorite square nail designs specifically for graduation — each one unique, stylish, and absolutely worthy of your big day. Let’s dive in!
Classic French Square Tips
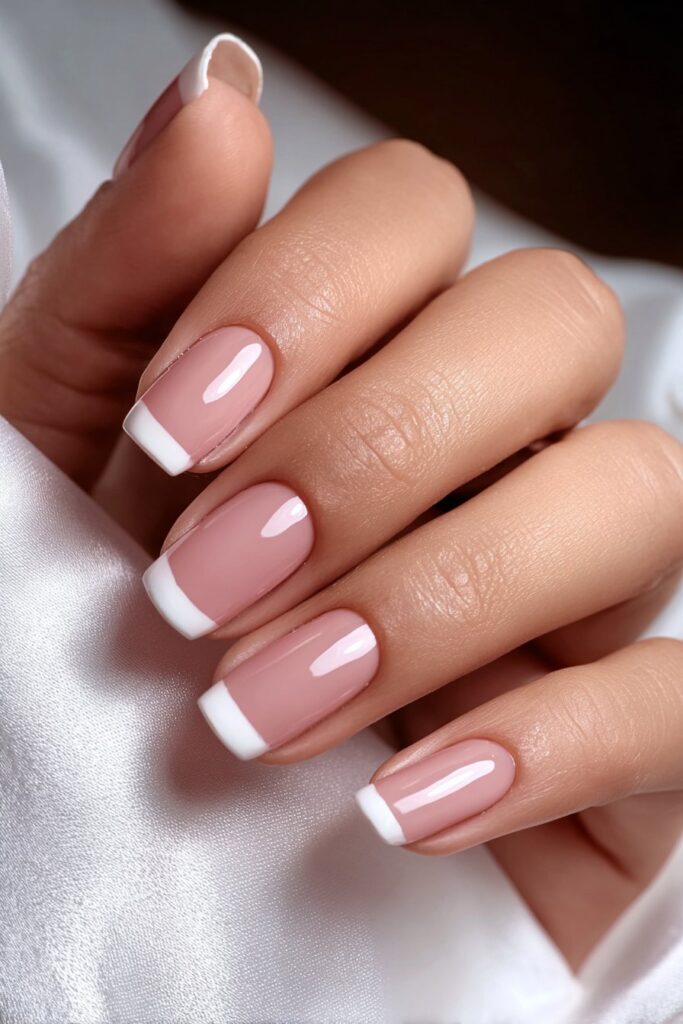
Inspiration from timeless elegance
When I think about a look that never goes out of style, the classic French tip immediately comes to mind. There’s something so beautifully refined about this design. I remember preparing a client for her big ceremony, and she wanted something that would look flawless in every photograph, from close-up hand shots to full group pictures. The French square tip was the answer. The crisp white edge against a sheer pink base gives the nails a polished, clean appearance that feels both youthful and sophisticated. It’s the kind of look that works whether you’re wearing a flowy sundress or a sharp blazer, and it photographs beautifully in natural light. For graduation, this design whispers confidence without screaming for attention — and sometimes, that’s exactly the vibe you want.
Tools needed to create the nail design
To achieve a perfect classic French square look, you’ll need a sheer pink or nude base coat, a bright white nail polish specifically formulated for French tips, a thin nail art brush or French tip guides, a top coat for lasting shine, and a nail buffer to smooth the surface before you begin. Having cuticle oil on hand is also something I always recommend because it keeps the skin around the nail looking clean and healthy, which makes the whole design pop even more beautifully.
Step by step guide to create nail design
- Start by shaping your nails into a perfect square using a nail file, then buff the surface gently and apply a base coat to protect your natural nails.
- Apply two thin coats of your sheer pink or nude base shade, allowing each coat to dry fully before moving on.
- Using French tip guides or a steady hand with a thin brush, paint a clean white line across the very tip of each nail, keeping the line even and consistent.
- Seal everything with a glossy top coat and finish with a drop of cuticle oil around each nail for a polished, professional finish.
Glitter Ombre Graduation Nails

Inspiration from celebration and sparkle
Graduation is a celebration, and celebrations deserve glitter. Whenever I think of joy bottled into a nail design, I picture the soft gradient of a glitter ombre. I once created this look for someone heading to a rooftop graduation party, and the moment the light caught her nails, the whole room noticed. The beauty of a glitter ombre is that it feels glamorous without being overdone. Starting with a neutral or champagne base and letting fine glitter fade from the tip downward creates this magical, almost ethereal effect. It looks like your nails are catching a little bit of light with every movement, which honestly feels like the perfect metaphor for stepping into your next chapter.
Tools needed to create the nail design
You’ll need a neutral or champagne base polish, fine holographic or gold glitter polish, a makeup sponge for blending, a cleanup brush with acetone, a clear top coat, and a nail buffer. The sponge is the real secret here — it allows you to dab the glitter on and create that seamless gradient effect that looks incredibly professional even if you’re doing it at home.
Step by step guide to create nail design
- Apply your base color in two coats and let it dry completely before starting the glitter application.
- Dab the glitter polish onto a small makeup sponge and gently press it onto the tip of the nail, blending it upward about halfway to create the ombre fade.
- Repeat the sponge application two or three times to build up the glitter density at the tip while keeping it light toward the base.
- Apply a generous layer of clear top coat to smooth out any texture from the glitter and seal the look with a beautiful, glossy finish.
Minimalist Gold Line Square Nails

Inspiration from modern sophistication
I’m a huge fan of the “less is more” philosophy in nail art, and nothing embodies that better than minimalist gold line nails. This design draws inspiration from modern art and architecture — those clean lines, those deliberate strokes of gold against a neutral background. I think about how much courage it takes to choose something understated, and this design rewards that choice beautifully. For a graduation look, thin gold geometric lines on a soft white or nude base communicate elegance, intelligence, and artistic sensibility all at once. It’s the kind of nail art that catches someone’s eye and makes them look twice because it’s so intentional.
Tools needed to create the nail design
You’ll need a white or nude base polish, a gold nail art striping brush or metallic nail art pen, a clear top coat, and nail tape if you prefer perfectly straight lines. A steady hand and a bit of patience go a long way here, but nail tape is a fantastic helper for beginners who want crisp, precise lines without stress.
Step by step guide to create nail design
- Paint your nails with two layers of white or nude base polish and allow it to dry fully to prevent smudging when you add the line work.
- Using your gold striping brush or metallic pen, draw one or two thin diagonal or vertical lines across each nail, keeping the placement intentional and balanced.
- Allow the gold lines to dry for at least a minute before touching to avoid smearing, then assess the design and add any additional lines if desired.
- Seal with a flat or glossy top coat to protect the linework and give the finished look a refined, gallery-worthy finish.
Pastel Dream Square Nails

Inspiration from soft springtime beauty
There’s something about pastel nails that makes me think of fresh starts, blooming flowers, and the soft warmth of a spring morning — which is exactly what graduation season feels like. I love designing pastel sets because each nail can be a different shade, creating this dreamy, mismatched-but-cohesive rainbow effect. Lavender, mint, baby pink, soft yellow, and powder blue all together on one set of square nails is like wearing a garden on your hands. I once put together a pastel set like this for a client who said she wanted to feel like she was walking into her future with joy, and that’s exactly the energy this look carries.
Tools needed to create the nail design
You’ll need five individual pastel nail polishes in your chosen shades, a base coat, a top coat, and cuticle oil. Keeping the shades within the same pastel family ensures they work together harmoniously even though each nail is a different color. A good base coat is essential here to prevent any of the lighter shades from staining your natural nails.
Step by step guide to create nail design
- Apply a base coat to all nails and let it dry, then assign each nail a specific pastel color before you begin to ensure a balanced color distribution across both hands.
- Apply two thin coats of each individual pastel color to its designated nail, allowing each coat to dry between applications to keep the color vibrant and smooth.
- Once all the colors are fully dry, check for any uneven patches and add a third coat where needed to achieve complete, streak-free coverage.
- Finish with a glossy top coat across all nails to unify the look and give each pastel shade that beautiful, polished shine.
Bold Burgundy Square Nails
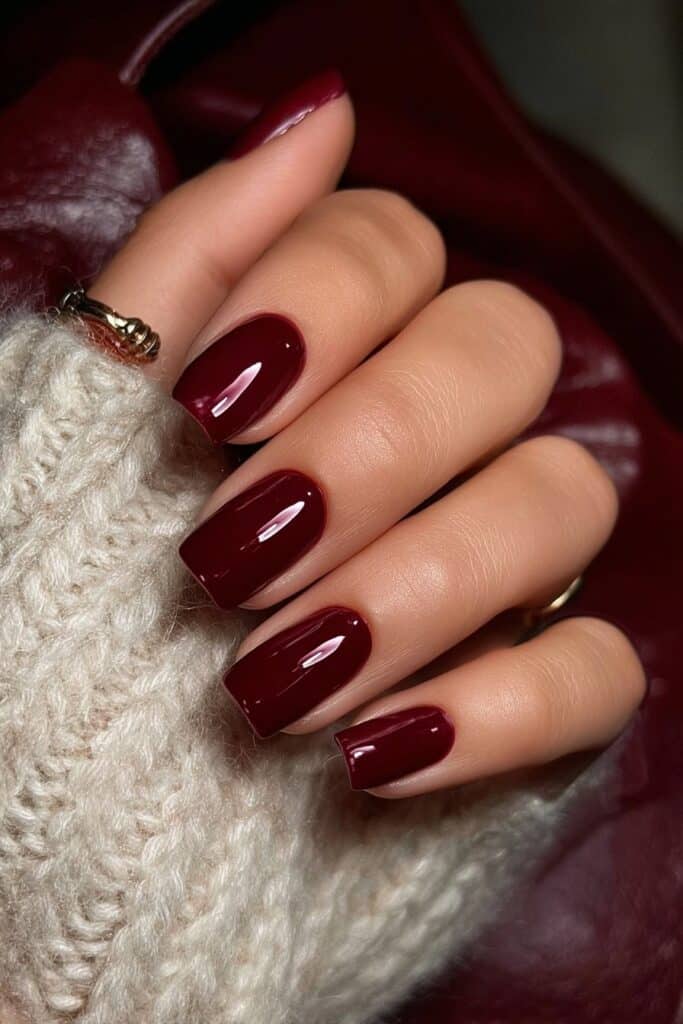
Inspiration from confident sophistication
Burgundy is one of those shades that I reach for when I want someone to walk into a room and feel powerful. It’s rich, deep, and impossibly sophisticated. For a graduation, this color says “I worked hard, I’ve arrived, and I’m proud of it.” I love pairing deep burgundy with a subtle shimmer finish to give it a little extra dimension — something that reads as solid from a distance but glows up close. This is the nail look for the graduate who has big plans and even bigger confidence. It photographs stunningly against both light and dark outfits, and it has this timeless quality that feels both classic and current at the same time.
Tools needed to create the nail design
You’ll need a deep burgundy nail polish with or without shimmer, a base coat, a top coat, and a fine cleanup brush with acetone for any edges that need perfecting. The cleanup brush is particularly important with dark shades because any polish on the skin around the nail is very visible and makes the finish look less professional.
Step by step guide to create nail design
- Shape your nails into clean square tips and apply a base coat, which is especially important with dark shades to prevent long-term nail staining.
- Apply the first coat of burgundy and allow it to dry fully before adding a second coat, as dark colors applied too thickly can bubble or become uneven.
- Use your cleanup brush dipped lightly in acetone to tidy up any skin around the cuticles or sides of the nail for a crisp, salon-like result.
- Apply a glossy or gel-effect top coat to deepen the color and add that luscious, high-shine finish that makes dark nails look incredibly luxurious.
Holographic Square Nails

Inspiration from futuristic magic
Holographic nails are one of those designs that genuinely stop people in their tracks. I vividly remember the first time I applied a full holographic set — the client literally gasped when she held her hands up in the light. Every movement created a cascade of rainbow colors shifting across the nails, like wearing a prism on your fingertips. For a graduation, this feel like stepping into the future, which is exactly what this milestone represents. A holographic square nail is perfect for the bold, trend-forward graduate who isn’t afraid to stand out and make a statement.
Tools needed to create the nail design
You’ll need a holographic nail powder or holographic gel/polish, a base in silver or clear, a silicone eyeshadow applicator for rubbing in the powder, a gel top coat if using powder, and a UV or LED lamp if working with gel products. The powder version gives the most intense holographic effect, but a good holographic polish achieves a beautiful result without the extra equipment.
Step by step guide to create nail design
- Apply and cure a silver or clear base coat, then apply your holographic polish in thin, even layers, curing between each layer if using a gel formula.
- If using holographic powder, apply it over a sticky gel base layer and rub it firmly onto the nail surface using a silicone applicator until the rainbow shift is fully visible.
- Buff away any excess powder from the nail edges and cuticle area, then seal with a no-wipe gel top coat for a smooth, glass-like finish.
- Cure under your lamp, wipe with a cleanser if needed, and finish with cuticle oil to complete the look with a professional, luminous result.
Marble Effect Square Nails

Inspiration from luxury and artistry
Marble nail art is one of the most requested designs I get for elegant occasions, and for good reason — it looks like you’re wearing fine stone jewelry on your fingertips. The swirling white and grey veins against a clean white background evoke a sense of luxury, refinement, and artistic depth. I love marble nails for graduation because they feel simultaneously timeless and modern. The design pairs beautifully with gold jewelry and a classic outfit, and it elevates even the simplest graduation gown into something that looks intentional and curated. Every marble design is slightly different, which makes each set feel one-of-a-kind.
Tools needed to create the nail design
You’ll need a white base polish, grey nail polish and optionally a touch of rose gold or black for additional veining, a very fine nail art brush or a toothpick for drawing the veins, a water marble tool for a different technique variation, and a glossy top coat to seal and smooth the finished design.
Step by step guide to create nail design
- Apply two coats of white base polish and allow each to dry thoroughly before starting the vein work, as the base needs to be completely set for clean marble details.
- Using a very thin brush dipped in grey polish, draw loose, irregular diagonal lines across the nail, pressing lightly to vary the thickness and create natural-looking veins.
- Add thin gold or black lines running parallel and close to the grey veins for depth and dimension, keeping the lines organic and imperfect — real marble is never perfectly symmetrical.
- Seal with a high-gloss top coat to give the marble design that polished, stone-like finish that makes the whole look genuinely stunning.
Navy Blue Elegance Square Nails

Inspiration from timeless depth and grace
Navy blue is one of those colors that carries a certain gravitas. It’s serious without being somber, bold without being aggressive. When I create navy square nails for someone heading to a formal occasion, I always love seeing their reaction — there’s an immediate sense of “yes, this is exactly right.” For graduation, navy nails work beautifully with white, cream, or gold tones in an outfit, and they photograph incredibly well. Adding a subtle shimmer or a single accent nail with a tiny pearl or rhinestone detail elevates the look from simple to spectacular without overcomplicating it.
Tools needed to create the nail design
You’ll need a deep navy blue nail polish, a base coat, a top coat, and optionally small pearl or rhinestone nail gems and nail glue for an accent nail detail. Tweezers are your best friend when placing tiny gems because they allow precise placement without fingerprint smudging.
Step by step guide to create nail design
- Apply base coat and then two even layers of navy blue polish across all nails, allowing each layer to dry fully between applications for a rich, streak-free result.
- Choose one nail on each hand — typically the ring finger — as your accent nail, and once dry, apply a tiny dot of nail glue to place a single pearl or rhinestone near the cuticle area.
- Use tweezers to gently press the gem into place and hold for a few seconds until it’s fully secure, then check the positioning before the glue sets completely.
- Apply a top coat over all nails, carefully going around any raised gems, and finish with cuticle oil to complete this elegant, graduate-ready look.
Rose Gold Glam Square Nails

Inspiration from romance and luxury
Rose gold is having a long, glorious moment in the beauty and fashion world, and I am absolutely here for it. There’s something warm and romantic about rose gold — it catches the light in the most flattering way and complements virtually every skin tone beautifully. For a graduation set, I love doing a rose gold foil or metallic polish on square nails because it gives that luxurious mirror effect that feels incredibly high-end. Whether you choose a full metallic look or a sheer base with rose gold glitter, this design makes a statement that balances glamour with femininity.
Tools needed to create the nail design
You’ll need a rose gold metallic nail polish or nail foil sheets, adhesive for foil application, a base coat, a top coat, and an orangewood stick or foil applicator tool. If you’re going the glitter route, a sponge applicator and a chunky rose gold glitter polish will give a softer, more textured version of this stunning look.
Step by step guide to create nail design
- Prepare your nails with a base coat and then apply a blush pink or nude base if you’re going for a glitter version, or go straight to the rose gold metallic polish for a full mirror finish.
- For foil application, paint a tacky foil adhesive layer and allow it to become slightly dry but still sticky before pressing the foil sheet firmly onto the nail surface.
- Peel the foil back slowly at an angle to reveal the transferred metallic finish, then press again over any gaps until you’re happy with the coverage.
- Seal with a gel-effect or glossy top coat to protect the foil and enhance the shine, and don’t forget the cuticle oil to complete your rose gold glam look.
Sage Green Aesthetic Square Nails

Inspiration from nature and calm confidence
Sage green is one of those unexpected shades that surprises everyone once it’s on the nails — it’s somehow both understated and incredibly striking. I fell in love with this color because it reminded me of long walks through gardens, of peace and groundedness. For a graduation, sage green says something really beautiful: it speaks to growth, to nature, to the idea of putting down roots while also reaching toward something new. Paired with gold details or a matte finish, sage green square nails look incredibly editorial and fashion-forward without trying too hard.
Tools needed to create the nail design
You’ll need a sage green nail polish, a matte top coat for a trendy finish or a glossy one for a more polished look, fine gold nail art striping tape or a gold striping brush for optional detailing, and a base coat to prevent staining since greens can sometimes leave a tint on natural nails.
Step by step guide to create nail design
- Apply a base coat generously across all nails and allow it to dry before moving to the sage green polish, as this protects the nail from any potential green tinting.
- Apply two thin, even coats of sage green polish, letting each layer dry fully so the color builds smoothly without streaking, which can be a common challenge with earthy tones.
- If adding gold details, use nail striping tape or a thin brush to create one or two delicate gold lines along the tip or diagonal across the nail for a minimalist editorial touch.
- Finish with either a matte or glossy top coat depending on your preference — matte gives it a modern, velvety look while gloss adds a more classic, polished finish.
Vintage Lace Square Nails

Inspiration from delicate femininity and heritage
Lace nail art is one of those designs that feels like wearable art. It’s intricate, delicate, and carries a sense of timeless femininity that I absolutely adore. I think about the artistry required to create even the simplest lace pattern and it always reminds me why I fell in love with beauty in the first place — because it’s a form of creative expression that can be as complex or as simple as you choose. For graduation, a white or ivory lace design on a blush base gives nails a romantic, vintage quality that feels special and considered. It’s not a look you see every day, which makes it all the more memorable.
Tools needed to create the nail design
You’ll need a nude or blush base polish, white nail art polish, a very fine nail art brush for detail work, a dotting tool for creating lace dot patterns, a top coat, and a magnifying glass if you want to get extremely precise with your detailing. Patience is honestly the most important tool here.
Step by step guide to create nail design
- Apply your nude or blush base in two smooth coats and allow it to dry completely so you have a clean, stable surface to work on with the white detail work.
- Using a fine nail art brush, paint a delicate border along the tip or sides of the nail with white polish, creating small loops, curves, or scalloped edges that mimic the look of lace trim.
- Add tiny white dots along the interior of the design using a dotting tool to create the intricate, perforated texture that makes lace look so authentic and detailed.
- Seal gently with a glossy top coat to preserve every delicate detail and give the finished design that beautiful, glassy clarity.
Celestial Star Square Nails

Inspiration from the universe and wonder
There’s a version of beauty that feels cosmic — expansive and full of wonder — and that’s exactly what celestial nail art captures. Stars, moons, and constellations painted across deep navy, midnight black, or rich purple square nails feel like wearing the night sky on your hands. For a graduation, I think this is such a meaningful design because it speaks to dreaming big, to looking up and reaching for something beyond what’s in front of you. I love adding tiny gold star details with fine glitter accents to make this design shimmer like an actual star-filled sky.
Tools needed to create the nail design
You’ll need a deep blue, navy, or black base polish, a white or gold nail art pen or fine brush, star-shaped nail stencils or stickers as an optional guide, fine gold glitter polish for accent details, and a glossy top coat to make the celestial design feel luminous and deep.
Step by step guide to create nail design
- Apply two coats of your deep base color and let it dry fully, as the richness of the dark background is what makes the star and moon details stand out so beautifully against it.
- Using a white or gold nail art pen, draw small five-pointed stars scattered across the nails in varying sizes to create a natural, galaxy-like distribution across the design.
- Add tiny crescent moons or dot constellations to one or two accent nails using a fine brush for a variation in texture and design across the set.
- Dab fine gold glitter over the stars and seal everything under a thick, glossy top coat to add that final glow that brings the whole celestial look to life.
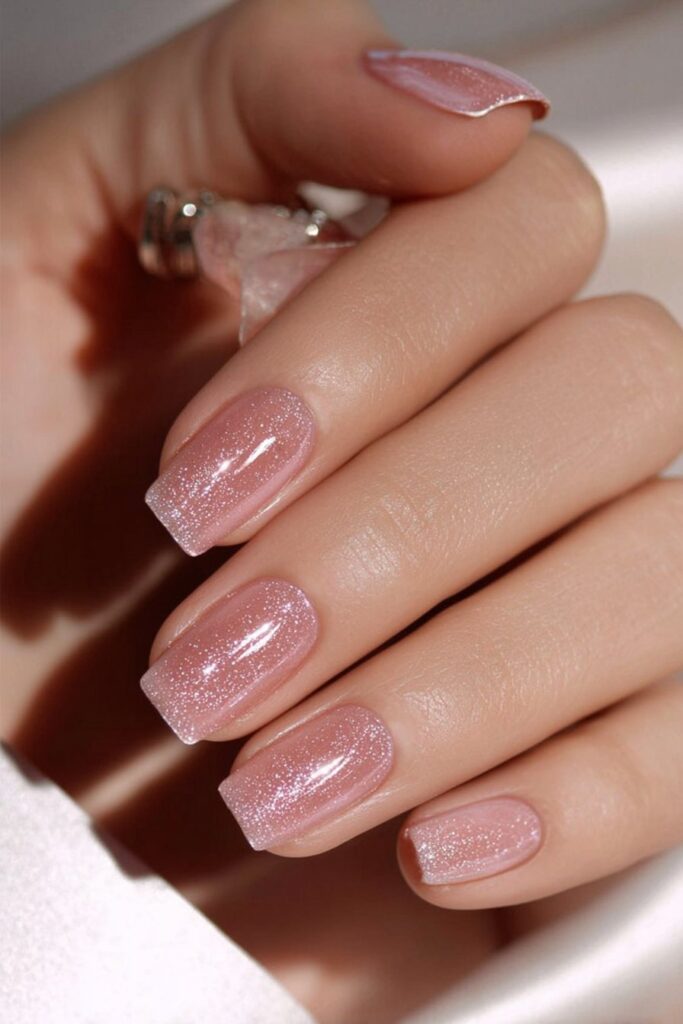
Pearl Square Nails

Inspiration from quiet luxury and understated glamour
I’ve always believed that some of the most powerful looks are the ones that don’t announce themselves loudly — they simply radiate quality. Nude pearl nails embody that philosophy perfectly. The soft shimmer of a pearl finish on a square nail creates this incredibly sophisticated effect that reads as effortlessly polished. I love this look for graduation because it works with absolutely any outfit, from a formal gown to a casual sundress, and it photographs beautifully in both indoor and outdoor settings. There’s an understated luxury to pearl nails that I find endlessly appealing.
Tools needed to create the nail design
You’ll need a blush nail polish, a pearl shimmer top coat or a pearlescent nail polish with built-in shimmer, a base coat, a glossy top coat for extra shine, and cuticle oil to complete the finished look. The key here is layering the pearl shimmer at different angles to maximize the iridescent effect.
Step by step guide to create nail design
- Start with a base coat followed by two thin layers of your nude base polish, keeping each layer smooth and even for the cleanest foundation before adding the pearl effect.
- Apply your pearl shimmer polish over the dried base, working in one direction from cuticle to tip to ensure the shimmer particles align and catch the light consistently.
- Add a second coat of pearl shimmer if you want a more intense, opalescent effect, and allow each layer to dry before assessing whether more coverage is needed.
- Seal with a glossy top coat and apply cuticle oil for a final touch that makes the pearl finish look genuinely luminous and freshly done.
Champagne Bubbles Square Nails
Inspiration from celebration and joyful elegance
Champagne is synonymous with celebration, and champagne bubbles nail art translates that joyful, effervescent energy directly onto your fingertips. This design uses a warm champagne or golden-beige base with tiny circular bubble details created using a small dotting tool — the effect is playful, elegant, and incredibly fitting for a graduation celebration. I created a version of this look for someone who said she wanted her nails to feel like a toast to her own achievement, and honestly, that description could not have been more perfect for this design.
Tools needed to create the nail design
You’ll need a champagne or warm beige base polish, a white and gold nail polish for the bubble details, a small and medium dotting tool to create bubbles in different sizes, a base coat, a glossy or gel-effect top coat, and fine gold glitter for optional bubble highlights that make the design even more festive.
Step by step guide to create nail design
- Apply two coats of your champagne base color and let it dry fully, as the bubble details will be much cleaner and more precise when applied over a completely set base.
- Use a medium dotting tool dipped in white polish to create scattered circles across the nail in varying placements, simulating the random, floating quality of champagne bubbles.
- Switch to a smaller dotting tool and gold polish to add tiny gold-rimmed highlights on or beside each white bubble, giving the design depth and that luxurious, celebratory sparkle.
- Seal the whole design under a high-gloss top coat to bring all the elements together and give the champagne bubbles design that beautiful, glass-like clarity it deserves.
Coral Sunset Square Nails

Inspiration from warmth, energy, and new beginnings
Coral is one of those shades that instantly brings energy and warmth into a room. It sits beautifully between orange and pink, carrying the vibrancy of one and the softness of the other. For a graduation, coral square nails feel like a sunrise — full of promise, brightness, and the kind of enthusiasm that comes from standing at the beginning of something wonderful. I especially love a coral-to-peach ombre on square nails because it creates this gorgeous sunset gradient that feels both artistic and wearable. It’s bold enough to be interesting but warm enough to feel approachable and friendly.
Tools needed to create the nail design
You’ll need a coral nail polish, a peach or soft orange nail polish for the gradient blend, a makeup sponge for the ombre blending technique, a base coat, a glossy top coat, and acetone with a cleanup brush for any color that bleeds onto the skin during the sponge application process.
Step by step guide to create nail design
- Apply a white or light peach base coat to all nails so the coral and orange shades appear as true and vibrant as possible when layered on top.
- Paint both the coral and peach shades side-by-side on a small piece of plastic or foil, overlap them slightly at the meeting point, then dab the sponge into both colors and press it onto the nail to create the gradient.
- Repeat the sponge application two to three times to build up color depth, especially at the tip where the coral should be most intense, gently blending toward peach near the base.
- Clean up any sponged color on the skin with acetone and a fine brush, then seal with a glossy top coat for a beautifully smooth, professional-looking sunset ombre finish.
Conclusion
Stepping into graduation day is one of the most significant moments of your life, and every detail you choose — from your outfit to your accessories to your nails — is part of the story you’re telling the world about who you are. I’ve spent years believing that beauty is not just about how you look; it’s about how you feel and what you’re communicating to yourself and others when you walk into a room.
Square nails, in particular, have this incredible capacity for storytelling. Their clean, structured shape provides the perfect canvas for everything from the most minimalist gold line to the most intricate lace pattern. What I love most about the fifteen designs I’ve shared with you today is that each one carries its own personality and energy — and somewhere in that list, there’s a design that speaks to exactly who you are right now, at this incredible turning point in your life.
If you’re someone who leads with confidence and boldness, the deep burgundy or holographic nails will serve you beautifully. If you’re a romantic at heart, the vintage lace or nude pearl design will feel like a dream. If you’re all about joy and celebration, the champagne bubbles or glitter ombre nails will keep you sparkling all day long. And if you’re the kind of person who finds beauty in the understated, the sage green or minimalist gold lines will whisper your elegance to everyone who notices.
What I always tell everyone who sits in my chair before a big event is this: choose the design that makes you smile when you look down at your hands. Because on your graduation day, you’re going to be looking at those nails as you shake hands, as you pose for photos, as you hold the diploma you worked so hard to earn. They should make you feel powerful, joyful, and completely yourself.
The most beautiful thing about beauty is that it belongs to you. Nobody else gets to decide what makes you feel radiant — that’s entirely your story to tell. And whatever square nail design you choose for your graduation, wear it with the confidence of someone who has accomplished something extraordinary. Because you have.